개요
- 1편에서 다룬 내용 (보러가기)
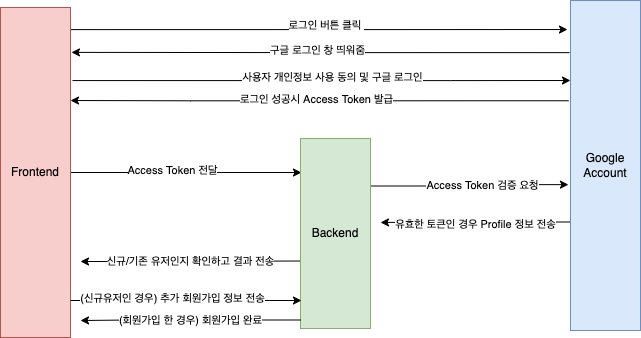
- Front-end와 Back-end 분리
- Front-end에서 AccessToken을 받아 Backend에게 주면 Backend가 Google에 AccessToken으로 요청하여 Profile정보를 받아옴
- 이번 편에서 다룰 내용
- Profile 정보를 바탕으로 DB에서 동일한 유저가 있는지 확인(이메일 중복확인)
- 신규유저인 경우 -> email, name, picture 를 리턴해줌 -> 회원가입 페이지로 이동
- 기존 유저인 경우 -> 로그인 JWT 토큰 리턴 (로그인 한 것으로 간주)
- JWT 토큰 생성은 Gateway에서
JWT(Json Web Token)란? Json 포맷을 이용하여 사용자에 대한 속성을 저장하는 Claim 기반의 Web Token. (설명 보러가기)
로그인 프로세스
- 구글 로그인 버튼 클릭
- 구글 서버로부터 Access token을 받는다.
- 서버로 Access token 정보를 담은 HTTP 요청
- 서버에서 유저 정보 응답
4.1. AccessToken으로 profile 가져옴
4.2. email을 기준으로 기존에 회원가입 되어있는 유저인지 확인
4.3. 응답- 신규 회원인 경우 : email, name, picture 를 리턴해줌 -> 회원가입 페이지로 이동
- 기존 회원인 경우 : 로그인 JWT 토큰 리턴 (gateway에서)
- 유저가 회원가입 페이지에서 입력한 닉네임, github url, blog url, 자기소개, 태그 정보 등을 포함하여 서버로 전송
- 서버에서 DB에 저장
💡 프론트엔드가 굳이 서버에게 요청해서 email, username, picture 받아오는 이유
1. 신규 유저인지 기존 유저인지 확인하려면 DB 까지 갔다와야해서
2. 프론트엔드가 구글에 요청해서 email, username, picture 받아온 후 서버에게 로그인/회원가입 요청하면(나 이미 구글로그인 했어! email만 줄테니 로그인 된것으로 처리해줘!) 서버 입장에서 진짜 구글 로그인 한게 맞는지 믿을 수 없음 (보안 문제)
User 관리 MicroService
1. Controller
@GetMapping("/oauth/{socialLoginType}")
   public CommonResponse accessOauth(@PathVariable("socialLoginType") String oauthType, @RequestParam("code") String code) {
       GetSocialOAuthRes res = oAuthService.oAuthLogin(oauthType.toUpperCase(), code);
       DevUser user = devUserService.findUserByEmail(res.getEmail());
       if (user == null) {
           return new CommonResponse(CommonCode.OAUTH_CHECK_SUCCESS, Map.of("userInfo", res));
       } else {
           // 유저가 이미 존재하는 경우 어떻게 Gateway에 데이터를 넘겨줄지에 따라 attribute 객체가 수정될 수 있음
           return new CommonResponse(CommonCode.USER_ALREADY_EXIST, Map.of("userInfo", new GetSocialOAuthRes(user)));
       }
   }
- oAuthLogin: Access Token으로 구글 API에 Profile 정보 요청
- findUserByEmail: 이메일을 기준으로 기존에 존재하는 유저인지 확인
- 신규 유저인 경우 : Profile 정보 리턴
- 기존 유저인 경우 : JWT 토큰을 만드는데 필요한 유저 정보 리턴
2. Service
2.1 OAuthService
@Service
@RequiredArgsConstructor
@Slf4j
public class OAuthService {
    private final GoogleOauth googleOauth;

    public GetSocialOAuthRes oAuthLogin(String socialLoginType, String code) throws CustomException {
        GetSocialOAuthRes result;
        switch (socialLoginType) {
            case "GOOGLE": {
                try {
                    //응답 객체가 JSON형식으로 되어 있으므로, 이를 deserialization해서 자바 객체에 담을 것이다.
//                    GoogleOAuthToken oAuthToken = googleOauth.getAccessToken(code);
                    //액세스 토큰을 다시 구글로 보내 구글에 저장된 사용자 정보가 담긴 응답 객체를 받아온다.
                    ResponseEntity<String> userInfoResponse = googleOauth.requestUserInfo(code);
                    //다시 JSON 형식의 응답 객체를 자바 객체로 역직렬화한다.
                    GoogleUser googleUser = googleOauth.getUserInfo(userInfoResponse);
                    log.info("googleUser: " + googleUser.getEmail());
                    result = new GetSocialOAuthRes(googleUser.email, googleUser.name, googleUser.getPicture());
                    break;
                } catch (Exception e) {
                    log.error(">>>" + e.getMessage());
                    throw new CustomException(CommonCode.OAUTH_LOGIN_FAILED);
                }

            }
            default: {
                throw new CustomException(CommonCode.INVALID_SOCIAL_LOGIN_TYPE);
            }
        }
        return result;
    }
}- 지금은 구글로그인만 가능하지만 추후 다른 소셜 로그인으로 확장할 수 있기 때문에 socialLoginType으로 분기
- requestUserInfo: 구글 API로 프로필 정보 요청
- getUserInfo: Json 파싱
- 각 메서드 자세한 내용은 github 참고
2.2 UserService
public class DevUserService {
    private final DevUserRepository devUserRepository;
    private final MongoTemplate mongoTemplate;
    final static private String COLLECTION_NAME = "DevUser";

    public DevUser findUserByEmail(String email) {
        Query query = new Query(Criteria.where("email").is(email));
        DevUser targetUser = mongoTemplate.findOne(query, DevUser.class);
        return targetUser;
    }
}- findAllUserByEmail: email로 유저 찾기
- mongoTemplate을 사용하여 1명의 유저 찾기 (비즈니스 로직상 이메일은 중복되지 않기 때문)
Gateway(JWT 생성)
1. Controller
    @GetMapping("/oauth/{socialLoginType}")
    public CommonResponse accessOauth(@PathVariable("socialLoginType") String oauthType, @RequestParam("code") String code) {
        String response = restClient.restTemplateGet(userUri, String.format("/auth/oauth/%s?code=%s", oauthType, code),null);

        return authService.parseResponseWrapper(response, OAUTH);
}- User 관리 MicroService(devsta-user)에서 보내준 응답을 기반으로 Gateway에서 JWT 토큰 생성하는 작업을 해야하기 때문에 restTemplate으로 HTTP 통신하는 (내부통신) 방법 사용
- parseResponseWrapper: devsta-user가 보내준 response값을 Parsing 해서 원하는 형태로 변환하여 Client에 response
2. AuthService
@Slf4j
@Service
@AllArgsConstructor
public class AuthService {
    private final Gson gson = new Gson();
    private final JwtUtils jwtUtils;

    public CommonResponse parseResponseWrapper(String response, String uri) {
        HashMap responseEntity;
        try {
            responseEntity = gson.fromJson(response, HashMap.class);
            Double codeDouble = (Double) responseEntity.get("code");
            int code = codeDouble.intValue();
            switch (code) {
                case 200:
                    switch (uri) {
                        case SIGN_IN:
                        case OAUTH:
                            return parseSignInSuccess(responseEntity);
                        case SIGN_UP: return parseSignUpSuccess(responseEntity);
                        default: return parseChangePwSuccess(responseEntity);
                    }
                case 201:
                    log.info("oauthSignUpNewUser >>> " + responseEntity);
                    return new CommonResponse(CommonCode.OAUTH_CHECK_SUCCESS, (LinkedTreeMap) responseEntity.get("attribute"));
                default:
                    //에러는 음수대의 코드를 가지기 때문에 여기로 들어옴
                    Map map = (Map) responseEntity.get("attribute");
                    return new CommonResponse(CommonCode.of((code)),responseEntity.get("message").toString(), map);
            }

        } catch (Exception e) {
        	//CustomExceptionHandler에서 미처 잡지 못한 에러인 경우
            log.info(">>>  " + e);
            return new CommonResponse(CommonCode.FAIL, Map.of("message", e.getMessage()));
        }
    }

    private CommonResponse parseSignInSuccess(HashMap responseEntity) {
        LinkedTreeMap attribute = (LinkedTreeMap) responseEntity.get("attribute");
        String id = (String) attribute.get("id");
        String email = (String) attribute.get("email");
        String token = jwtUtils.generate(new TokenUser(id, email));
        log.info("parseSignInSuccess >>> ", token);
        return new CommonResponse(CommonCode.SUCCESS, Map.of("Authorization", token));
    }

    private CommonResponse parseSignUpSuccess(HashMap responseEntity) {
        LinkedTreeMap attribute = (LinkedTreeMap) responseEntity.get("attribute");
        return new CommonResponse(CommonCode.SUCCESS, attribute);
    }

    private CommonResponse parseChangePwSuccess(HashMap responseEntity) {
        return new CommonResponse(CommonCode.SUCCESS);
    }
}- CommonResponse는 Devstagram의 모든 MicroServices에서 사용하는 응답 형식. code, message, attribute로 구성되어 있다. (자세한 내용은 후속 편에서 다룰 예정)
- code
200: 로그인 성공 (기존 유저) - code
201: Oauth 로그인/회원가입 시도했는데 신규 유저인 경우 - code
음수: 실패
- code
- parseSignInSuccess : 로그인 성공시. JWT 토큰 생성.
- parseSignUpSuccess: 웹에서 자체 회원가입 하는 경우(Oauth 사용 안하는 회원가입). 회원가입 성공 축하 메세지에 들어갈 요소를 응답메세지에 포함시킨다.
- parseChangePwSuccess: 비밀번호 변경 등 JWT토큰도 없고, attribute에 아무것도 없이 응답해야하는 경우
3. Create JWT
3.1 JwtProperties
@Component
@Setter
@Getter
public class JwtProperties {
    @Value("${jwt.secret}")
    private String secret;

    @Value("${jwt.expiration-second}")
    private long expirationSecond;

}
3.2 JwtUtils
@Component
@RequiredArgsConstructor
public class JwtUtils implements InitializingBean {

    private static final String EMAIL = "email";

    private final JwtProperties jwtProperties;

    private Algorithm algorithm;
    private JWTVerifier jwtVerifier;

    @Override
    public void afterPropertiesSet() {
        this.algorithm = Algorithm.HMAC512(jwtProperties.getSecret());
        this.jwtVerifier = JWT.require(algorithm).acceptLeeway(5).build();
    }

    public boolean isValid(String token) {
        try {
            jwtVerifier.verify(token);
            return true;
        } catch (RuntimeException e){
            return false;
        }
    }

    public TokenUser decode(String token) {
        jwtVerifier.verify(token);

        DecodedJWT jwt = JWT.decode(token);

        String id = jwt.getSubject();
        String email = jwt.getClaim(EMAIL).asString();

        return new TokenUser(id, email);
    }


    public String generate(TokenUser user) {
        Date now = new Date();
        Date expiresAt = new Date(now.getTime() + jwtProperties.getExpirationSecond() * 1000);

        return JWT.create()
                   .withSubject(user.getId())
                   .withClaim(EMAIL, user.getEmail())
                   .withExpiresAt(expiresAt)
                   .withIssuedAt(now)
                   .sign(algorithm);
    }

}
Request & Response
- Request
curl --location --request GET '<gateway 주소>:9999/api/auth/oauth/GOOGLE?code=<AccessToken>'- Response (실패 - Access Token 인증 실패)
{
    "code": -1005,
    "message": "Oauth에서 프로필 정보를 가져오는데 실패했습니다.",
    "attribute": null
}- Response (성공 - 신규유저인 경우)
{
    "code": 201,
    "message": "Oauth 로그인 확인",
    "attribute": {
        "userInfo": {
            "email": "<메일>",
            "userName": "<이름>",
            "pictureUrl": <profile 사진 url>"
        }
    }
}
결론
- Frontend에서 구글 로그인해서 얻은 AccessToken을 Backend로 보내주면 구글 API로 Profile 정보를 받아 DB에서 기존 유저인지 확인 후 Response 해준다
- 이 때 기존 유저인 경우 Gateway에서 JWT 토큰을 발행해준다
- Gateway에서 토큰을 발행하는 이유: 모든 API 요청은 Gateway를 통과하기 때문에 인증 인가를 담당
- Devstagram의 모든 MicroService에서 사용하는 모든 응답은 CommonResponse라는 특정 형식을 갖는다. FrontEnd 입장에서 일정한 형식의 Response를 받으면 처리하기 용이하기 때문이다.
- 추후 CommonResponse와 CusomException(에러 발생시 CommonResponse 형식으로 에러 메세지 리턴)에 대해 다룰 예정이다.

LLM Application을 개발중인 BackEnd 개발자