Gateway 개념
💡 Gateway는 왜 필요할까?
- 각각의 서비스마다 인증/인가 등 공통된 로직을 구현해야하는 번거로움이 있음
- 수많은 API 호출을 기록하고 관리하기 어려움
- 클라이언트에서 여러 마이크로 서비스에 대해 번거로운 호출을 해야함(서비스 주소가 달라지면 클라이언트도 알고있어야 함)
- 내부의 비즈니스 로직이 클아이언트에게 공개되어 보안에 취약해짐
💡 Gateway란?
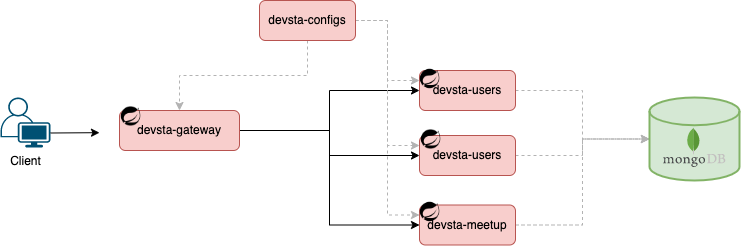
- API 서버 앞단에서 모든 API 서버들의 엔드포인트를 단일화 해주는 서버
- API에 대한 인증과 인가 기능을 가지고 있음
- 메세지의 내용에 따라 어플리케이션 내부에 있는 마이크로 서비스로 라우팅 하는 역할 수행
더 자세한 Gateway 내용은 여기 참고
Devstagram의 Gateway 정책
👆 요구사항
- URI를 보고 해당 서버에 라우팅
- Authorization 토큰이 필요한 API와 필요없는 API 분리
- 로그인 관련 기능이나 비로그인 유저도 볼 수 있는 밋업 페이지 Read 기능은 토큰이 필요 없음
- Authorization 토큰을 Decoding 해서 얻은 정보를 Header에 담아 MicroServices에게 전달
🙅♀️ Gateway 정책
| URI Rule | 기능 | 토큰 필요 | Gateway 동작 | routing to |
|---|---|---|---|---|
| Path=/api/auth/** | 로그인, 비밀번호 관련 기능 | N | RestTemplate로 내부통신(devsta-user에서 받은 응답으로 JWT 생성 처리) | devsta-users |
| Path=/api/user/profile/** | 내 프로필 정보, 수정 | Y | UserFilter에서 토큰 인증 후 라우팅 | devsta-users |
| Path=/api/posts/** | 포스팅, 타임라인 관련 기능 | Y | UserFilter에서 토큰 인증 후 라우팅 | devsta-posts |
| Path=/api/meetup/service/** | 밋업 관련 기능 중 로그인 필요한 기능 | Y | UserFilter에서 토큰 인증 후 라우팅 | devsta-meetup |
| Path=/api/meetup/read/** | 밋업 관련 기능 중 로그인 필요 없는 기능 | N | uri rewrite만 하고 토큰 인증 없이 라우팅 | devsta-meetup |
🏃♂️ 구현
0. Dependencies
	<dependencies>
		<dependency>
			<groupId>org.springframework.cloud</groupId>
			<artifactId>spring-cloud-starter-gateway</artifactId>
		</dependency>
		<dependency>
			<groupId>org.springframework.boot</groupId>
			<artifactId>spring-boot-starter-test</artifactId>
			<scope>test</scope>
		</dependency>
		<dependency>
			<groupId>org.projectlombok</groupId>
			<artifactId>lombok</artifactId>
			<optional>true</optional>
		</dependency>
        <dependency>
            <groupId>com.google.code.gson</groupId>
            <artifactId>gson</artifactId>
            <version>2.9.0</version>
        </dependency>
		<dependency>
			<groupId>com.auth0</groupId>
			<artifactId>java-jwt</artifactId>
			<version>3.18.3</version>
		</dependency>
    </dependencies>
1. RestTemplate으로 내부통신
- 로그인, 비밀번호 관련 기능은 유저 정보를 관리하는 devsta-user 서버에서 받은 응답을 가지고 Gateway에서 처리할 작업이 있다. (JWT 토큰 생성 등)
- 따라서 단순 라우팅해서 보내기 보다는 RestTemplate으로 내부통신하고, 응답을 받아서 처리하는 방식으로 구현했다
1.1 RestTemplateConfig 설정
- 우선 RestTemplate를 매번 새로 생성하기 보다 빈으로 만들어서 의존성을 주입받도록 한다.
RestTemplate: HTTP get,post 요청을 날릴때 일정한 형식에 맞춰주는 template
@Configuration
public class RestTemplateConfig {
    @Bean
    public RestTemplate restTemplate() {
        var factory = new SimpleClientHttpRequestFactory();
        factory.setConnectTimeout(30000);
        factory.setReadTimeout(30000);
        return new RestTemplate(factory);
    }
}
1.2 RestClient
- RestTemplate을 이용해 Post를 보내는 일련의 과정을 매번 반복해야하는데, 이를 코드 한곳에서 관리하기 위해 Wrapper 클래스 생성
@Component
@Slf4j
public class RestClient{
    @Autowired
    private RestTemplate restTemplate;
    public String restTemplatePost(String serviceName, String endpoint, HashMap<String, ?> requestBody) {
        try {
            String serviceUrl = String.format("%s%s", serviceName, endpoint);
            HttpHeaders httpHeaders = new HttpHeaders();
            httpHeaders.setContentType(MediaType.APPLICATION_JSON);
            HttpEntity httpEntity = new HttpEntity(requestBody, httpHeaders);
            log.info("restTemplate ->" + serviceUrl);
            ResponseEntity<String> restExchange = restTemplate.exchange(serviceUrl, HttpMethod.POST, httpEntity, String.class, "");
            log.info("restExchange -> " + restExchange);
            log.info("body -> " + restExchange.getBody());
            return restExchange.getBody();
        } catch (Exception e) {
            log.info(">>> " + e);
            throw new CustomException(CommonCode.FAIL);
        }
    }
1.3 Controller
- devsta-user와 내부통신하는 API를 위한 Controller
- devsta-user 의 ip 주소를 쉽게 관리하기 위해
userUri값을 application.yml 파일의uri.user-service의 값을 받아와서 사용하도록 구현했다. - SIGN_IN, SIGN_UP 등 중요한 상수값은 가독성, 관리 포인트 통일, 오타 방지를 위해
public static final로 선언했다. - devsta-user에서 받은 응답은
authService의parseResponseWrapper로 파싱
@Slf4j
@RestController
@RequestMapping("/api/auth")
public class AuthController {
    private final RestClient restClient;
    private final AuthService authService;
    public static final String SIGN_IN = "signIn";
    public static final String SIGN_UP = "signUp";
    public static final String CHANGE_PW = "changePw";


    @Value("${uri.user-service}")
    private String userUri = "";

    public AuthController(RestClient restClient, JwtUtils jwtUtils, AuthService authService) {
        this.restClient = restClient;
        this.authService = authService;
    }

    @PostMapping("/signIn")
    public CommonResponse signIn(@RequestBody HashMap<String, String> requestBody) {
        HashMap responseEntity;
        String response = restClient.restTemplatePost(userUri, "/auth/signIn", requestBody);
        return authService.parseResponseWrapper(response, SIGN_IN);
    }

    @PostMapping("/signUp")
    public CommonResponse signUp(@RequestBody HashMap<String, Object> requestBody) {
        HashMap responseEntity;
        String response = restClient.restTemplatePost(userUri, "/auth/signUp", requestBody);
        return authService.parseResponseWrapper(response, SIGN_UP);
    }

    @PostMapping("/changePW")
    public CommonResponse changePw(@RequestBody HashMap<String, Object> requestBody) {
        HashMap responseEntity;
        String response = restClient.restTemplatePost(userUri, "/auth/changePW", requestBody);
        return authService.parseResponseWrapper(response, CHANGE_PW);
    }
}
1.4 AuthService
- 응답을 Parsing하는
parseResponseWrapper구현 parseSignInSuccess: 응답에서 attribute에 담아서 보내준 id, email 값을 담아 JWT 토큰으로 Encoding, JWT 토큰을 CommonResponse에 담아 리턴- CommonResponse는 응답 형식을 통일시킴으로서 Frontend가 API응답을 받아서 처리하기 용이하게 하기 위해 만든 클래스. 추후 자세히 포스팅할 예정
@Slf4j
@Service
@AllArgsConstructor
public class AuthService {
    private final Gson gson = new Gson();
    private final JwtUtils jwtUtils;

    public CommonResponse parseResponseWrapper(String response, String uri) {
        HashMap responseEntity;
        try {
            responseEntity = gson.fromJson(response, HashMap.class);
            Double codeDouble = (Double) responseEntity.get("code");
            int code = codeDouble.intValue();
            switch (code) {
                case 200:
                    switch (uri) {
                        case SIGN_IN: return parseSignInSuccess(responseEntity);
                        case SIGN_UP: return parseSignUpSuccess(responseEntity);
                        default: return parseChangePwSuccess(responseEntity);
                    }
                default:
                    return new CommonResponse(CommonCode.of((code)));
            }

        } catch (Exception e) {
            log.info(">>>  " + e);
            return new CommonResponse(CommonCode.FAIL, Map.of("message", e.getMessage()));
        }
    }

    private CommonResponse parseSignInSuccess(HashMap responseEntity) {
        LinkedTreeMap attribute = (LinkedTreeMap) responseEntity.get("attribute");
        String id = (String) attribute.get("id");
        String email = (String) attribute.get("email");
        String token = jwtUtils.generate(new TokenUser(id, email));
        return new CommonResponse(CommonCode.SUCCESS, Map.of("Authorization", token));
    }

    private CommonResponse parseSignUpSuccess(HashMap responseEntity) {
        LinkedTreeMap attribute = (LinkedTreeMap) responseEntity.get("attribute");
        return new CommonResponse(CommonCode.SUCCESS, attribute);
    }

    private CommonResponse parseChangePwSuccess(HashMap responseEntity) {
        return new CommonResponse(CommonCode.SUCCESS);
    }


}
2. 비로그인 API 라우팅
- 밋업 관련 기능 중 로그인 필요 없는 기능은 Gateway에서 URI 부분만 수정한 후 밋업 서버로 라우팅하면 된다.
2.1 application.yml
spring:
  cloud:
    gateway:
      routes:
        - id: meetup-read
          uri: ${uri.meetup-service}
          predicates:
            - Path=/api/meetup/read/**
          filters:
            - RewritePath=/api/meetup/(?<path>.*),/$\{path}
3. 로그인 API 라우팅
- 기타 API는 로그인 후 사용해야한다.
UserFilter: Header에 Authorization Token을 Deconding하여 인증/인가- Decoding 한 값 중 UserId, Email을 헤더에 담아 MicroService로 라우팅
3.1 application.yml
spring:
  cloud:
    gateway:
     routes:
        - id: user-service
          uri: ${uri.user-service}
          predicates:
            - Path=/api/user/profile/**
          filters:
            - RewritePath=/api/user/profile/(?<path>.*),/$\{path}
            - UserJwtFilter
        - id: post-service
          uri: ${uri.post-service}
          predicates:
            - Path=/api/posts/**
          filters:
            - RewritePath=/api/posts/(?<path>.*),/$\{path}
            - UserJwtFilter
        - id: meetup-service
          uri: ${uri.meetup-service}
          predicates:
            - Path=/api/meetup/service/**
          filters:
            - RewritePath=/api/meetup/(?<path>.*),/$\{path}
            - UserJwtFilter
3.2 UserJwtFilter
- 헤더에 Authorization 토큰 확인
- 토큰을 Deconding 한 값을 다시 헤더에 넣은 후 라우팅 (다음 filter chain으로)
@Component
@Slf4j
public class UserJwtFilter extends AbstractGatewayFilterFactory<UserJwtFilter.Config> {

    private static final String USER_ID = "userId";
    private static final String EMAIL = "email";

    private final JwtUtils jwtUtils;

    public UserJwtFilter(JwtUtils jwtUtils) {
        super(Config.class);
        this.jwtUtils = jwtUtils;
    }

    @Override
    public GatewayFilter apply(Config config) {
        return (exchange, chain) -> {
            ServerHttpRequest request = exchange.getRequest();
            ServerHttpResponse response = exchange.getResponse();

            if (!containsAuthorization(request)) {
                return onError(response, "헤더에 Authorization 토큰이 없습니다.", HttpStatus.BAD_REQUEST);
            }

            String token = extractToken(request);
            if (!jwtUtils.isValid(token)) {
                return onError(response, "Authorization 토큰이 유효하지 않습니다.", HttpStatus.BAD_REQUEST);
            }

            TokenUser tokenUser = jwtUtils.decode(token);
            addAuthorizationHeaders(request, tokenUser);
            return chain.filter(exchange);
        };
    }

    private boolean containsAuthorization(ServerHttpRequest request) {
        return request.getHeaders().containsKey(HttpHeaders.AUTHORIZATION);
    }

    private String extractToken(ServerHttpRequest request) {
        return request.getHeaders().getOrEmpty(HttpHeaders.AUTHORIZATION).get(0);
    }

    private void addAuthorizationHeaders(ServerHttpRequest request, TokenUser tokenUser) {
        request.mutate()
            .header(USER_ID, tokenUser.getId())
            .header(EMAIL, tokenUser.getEmail())
            .build();
    }

    private Mono<Void> onError(ServerHttpResponse response, String message, HttpStatus status) {
        response.setStatusCode(status);
        DataBuffer buffer = response.bufferFactory().wrap(message.getBytes(StandardCharsets.UTF_8));
        return response.writeWith(Mono.just(buffer));
    }

}
3.3 JwtUtils
- JWT Encoding, Decoding, Validation 기능
@Component
@RequiredArgsConstructor
public class JwtUtils implements InitializingBean {

    private static final String EMAIL = "email";

    private final JwtProperties jwtProperties;

    private Algorithm algorithm;
    private JWTVerifier jwtVerifier;

    @Override
    public void afterPropertiesSet() {
        this.algorithm = Algorithm.HMAC512(jwtProperties.getSecret());
        this.jwtVerifier = JWT.require(algorithm).acceptLeeway(5).build();
    }

    public boolean isValid(String token) {
        try {
            jwtVerifier.verify(token);
            return true;
        } catch (RuntimeException e){
            return false;
        }
    }

    public TokenUser decode(String token) {
        jwtVerifier.verify(token);

        DecodedJWT jwt = JWT.decode(token);

        String id = jwt.getSubject();
        String email = jwt.getClaim(EMAIL).asString();

        return new TokenUser(id, email);
    }


    public String generate(TokenUser user) {
        Date now = new Date();
        Date expiresAt = new Date(now.getTime() + jwtProperties.getExpirationSecond() * 1000);

        return JWT.create()
                   .withSubject(user.getId())
                   .withClaim(EMAIL, user.getEmail())
                   .withExpiresAt(expiresAt)
                   .withIssuedAt(now)
                   .sign(algorithm);
    }

}
3.4 application.yml의 JWT관련 설정
jwt:
  secret: [SECRET KEY]
  expiration-second: 172800  #48시간
한계
- JWT의 단점은 한번 발행한 것은 수정할 수 없다는 것이다. 따라서 JWT 토큰이 유출되거나 , 로그아웃을 했을 때 기존에 발행한 JWT토큰을 무효화해야하는데 그럴 수 없다는 문제가 있다.
- 이를 해결하기 위해 서버 단에서 발행한 토큰을 관리하는 저장소를 운영하여 이중으로 체크하는 방법이 있다.
- 이와 관련해서는 추후 포스팅하도록 하겠다.

LLM Application을 개발중인 BackEnd 개발자