요약
Django 를 AWS EC2 에 Git 을 통해 배포 하였다.
구성환경
맥북, Django, AWS EC2 Ubuntu 서버, nginx, uwsgi,git
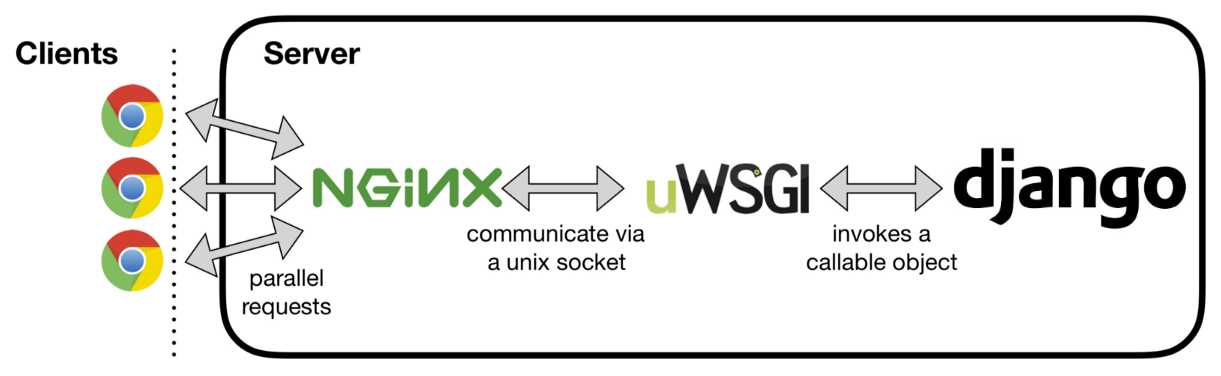
구성도
접속 요청→nginx : 80 번 포트→uwsgi→Django : 8000 포트
AWS EC2
📚 ec2 서버 접속, git, python, django 설치
- AWS ec2 인스턴스 실행 Ubuntu
- chmod 400 django-api.pem
- cd Download/
- ssh -i "django-api.pem" ubuntu@ec2-15-165-235-103.ap-northeast-2.compute.amazonaws.com
- sudo apt-get update
- sudo apt-get upgrade
- sudo apt-get install git
- sudo apt-get install python3-pip
- sudo pip3 install django
- pip3 install --upgrade django
맥북
📚 가상환경 설정, 가상환경에 django 설치, django 시작 및 git에 업로드
- virtualenv ~/django-api --python=python3.8
- source ~/django-api/bin/activate
- pip3 install django
- pip3 install --upgrade django
- django-admin startproject backend
- backend 파일 안에 내용을 상위파일로 옮김
- python manage.py migrate
- python manage.py runserver
- 확인
- git init && git add . && git commit -m "first django-api" && git remote add origin [본인에 git 주소 입력] && git push origin master
AWS EC2
📚 nginx 설치, 서버에서 django 실행 확인
- sudo apt-get install nginx
- cd /var/www
- sudo git clone [본인에 git 주소 입력]
- cd zerowastrip-api/
- python3 manage.py runserver
- 확인
맥북
📚 nginx 설치, 서버에서 django 실행 확인,static 파일 업로드
settings.py 추가
ALLOWED_HOSTS = ['ec2-15-165-235-103.ap-northeast-2.compute.amazonaws.com']

STATIC_ROOT = 'static'
python manage.py collectstatic
git add . && git commit -m "static 파일" && git push origin master
AWS EC2
📚 nginx 설정, nohup 명령어로 접속 세션이 끊어져도 프로세스 유지, uwsgi 로 django 실행
- cd /var/www
- sudo git clone [본인에 git 주소 입력]
- sudo nano /etc/nginx/sites-available/default
(원래는 /etc/nginx/nginx.conf 에 설정함)
추가

upstream django{
        server 127.0.0.1:8000;
}

server{
        listen 80 default_server;
        listen [::]:80 default_server;

        server_name ec2-15-165-235-103.ap-northeast-2.compute.amazonaws.com 15.165.235.103;

        location / {
                uwsgi_pass django;
                include /etc/nginx/uwsgi_params;
        }

        location /static {
                alias /var/www/zerowastrip-api/static;
        }
}-
sudo service nginx restart
-
sudo apt install net-tools
명령어 netstat -tnlp

(Not all processes could be identified, non-owned process info
will not be shown, you would have to be root to see it all.)
Active Internet connections (only servers)
Proto Recv-Q Send-Q Local Address           Foreign Address         State       PID/Program name
tcp        0      0 0.0.0.0:80              0.0.0.0:*               LISTEN      -
tcp        0      0 127.0.0.53:53           0.0.0.0:*               LISTEN      -
tcp        0      0 0.0.0.0:22              0.0.0.0:*               LISTEN      -
tcp6       0      0 :::80                   :::*                    LISTEN      -
tcp6 0 0 :::22 :::* LISTEN --
pip3 install uwsgi
-
nohup uwsgi --socket 0.0.0.0:8000 --plugin python3 --module backend.wsgi &
AWS 도메인 주소로 접속 확인!!
정리
맥북에서 django 웹 서비스 개발해서 git 에 푸쉬하고,
AWS EC2 에서 git 으로 django 받아서,
uwsgi 로 실행시키고,
nginx 웹서버에서 요청받는 트래픽을 연동시켜줬다.
