각각의 MSA로 분리된 애플리케이션들이 Opentelemetry SDK를 활용해서
Optentelemetry Collector로 Trace, Metric, Log를 전송 중에 있었다.

나는 이를 시각화해서 한 번에 볼 필요가 있다.
ElasticSearch 공식 문서에 따르면
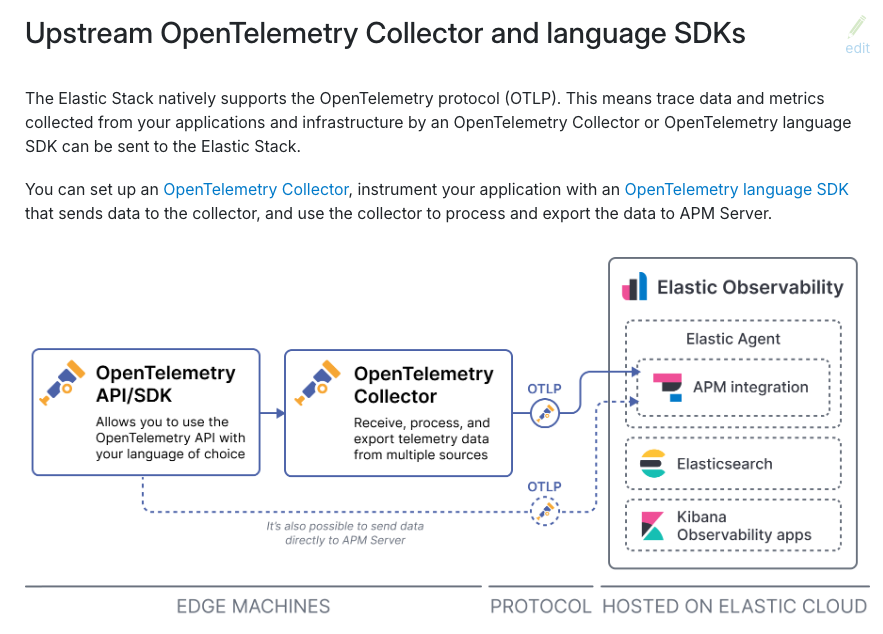
이렇게 애플리케이션의 MLT 파이프라인을 통합할 수있다고 한다.
Elasticsearch와 Kibana에서 APM 사용하려면,
보안설정이 되어있어야하고,
TLS를 설정(?)을 해야하는 것 같아보였다.
TLS
도커 컴포즈의 일부분인 tls을 먼저 실행해줘야하기에,
entrypoint.sh와 instance.yml을 작성해주자.
version: "3.8"
services:
  tls:
    profiles:
      - setup
    build:
      context: tls
      args:
        ELASTIC_VERSION: ${ELASTIC_VERSION}
    user: root
    init: true
    volumes:
      - /tls/entrypoint.sh:/entrypoint.sh:ro,Z
      - /tls/instances.yml:/usr/share/elasticsearch/tls/instances.yml:ro,Z
- /tls/certs:/usr/share/elasticsearch/tls/certs:z- entrypoint.sh
#!/usr/bin/env bash

set -eu
set -o pipefail

declare symbol=⠍

echo '[+] CA certificate and key'

if [ ! -f tls/certs/ca/ca.key ]; then
	symbol=⠿

	bin/elasticsearch-certutil ca \
		--silent \
		--pem \
		--out tls/certs/ca.zip

	unzip tls/certs/ca.zip -d tls/certs/ >/dev/null
	rm tls/certs/ca.zip

	echo '   ⠿ Created'
else
	echo '   ⠍ Already present, skipping'
fi

declare ca_fingerprint
ca_fingerprint="$(openssl x509 -fingerprint -sha256 -noout -in tls/certs/ca/ca.crt \
	| cut -d '=' -f2 \
	| tr -d ':' \
	| tr '[:upper:]' '[:lower:]'
)"

echo "   ${symbol} SHA256 fingerprint: ${ca_fingerprint}"

while IFS= read -r file; do
	echo "   ${symbol}   ${file}"
done < <(find tls/certs/ca -type f \( -name '*.crt' -or -name '*.key' \) -mindepth 1 -print)

symbol=⠍

echo '[+] Server certificates and keys'

if [ ! -f tls/certs/elasticsearch/elasticsearch.key ]; then
	symbol=⠿

	bin/elasticsearch-certutil cert \
		--silent \
		--pem \
		--in tls/instances.yml \
		--ca-cert tls/certs/ca/ca.crt \
		--ca-key tls/certs/ca/ca.key \
		--out tls/certs/certs.zip

	unzip tls/certs/certs.zip -d tls/certs/ >/dev/null
	rm tls/certs/certs.zip

	find tls -name ca -prune -or -type f -name '*.crt' -exec sh -c 'cat tls/certs/ca/ca.crt >>{}' \;

	echo '   ⠿ Created'
else
	echo '   ⠍ Already present, skipping'
fi

while IFS= read -r file; do
	echo "   ${symbol}   ${file}"
done < <(find tls -name ca -prune -or -type f \( -name '*.crt' -or -name '*.key' \) -mindepth 1 -print)- instance.yml
# This file is used by elasticsearch-certutil to generate X.509 certificates
# for stack components.
#
# Ref. https://www.elastic.co/guide/en/elasticsearch/reference/current/certutil.html#certutil-silent
instances:

- name: elasticsearch
  dns:
  - elasticsearch  # Compose service, resolved by the embedded Docker DNS server name
  - localhost      # local connections
  ip:
  - 127.0.0.1      # local connections
  - ::1

- name: kibana
  dns:
  - kibana.127.0.0.1.nip.io    # Examples of resolvable domains.
  - kibana.127.0.0.1.sslip.io  #
  - localhost
  ip:
  - 127.0.0.1
  - ::1

- name: fleet-server
  dns:
  - fleet-server
  - localhost
  ip:
  - 127.0.0.1
  - ::1

- name: apm-server
  dns:
  - apm-server
  - localhost
  ip:
  - 127.0.0.1
  - ::1
그 다음
docker compose -f <docker-compose 파일> up tls -d를 실행하면 certs 폴더에 각 서비스별 인증서가 발급된 것을 볼 수 있다.
Setup
  setup:
    profiles:
      - setup
    build:
      context: setup
      args:
        ELASTIC_VERSION: ${ELASTIC_VERSION}
    init: true
    volumes:
      - /setup/entrypoint.sh:/entrypoint.sh:ro,Z
      - /setup/lib.sh:/lib.sh:ro,Z
      - /setup/roles:/roles:ro,Z
      - /tls/certs/ca/ca.crt:/ca.crt:ro,z
    environment:
      ELASTIC_PASSWORD: ${ELASTIC_PASSWORD:-}
      LOGSTASH_INTERNAL_PASSWORD: ${LOGSTASH_INTERNAL_PASSWORD:-}
      KIBANA_SYSTEM_PASSWORD: ${KIBANA_SYSTEM_PASSWORD:-}
      METRICBEAT_INTERNAL_PASSWORD: ${METRICBEAT_INTERNAL_PASSWORD:-}
      FILEBEAT_INTERNAL_PASSWORD: ${FILEBEAT_INTERNAL_PASSWORD:-}
      HEARTBEAT_INTERNAL_PASSWORD: ${HEARTBEAT_INTERNAL_PASSWORD:-}
      MONITORING_INTERNAL_PASSWORD: ${MONITORING_INTERNAL_PASSWORD:-}
      BEATS_SYSTEM_PASSWORD: ${BEATS_SYSTEM_PASSWORD:-}
    depends_on:
      - elasticsearch
      - kibana
TLS를 하고나면 Setup을 해줘야하는데, 셋업에 필요한 파일은 아래와 같다.
- entrypoint.sh
#!/usr/bin/env bash

set -eu
set -o pipefail

source "${BASH_SOURCE[0]%/*}"/lib.sh


# --------------------------------------------------------
# Users declarations

declare -A users_passwords
users_passwords=(
	[logstash_internal]="${LOGSTASH_INTERNAL_PASSWORD:-}"
	[kibana_system]="${KIBANA_SYSTEM_PASSWORD:-}"
	[metricbeat_internal]="${METRICBEAT_INTERNAL_PASSWORD:-}"
	[filebeat_internal]="${FILEBEAT_INTERNAL_PASSWORD:-}"
	[heartbeat_internal]="${HEARTBEAT_INTERNAL_PASSWORD:-}"
	[monitoring_internal]="${MONITORING_INTERNAL_PASSWORD:-}"
	[beats_system]="${BEATS_SYSTEM_PASSWORD=:-}"
)

declare -A users_roles
users_roles=(
	[logstash_internal]='logstash_writer'
	[metricbeat_internal]='metricbeat_writer'
	[filebeat_internal]='filebeat_writer'
	[heartbeat_internal]='heartbeat_writer'
	[monitoring_internal]='remote_monitoring_collector'
)

# --------------------------------------------------------
# Roles declarations

declare -A roles_files
roles_files=(
	[logstash_writer]='logstash_writer.json'
	[metricbeat_writer]='metricbeat_writer.json'
	[filebeat_writer]='filebeat_writer.json'
	[heartbeat_writer]='heartbeat_writer.json'
)

# --------------------------------------------------------


log 'Waiting for availability of Elasticsearch. This can take several minutes.'

declare -i exit_code=0
wait_for_elasticsearch || exit_code=$?

if ((exit_code)); then
	case $exit_code in
		6)
			suberr 'Could not resolve host. Is Elasticsearch running?'
			;;
		7)
			suberr 'Failed to connect to host. Is Elasticsearch healthy?'
			;;
		28)
			suberr 'Timeout connecting to host. Is Elasticsearch healthy?'
			;;
		*)
			suberr "Connection to Elasticsearch failed. Exit code: ${exit_code}"
			;;
	esac

	exit $exit_code
fi

sublog 'Elasticsearch is running'

log 'Waiting for initialization of built-in users'

wait_for_builtin_users || exit_code=$?

if ((exit_code)); then
	suberr 'Timed out waiting for condition'
	exit $exit_code
fi

sublog 'Built-in users were initialized'

for role in "${!roles_files[@]}"; do
	log "Role '$role'"

	declare body_file
	body_file="${BASH_SOURCE[0]%/*}/roles/${roles_files[$role]:-}"
	if [[ ! -f "${body_file:-}" ]]; then
		sublog "No role body found at '${body_file}', skipping"
		continue
	fi

	sublog 'Creating/updating'
	ensure_role "$role" "$(<"${body_file}")"
done

for user in "${!users_passwords[@]}"; do
	log "User '$user'"
	if [[ -z "${users_passwords[$user]:-}" ]]; then
		sublog 'No password defined, skipping'
		continue
	fi

	declare -i user_exists=0
	user_exists="$(check_user_exists "$user")"

	if ((user_exists)); then
		sublog 'User exists, setting password'
		set_user_password "$user" "${users_passwords[$user]}"
	else
		if [[ -z "${users_roles[$user]:-}" ]]; then
			suberr '  No role defined, skipping creation'
			continue
		fi

		sublog 'User does not exist, creating'
		create_user "$user" "${users_passwords[$user]}" "${users_roles[$user]}"
	fi
done- lib.sh
#!/usr/bin/env bash

es_ca_cert="${BASH_SOURCE[0]%/*}"/ca.crt

# Log a message.
function log {
	echo "[+] $1"
}

# Log a message at a sub-level.
function sublog {
	echo "   ⠿ $1"
}

# Log an error.
function err {
	echo "[x] $1" >&2
}

# Log an error at a sub-level.
function suberr {
	echo "   ⠍ $1" >&2
}

# Poll the 'elasticsearch' service until it responds with HTTP code 200.
function wait_for_elasticsearch {
	local elasticsearch_host="${ELASTICSEARCH_HOST:-elasticsearch}"

	local -a args=( '-s' '-D-' '-m15' '-w' '%{http_code}' 'https://elasticsearch:9200/'
		'--resolve' "elasticsearch:9200:${elasticsearch_host}" '--cacert' "$es_ca_cert"
		)

	if [[ -n "${ELASTIC_PASSWORD:-}" ]]; then
		args+=( '-u' "elastic:${ELASTIC_PASSWORD}" )
	fi

	local -i result=1
	local output

	# retry for max 300s (60*5s)
	for _ in $(seq 1 60); do
		local -i exit_code=0
		output="$(curl "${args[@]}")" || exit_code=$?

		if ((exit_code)); then
			result=$exit_code
		fi

		if [[ "${output: -3}" -eq 200 ]]; then
			result=0
			break
		fi

		sleep 5
	done

	if ((result)) && [[ "${output: -3}" -ne 000 ]]; then
		echo -e "\n${output::-3}"
	fi

	return $result
}

# Poll the Elasticsearch users API until it returns users.
function wait_for_builtin_users {
	local elasticsearch_host="${ELASTICSEARCH_HOST:-elasticsearch}"

	local -a args=( '-s' '-D-' '-m15' 'https://elasticsearch:9200/_security/user?pretty'
		'--resolve' "elasticsearch:9200:${elasticsearch_host}" '--cacert' "$es_ca_cert"
		)

	if [[ -n "${ELASTIC_PASSWORD:-}" ]]; then
		args+=( '-u' "elastic:${ELASTIC_PASSWORD}" )
	fi

	local -i result=1

	local line
	local -i exit_code
	local -i num_users

	# retry for max 30s (30*1s)
	for _ in $(seq 1 30); do
		num_users=0

		# read exits with a non-zero code if the last read input doesn't end
		# with a newline character. The printf without newline that follows the
		# curl command ensures that the final input not only contains curl's
		# exit code, but causes read to fail so we can capture the return value.
		# Ref. https://unix.stackexchange.com/a/176703/152409
		while IFS= read -r line || ! exit_code="$line"; do
			if [[ "$line" =~ _reserved.+true ]]; then
				(( num_users++ ))
			fi
		done < <(curl "${args[@]}"; printf '%s' "$?")

		if ((exit_code)); then
			result=$exit_code
		fi

		# we expect more than just the 'elastic' user in the result
		if (( num_users > 1 )); then
			result=0
			break
		fi

		sleep 1
	done

	return $result
}

# Verify that the given Elasticsearch user exists.
function check_user_exists {
	local username=$1

	local elasticsearch_host="${ELASTICSEARCH_HOST:-elasticsearch}"

	local -a args=( '-s' '-D-' '-m15' '-w' '%{http_code}'
		"https://elasticsearch:9200/_security/user/${username}"
		'--resolve' "elasticsearch:9200:${elasticsearch_host}" '--cacert' "$es_ca_cert"
		)

	if [[ -n "${ELASTIC_PASSWORD:-}" ]]; then
		args+=( '-u' "elastic:${ELASTIC_PASSWORD}" )
	fi

	local -i result=1
	local -i exists=0
	local output

	output="$(curl "${args[@]}")"
	if [[ "${output: -3}" -eq 200 || "${output: -3}" -eq 404 ]]; then
		result=0
	fi
	if [[ "${output: -3}" -eq 200 ]]; then
		exists=1
	fi

	if ((result)); then
		echo -e "\n${output::-3}"
	else
		echo "$exists"
	fi

	return $result
}

# Set password of a given Elasticsearch user.
function set_user_password {
	local username=$1
	local password=$2

	local elasticsearch_host="${ELASTICSEARCH_HOST:-elasticsearch}"

	local -a args=( '-s' '-D-' '-m15' '-w' '%{http_code}'
		"https://elasticsearch:9200/_security/user/${username}/_password"
		'--resolve' "elasticsearch:9200:${elasticsearch_host}" '--cacert' "$es_ca_cert"
		'-X' 'POST'
		'-H' 'Content-Type: application/json'
		'-d' "{\"password\" : \"${password}\"}"
		)

	if [[ -n "${ELASTIC_PASSWORD:-}" ]]; then
		args+=( '-u' "elastic:${ELASTIC_PASSWORD}" )
	fi

	local -i result=1
	local output

	output="$(curl "${args[@]}")"
	if [[ "${output: -3}" -eq 200 ]]; then
		result=0
	fi

	if ((result)); then
		echo -e "\n${output::-3}\n"
	fi

	return $result
}

# Create the given Elasticsearch user.
function create_user {
	local username=$1
	local password=$2
	local role=$3

	local elasticsearch_host="${ELASTICSEARCH_HOST:-elasticsearch}"

	local -a args=( '-s' '-D-' '-m15' '-w' '%{http_code}'
		"https://elasticsearch:9200/_security/user/${username}"
		'--resolve' "elasticsearch:9200:${elasticsearch_host}" '--cacert' "$es_ca_cert"
		'-X' 'POST'
		'-H' 'Content-Type: application/json'
		'-d' "{\"password\":\"${password}\",\"roles\":[\"${role}\"]}"
		)

	if [[ -n "${ELASTIC_PASSWORD:-}" ]]; then
		args+=( '-u' "elastic:${ELASTIC_PASSWORD}" )
	fi

	local -i result=1
	local output

	output="$(curl "${args[@]}")"
	if [[ "${output: -3}" -eq 200 ]]; then
		result=0
	fi

	if ((result)); then
		echo -e "\n${output::-3}\n"
	fi

	return $result
}

# Ensure that the given Elasticsearch role is up-to-date, create it if required.
function ensure_role {
	local name=$1
	local body=$2

	local elasticsearch_host="${ELASTICSEARCH_HOST:-elasticsearch}"

	local -a args=( '-s' '-D-' '-m15' '-w' '%{http_code}'
		"https://elasticsearch:9200/_security/role/${name}"
		'--resolve' "elasticsearch:9200:${elasticsearch_host}" '--cacert' "$es_ca_cert"
		'-X' 'POST'
		'-H' 'Content-Type: application/json'
		'-d' "$body"
		)

	if [[ -n "${ELASTIC_PASSWORD:-}" ]]; then
		args+=( '-u' "elastic:${ELASTIC_PASSWORD}" )
	fi

	local -i result=1
	local output

	output="$(curl "${args[@]}")"
	if [[ "${output: -3}" -eq 200 ]]; then
		result=0
	fi

	if ((result)); then
		echo -e "\n${output::-3}\n"
	fi

	return $result
}
그 다음, 아래 커맨드로 Setup을 해준다.
docker compose -f <docker-compose 파일> up setup -dAPM Server + OTEL
이제 우리는 APM 서버와 Opentelemetry Collector를 구성해서
각 애플리케이션들이 SDK를 통해 Opentelemetry Collector로 데이터를 전송하고
Opentelemetry Collector가 APM 서버에게 데이터를 송신하면
Elasticsearch 포맷으로 데이터를 가공한 뒤, 대시보드로 볼 수 있게 되는 것이다.
  apm-server:
    image: docker.elastic.co/apm/apm-server:${ELASTIC_VERSION}
    container_name: apm-server
    environment:
      - output.elasticsearch.hosts=["elasticsearch:9200"]
    ports:
      - "8200:8200"  # APM 서버가 수집할 데이터를 수신하는 포트
    volumes:
      - /apm/config.yaml:/usr/share/apm-server/apm-server.yml:ro
      - ./persistence/apm-server:/var/log/apm-server:rw
      - /tls/certs/ca/ca.crt:/usr/share/ca/ca.crt:ro
      - /tls/certs/apm-server/apm-server.crt:/usr/share/apm-server/apm-server.crt:ro
      - /tls/certs/apm-server/apm-server.key:/usr/share/apm-server/apm-server.key:ro
      - /tls/certs/elasticsearch/elasticsearch.crt:/usr/share/elasticsearch/elasticsearch.crt:ro
      - /tls/certs/elasticsearch/elasticsearch.key:/usr/share/elasticsearch/elasticsearch.key:ro
    depends_on:
      - elasticsearch

  # OPENTELEMETRY-COLLECTOR
  opentelemetry-collector:
    image: otel/opentelemetry-collector-contrib:latest
    container_name: opentelemetry-collector
    user: 0:0
    cap_add:
      - SYS_ADMIN
    privileged: true
    volumes:
      - /collector/config.yml:/etc/opentelemetry-collector.yml
      - /tls/certs/apm-server/apm-server.crt:/etc/apm-server.crt
      - /tls/certs/apm-server/apm-server.key:/etc/apm-server.key
      - /tls/certs/ca/ca.crt:/etc/ca.crt
      - /var/run/docker.sock:/var/run/docker.sock
    command:
      - "--config=/etc/opentelemetry-collector.yml"
    links:
      - elasticsearch
      - kibana
      - apm-server
    ports:
      - 4317:4317     # OTLP over gRPC receiver
      - 4318:4318     # OTLP over HTTP receiver
      - 3500:3500     # Loki HTTP receiver
      - 3600:3600     # Loki gRPC receiver
      - 8888:8888     # metrics endpoint
APM 서버 설정은 아래와 같다.
- config.yaml
apm-server:
  # Defines the host and port the server is listening on. Use "unix:/path/to.sock" to listen on a unix domain socket.
  host: "0.0.0.0:8200"
  auth:
  	secret_token: <직접 만든 Bearer 토큰을 넣으면 된다.>
  ...
  ...
  ..
  .
  ssl:
    enabled: true
    certificate: '/usr/share/apm-server/apm-server.crt'
    key: '/usr/share/apm-server/apm-server.key'

...
..
..
output.elasticsearch:
  hosts: ["https://elasticsearch:9200"]
  username: "elastic"
  password: "Qwe123!@#"
  ssl.enabled: true
  ssl.supported_protocols: [TLSv1.0, TLSv1.1, TLSv1.2]

  # List of root certificates for HTTPS server verifications.
  ssl.certificate_authorities: ["/usr/share/ca/ca.crt"]

  # Certificate for SSL client authentication.
  ssl.certificate: "/usr/share/elasticsearch/elasticsearch.crt"

  # Client Certificate Key
  ssl.key: "/usr/share/elasticsearch/elasticsearch.key"

...
...
..
# 만약 로깅을 원하면 아래 세팅을 추가하면 된다.
logging.level: debug
logging.to_files: true
logging.files:
  # Configure the path where the logs are written. The default is the logs directory
  path: /var/log/apm-server
  name: apm-server
  rotateeverybytes: 10485760 # = 10MB
  keepfiles: 7
  permissions: 0600
  interval: 24h
...
...
APM 서버 설정 파일의 기본 템플릿 파일은 검색만 해보면 쉽게 알 수 있다.
그 파일을 가져다가 필요한 부분만 수정하면 된다.
Opentelemetry Collector 설정은 아래와 같다.
- config.yaml
receivers:
  otlp:
    protocols:
      grpc:
        endpoint: "0.0.0.0:4317"
      http:
        endpoint: "0.0.0.0:4318"

exporters:
  logging:
    loglevel: debug
  otlp/elastic:
    endpoint: "https://apm-server:8200"
    tls:
      insecure: false
      ca_file: /etc/ca.crt
      cert_file: /etc/apm-server.crt
      key_file: /etc/apm-server.key
    headers:
      Authorization: "Bearer <APM 서버 설정 시 작성한 secret token을 넣으면 된다.>"

processors:
  batch:

extensions:
  health_check:
  pprof:
  zpages:

service:
  extensions: [health_check]
  pipelines:
    traces:
      receivers: [otlp]
      processors: []
      exporters: [logging, otlp/elastic]
    metrics:
      receivers: [otlp]
      processors: []
      exporters: [logging, otlp/elastic]
    logs:
      receivers: [otlp]
      processors: []
      exporters: [logging, otlp/elastic]
서버 실행
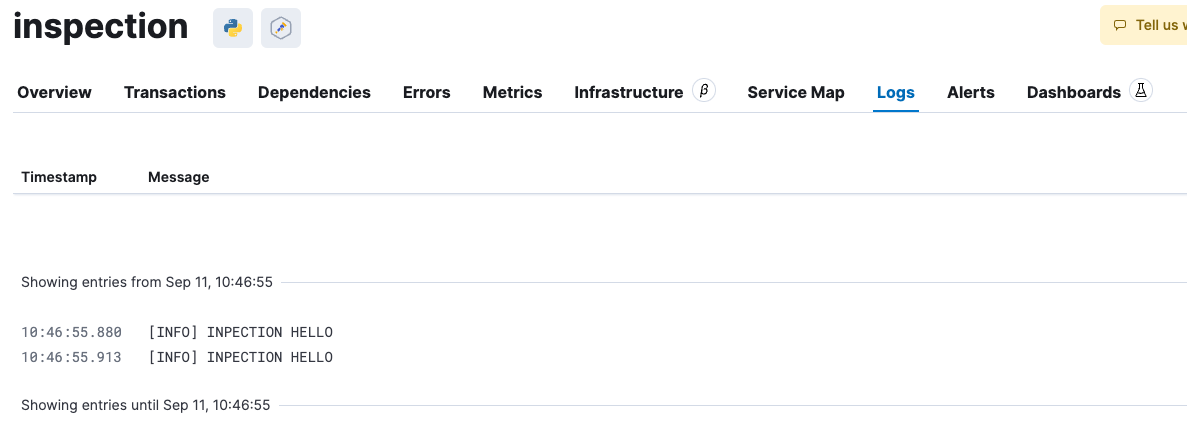
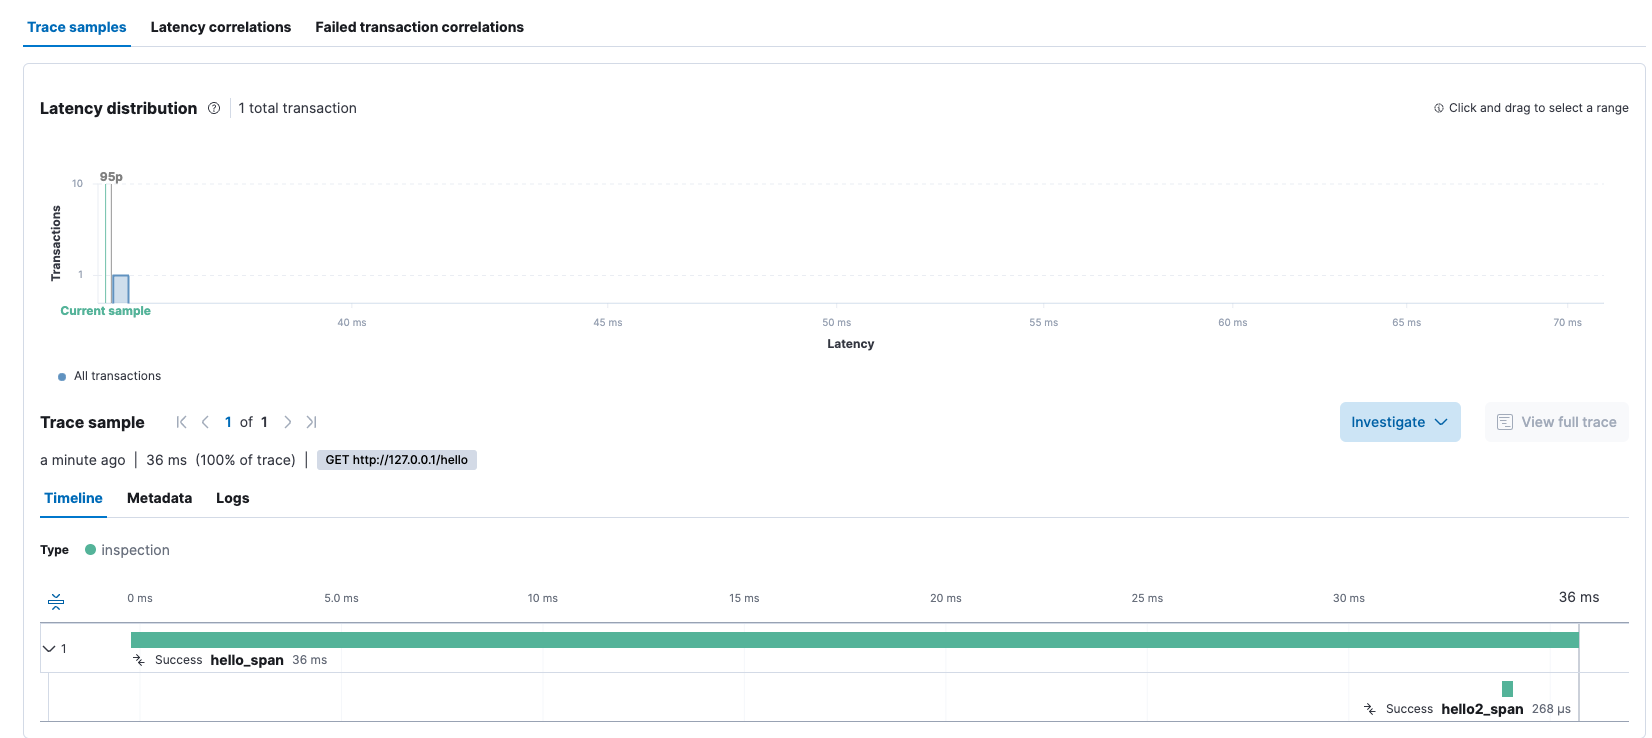
docker compose -f <docker compose 파일> up -d