아고라를 이용한 실시간 소통 앱을 만드는 도중 유저의 마이크와 카메라 접근 허락을 받을 일이 생겼다.
요즘 모바일 앱은 예전과 다르게 사용자의 카메라, 앨범, 마이크 등을 사용하기 위해 사용자의 허락을 받아야 한다. 이런 사전 작업은 매우 귀찮고 힘들다. 환경 설정 뿐 아니라 사용자의 허락을 받기 위한 코드도 짜야하기 때문이다.
특히 Native 언어가 아닌 Cross Platfrom Framework의 경우 더욱 까다로워지는데, Flutter의 경우 permission_handler라는 패키지로 사용자의 허락을 쉽게 받을 수가 있다.
물론 환경설정은 iOS도 Android도 따로 해줘야 한다.
📍 iOS 환경 설정
1. permission_handler package install
여기서 가장 최신 버젼을 다운 받자.
2. Info.plist 수정하기
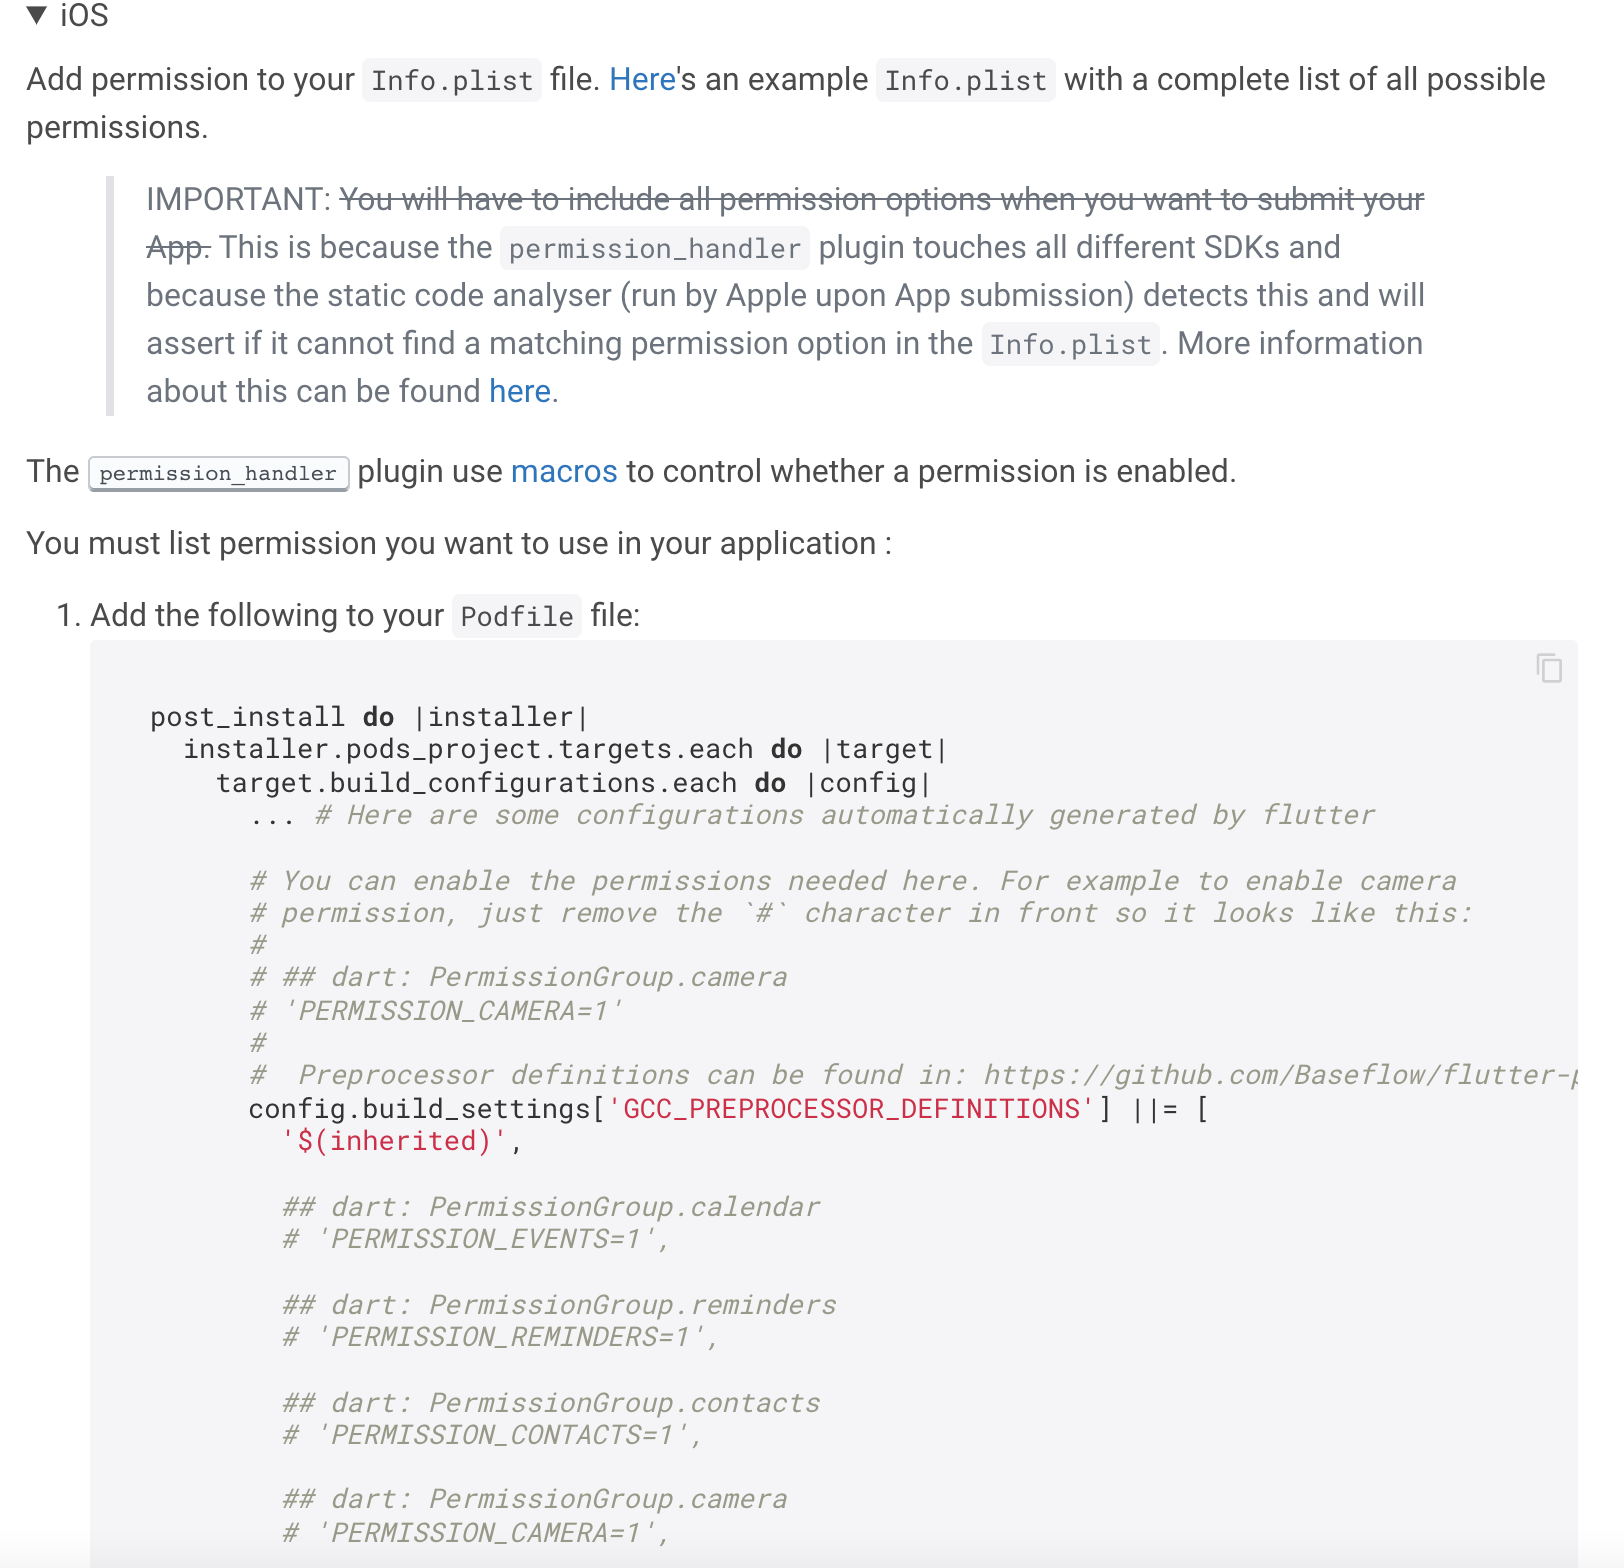
플러터 패키지 공식 홈페이지의 permission_handler 관련 문서를 보면 아래 그림과 같이 Info.plist 파일의 수정과 Podfile의 수정이 필요하다고 말한다.
이 중 Info.plist를 먼저 수정해보자.
VScode나 다른 IDE를 이용해서 Project Folder > iOS > Runner > Info.plist를 들어가면 여러 설정들이 나와 있다. 이 중간에 아래와 같은 코드를 삽입한 후 필요하지 않은 기능에 주석처리를 하면 된다.
<!-- Permission options for the `location` group -->
    <key>NSLocationWhenInUseUsageDescription</key>
    <string>Need location when in use</string>
    <key>NSLocationAlwaysAndWhenInUseUsageDescription</key>
    <string>Always and when in use!</string>
    <key>NSLocationUsageDescription</key>
    <string>Older devices need location.</string>
    <key>NSLocationAlwaysUsageDescription</key>
    <string>Can I have location always?</string>

    <!-- Permission options for the `mediaLibrary` group -->
    <key>NSAppleMusicUsageDescription</key>
    <string>Music!</string>
    <key>kTCCServiceMediaLibrary</key>
    <string>media</string>

    <!-- Permission options for the `calendar` group -->
    <key>NSCalendarsUsageDescription</key>
    <string>Calendars</string>

    <!-- Permission options for the `camera` group -->
    <key>NSCameraUsageDescription</key>
    <string>camera</string>

    <!-- Permission options for the `contacts` group -->
    <key>NSContactsUsageDescription</key>
    <string>contacts</string>

    <!-- Permission options for the `microphone` group -->
    <key>NSMicrophoneUsageDescription</key>
    <string>microphone</string>

    <!-- Permission options for the `speech` group -->
    <key>NSSpeechRecognitionUsageDescription</key>
    <string>speech</string>

    <!-- Permission options for the `sensors` group -->
    <key>NSMotionUsageDescription</key>
    <string>motion</string>

    <!-- Permission options for the `photos` group -->
    <key>NSPhotoLibraryUsageDescription</key>
    <string>photos</string>

    <!-- Permission options for the `reminder` group -->
    <key>NSRemindersUsageDescription</key>
    <string>reminders</string>

    <!-- Permission options for the `bluetooth` -->
    <key>NSBluetoothAlwaysUsageDescription</key>
    <string>bluetooth</string>
    <key>NSBluetoothPeripheralUsageDescription</key>
    <string>bluetooth</string>

    <!-- Permission options for the `appTrackingTransparency` -->
    <key>NSUserTrackingUsageDescription</key>
    <string>appTrackingTransparency</string>
자세한 사항은 이 깃헙 링크에서 확인해볼 수 있다. 여기서 위와 같이 permission 관련 string에 그저 'photos' , 'camera'와 같이 명사를 적어놓는 것이 아니라, 왜 해당 permission이 필요한지 이유를 적어야 하는 것 같다.
https://github.com/Baseflow/flutter-permission-handler/issues/26 을 보면
Missing Purpose String in Info.plist File - Your app's code references one or more APIs that access sensitive user data. The app's Info.plist file should contain a NSContactsUsageDescription key with a user-facing purpose string explaining clearly and completely why your app needs the data. Starting Spring 2019, all apps submitted to the App Store that access user data will be required to include a purpose string.If you're using external libraries or SDKs, they may reference APIs that require a purpose string. While your app might not use these APIs, a purpose string is still required. You can contact the developer of the library or SDK and request they release a version of their code that doesn't contain the APIs. Learn more (https://developer.apple.com/documentation/uikit/core_app/protecting_the_user_s_privacy).
라는 앱 출시 reject 메일을 받은 경우가 있다고 한다. 위 메일의 The app's Info.plist file should contain a NSContactsUsageDescription key with a user-facing purpose string explaining clearly and completely why your app needs the data. 라는 부분을 보면 명확하게 왜 당신의 앱에 이런 정보가 필요한지 설명하라고 써져있다.
3. Podfile 설정하기
Podfile의 위치: Project Folder > iOS > Podfile
예전 블로그를 보며 permission handler를 사용하려 했다면 Podfile 설정에서 문제가 있을 수도 있다.
대부분의 블로그 글을 보면 Podfile에 아래와 같은 코드를 추가하라고 하기 때문이다.
post_install do |installer|
  installer.pods_project.targets.each do |target|
    target.build_configurations.each do |config|
      ... # Here are some configurations automatically generated by flutter

      # You can remove unused permissions here
      # for more infomation: https://github.com/BaseflowIT/flutter-permission-handler/blob/develop/permission_handler/ios/Classes/PermissionHandlerEnums.h
      # e.g. when you don't need camera permission, just add 'PERMISSION_CAMERA=0'
      config.build_settings['GCC_PREPROCESSOR_DEFINITIONS'] ||= [
        '$(inherited)',

        ## dart: PermissionGroup.calendar
        # 'PERMISSION_EVENTS=0',

        ## dart: PermissionGroup.reminders
        # 'PERMISSION_REMINDERS=0',

        ## dart: PermissionGroup.contacts
        # 'PERMISSION_CONTACTS=0',

        ## dart: PermissionGroup.camera
        # 'PERMISSION_CAMERA=0',

        ## dart: PermissionGroup.microphone
        # 'PERMISSION_MICROPHONE=0',

        ## dart: PermissionGroup.speech
        # 'PERMISSION_SPEECH_RECOGNIZER=0',

        ## dart: PermissionGroup.photos
        # 'PERMISSION_PHOTOS=0',

        ## dart: [PermissionGroup.location, PermissionGroup.locationAlways, PermissionGroup.locationWhenInUse]
        # 'PERMISSION_LOCATION=0',

        ## dart: PermissionGroup.notification
        # 'PERMISSION_NOTIFICATIONS=0',

        ## dart: PermissionGroup.mediaLibrary
        # 'PERMISSION_MEDIA_LIBRARY=0',

        ## dart: PermissionGroup.sensors
        # 'PERMISSION_SENSORS=0',

        ## dart: PermissionGroup.bluetooth
        # 'PERMISSION_BLUETOOTH=0'
      ]

    end
  end
end
대부분의 스택 오버플로우 글이나 블로그를 보면 위 코드에서 필요없는 부분의 주석을 해제하라고 하는데, 이는 iOS 정책이 변하기 전이다. 머릿글에 언급했듯이, 예전에는 사용자의 허가를 굳이 받을 필요 없었기 때문에 필요없는 기능들을 위 코드를 통해 지웠다.
하지만 이제 어플에서 필요한 기능을 요구하는 방식으로 바뀌었기 때문에 위의 0을 전부 1로 바꾸고, 필요한 기능의 주석을 해제해야 한다
이는 pub.dev의 permission handler readme.md의 setup 부분을 보면 쉽게 알 수 있다.
주의할 점: 위에 'dart: PermissionGroup.~~~ ' 부분의 주석은 해제하면 안되용~
마지막으로 Podfile을 수정했으면 터미널에 flutter clean > flutter pub get > (iOS 폴더에서) pod install을 해줘야 한다. 이제 환경 설정은 끝!
+ 아니, 그래서 Info.plist와 대응하는 permission을 Podfile에서 어떻게 찾는데??

웅 공식문서 보면 다 나왕~.~ 같은 row에 있는 것이 같은 permission이다!
📍 코드 예제
자 이제 환경 설정을 끝냈으니 코드를 써보자. 굉장히 간단하다. 허가를 받는 화면의 initState나, 그 전 화면에서 import 'package:permission_handler/permission_handler.dart';를 import 해주면 Permission이라는 클래스를 사용할 수 있다.
나는 카메라와 마이크에 접근하기 위해 statefulwidget 내부에 아래와 같은 async 함수 두개를 정의 했다.
Future<void> _handleCameraAndMic(Permission permission) async {
    final status = await permission.request();
    print(status);
  }

  Future<void> onJoin(TalkRoom _room) async {
      await _handleCameraAndMic(Permission.camera);
      await _handleCameraAndMic(Permission.microphone);

      Get.toNamed('/room'); //Named Router '/room'으로 넘어가면 마이크가 필요하다. 따라서 이 전에 허락을 받는다.
  }
그리고 특정 버튼을 누르면 onJoin() 함수가 async하게 작동하게 설정하면 끝!!
모두 즐코~
출처
iOS 에서 카메라 권한 설정을 하기 위해 찾다찾다보니 여기도 방문을 했었네요 처음엔 몰랐습니다 ㅋㅋ
제 경우에는 camera library와 permission_handler library의 official document대로만 따라했을 때는 pubspec에서 추가한 카메라 모듈을 iOS 빌드때 pod file이 인식을 못해 iOS 빌드 과정에서 카메라 모듈을 import하지 못하는 에러가 발생해 애를 좀 먹었습니다.
깊게 공부하지 않아 정확하진 않지만, flutter에서 사용되는 root path, library등을 podfile에 알려주는 코드가 있는 것 같더라구요!
Podfile의 구조와 flutter에서 올바르게 iOS build를 하는 방법을 추가해주시면 감사하겠습니다:)