SwiftUI Tutorials 1-2. Building Lists and Navigation
기본 랜드마크 세부 보기를 설정하면 사용자가 랜드마크의 전체 목록을 보고 각 위치에 대한 세부 정보를 볼 수 있는 방법을 제공해야 합니다.
랜드마크에 대한 정보를 표시할 수 있는 보기를 만들고 사용자가 랜드마크에 대한 세부 보기를 보기 위해 누를 수 있는 스크롤 목록을 동적으로 생성합니다. UI를 미세 조정하려면 Xcode의 캔버스를 사용하여 다양한 장치 크기로 여러 미리 보기를 렌더링합니다.
Section 1. Create a Landmark Model
뷰에 전달할 수 있는 데이터를 저장할 모델을 만듭니다.
→.json파일을 추가하고 Model을 생성하는 파트
1. .Json 파일 추가
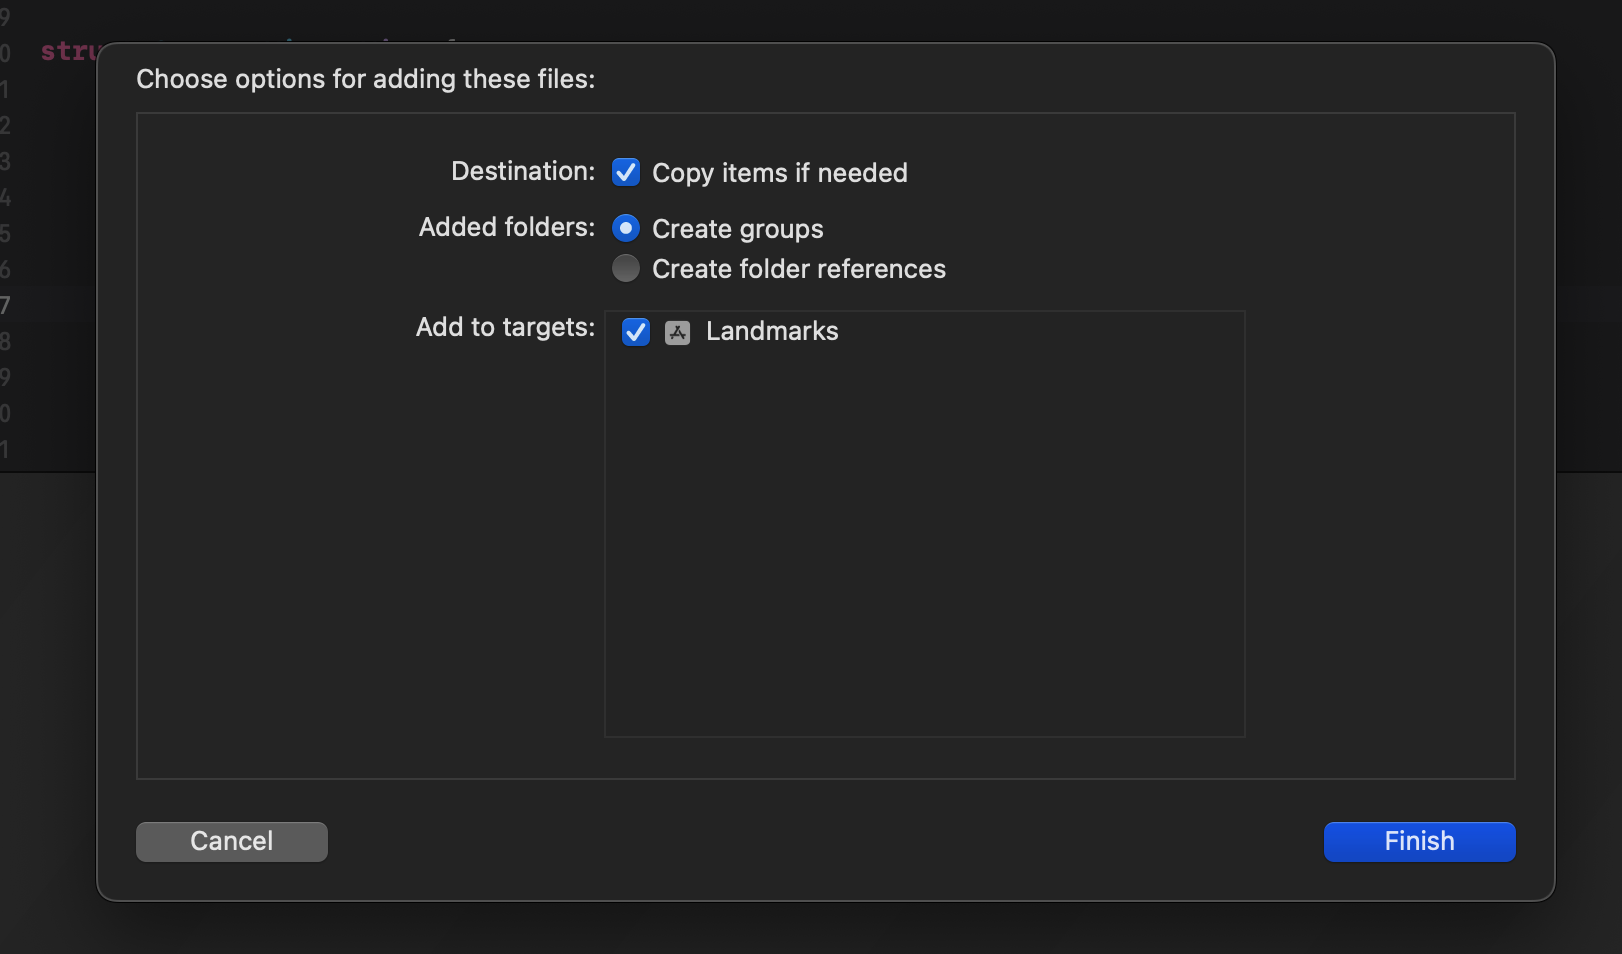
“Copy items if needed” 체크해주기
- 파일을 복사하여 추가하는 옵션, 이 옵션없이 추가하면 프로젝트 폴더가 복사되지 않고 원본의 레퍼런스를 참조하게 된다. (!!)원본 폴더가 변경되거나 삭제되었을 때 더 이상 파일을 사용할 수 없게 된다. git에 커밋하게 되었을 때 다른 사람들에게는 해당파일이 존재하지 않아 오류 발생 가능
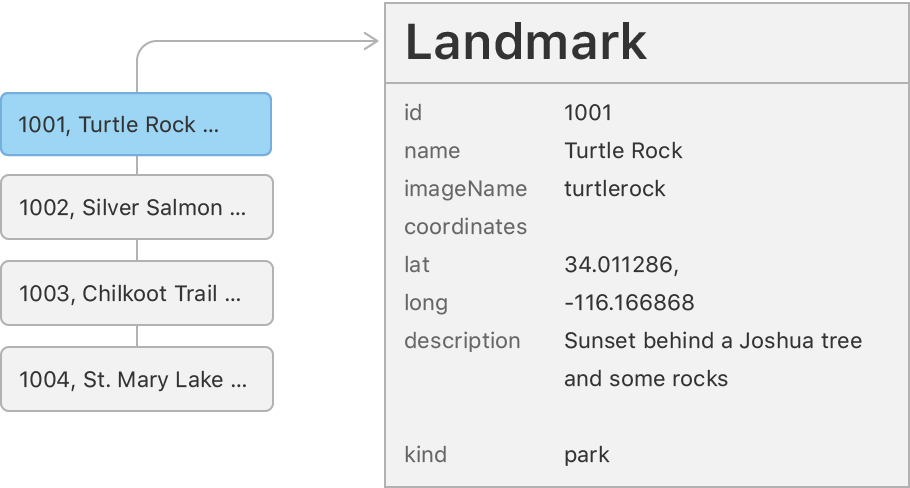
2. Landmark 구조 정의 / Model 정의
landmarkData.json 데이터 파일의 일부 키 이름과 일치하는 몇 가지 속성으로 Landmark 구조를 정의합니다.
import Foundation

struct Landmark: Hashable, Codable {
    var id: Int
    var name: String
    var park: String
    var state: String
    var description: String
}Codable?
구조와 데이터 파일 간에 데이터를 더 쉽게 이동 가능
Codable프로토콜 :Encodable과Decodable프로토콜의 별칭 (union type)- 자신을 외부 표현으로 변한(Encode)하거나 외부 표현으로 부터 변환(Decode)할 수 있는 타입.
- 타입이나 제너릭 제약 조건으로 사용하면 두 프로토콜을 모두 사용하는 형태
Codable | Apple Developer Documentation
Hashable?
“정수 hash 값을 제공하는 타입"으로 정의된 프로토콜, Equatable을 상속 받음
- hash 함수: 임의의 길이의 데이터를 고정된 길이의 데이터로 매핑하는 함수
- hashValue(hash값) - 어떠한 데이터를 Hash 함수에 넣게 되면 반환해주는 값
- HashTable에서 hash값을 찾기 위해선 key가 필요하고 이 key는 식별할 수 있도록 unique 해야 함
- 기본 데이터 타입(
Double,Int,String)은Hashable타입을 상속
Equatable
Equatable은 값이 동일한 지 어떤지를 비교 할 수 있는 타입인 프로토콜
- 이 프로토콜을 준수하는 타입은 == 혹은 != 사용하여 동등성을 비교 가능
- 해시 값이 유일한 값인지를 비교해야하기 때문에
Equatable프로토콜을 상속 받아 값을 비교 Set,Dictionary의 key는 중복을 허용하지 않아야 함으로Equatable을 상속하고 있는Hashable을 준수
protocol Equatable {
	static func == (lhs: Self, rhs: Self) -> Bool
}
hashable 구현
Hashable 만들어 주기 위해선 2가지가 필요합니다.
1. Equatable에 있는 == 함수 구현
2. HashValue를 만들기
Hasher는 hashValue를 생성해주는 해시함수가 있는 struct로, combine 메서드를 가지고 있습니다. 이 메소드를 사용하여 식별할 수 있는 Identifire를 hasher에게 넘겨주면 됩니다.
hashable을 사용하는 경우
- Hashable 프로토콜을 준수하는 모든 유형은 set, dictionary key로 사용
- Hashable을 준수하고 있는 타입: String, Integer, floating-point, Boolean
- Optional과 Array, Range들은 argument들이 동일하게 구현될 때 자동으로 Hashable이 됨
- custom 타입에도 Hashable을 준수하도록 할 수 있다.
- associated value 없이 enum을 정의하면 자동으로 Hashable을 준수한다.
hash(into:)메서드를 구현한다면 다른 custom 타입도 Hashable을 준수할 수 있다.- 저장 property들이 모두 Hashable한 구조체, 모두 Hashable한 enum 타입을 가진 enum 이라면컴파일러가
hash(into:)메서드를 자동으로 제공한다.
3. 이미지 속성 추가
데이터에서 이미지의 이름을 읽는 imageName 속성과 asset 카탈로그에서 이미지를 로드하는 computed image property 추가
- 내부에서만 변경할 수 있도록
private로 선언
private var imageName: String
    var image: Image {
        Image(imageName)
    }
4. 위치 정보 다루기
JSON 데이터 구조의 저장소를 반영하는 nested Coordinates type을 사용하여 구조물에 coordinates 프로퍼티을 추가
private var coordinates: Coordinates

    struct Coordinates: Hashable, Codable {
        var latitude: Double
        var longitude: Double
    }
Mapkit framework와 인터랙트하기 위해 locationCoordinate 계산
var locationCoordinate: CLLocationCoordinate2D {
        CLLocationCoordinate2D(
            latitude: coordinates.latitude,
            longitude: coordinates.longitude)
    }
CoreLocation
iOS 에서 기본으로 제공하는 Mapkit과 작용하기 위해서 사용
4. ModelData 생성
앱의 메인 번들에서 지정된 이름의 JSON 데이터를 가져오는 load(_:) 메서드 생성
로드 방법은 Codable 프로토콜의 한 구성 요소인 Decodable 프로토콜에 대한 return type의 준수에 의존
import Foundation

var landmarks: [Landmark] = load("landmarkData.json")

func load<T: Decodable>(_ filename: String) -> T {
    let data: Data

    guard let file = Bundle.main.url(forResource: filename, withExtension: nil)
    else {
        fatalError("Couldn't find \(filename) in main bundle.")
    }

    do {
        data = try Data(contentsOf: file)
    } catch {
        fatalError("Couldn't load \(filename) from main bundle:\n\(error)")
    }

    do {
        let decoder = JSONDecoder()
        return try decoder.decode(T.self, from: data)
    } catch {
        fatalError("Couldn't parse \(filename) as \(T.self):\n\(error)")
    }
}
폴더 구조 변경

파일을 그룹화하여 성장하는 프로젝트를 보다 쉽게 관리
Section 2. Create the Row View
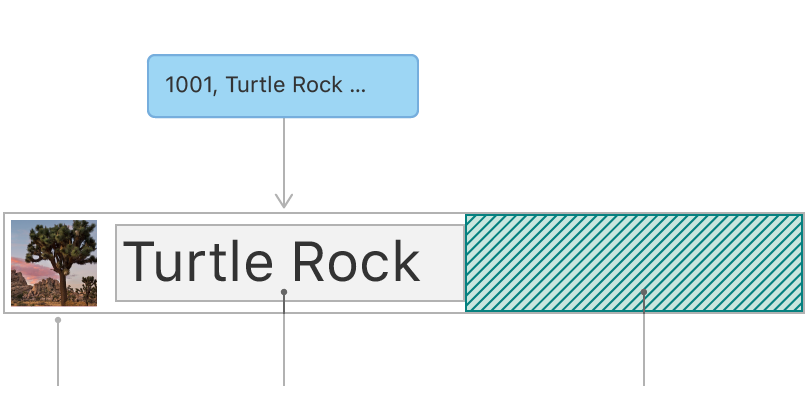
첫 번째 뷰는 각 랜드마크에 대한 세부 정보를 표시하는 행입니다. 이 행 보기는 표시되는 랜드마크에 대한 정보를 속성에 저장하므로 한 뷰에서 모든 랜드마크를 표시할 수 있습니다. 나중에 여러 행을 랜드마크 목록으로 결합합니다.
//LandmarkRow.swift
import SwiftUI

struct LandmarkRow: View {
    var landmark: Landmark

    var body: some View {
        HStack {
            landmark.image
                .resizable()
                .frame(width: 50, height: 50)
            Text(landmark.name)

            Spacer()
        }
    }
}

struct LandmarkRow_Previews: PreviewProvider {
    static var previews: some View {
        LandmarkRow(landmark: landmarks[0])
    }
}
생성자(init) 없이 자동으로 인자를 받음
class에서는 init이 없으면 생성해야한다는 에러 발생
struct에서는 Memberwise Initializer를 통해 자동으로 생성자 정의
.resizable()
- Swift UI에서 이미지는 원본 사이즈를 기준으로 로드됨
resizable()을 이용해서 이미지 크기를 변경할 수 있음
Section 3. Customize the Row Preview
Xcode의 캔버스는 PreviewProvider 프로토콜과 일치하는 현재 편집기의 모든 유형을 자동으로 인식하고 표시합니다. 미리 보기 공급자는 크기 및 장치를 구성하는 옵션이 있는 하나 이상의 보기를 반환합니다.
preview provider에서 반환된 콘텐츠를 사용자 정의하여 가장 유용한 미리 보기를 정확하게 렌더링할 수 있습니다.
//LandmarkRow.swift
Group {
            LandmarkRow(landmark: landmarks[0])
            LandmarkRow(landmark: landmarks[1])
        }
        .previewLayout(.fixed(width: 300, height: 70))
프리뷰 화면 조정
- preveiwLayout modifier를 통해 프리뷰 화면을 조정
.previewLayout(.fixed(width: 너비, height: 높이 ))
Group
Group은 뷰 contents를 그룹핑하는 컨테이너 역할. 여러 뷰들을 한번에 제어하고 싶을 때 사용하면 유용
(EX.Group 에 여러개의 뷰를 넣고 숨기는 명령을 주면 모든 뷰를 숨길 수 있음)
Group을 사용하여 여러 개의 Preview를 보여줄 수도 있음.
- View를 받는 extension →
@ViewBulider클로저로 뷰를 받음. 즉, 입력되는 View 속성들을 모두 Child로 인식
Section 4. Create the List of Landmarks ~ Section 5. Make the List Dynamic

SwiftUI의
List은 플랫폼별 보기 list를 표시할 수 있습니다.List의 요소는 지금까지 생성한 스택의 하위 보기와 같이 정적(static)이거나 동적(dynamic)으로 생성된 것일 수 있습니다. 정적 뷰와 동적으로 생성된 뷰를 혼합할 수도 있습니다.
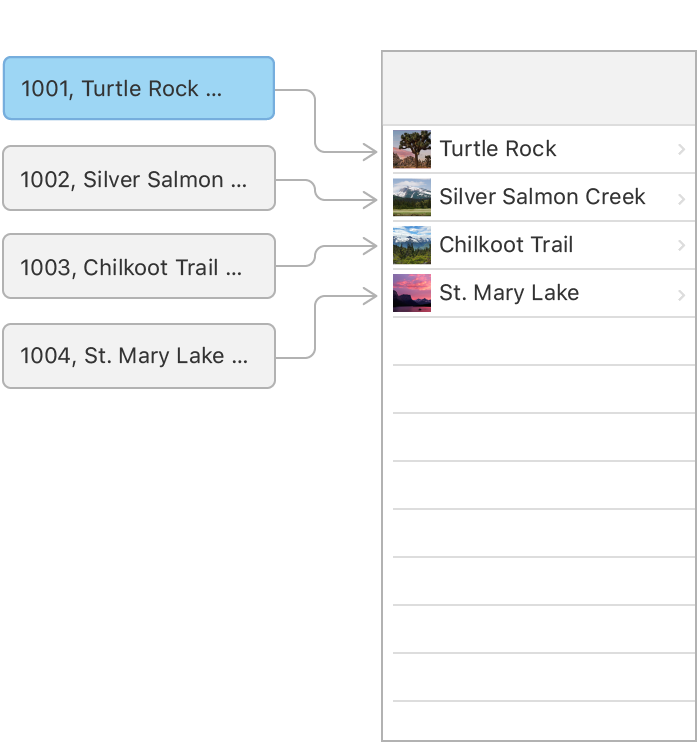
목록의 요소를 개별적으로 지정하는 대신 집합에서 직접 행을 생성할 수 있습니다.
데이터 컬렉션과 컬렉션의 각 요소에 대한 보기를 제공하는 마감을 전달하여 컬렉션의 요소를 표시하는 목록을 만들 수 있습니다. 목록은 제공된 폐쇄를 사용하여 집합의 각 요소를 하위 뷰로 변환합니다.
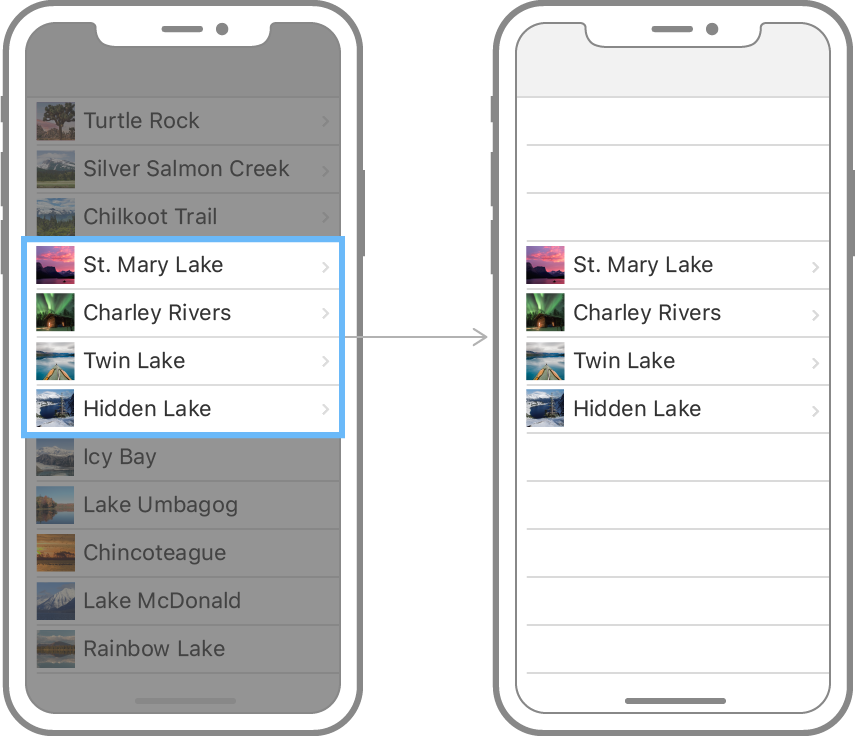
1. LandmarkList 만들기
List
단일 열에 정렬된 데이터 행을 표시하는 컨테이너로, 선택적으로 하나 이상의 구성원을 선택 가능
셀에 포함된 하나 이상의 뷰의 각 행을 수직 방향의 목록으로 정보 표현
UIIkit의 tableView 클래스와 비슷한 기능 제공
@MainActor public init<Data, RowContent>(_ data: Data, @ViewBuilder
rowContent: @escaping (Data.Element) -> RowContent)
where Content == ForEach<Data, Data.Element.ID, RowContent>,
Data : RandomAccessCollection, RowContent : View, Data.Element : Identifiable- 파라미터 :
data,id,rowContentrowContent:@ViewBulider로 선언되어 있어서, 클로저로 받는 모든 뷰들이 child요소로 들어가게 됨id:keyPath<Data, Element>→ iterator를 통해 data로 받은 컨테이너(배열 등)을 하나씩 순회하면서 매칭되는 아이템이 Data Element에 해당, ID는Hashable준수
KeyPath ?
- Root에서 해당 Value로 가는 길을 미리 지정해두는 것!
List(landmarks, id: \.id): \는 각각의 id요소를 넣어주겠다는 의미 (keyPath<Landmark, ID>)
//LandmarkList.swift
import SwiftUI

struct LandmarkList: View {
    var body: some View {
        /*List {
            LandmarkRow(landmark: landmarks[0])
            LandmarkRow(landmark: landmarks[1])
        }*/
// Identifiable 추가 전
        List(landmarks, id: \.id) { landmark in
            LandmarkRow(landmark: landmark)
        }
// Identifiable 추가 후
				List(landmarks) { landmark in
            LandmarkRow(landmark: landmark)
        }
    }
}

struct LandmarkList_Previews: PreviewProvider {
    static var previews: some View {
        LandmarkList()
    }
}
SwiftUI의 동적 리스트
시간이 지남에 따라 변할 수 있는 항목들을 포함하고 있는 리스트
list의 요소를 개별적으로 지정하는 대신 컬렉션으로부터 직접 행을 생성가능
- 데이터 컬렉션과 컬렉션의 각 요소에 대한 view를 제공하는 클로저를 전달하여 컬렉션 요소를 표시하는 list생성.
- 이 list는 제공된 클로저를 사용하여 컬렉션의 각 요소를 child view로 변환
identifiable data를 만드는 방법
- 데이터와 함께 각 요소를 고유하게 식별하는 속성의 키 path로 전달
- 데이터 유형을
Identifiable프로토콜에 맞게 설정
Landmark에 Identifiable 프로토콜을 추가
Identifiable 프로토콜
protocol Identifiable {
    associatedtype ID: Hashable
    var id: ID { get }
}
Identifiable 프로토콜의 목적: 이 프로토콜을 채택함으로써 Hashable을 준수하는 id(식별자)를 구현
Hashable을 준수하는 연관 타입(associatedtype) ID가 있고 이 ID를 타입으로 하는 id가 있는 단순한 구조
→ 사용하면 List의 init부분을 다른방식으로 받을 수 있음
@MainActor public init<Data, RowContent>(_ data: Data, selection:
Binding<Set<SelectionValue>>?, @ViewBuilder
rowContent: @escaping (Data.Element) -> RowContent)
where Content == ForEach<Data, Data.Element.ID, RowContent>,
Data : RandomAccessCollection, RowContent : View, Data.Element : Identifiable
id를 표기하지 않고도 사용가능, 랜드마크 elements collection을 직접 사용 가능
Section 6. Set Up Navigation Between List and Detail
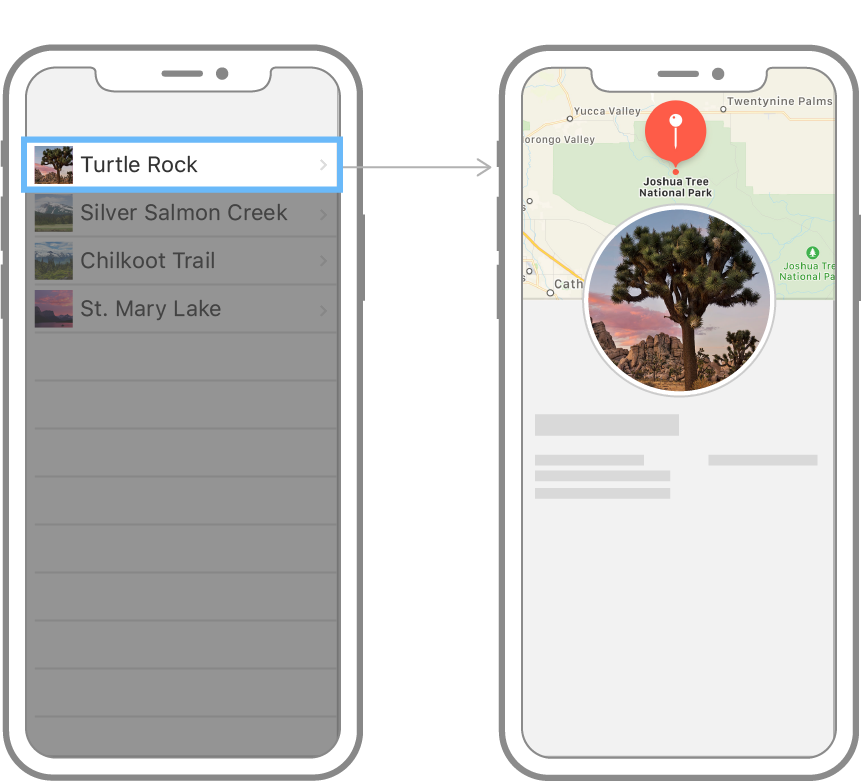
목록이 올바르게 렌더링되지만 개별 랜드마크를 눌러 해당 랜드마크의 세부 정보 페이지를 볼 수는 없습니다.
목록을
NavigationView에 내장한 다음NavigationLink에 각 행을 중첩하여 estination view.로의 전환을 설정하여 navigation 기능을 목록에 추가할 수 있습니다.
LandmarkDetail.swift를 만들고 이전에 제작한 뷰를 옮겨 둔다.
//
//  LandmarkDetail.swift

import SwiftUI

struct LandmarkDetail: View {
    var landmark: Landmark
    var body: some View {
        ScrollView {
            MapView(coordinate: landmark.locationCoordinate)
                       .ignoresSafeArea(edges: .top)
                       .frame(height: 300)

            CircleImage(image: landmark.image)
                       .offset(y: -130)
                       .padding(.bottom, -130)

                   VStack(alignment: .leading) {
                       Text(landmark.name)
                           .font(.title)

                       HStack {
                           Text(landmark.park)
                           Spacer()
                           Text(landmark.state)
                       }
                       .font(.subheadline)
                       .foregroundColor(.secondary)

                       Divider()

                       Text("About \(landmark.name)")
                           .font(.title2)
                       Text(landmark.description)
                   }
                   .padding()
               }
                .navigationTitle(landmark.name)
                .navigationBarTitleDisplayMode(.inline)
    }
}

struct LandmarkDetail_Previews: PreviewProvider {
    static var previews: some View {
        LandmarkDetail(landmark: landmarks[0])
    }
}
LandmarkList 뷰에 네비게이션 영역 추가
//LandmarkList.swift
import SwiftUI

struct LandmarkList: View {
    var body: some View {
        NavigationView {
            List(landmarks) { landmark in
                LandmarkRow(landmark: landmark)
            }
            .navigationTitle("Landmarks")
        }
    }
}

struct LandmarkList_Previews: PreviewProvider {
    static var previews: some View {
        LandmarkList()
    }
}
NavigationView
- 라이브 모드로 전환하여 미리 보기에서 직접 네이비게이션 실행 가능.( 라이브 미리 보기 버튼을 클릭하고 랜드마크를 눌러 세부 정보 페이지를 방문) ⇒ 16.4 부터 사용하지 않는다!!
NavigationStack
NavigationStack | Apple Developer Documentation
NavigationStack {
    List(parks) { park in
        NavigationLink(park.name, value: park)
    }
    .navigationDestination(for: Park.self) { park in
        ParkDetails(park: park)
    }
}- NavigationStack 이용하여 루트뷰에 대한 뷰 스택 표시
- Stack은 항상 제거되지 않은 가장 최근에 추가된 뷰를 표시, 루트 뷰는 제거(pop) 불가
- NavigationPath를 이용해서 미리 쌓일 뷰 정의 가능
@MainActor public struct NavigationStack<Data, Root> : View where Root : View {
@MainActor public init(@ViewBuilder root: () -> Root) where Data == NavigationPath
...
}
Navigation Link
- Stack 뷰 계층 구조 내에
navigationDestination(for: destination: )modifier 추가하여 뷰와 데이터 타입 연결 - 동일한 종류의 데이터 인스턴스를 나타내는 NavigationLink 초기화
- 간단한 text를 띄우기 위해 사용하는
init
public init<S, P>(_ title: S, value: P?) where Label == Text, S : StringProtocol, P : Decodable, P : Encodable, P : Hashable- 커스텀 뷰를 위한
init
public init<P>(value: P?, @**ViewBuilder** label: () -> Label) where P : Decodable, P : Encodable, P : Hashable.navigationDestination 을 이용하면 어떤 커스컴 뷰를 띄울지 정의할 수 있음.
Section 7. Pass Data into Child Views
Landmark Detail 뷰는 여전히 하드 코딩된 세부 정보를 사용하여 랜드마크를 표시합니다. LandmarkRow와 마찬가지로 LandmarkDetailtype 및 이를 구성하는 뷰는 랜드마크 특성을 데이터 소스로 사용해야 합니다.
하위 뷰부터 시작하여 CircleImage, MapView 및 LandmarkDetail을 변환하여 각 행을 하드 코딩하는 대신 전달된 데이터를 표시합니다.
ScrollView {
            MapView(coordinate: landmark.locationCoordinate)
                .ignoresSafeArea(edges: .top)
                .frame(height: 300)

            CircleImage(image: landmark.image)
                .offset(y: -130)
                .padding(.bottom, -130)

            VStack(alignment: .leading) {
                HStack {
                    Text(landmark.name)
                        .font(.title)
                    FavoriteButton(isSet: $modelData.landmarks[landmarkIndex].isFavorite)
                }

                HStack {
                    Text(landmark.park)
                    Spacer()
                    Text(landmark.state)
                }
                .font(.subheadline)
                .foregroundColor(.secondary)

                Divider()

                Text("About \(landmark.name)")
                    .font(.title2)
                Text(landmark.description)
            }
            .padding()
        }
ScrollView
public struct ScrollView<Content> : View where Content : View {

    /// The scroll view's content.
    public var content: Content

    /// The scrollable axes of the scroll view.
    ///
    /// The default value is ``Axis/vertical``.
    public var axes: Axis.Set

    /// A value that indicates whether the scroll view displays the scrollable
    /// component of the content offset, in a way that's suitable for the
    /// platform.
    ///
    /// The default is `true`.
    public var showsIndicators: Bool

    /// Creates a new instance that's scrollable in the direction of the given
    /// axis and can show indicators while scrolling.
    ///
    /// - Parameters:
    ///   - axes: The scroll view's scrollable axis. The default axis is the
    ///     vertical axis.
    ///   - showsIndicators: A Boolean value that indicates whether the scroll
    ///     view displays the scrollable component of the content offset, in a way
    ///     suitable for the platform. The default value for this parameter is
    ///     `true`.
    ///   - content: The view builder that creates the scrollable view.
    public init(_ axes: Axis.Set = .vertical, showsIndicators: Bool = true, @ViewBuilder content: () -> Content)

    /// The content and behavior of the scroll view.
    @MainActor public var body: some View { get }

    /// The type of view representing the body of this view.
    ///
    /// When you create a custom view, Swift infers this type from your
    /// implementation of the required ``View/body-swift.property`` property.
    public typealias Body = some View
}- init에서 스크롤 방향과 indecator 여부도 설정 가능
Section 8. Generate Previews Dynamically
그런 다음 LandmarkListPreviews 미리 보기 공급자에 코드를 추가하여 다양한 장치 크기로 목록 보기의 미리 보기를 렌더링합니다. 기본적으로 미리 보기는 활성 구성표의 장치 크기로 렌더링됩니다. previewDevice(:) method를 호출하여 미리보기 장치를 변경할 수 있습니다.
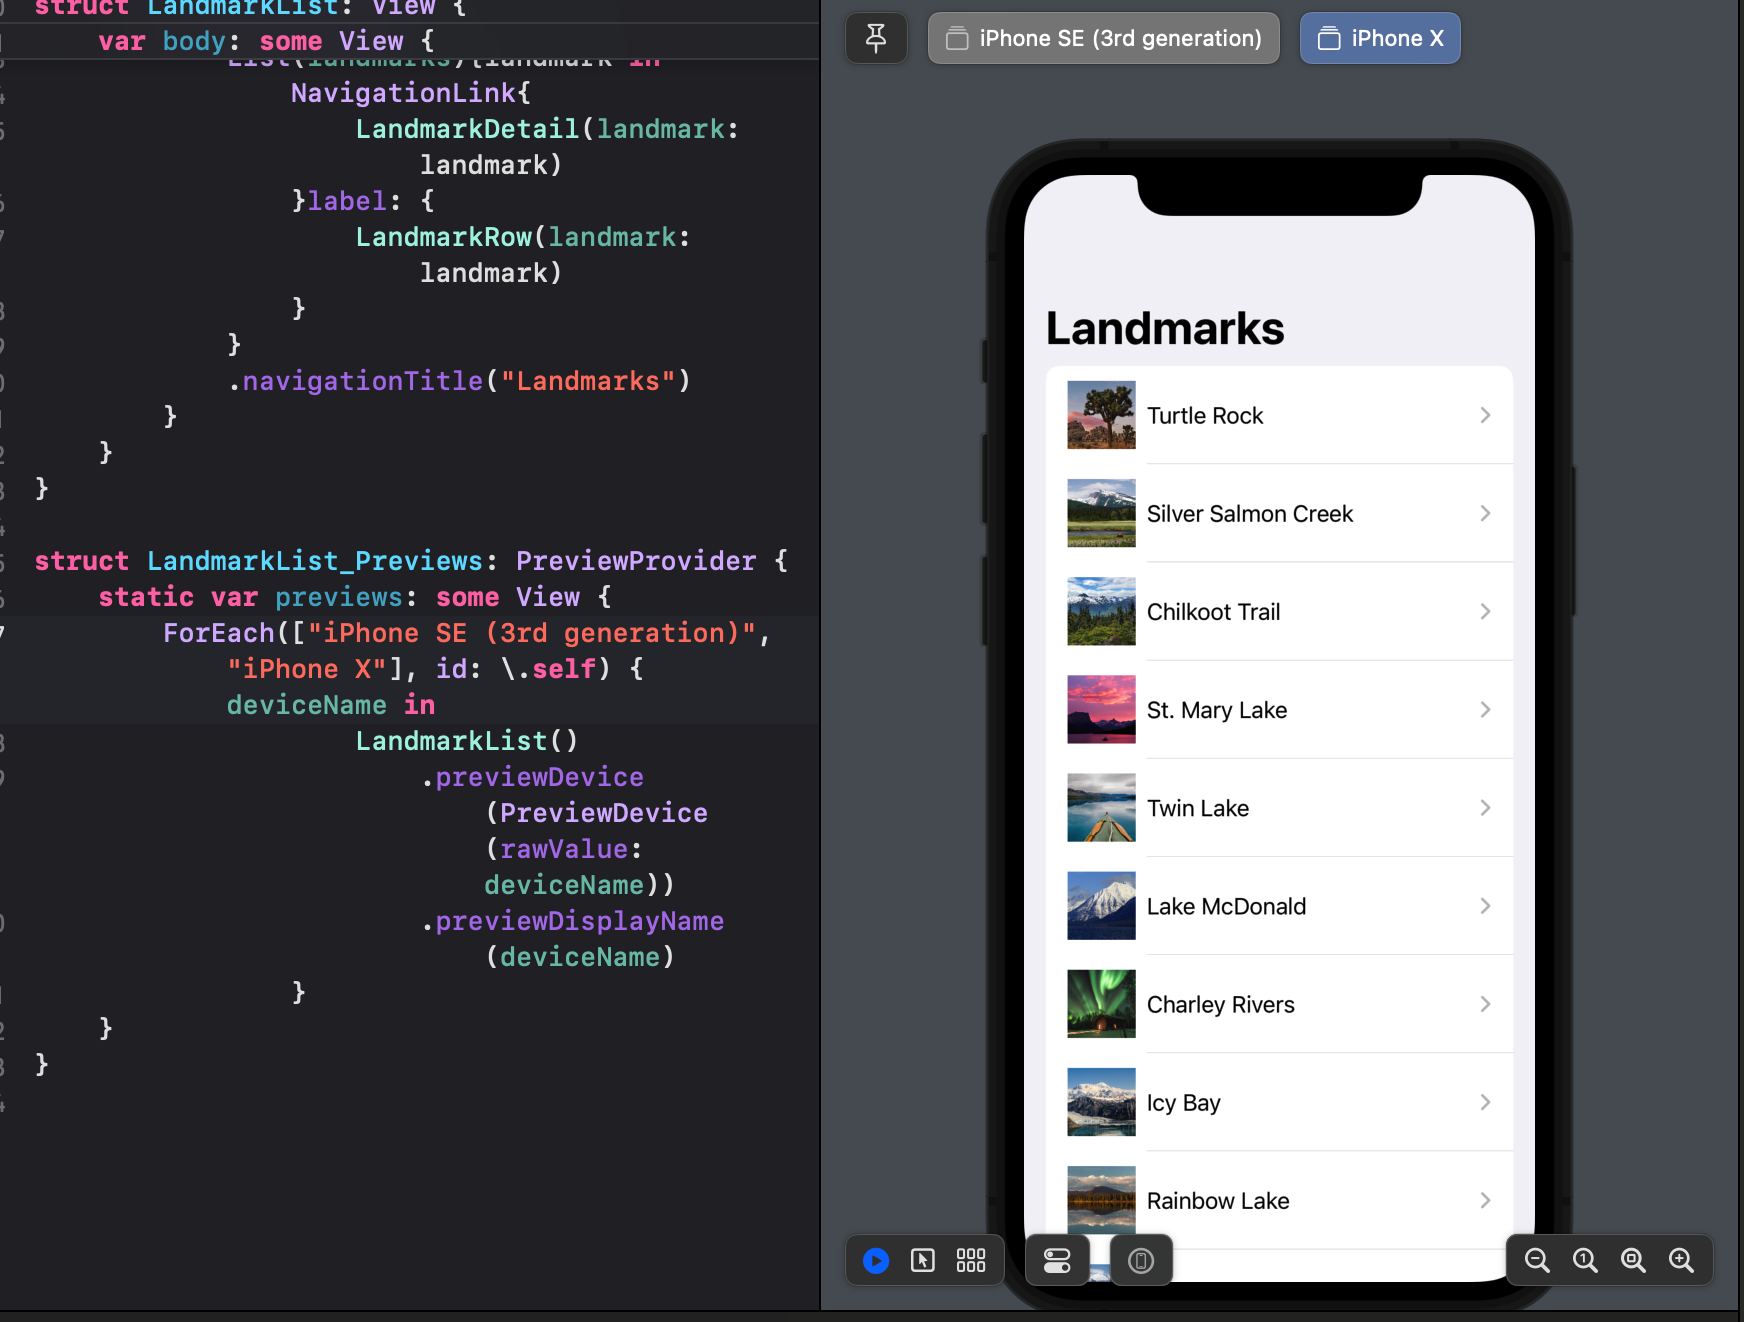
14시리즈가 기본 시뮬레이터인 지금 예제의 코드대로하면 iPhone SE (2nd generation) 과 iPhone XS Max 가 디바이스 목록에 없기 때문에 디바이스를 추가해주거나, 디바이스 목록에 있는 것들로 변경해주면 된다.
//원래 예제 코드
struct LandmarkList_Previews: PreviewProvider {
    static var previews: some View {
        ForEach(["iPhone SE (2nd generation)", "iPhone XS Max"], id: \.self) { deviceName in
            LandmarkList()
                .previewDevice(PreviewDevice(rawValue: deviceName))
        }
    }
}