TIL(12.21)
✅ git pull origin main # git pull 할 때 error
- git commit -am "Add: modified user app" # commit 취소해주기
- git pull origin main # 그리고 다시 풀받고 -> 푸쉬해주기
✅ mongodb
- 집계함수 aggregate를 최소한으로 하면서 최대한 find로 사용하면서 쿼리를 짤 수 있는 방법을 고민해보자. 하단의 쿼리는 값이 똑같지만 쿼리가 길어지거나 복잡해질 때, 충분히 find로 할 수 있는 방법을 고민해보기

✅ print vs return
def print_square(x): # parameter x의 제곱을 출력해주는 함수
	print(x * x)

def get_square(3): # parameter x의 제곱을 리턴(반환)해주는 함수
	return x * x

# 상황1
print_square(3) -> console에 9가 출력
# 상황2
get_square(3) -> return 9 -> get_square(3)이 9로 대체 -> 종료 (아무것도 출력되지않음)
# 상황3
print(get_square(3)) -> return 9 -> get_square(3)이 9로 대체 -> print(9) -> console에 9가 출력 -> 종료
# 상황4
print(print_square(3)) -> print(9) -> console에 9출력 -> return문이 따로 없으니 return값이 없다는 의미에서 none이 return -> print(None) -> console에 None이 출력 -> 함수 종료
✅ Flask 기능구현 새로 알게된 것
# database.py
def check_user_email(self, email):
        cur = self.conn.cursor()
        cur.execute("""
                    select * from user where email = ?
                    """, (email,))
        row = cur.fetchone()
        return row

📌 -> 여기서 return 되는 row가 튜플로 나온다. 이걸 dictionary로 바꾸는 방법은?
📌 -> query 넣을 때 포멧팅 형식 지켜주기:
📌 ('SELECT * FROM my_table WHERE id= ?', (id,))
📌 ('INSERT INTO table_name VALUES (?,?,?)', (menu_items))
📌 -> return값이 있는 애들은 fetch() 함수 써줘서 return 없는 애들은 db에 저장할 수 있게 commit()

def sign_up(self, email, password):
        cur = self.conn.cursor()
        cur.execute(
                """
                INSERT INTO user (email, password)
                VALUES (?,?)
                """, (email, password))
        self.conn.commit()


# auth.py
@bp.route('/signup', methods=['POST'])
def sign_up():
    try:
        input_data = request.get_json()
        email      = input_data['email']
        password   = input_data['password']

        db = Database()
        user = db.check_user_email(email)

        if user != None and email in user:
            return jsonify({'result':'failed', 'msg':'중복된 유저입니다!'})

📌 -> None 인경우도 고려해주기, tuple 형태로 나오는 user 값에서 email 찾기

        if password:
            password = bcrypt.hashpw(password.encode("utf-8"), bcrypt.gensalt()).decode("utf-8")

        db.SignUp(email, password)

        return redirect('/user/signup')

    except KeyError:
        return jsonify({'result':'key_error', 'msg':'오류입니다!'})

@bp.route('/signin', methods=['POST'])
def sign_in():
    try:
        input_data = request.get_json()
        email      = input_data['email']
        password   = input_data['password']

        db = Database()
        login = db.SignIn(email, password)

📌 plain 비밀번호 넣으면 hash된거랑 비교해서 확인해주기 -> flask에서는 werkzeug를 씀 bcrypt 대신 이거 사용해보기
📌 from werkzeug.security import generate_password_hash

        if email in login[1] and password in login[2]:
            return jsonify({"message" : "success",
                        "access_token" : create_access_token(identity = email, expires_delta = False)})
    except:
        return jsonify({"message" : "Invalid_user"})
✅ mongodb indexing 복합 인덱스
- 두 개의 index가 필요하다면 복합 index를 사용
- a와 b필드로 구성된 복합 index를 가지고 있다면 a에 대해 단일 index는 제거해도 됨
- 복합 index에서 키의 순서는 매우 중요
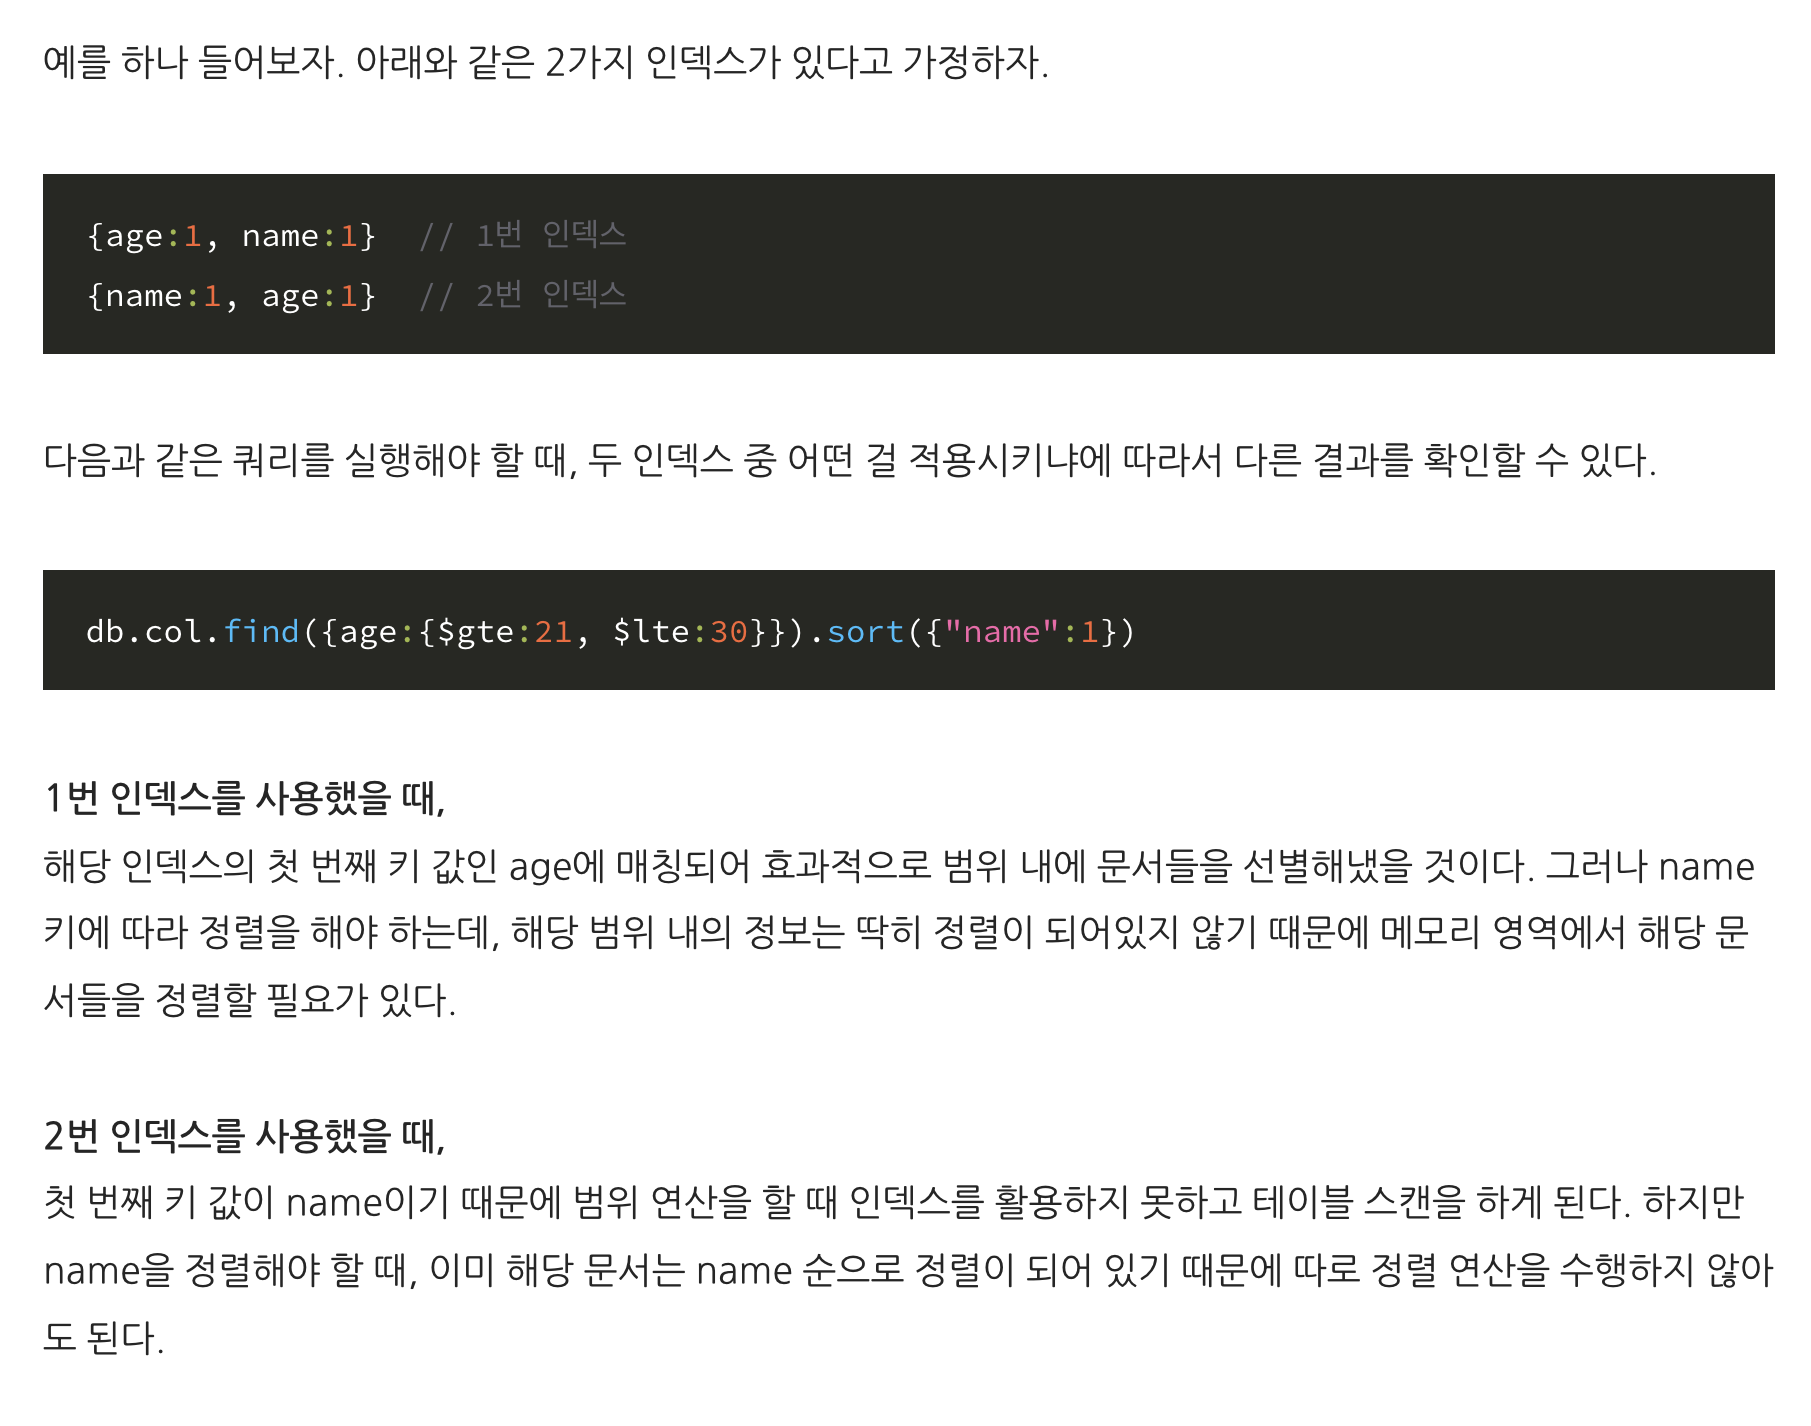
> db.col.find({age:{$gte:21, $lte:30}}).sort({"name":1})
{ "_id" : ObjectId("61c26c1a536111acfb403e1a"), "age" : 21, "name" : 1 }
{ "_id" : ObjectId("61c26ca0536111acfb403e1f"), "age" : 23, "name" : 1 }
{ "_id" : ObjectId("61c26cbf536111acfb403e23"), "age" : 25, "name" : 1 }
{ "_id" : ObjectId("61c26cc6536111acfb403e24"), "age" : 26, "name" : 1 }
{ "_id" : ObjectId("61c26cdb536111acfb403e29"), "age" : 30, "name" : 1 }
{ "_id" : ObjectId("61c26c84536111acfb403e1b"), "age" : 21, "name" : 2 }
{ "_id" : ObjectId("61c26ca9536111acfb403e20"), "age" : 23, "name" : 2 }
{ "_id" : ObjectId("61c26cca536111acfb403e25"), "age" : 26, "name" : 2 }
{ "_id" : ObjectId("61c26c88536111acfb403e1c"), "age" : 21, "name" : 3 }
{ "_id" : ObjectId("61c26cae536111acfb403e21"), "age" : 23, "name" : 3 }
{ "_id" : ObjectId("61c26cd0536111acfb403e26"), "age" : 28, "name" : 3 }
{ "_id" : ObjectId("61c26c8d536111acfb403e1d"), "age" : 22, "name" : 4 }
{ "_id" : ObjectId("61c26cb6536111acfb403e22"), "age" : 24, "name" : 4 }
{ "_id" : ObjectId("61c26cd4536111acfb403e27"), "age" : 28, "name" : 4 }
{ "_id" : ObjectId("61c26c91536111acfb403e1e"), "age" : 22, "name" : 5 }
{ "_id" : ObjectId("61c26cd7536111acfb403e28"), "age" : 28, "name" : 5 }

> db.col.find({age:{$gte:21, $lte:30}}).sort({"name":1}).explain("executionStats")
# mongodb는 2번 인덱스를 사용함
#"winningPlan" : {...
	"indexName" : "name_1_age_1",
    ...}
📌 1번 인덱스 사용) age로 21-30살 걸러주고, name도 오름차순 정리를 한다. 그렇게하고 다시 한 번 name으로 솔팅을 하면 중간에 있는 값들로 정렬이 돼서 age가 재정렬이 된다. 두 번 정렬을 해줘야하는 입장.
📌 2번 인덱스 사용) 2번 인덱스는 name 키가 먼저 나오기 때문에 먼저 정렬을 하고 그 후에 age를 정렬한 후 range에 맞게 21-30살을 걸러준다. 그 후 name으로 솔팅을 할 때는 이미 name으로 정렬이 되어있으니까 그대로 출력해주면 되기 때문에 두 번 정렬해 줄 필요가 없는 것.
- 궁금한게
인덱스 2번 인덱스에서 name 오름차순 정렬 한 후, age 오름차순 정렬이면 21-30살 필터링은 인덱스에서 하지 못하고 정렬만 시켜준 상태로 필터링은 메모리 솔팅이 들어가는 걸까? 블로그에는 범위 연산을 할 때 인덱스를 활용하지 못한다고 하는데 이 부분이 헷갈린다. 2번은 분명 인덱스를 통해 name에서 정렬을 시켜주니까 sort로 들어갈 때 name으로 정렬을 시켜줄 필요가 없는데 age range 범위연산을 어떻게 하는지 궁금하다. 좀 더 compound index를 공부해봐겠당.......😦

개발 기록