xnb.js는 3월 28일 개발이 완료되어서, 현재 1.3.1버전이 웹에 퍼블리싱된 상태입니다. 본 아티클은 개발 도중 메모한 notion을 재구성한 아티클입니다.
개요
웹 xnb 컨버터를 개발하던 중, 우연히 이런 오류를 발견했다.
대량의 텍스트 데이터가 미리보기 컴포넌트에 렌더링되었을 때, 창의 너비를 늘리거나 줄이면 앱이 프리징되는 현상
해당 문제는 웹 xnb 컨버터 1.2 이전에도 있었던 잠재적인 문제였지만, 그 때 다루던 xnb 파일에 저장된 텍스트들은 그렇게 용량이 크지 않았기에, 발견하는 데에 시간이 오래 걸렸다. 스타듀 밸리 1.6 업데이트로 인해 커스텀 자료형 xnb 파일의 데이터를 담은 json 문자열이 5000줄 이상으로 매우 길어지는 경우가 생겼다.
해당 문제는 앱의 사용성과 직결된 프리징 문제였기에, 바로 고치는 작업에 들어갔다.
원인 파악
웹 xnb 컨버터는 반응형 웹을 채택하고 있다. 즉, 웹 페이지의 너비가 일정 크기 이상이면 다른 종류의 레이아웃을 보여줘야 해서, 웹 페이지의 너비를 특정 너비 이하로 줄이거나 특정 너비 이상으로 늘리면 레이아웃 재계산이 발생하게 된다.
문제가 되는 경우는 대용량의 텍스트가 미리보기되는 것으로, 레이아웃 재계산이 발생할 때, 렌더링된 대용량의 텍스트도 같이 레이아웃을 재계산하게 된다.
잠깐 브라우저의 렌더링 과정에 대해 간략하게 알아보자. 브라우저의 렌더링은 html, css 파싱, 렌더 트리 형성, 레이아웃, 페인팅으로 나뉜다. 여기서 일어난 문제는 레이아웃 시간의 급격한 증가인데, 레이아웃을 계산해야 하는 요소의 수가 많을수록 레이아웃 시간이 증가하게 된다. 텍스트 노드의 경우, 띄어쓰기된 각 텍스트의 단어 혹은 (css 속성 중 white-space가 pre인 경우) 줄바꿈을 기준으로 각 부분의 위치를 계산하게 된다. (이 부분은 웹킷 소스코드를 찾아서 분석하려고 했는데 텍스트를 요소로 만드는 코드를 찾을 수 없었습니다... 제보 부탁드립니다)
간단한 실험을 해 봤는데, 매우 긴 문자열(50000자의 한글)을 넣은 뒤 해당 문자열이 속한 태그의 리플로우를 일으켜 보았다.
- 모든 문자가 띄어쓰기가 없을 경우:10ms
- 모든 문자가 띄어쓰기가 있을 경우:2.42s
- 모든 문자가 띄어쓰기가 있는 대신, white-space가 pre인 경우:37ms (대신 rasterize paint에서 500ms 이상 소요)
해결법 고안
레이아웃을 계산해야 하는 텍스트 수가 많다면, 많은 양의 텍스트를 렌더 트리에서 빼 버리면 되지 않을까?라고 생각했다. 렌더 트리에서 엘리먼트를 제거하는 대표적인 방법은 display: none;을 사용하는 것(html 속성의 hidden도 동일한 효과를 낸다.)이다.
첫 번째 고안한 방법은 화면의 크기 변경이 감지되면 일시적으로 미리보기 엘리먼트를 숨기고, 화면 크기 변경이 끝나면 미리보기 엘리먼트를 다시 표시하는 것이었다. 하지만, 그렇게 하면 잦은 화면 변경이 일어나는 모바일 환경에서 사용자 경험을 해치게 되므로, 1안은 포기하였다. (모바일 웹의 특성상, 사용자의 스크롤 행동에 따라 상단 주소표시줄이 나타났다 사라지면서 화면의 크기가 바뀔 수 있다.)
두 번째 방법은 많은 양의 텍스트를 줄 수에 따라 청크로 분리하고, intersection observer api를 사용해 보이는 청크만 렌더링하는 것이다. 화면 너머의 청크는 기본적으로 hidden처리하기로 한다.
첫 번째 시도
class PreviewText extends HTMLElement {
	// data
	#text = "";
	#chunkedText = [];
	// observer
	#observer;

	get text()
	{
		return this.#text;
	}
	set text(value)
	{
		this.#text = value;
		this.#chunkedText = [];
		const sliced = value.split("\n");
		const lines = sliced.length;
		const LINE_CHUNK = 100;
		for(let i=0; i<lines; i+=LINE_CHUNK)
		{
			this.#chunkedText.push(sliced.slice(i, i+LINE_CHUNK).join('\n'));
		}
		this.render();
	}
	constructor()
	{
		super();
		const shadowRoot = this.attachShadow({mode: "open"});
		const style = new CSSStyleSheet();
		style.insertRule("pre { margin:0; }");
		shadowRoot.adoptedStyleSheets = [style];

		this.#observer = new IntersectionObserver((entries, observer)=>{
			for(let entry of entries) {
				entry.target.style.visibility = entry.isIntersecting ? "visible" : "hidden";
			}
		});
	}
	disconnectedCallback()
	{
		this.#observer.disconnect();
	}
	render()
	{
		const children = this.shadowRoot.children;
		const oldLength = children.length;
		const newLength = this.#chunkedText.length;
		const fragment = new DocumentFragment();

		// update existing element
		for(let i=0; i<newLength; i++)
		{
			if(i < oldLength) {
				children[i].textContent = this.#chunkedText[i];
				children[i].style.visibility = "visible";
			}
			else {
				let textNode = document.createElement("pre");
				textNode.textContent = this.#chunkedText[i];
				this.#observer.observe(textNode);
				fragment.append(textNode);
			}
		}
		// remove overflown element
		for(let i=oldLength-1; i>=newLength; i--)
		{
			this.#observer.unobserve(children[i]);
			children[i].remove();
		}
		this.shadowRoot.append(fragment);
	}
}

window.customElements.define("preview-text", PreviewText);

export default PreviewText;
이 코드는 텍스트를 렌더링하는 컴포넌트의 코드로, 바닐라 자바스크립트 + 웹 컴포넌트의 Custom Element, Shadow Dom을 이용해서 제작되었다.
constructor()
{
  super();
  const shadowRoot = this.attachShadow({mode: "open"});
  const style = new CSSStyleSheet();
  style.insertRule("pre { margin:0; }");
  shadowRoot.adoptedStyleSheets = [style];

  this.#observer = new IntersectionObserver((entries, observer)=>{
  for(let entry of entries) {
    entry.target.style.visibility = entry.isIntersecting ? "visible" : "hidden";
  }
});
}
이 커스텀 엘리먼트의 생성자 부분이다. shadow dom을 이용하여 constructor 내부에서도 자식의 dom을 초기화하는 작업을 할 수 있게 했으며, 커스텀 엘리먼트 내의 스타일을 외부 스타일과 분리하였다.
intersection observer api를 이용해, 옵저버를 생성하고, 옵저버가 각 청크의 화면상 보임을 감지하면 청크의 visibility를 전환하도록 하였다.
화면 너머의 청크를 숨기는 것은 display: none; 대신 visibility: hidden;을 사용했었는데, 첫 번째 이유로는 display: none;을 이용하면 intersection observer가 영원히 청크의 가시성을 꺼진 상태로 판별하기 때문이었으며, 두 번째 이유로는 각 청크의 높이 계산을 브라우저에 맡기기 위해서였다. 적용하기 전에 비해 성능 향상은 있었으나, 여전히 50만 자 이상의 텍스트를 렌더링하면 100ms 이상의 시간이 소요된다.
지금 생각해보니, visibility: hidden;은 렌더 트리에서 엘리먼트가 제거되지 않기 때문에 여전히 많은 양의 오브젝트의 바운딩박스를 계산하는 작업이 필요했다. 그럼에도 불구하고 성능 향상이 있었던 것은 대용량의 텍스트를 페인팅하는 작업이 줄어들었기 때문으로 보여진다.
set text(value)
{
  this.#text = value;
  this.#chunkedText = [];
  const sliced = value.split("\n");
  const lines = sliced.length;
  const LINE_CHUNK = 100;
  for(let i=0; i<lines; i+=LINE_CHUNK)
  {
    this.#chunkedText.push(sliced.slice(i, i+LINE_CHUNK).join('\n'));
  }
  this.render();
}
이 커스텀 엘리먼트는 text getter, setter를 가지고 있다. text를 할당하면 원본 텍스트를 \n 기준으로 분리하고, 이 중 100개째의 텍스트를 하나의 청크로 묶어서 chunkedText 프로퍼티에 저장한다. 이후, render 함수를 호출한다.
render()
{
  const children = this.shadowRoot.children;
  const oldLength = children.length;
  const newLength = this.#chunkedText.length;
  const fragment = new DocumentFragment();

  // update existing element
  for(let i=0; i<newLength; i++)
  {
    if(i < oldLength) {
      children[i].textContent = this.#chunkedText[i];
      children[i].style.visibility = "visible";
    }
    else {
      let textNode = document.createElement("pre");
      textNode.textContent = this.#chunkedText[i];
      this.#observer.observe(textNode);
      fragment.append(textNode);
    }
  }
  // remove overflown element
  for(let i=oldLength-1; i>=newLength; i--)
  {
    this.#observer.unobserve(children[i]);
    children[i].remove();
  }
  this.shadowRoot.append(fragment);
}
shadow root의 children을 기준으로, 다음의 작업을 수행한다.
- 이미 존재하던 청크는 내용을 변경한다.
- 새롭게 생긴 청크 수가 원래 청크 수보다 크면, 청크를 생성한 뒤 observer에 해당 청크를 관찰하도록 한다.
- 새롭게 생긴 청크 수가 원래 청크 수보다 작으면, 넘치는 청크의 observer 관찰을 해제시키고, dom에서 제거한다.
이 때 이미 있던 청크의 visibility를 visible로 설정한 이유는 모종의 사유로 인해 새롭게 청크가 생겨날 때 있던 청크가 보여지지 않는 오류가 있기 때문이었으며 (나중에 알았는데, text를 변경할 때 disammountCallback이 호출되어서 모든 청크의 가시성이 해제되기 때문이었다), fragment를 사용하여 dom을 추가한 이유는 불필요하게 실제 dom의 리플로우를 여러 번 일으키는 것을 막기 위해서였다.
첫 번째 시도의 문제점
위에서도 잠깐 언급했었지만, 2가지 문제점이 있었다.
-
화면 너머의 청크를 숨길 때
visiblity: hidden을 사용했기 때문에 일부 대용량의 텍스트를 렌더링할 때 여전히 100ms 이상의 시간이 소요된다는 점.visibility: hidden은 요소를 렌더 트리에서 제거하지 않기 때문에, 여전히 리플로우가 일어나면 보이지 않는 요소도 바운딩박스를 재계산하는 과정을 거쳐야 한다. -
text를 변경할 때 이미 존재하던 텍스트의 옵저버 관찰이 풀려버리는 문제. 임시로 있던 청크에
visibility: visible을 설정해 보이게 해 놓았으나, 그 점으로 인해 intersection observer를 활용한 청크 단위 렌더링의 효과가 줄어든다는 문제가 있었다.
이 문제를 다음과 같이 해결하기로 하였다.
-
이 컴포넌트는 코드를 보여주는 용도이기 때문에,
<pre>태그를 사용해서 텍스트를 렌더링하고 있다. 이 태그는 텍스트의 크기와 텍스트 줄 수에 따라 height가 고정적으로 바뀐다. 따라서, 미리 각 청크의 height값을 계산하여 자리를 차지하도록 전환한 뒤, 실제 텍스트를 렌더링하는 청크의 자식 엘리먼트를 숨기기로 하였다. 이렇게 하면 observer가 관찰하는 엘리먼트 자체는 보여진 상태로 유지되어 각 엘리먼트가 화면에 보이는 여부를 항상 관측할 수 있으며, 실제로 렌더링에 영향을 많이 미치는 보이지 않는 텍스트 엘리먼트를 렌더 트리에서 제거할 수 있다는 이점이 있다. -
connectedCallback에 shadow dom의 모든 자식 엘리먼트를 관찰하게 하는 코드를 추가한다.
두 번째 시도
const LINE_CHUNK = 100;

class PreviewText extends HTMLElement {
	// data
	#text = "";
	#chunkedText = [];
	#lastLines = 0;
	// observer
	#observer;

	get text()
	{
		return this.#text;
	}
	set text(value)
	{
		this.#text = value;
		this.#chunkedText = [];
		const sliced = value.split("\n");
		const lines = sliced.length;
		for(let i=0; i<lines; i+=LINE_CHUNK)
		{
			this.#chunkedText.push(sliced.slice(i, i+LINE_CHUNK).join('\n'));
		}
		this.#lastLines = lines - (this.#chunkedText.length - 1) * LINE_CHUNK;
		this.render();
	}
	constructor()
	{
		super();
		const shadowRoot = this.attachShadow({mode: "open"});
		const style = new CSSStyleSheet();
		style.insertRule(`.wrapper, pre { margin:0; }`);
		style.insertRule(`.wrapper:not(:last-child) { width:100%; height:${LINE_CHUNK*46/3}px; }`);
		style.insertRule(`.wrapper:last-child { width:100%; height:calc(var(--lastLine) * 46px / 3); }`);
		shadowRoot.adoptedStyleSheets = [style];

		this.#observer = new IntersectionObserver((entries, observer)=>{
			for(let entry of entries) {
				const pre = entry.target.firstChild;
				pre.hidden = !entry.isIntersecting;
			}
		});
	}
	connectedCallback()
	{
		for(let child of this.shadowRoot.children) {
			this.#observer.observe(child);
		}
	}
	disconnectedCallback()
	{
		this.#observer.disconnect();
	}
	render()
	{
		const children = this.shadowRoot.children;
		const oldLength = children.length;
		const newLength = this.#chunkedText.length;
		const fragment = new DocumentFragment();
		this.style.setProperty("--lastLine", this.#lastLines);

		// update existing element
		for(let i=0; i<newLength; i++)
		{
			if(i < oldLength) {
				const pre = children[i].firstChild;
				pre.textContent = this.#chunkedText[i];
				//pre.style.visibility = "visible";
			}
			else {
				let wrapperNode = document.createElement("div");
				wrapperNode.className = "wrapper";
				let textNode = document.createElement("pre");
				textNode.textContent = this.#chunkedText[i];
				wrapperNode.append(textNode);
				this.#observer.observe(wrapperNode);
				fragment.append(wrapperNode);
			}
		}
		// remove overflown element
		for(let i=oldLength-1; i>=newLength; i--)
		{
			this.#observer.unobserve(children[i]);
			children[i].remove();
		}
		this.shadowRoot.append(fragment);
	}
}

window.customElements.define("preview-text", PreviewText);

export default PreviewText;
여러분이 알아보기 쉽게, react 코드로 전환하면 다음과 비슷하다. (실제로 작동하는 코드가 아닐 수 있으니 참고만 하시라.)
import { useRef, useEffect } from "react";
import styled from "styled-component";

const LINE_CHUNK = 100;

const Wrapper = styled.div`
margin: 0;
&:not(:last-child) {
  width: 100%;
  height: {LINE_CHUNK * 46/3}px;
}
&:last-child {
  width: 100%;
  height: calc(var(--lastLine) * 46px / 3);
}
`;

const Pre = styled.pre`
margin: 0;
`

export function PreviewText({text})
{
  const ref = useRef(null);
  const observer = useRef( new IntersectionObserver( (entries, observer)=>{
    for(let entry of entries) {
      const pre = entry.target.firstChild;
      pre.hidden = !entry.isIntersecting;
    }
  } ) );

  useEffect( ()=>{
    for(let child of ref.children) {
      observer.current?.observe(child);
    }

    return ()=>{
      observer.current?.disconnect();
    }
  }, [text] );


  return <div style={ {"--lastLine": lastLine} } ref={ref}>
    {chunkedText.map( (content, i)=>{
      return <Wrapper className="wrapper">
        <Pre>{content}</Pre>
      </Wrapper>
    })}
  </div>
}
chunkedText를 element로 렌더링하는 부분에서, <pre> 태그를 <div> 태그로 감쌌다.
style.insertRule(`.wrapper, pre { margin:0; }`);
style.insertRule(`.wrapper:not(:last-child) { width:100%; height:${LINE_CHUNK*46/3}px; }`);
style.insertRule(`.wrapper:last-child { width:100%; height:calc(var(--lastLine) * 46px / 3); }`);
shadowRoot.adoptedStyleSheets = [style];

this.#observer = new IntersectionObserver((entries, observer)=>{
	for(let entry of entries) {
		const pre = entry.target.firstChild;
		pre.hidden = !entry.isIntersecting;
	}
});
먼저 constructor는 다음과 같이 바뀌었다. pre 엘리먼트는 렌더링되는 문자열의 줄 수와 폰트에 따라 높이가 결정되므로, 래퍼 엘리먼트의 마지막이 아닌 엘리먼트의 높이는 100 * 46/3 px으로 고정된다.
this.#lastLines = lines - (this.#chunkedText.length - 1) * LINE_CHUNK;마지막 엘리먼트일 경우, lastLine css 변수를 따라 계산되는데, 이것은 text를 청크로 나누는 과정에서 계산되고 할당된다.
observer의 경우, 각 엔트리의 첫 번째 자식의 hidden 여부를 결정하도록 변경했다.
connectedCallback()
{
  for(let child of this.shadowRoot.children) {
    this.#observer.observe(child);
  }
}
해당 커스텀 엘리먼트가 dom에 추가될 때, shadow root의 모든 자식에 대해 관찰을 시도하는 콜백을 추가했다.
let wrapperNode = document.createElement("div");
wrapperNode.className = "wrapper";
let textNode = document.createElement("pre");
textNode.textContent = this.#chunkedText[i];
wrapperNode.append(textNode);
this.#observer.observe(wrapperNode);
fragment.append(wrapperNode);
바뀐 dom 설계에 따라 새로운 엘리먼트를 추가하는 코드다.
<div class="wrapper">
 <pre>(chunkedText[i])</pre>
</div>
를 정의하고 프래그먼트에 추가하는 코드라고 보면 된다.
결과
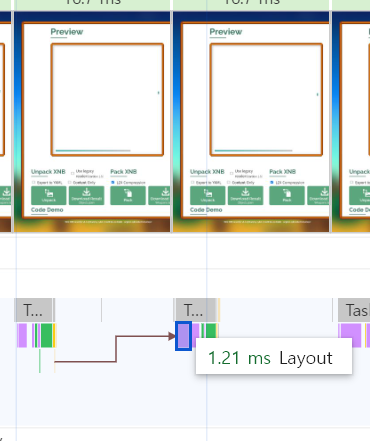
50만 자의 텍스트 렌더링 기준으로, 이전에는 2s 이상 걸리거나 아예 프리징이 되었던 텍스트 미리보기 컴포넌트의 레이아웃 계산 속도가 1~2ms로 2000배 이상 단축된 모습을 볼 수 있었다.