플러터에서는 지정된 공간보다 더 큰 ui 가 자식으로 들어갔을 때
디버깅 화면에 경고를 띄운다
Row, Column
해당 위젯은 css의 flex와 비슷한 것 같다
axis alignment에 space between 같은 값을 줄 수 있다
Row(
	mainAxisAlignment: MainAxisAlignment.spaceBetween,
)
Reusable Widgets
위젯을 분리하여 재사용할 수 있는 컴포넌트로 만들 수 있다
command + . 에서 Extract Widget 선택 후
이름만 지정하면 자동으로 해당 파일 내에서 분리를 해준다
하지만 초보자는 역시나 직접 작성해보는 편이..
파일 분리 시 소문자로 파일명 작성
Stateless 라고 적으면 자동완성이 뜨고
바로 위젯을 생성할 수 있다
모든 위젯은 각각 가지고 있는 build 메소드를 실행해줘야 한다
메소드 내부에서 다른 위젯들을 return 하는 것이
약간 리액트 같은 느낌
return 마지막에 세미콜론을 찍어줘야 한다
import 'package:flutter/material.dart';
class Button extends StatelessWidget {
Widget build(BuildContext context) {
// TODO: implement build
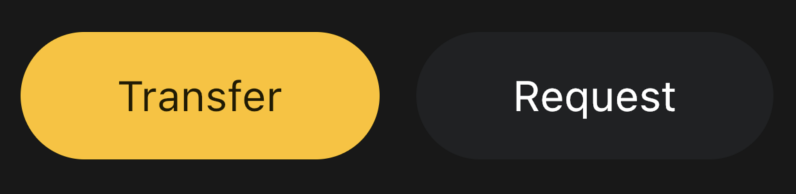
return Container(
decoration: BoxDecoration(
color: Colors.amber,
borderRadius: BorderRadius.circular(45),
),
child: const Padding(
padding: EdgeInsets.symmetric(
vertical: 20,
horizontal: 50,
),
child: Text(
'Transfer',
style: TextStyle(
fontSize: 22,
),
),
),
);
throw UnimplementedError();
}
}이건 다트의 클래스와 같다
프로퍼티를 설정하여 동적인 값을 받을 수 있도록 할 수 있다
이 때 color 는 Color 타입을 가진다
jsx 에서 css 에 값을 전달할 때는 string 타입이었으니
조심할 필요가 있다
생성한 프로퍼티에 값을 받기 위해서는
생성자 함수를 만들어줘야 한다
플러터의 생성자 함수는 항상 자신의 클래스 이름과 같다
// Button 클래스 내부에 작성

  final String text;
  final Color textColor;
  final Color backgroundColor;

  const Button({
  	super.key,
    required this.text,
    required this.textColor,
    required this.backgroundColor,
  });
생성자 함수 생성도 code actions 로 할 수 있다
위젯을 const 로 선언할 수 있는 경우는
내부의 값이 모두 상수일 경우에만 가능하다
변수가 들어갈 경우 const로 선언할 수 없다
만든 사용자 위젯을 사용할 때에는
main 으로 가서 Button 만 입력하면 모든게 자동완성 되어 나온다
생성자에서 받아야할 프로퍼티 까지..
코드 보고 생산성 좋은 것 맞나 싶었는데
너무 잘돼있다
const Button(text: 'Transfer',
	textColor: Colors.black,
    backgroundColor: Colors.amber
),
만든 버튼을 사용할 때는 const 를 사용한다
전해주는 값은 정해져 있기 때문이다
내부의 값이 모두 const 라면 가장 상위에서 한 번만
const 키워드를 사용한다
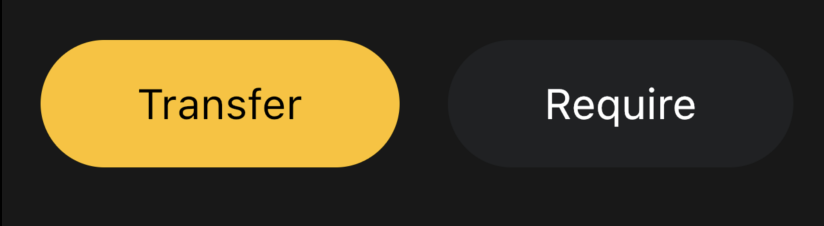
 Row(
 mainAxisAlignment: MainAxisAlignment.spaceBetween,
 children: const [
 	Button(
    	text: 'Transfer',
        textColor: Colors.black,
        backgroundColor: Colors.amber,
    ),
    Button(
    	text: 'Require',
        textColor: Colors.white,
        backgroundColor: Color(0xFF1F2123),
    ),
  ],
)