
-기본-
title.innerText="~~~" -> JS에 의해 제목이 변경된다
console.log() -> 콘솔에 괄호 내에 무언가가 출력된다
document.getElementByClassName() -> element를 가져오는 방법
ㅣ
이 둘의 차이점은 querySelector는 대상이 id인지 명확히 해주어야하고
getElementById는 이미 id를 찾고있는걸 알기 때매 명확히 안해줘도 된다!
ㅣ
document.querySelector() -> css를 이용해서 element를 가져옴
ㄴ example) document.querySelector(".hello h1"); -> hello라는 class 내부에 있는 h1을 가져오는 것
element를 다 가져오는 querySelectorAll도 있다
alert("~~"); -> 위에서 페이지 내용이 내려오게 하기
-event-
function handleTitleClick()
{ //click하면 title색 바뀌고 콘솔에 출력시키는 함수
	title.style.color="blue";
   console.log("title was clicked");
}

//함수 실행
title.addEventListner("click",handleTitleClick); addEventListner("~~",~~);-> 이벤트 실행
mouseenter -> 마우스가 올라가기만 해도 event 실행된다.
function handleMouseEnter()
{
    console.log("mouse is here!");
}

title.addEventListener("mouseenter",handleMouseEnter);
mouseleave -> 마우스가 없어지면 event 실행
function handleMouseLeave()
{
    title.innerText="Mouse is gone!";
}

title.addEventListener("mouseleave",handleMouseLeave);
-resize-
resize -> 화면의 너비와 높이가 달라지면 event 실행된다
function handleWindowResize() //resize 함수
{
    document.body.style.backgroundColor="tomato"; //색 바꾸기
}

window.addEventListener("resize",handleWindowResize); //함수 실행
-Copy-
copy -> Crtl C를 누르면 event 실행
function handleWindowCopy() //copy 함수
{
    alert("copier!"); //alert로 나타내기
}

window.addEventListener("copy",handleWindowCopy); //함수 실행
-offline & online-
offline&online -> wifi가 꺼짐 or 켜짐 = event 실행
function handleWindowOffline() //offline 함수
{
    alert("SOS no WIFI"); //alert로 나타내기
}

function handleWindowOnline() //online 함수
{
   alert("All Good"); //alert로 나타내기


window.addEventListener("offline",handleWindowOffline); //함수 실행
window.addEventListener("online",handleWindowOnline); //함수 실행
}
-js 속 css-
style code
const h1 = document.querySelector("div.hello:first-child h1"); //h1 가져오기

function handleTitleClick() //titleClick event 함수
{
    if(h1.style.color==="blue") //css의 style코드 사용됨
    {
        h1.style.color="tomato";
    }
    else
    {
        h1.style.color = "blue";
    }
}

h1.addEventListener("click",handleTitleClick); //함수 실행
className
const h1 = document.querySelector("div.hello:first-child h1"); //h1 가져오기

function handleTitleClick() //titleClick event 함수
{
    const clickedClass="clicked"; //변수 지정
    if(h1.className===clickedClass)
    {
        h1.className="";
    }
    else{
        h1.className=clickedClass;
    }
}

h1.addEventListener("click",handleTitleClick);
a==b -> (Equal Operator) a와 b의 값이 같은지 비교
a===b -> (Strict Equal Operator) a와 b의 값 & data type이 같은지까지 비교
classList -> class name을 바꾸는 다른 방법 (className = 이전의 class는 생각 안하고 다 교체해버린다)
const h1 = document.querySelector("div.hello:first-child h1");

function handleTitleClick()
{
    const clickedClass="clicked";
    if(h1.classList.contains(clickedClass)) //clickedClass가 있다면
    {
        h1.classList.remove(clickedClass); //clickedClass 삭제
    }
    else{ //clickedClass가 없다면
        h1.classList.add(clickedClass); //clickedClass 추가
    }
}
//toggle will check classname exists
h1.addEventListener("click",handleTitleClick);
toggle -> className이 존재하는지 체크해준다
(없으면 넣고, 있으면 빼줌)
const h1 = document.querySelector("div.hello:first-child h1");

function handleTitleClick()
{
    h1.classList.toggle("clicked");
}
//toggle will check classname exists
h1.addEventListener("click",handleTitleClick);
-input values-
const loginInput=document.querySelector("#login-form input");
const loginButton=document.querySelector("#login-form button");

function onLoginBtnClick() //로그인 버튼 클릭
{
    console.dir(loginInput.value); //로그인 input 값들 콘솔에 다 불러오기
}

loginButton.addEventListener("click",onLoginBtnClick) //함수 실행
로그인 예제
const loginInput=document.querySelector("#login-form input");
const loginButton=document.querySelector("#login-form button");

function onLoginBtnClick()
{
    const username = loginInput.value;
    if(username==="")
    {
        alert("Please write your name");
    }
    else if(username.length>15)
    {
        alert("Your name is too long.");
    }
}

loginButton.addEventListener("click",onLoginBtnClick)
preventDefault() -> browser의 기본 동작을 막아준다!
const loginInput=document.querySelector("#login-form input");
const loginForm = document.querySelector("#login-form");

function onLoginSubmit(event)
{
    event.preventDefault(); //browser의 기본 동작을 막아줌
    console.log(loginInput.value);
}

loginForm.addEventListener("submit",onLoginSubmit);
//we don't do () browser press function automatically
ㄴ 예시
로그인 버튼 누르면 alert 뜨고 링크 페이지로 이동 !
function handleLinkClick()
{
    alert("clicked!");
}
link.addEventListener("click",handleLinkClick); //앞에 link.이 붙었당
그런데 event.preventDefault();는 기본동작을 막아주는 함수여 넣으면 링크페이지로 넘어가지 않는다 !
function handleLinkClick(event)
{
    event.preventDefault();
    console.dir(event);
}
-local storage 저장-
localStorage.setItem("username") //local storage에 저장
localStorage.removeItem("username") //local storage 삭제
localStorage.getItem("username") //local storage에 저장한 값 불러내기
코드를 봐두면 좋을 것 같아서..첨부 !
const loginInput=document.querySelector("#login-form input");
const loginForm = document.querySelector("#login-form");
const greeting = document.querySelector("#greeting");

const HIDDEN_CLASSNAME="hidden";
const USERNAME_KEY="username";

function onLoginSubmit(event)
{
    event.preventDefault(); //browser의 기본 동작을 막아줌
    loginForm.classList.add(HIDDEN_CLASSNAME); //form 을 다신 숨겨준다
    const username=loginInput.value; //loginInput.value을 username이라는 변수로 저장
    localStorage.setItem(USERNAME_KEY,username);//username 값을 username이라는 key와 함께 local storage에 저장
    paintGreetings(username); //paintGreetings 함수 호출
}
function paintGreetings(username)
{
    greeting.innerText="Hello "+username;//비어있는 h1 요소 안에 "Hello "+username라는 text추가
    greeting.classList.remove(HIDDEN_CLASSNAME);//h1요소로부터 hidden이란느 클래스 제거
}
const savedUsername=localStorage.getItem(USERNAME_KEY);
//유저 정보가 local storage에 없다면 null을 반환하자
if(savedUsername===null){
    //savedUsername 값이 null 이라면 form의 hidden class를 지워서 form이 화면에 표시되게 해줌
    loginForm.classList.remove(HIDDEN_CLASSNAME);
    loginForm.addEventListener("submit",onLoginSubmit);
}
else{
    paintGreetings(savedUsername); //화면에 출력
}
-clock interval-
setInterval -> 함수를 실행해주고 ms 단위로 함수의 간격을 호출해준다
ex) setInterval(함수이름, 3000)-> 3초 마다 함수를 실행시킴
const clock=document.querySelector("h2#clock");

function sayHello() //실행시킬 함수
{
    console.log("hello");
}

setInterval(sayHello,5000); //sayHello를 5초마다 실행
setTimeout(sayHello,5000) = setInterval
예시 코드)
new Date() -> 이 생성자 함수는 날짜와 시간을 가지는 인스턴스를 생성함.
1) new Date()
ㄴ 인수를 전달하지 않으면 현재 날짜와 시간을 가지는 인스턴스를 반환
2) newDate(milliseconds) -> 밀리초만큼 경과한 날짜와 시간을 가지는 인스턴스를 반환
3) new Date(dateString) -> 날짜와 시간을 나타내는 문자열을 전달하면 지정된 날짜와 시간을 가지는 인스턴스 반환
ex) let date = new Date('May 16, 2019 17:22:10');
4) new Date(year,month,day,hour,minute,second,millisecond) -> 다 반환한다. 년과 월은 무조건 지정해야함
Date 객체소개 -> 관련 링크
const clock=document.querySelector("h2#clock");

function getClock() //실행함수
{
    const date=new Date(); //
    clock.innerText = (`${date.getHours()}:${date.getMinutes()}:${date.getSeconds()}`);
}

getClock();
setInterval(getClock,1000); //매 초마다 getclock 실행
-PadStart-
padStart -> 길이가 n이어야하는 string이라고 말해주고 아니면 문자로 채워서 원하는 길이로 만들어 달라는 것
"hello".padStart(20,"x")ㄴ이렇게 하면
'xxxxxxxxxxxxxxxhello 이렇게 출력 되는 것 !
-Math-
Math.random() - 0부터 1사이에 아무 숫자나 랜덤하게 출력해줌
Math.round() - 1.1~1.5 까지는 1로 1.6~1.9 까지는 2로 출력 (반올림)
Math.ceil() - 숫자를 천장까지 높여주는 것 (올림함수)
Math.floor() - 숫자를 바닥까지 내려주는 것 (내림함수)
예시)
const todaysQuote = quotes[Math.floor(Math.random()*quotes.length)]
//랜덤 수를 배열의 길이 만큼 곱하고 그걸 내림함수로 내린 수 = 배열의 몇번째꺼
-Image-
const images=["0.jpeg","1.jpeg","2.jpeg"]; //이미지 파일들

const chosenImage=images[Math.floor(Math.random()*images.length)];

//js에서 html로 갖다주기
const bgImage=document.createElement("img");

bgImage.src=`img/${chosenImage}`;

document.body.appendChild(bgImage); //appendChild - 선택한 요소 안에 자식 요소를 추가하는 함수
-ToDo-
const toDoForm = document.getElementById("todo-form");
const toDoInput = toDoForm.querySelector("#todo-form input");
const toDoLlist= document.getElementById("todo-list");

function paintToDo(newTodo)
{
    const li = document.createElement("li"); //create li
    const span = document.createElement("span"); //create span
    li.appendChild(span); //li는 span이라는 자식을 가짐 (put span into li)
    span.innerText = newTodo; //put some text(=newTodo) inside the span
    toDoLlist.appendChild(li);
}

function handleToDoSubmit(event)
{
    event.preventDefault();
    const newTodo = toDoInput.value; //input의 현재 value를 새로운 변수에 복사
    toDoInput.value=""; //입력 칸 비우기
    paintToDo(newTodo);
}

toDoForm.addEventListener("submit",handleToDoSubmit);
ㄴ toDoForm,toDoInput,toDoLlist 를 만든다 !
그 다음에 paintToDo 함수를 보면
li와span을 만든다 ->li안에span을 자식으로 설정해주고span안에 텍스트를 넣어준다 ->todolist안에span을 자식으로 가진li를 자식으로 설정
handleToDoSubmit함수를 봐보자 ! (todo값 저장해주는거)
- 기본설정을 없애주는
preventDefault를 넣어줌newTodo변수안에 현재 넣은value를 복사시킴 -> 새 value를 또 써야하니까 입력 칸을 비워주고todoList가 보여야하니까paintToDo함수 소환 -> 그 다음에 함수를 실행시킨다
삭제 시키는법
삭제 함수
function deleteToDo(event)
{
    console.dir(event.target.parentElement.innerText);
}
삭제버튼을 누르는 이벤트를 타게팅하고 그걸 innerText로 출력해주면 된다
function deleteToDo(event)
{
    const li = event.target.parentElement;
    li.remove();
}
이렇게 삭제 시킬 수도 있다
저장하는 법
일단 local storage에 저장해야함
function saveToDos()
{
    localStorage.setItem("todos",JSON.stringify(toDos)); //local storage에 toDos 집어넣기
}
여기서 JSON.stringify() -> 어느것이던 string으로 바꿔줌 여기서는 toDos를 string으로 바꿔주는것 !
-API-
난 날씨 api를 써볼것임
https://api.openweathermap.org/data/2.5/weather?lat=37.5985&lon=126.9783&appid=7225b239251c7729012dd9d355bcc2c0이렇게 lat과 lon에 위도 경도를 넣어주고 위에 api사이트의 내 api key값을 복붙하면
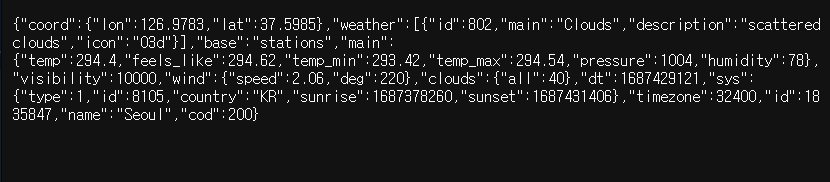
요렇게 나온당
아래에 보면 내가 지금 있는 나라와 도시도 나옴
https://api.openweathermap.org/data/2.5/weather?lat=37.2889142&lon=127.0292881&appid=7225b239251c7729012dd9d355bcc2c0&units=metric이렇게 뒤에 &units=metric를 붙이면 원래는 화씨온도로 api가 주지만 섭씨로 바꿔준다
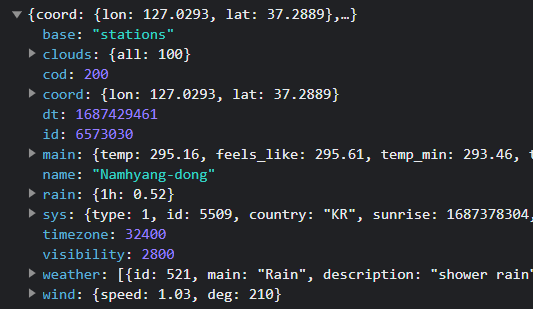
(얘네들이 json이다)
-last code-
const API_KEY = "7225b239251c7729012dd9d355bcc2c0"; //내 api key값

function onGeoOk(position)
{
    const lat = position.coords.latitude; //내 현재 위도를 받아옴
    const lon = position.coords.longitude; //내 현재 경도를 받아옴
    const url = `https://api.openweathermap.org/data/2.5/weather?lat=${lat}&lon=${lon}&appid=${API_KEY}&units=metric`;
    fetch(url).then(response => response.json()).then(data =>{
        const weather = document.querySelector("#weather span:first-child") //span에서 날씨를 줄거임
        const city = document.querySelector("#weather span:last-child") //span에서 날씨를 줄거임
        city.innerText = data.name;
        weather.innerText = `${data.weather[0].main}/${data.main.temp}`; //weather은 배열이라 이렇게 해줘야한다
    }); //js가 url을 부르는거
}

function onGeoError()
{
    alert("Can't find you. No weather for you.")
}

navigator.geolocation.getCurrentPosition(onGeoOk,onGeoError);
// argument는 1번 잘 됐을 때 실행될 함수, 2번 오류날 때 실행될 함수
-그냥 끄적끄적-
onChange -> 변화 감지 event
onkeydown -> key를 누르면 event
forEach() -> 배열의 요소마다 괄호안에 함수를 실행함
ex) parsedToDos.forEach(paintToDo); -> forEach함수가 paintToDo 함수를 parsedToDos 배열의 요소마다 실행시킴.
filter() -> 위와 비슷하게 배열의 요소들에게 모두 filter함수 내에 있는 함수를 적용시키는것
ex) [1,2,3,4].filter(sexyFilter) -> sexyFilter(1), sexyFilter(2), ... 이렇게 나온다