접근 제어자(access modifier)
멤버 변수/한수 혹은 클래스에 사용되며 외부에서의 접근을 제한하는 역할
- 접근 제어자의 종류
- private : 같은 클래스 내에서만 접근이 가능,
외부 클래스에서 사용할 수 없다. - default(nothing) : 같은 패키지 내에서만 접근이 가능하다. 아무것도 선언하지 않은 경우
- protected : 같은 패키지 내에서, 그리고 다른 패키지의 자손 클래스에서 접근이 가능하다.
- public : 접근 제한이 없다.
예시 - 1
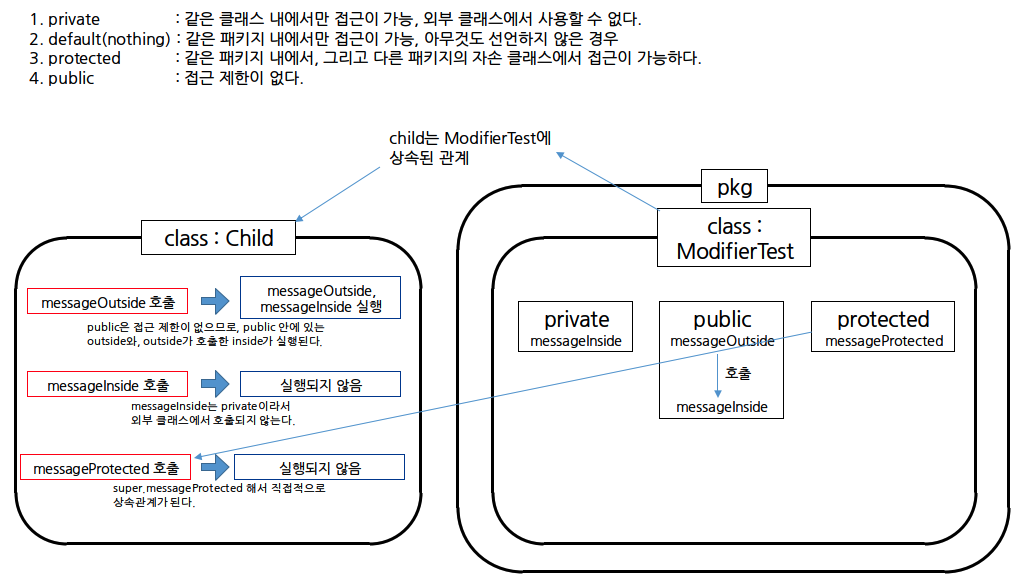
package pkg;	// pkg란 이름의 패키지

public class ModifierTest {

    private void messageInside(){
        System.out.println("This is private modifier");
    }

    public void messageOutside(){
        System.out.println("This is public modifier");
        messageInside();
    }

    protected void  messageProtected(){
        System.out.println("This is protected modifier");
    }
}
import pkg.ModifierTest;

class Child extends ModifierTest{
    void callParentProtected(){			// 앞에 아무것도 선언하지 않았기 때문에 default = private 이다.
        System.out.println("call my parent's protected method");
    	super.messageProtected();                  // super : 내가 상속받은 부모 클래스를 가리키는 키워드
    }
}

public class Main {
    public static void main(String[] args) {
        ModifierTest modifierTest = new ModifierTest();
        modifierTest.messageOutside();
        // modifierTest.messageInside();           // 실행되지 않음
        // modifierTest.messageProtected();        // 실행되지 않음
    }
}
추상클래스
추상메소드를 선언할 수 있는 클래스
상속받는 자식 클래스 없이 인스턴스를 생성할 수 없다.
추상메소드 : 설계만 되어있고, 구현체가 없는 것(자식클래스에서 구현)
예를들어,
int add(int x, int y){
	return x + y;
}
여기서 중괄호 부분을 구현체 라고 한다.
예제
abstract class Bird{
    private int x,y,z;

    void fly(int x, int y, int z){
        printLocation();
        System.out.println("이동합니다.");
        this.x = x;
        this.y = y;
        if(flyable(z)){
            this.z = z;
        }else{
            System.out.println("그 높이로는 날 수 없습니다.");
        }
        printLocation();
    }

    abstract boolean flyable(int z);        // 추상메서드

    public void printLocation(){
        System.out.println("현재위치 {" + x + "," + y + "," + z + "}");
    }
}

class Pigeon extends Bird {
    @Override
    boolean flyable(int z) {
        return z < 10000;
    }
}

class Peacock extends Bird{
    @Override
    boolean flyable(int z) {
        return false;
    }
}

public class Main {
    public static void main(String[] args) {
        Bird pigeon = new Pigeon();
        Bird peacock = new Peacock();
        System.out.println("--- 비둘기--- ");
        pigeon.fly(1,1,3);
        System.out.println("--- 공장새 ---");
        peacock.fly(1,1,3);
        System.out.println("--- 비둘기 ---");
        pigeon.fly(3,3,30000);
    }
}
:
--- 비둘기---
현재위치 {0,0,0}
이동합니다.
현재위치 {1,1,3}
--- 공장새 ---
현재위치 {0,0,0}
이동합니다.
그 높이로는 날 수 없습니다.
현재위치 {1,1,0}
--- 비둘기 ---
현재위치 {1,1,3}
이동합니다.
그 높이로는 날 수 없습니다.
현재위치 {3,3,3}
인터페이스
인터페이스는 객체의 특정 행동의 특징을 정의하는 간단한 문법입니다. 인터페이스는 함수의 특징(method signature)인 접근제어자, 리턴타입, 메소드 이름만을 정의합니다. 함수의 내용은 없습니다. 인터페이스를 구현하는 클래스는 인터페이스에 존재하는 함수의 내용({} 중괄호 안의 내용)을 반드시 구현해야합니다.
interface MyInterFace{	// 인터페이스명
    void myMethod();	// 추상메서드명
}
매개변수(parameter)를 받고싶다면
interface MyInterFace{
    void myMethod(int x);
}
: body 없이 정의하면 된다.
예제
interface Flyable{
    void fly(int x, int y, int z);
}

class Pigeon implements Flyable{
    private int x,y,z;
    @Override
    public void fly(int x, int y, int z) {
        printLocation();
        System.out.println("날아갑니다.");
        this.x = x;
        this.y = y;
        this.z = z;
        printLocation();
    }

    public void printLocation(){
        System.out.println("현재위치 {" + x + "," + y + "," + z + "}");
    }
}

public class Main {
    public static void main(String[] args) {
        Flyable pigeon = new Pigeon();
        pigeon.fly(1,2,3);
    }
}
:
현재위치 {0,0,0}
날아갑니다.
현재위치 {1,2,3}
인터페이스 & 추상클래스 정리
- 인터페이스
- 구현하려는 객체의 동작의 명세
- 다중 상속 가능
- implements를 이용하여 구현
- 메소드 시그니처(이름, 파라미터, 리턴 타입)에 대한 선언만 가능
- 추상클래스
- 클래스를 상속받아 이용 및 확장을 위함
- 다중 상속 불가능 , 단일 상속
- extends를 이용하여 구현
- 추상메소드에 대한 구현 가능
예외 처리
- 코드를 완벽하게 짰다고 해서 항상 프로그램이 성공적으로 도는 것은 아닙니다. 다양한 예외 상황이 발생할 수 있는데요. 이것에 대응하기 위해서 예외 처리 코드가 필요합니다.
- 예외처리의 목적
- 예외의 발생으로 인한 실행 중인 프로그램의 비정상 종료를 막기 위해서
- 개발자에게 알려서 코드를 보완할 수 있도록 하게 위해서
자바는 상속을 통해 모든 예외 클래스를 정의할 수 있다.

Error
대부분 프로그램이 종료되어야 하는 심각한 문제
대부분 컴퓨터나 JVM이 시스템적으로 동작할 수 없는 상황
try-catch(-finally) 형식
try {
    // 예외가 발생할 가능성이 있는 코드를 구현합니다.
} catch (FileNotFoundException e) {
    // FileNotFoundException이 발생했을 경우,이를 처리하기 위한 코드를 구현합니다.
} catch (IOException e) {
    // FileNotFoundException이 아닌 IOException이 발생했을 경우,이를 처리하기 위한 코드를 구현합니다.
} finally {
    // 예외의 발생여부에 관계없이 항상 수행되어야하는 코드를 구현합니다.
}
finally 구문은 필수는 아니다.
예외가 발생하지 않는다면 try -> finally 순으로 실행
예제
public class Main {
    public static void main(String[] args) {
        int number = 5;
        int result;

        for(int i = 5; i >= 0; i--){
            try{
                result = number / i;
                System.out.println(result);
            }catch(Exception e){
                System.out.println("Exception 발생: " + e.getMessage());
            }finally{
                System.out.println("항상 실행되는 finally 구문");
            }
        }
    }
}
:
1
항상 실행되는 finally 구문
1
항상 실행되는 finally 구문
1
항상 실행되는 finally 구문
2
항상 실행되는 finally 구문
5
항상 실행되는 finally 구문
Exception 발생: / by zero -> catch문의 출력문이 출력됨
항상 실행되는 finally 구문
try-with(-resource) 형식
- 입출력과 함께 자주 쓰이는 구문
- try-catch문과 비슷하지만, try()안에 AutoClosable 인터페이스를 구현한 객체를 선언하면 사용할 수 있다.
- 기존의 try-catch(-finally)문은 자원을 닫을 때 close()를 사용해야 합니다.
- try-with-resource문은 try문을 벗어나는 순간 자동적으로 close()가 호출됩니다.
예제
import java.io.FileOutputStream;
import java.io.IOException;

public class Main {
    public static void main(String[] args) {

        try(FileOutputStream out = new FileOutputStream("test.txt")){
            out.write("Hello Sparta".getBytes());
            out.flush();
        } catch (IOException e) {
            System.out.println("IOException 발생: " + e.getMessage());
            e.printStackTrace();
        }
    }
}
:
값은 출력되지 않고 test.txt 파일에 "Hello Sparta"라는 글이 적혀있다.
- 에러가 발생하지 않더라도 에러의 핸들링에 대한 코드가 필요할 수 있다.
날짜와 시간 다루기
Java에서의 날짜와 시간
- Java를 기반으로 하는 개발을 할 때 날짜를 이용하여 여러 기능을 제공해야 할 때가 있습니다. 날짜와 시간을 처리하는 클래스들을 다루면서 하나씩 공부를 해보겠습니다!
- 우리는 이제 날짜와 시간을 사용할 때 자주 쓰이는 java.time패키지에 대해서 하나씩 살펴볼 것입니다!
시간 만들기
import java.time.LocalDate;
import java.time.LocalDateTime;
import java.time.LocalTime;

public class Main {
    public static void main(String[] args) {
        System.out.println("now usages");
        LocalDate date = LocalDate.now();
        LocalTime time = LocalTime.now();
        LocalDateTime dateTime = LocalDateTime.now();

        System.out.println(date);
        System.out.println(time);
        System.out.println(dateTime);

        System.out.println("of() usage");
        LocalDate dateOf = LocalDate.of(2022, 11, 15);
        LocalTime timeOf = LocalTime.of(21, 20, 25);

        System.out.println(dateOf);
        System.out.println(timeOf);
    }
}
:
now usages
2022-11-15
21:21:30.809493
2022-11-15T21:21:30.809721
of() usage
2022-11-15
21:20: