Composition Api
원래 사용하던 API방식이 아닌 vue3에서 등장한 방식!
원래 사용하던 Options API방식보다 더 복잡한 애플리케이션을 제작할때 사용함
또한 타입스크립트와 잘 연동됨ㅎㅎ
백문이 불여일견 먼저 써보자!
npm create vite@latest .으로 바이트를 이용하여 개발환경 후딱세팅!
vite with Vue&TS
<script setup>이렇게 setup키워드가 있다면 composition Api다 !
템플릿내부 문법은 그대로고, 스크립트 내부 문법만 조금 달라짐
시작하기전에 린트설정부터 해주자
eslint prettier eslint-plugin-prettier eslint-config-prettier @typescript-eslint/parser @typescript-eslint/eslint-plugin eslint-plugin-vue
를 설치...하자! 길어보이는데 자세히보면
- eslint
- prettier
- eslint-prettier연결 플러그인
- eslint-prettier 출동 방지 설정
- @typescript-eslint/parser eslint가 ts읽을수 있게
- @typescript-eslint/eslint-plugin ts코드에서 eslint적용
- eslint-plugin-vue vue에서 eslint 적용
이상!
//.eslintrec.json
{
  "extends":[
    "eslint:recommended",
    "plugin:@typescript-eslint/recommended",
    "plugin:vue/vue3-recommended",
    "plugin:prettier/recommended"
  ],
  "parserOptions": {
    "parser": "@typescript-eslint/parser"
  },
}
//.prettierrc
{
  "semi": true,
  "singleQuote": true,
  "endOfLine": "lf",
  "trailingComma": "none",
  "singleAttributePerLine": true,
  "bracketSameLine": true
}
설정 요래해주자
참고로 EOLtrue로 두면 개행문자 오류가 날때도 있는데 린트 파일에 이거 추가해주면 됨
  "rules": {
    "prettier/prettier": ["error", { "endOfLine": "auto" }]
  }
compositionAPI
시작부터 좀 다르다
<!-- CompositionAPI -->
<script setup lang="ts">
import { ref } from 'vue';

const count = ref(0);
</script>

<template>
  <h1>{{ count }}</h1>
</template>

<!-- OptionsAPI -->
<script lang="ts">
// ts 적용할때 이렇게 넣어주어야 함
import { defineComponent } from 'vue';
export default defineComponent({
  data() {
    return {
      count: 0
    };
  }
});
</script>

<template>
  <h1>{{ count }}</h1>
</template>
스크립트가 아주 짧아졌다 와우!
ref를사용해서 값을 참조할땐 이렇게 접근해야한다.
const increase = () => (count.value += 1); value라는 키워드를 꼭 사용해주어야함 단, script부분에서만!
또한 TS를 사용할때도 setup만 넣어주면되는 CompositionAPI에 비해, OptionsAPI는 defineCOmponent내부에 넣어야 TS를 인식함.
라이프사이클
메소드처럼 적던 라이프사이클은 어떻게 사용할까?
=> created를 제외한 라이프사이클은 vue에서 가져와서사용
예를들어 mounted라면...
//Options
export default defineComponent({
  data() {
    return {
      count: 0
    };
  },
  mounted() {},
}

//Composition
import { ref, onMounted } from 'vue';

const count = ref(0);
onMounted(() => console.log('mounted!'));
이렇게 된다.
computed, watch
computed, watch도 라이프사이클처럼 vue에서 가져와 사용하면 끝이다.
import { ref, computed, watch } from 'vue';
const count = ref(0);
const double = computed({
  get() {
    return count.value * 2;
  },
  set(newVal: number) {
    count.value = newVal / 2;
  }
});
watch(count, (newVal, oldVal) => console.log(newVal, oldVal));
getter, setter도 이렇게 똑같이 사용할수 있음.
watch를 사용할땐 .value없이 객체를 참조함.
잘 관찰하고있다.
Components
프롭스를 가져올때 타입을 정하려면 제네릭을 사용한다
defineProps<{
  modelValue: string;
  name?: string;
  active?: boolean;
}>();
대신 이렇게하면 기본값을 할당하기가 어려움. 따라서 이때 withDefaults라는 함수를 사용한다.
withDefaults(
  defineProps<{
    modelValue: string;
    name?: string;
    active?: boolean;
  }>(),
  {
    name: '',
    active: false
  }
);Options에서는 정의되지 않은 프롭스를 넘겨줄때, 최상위 요소가 프롭스를 가지게됨. 이런 원치 않는 일을 방지하기위하여inheritAttrs를 사용했었음.
Composition에서는 이렇게 사용한다
//컴포넌트에 적용하는 옵션들은 대부분 이렇게 사용한다!
defineOptions({
	inheritArrts:false
})
만약 콘솔로그에 찍어보고싶다면...Composition에서는 $달러사인이 붙은 프로퍼티를 쓰지않음.
import {useAttrs} from 'vue';
const attrs = useAttrs();
console.log(attrs);
이렇게 사용함
ref vs reactive
CompositionAPI에서 반응형 데이터를 만들때 사용하는 키워드 두가지.
ref
ref사용할땐 항상 value프로퍼티로 접근해야함.
참조형 데이터를 watch할땐...
const user = ref({
name: 'kim',
age: 25
});
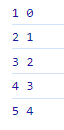
watch(user, (newVal) => console.log(newVal));이렇게 객체를 watch했을때, 객체자체가 바뀌는게 아니어서 전달한 함수가 실행되지 않음.
watch(user, (newVal) => console.log(newVal), {
	deep:true
})
물론 이렇게 사용할수 도있다. 하지만 이렇게 감시하려면 다른 프로퍼티(의도하지 않은 값인 age)도 같이 넘어옴.
watch(
  () => user.value.name,
  (newVal) => console.log(newVal)
);
이렇게 넘겨주는게 옳다.
OptionsAPI에서 사용하던 $ref(요소 취득)는 어떻게 사용할수 있을까?
<script setup lang="ts">
import { onMounted, ref } from 'vue';

const inputEl = ref<HTMLInputElement | null>(null);
onMounted(() => {
  if (inputEl.value) {
    inputEl.value.focus();
  }
});
</script>
ref에는 제네릭으로 타입을 넣어준다.
reactive
reactvie는 value로접근하지 않아도 된다.
와우!
import { reactive, watch } from 'vue';

const user = reactive({
  name: 'kim',
  age: 25
});

watch(
  () => user.name,
  (newVal) => console.log(newVal)
);

console.log(user.name, user.age);
하지만 참조형만 reactive에 할당이 가능하다.
결국 둘의 차이는 참조형이냐 아니냐군?
Pinia
vuex 보다 더 좋은 vue 상태관리 라이브러리! 와우! 뭐가 다르길래 더 좋다는걸까? 심지어 vue에서 인정한 공식 상태관리 라이브러리다. 후딱 사용해보자!
npm i pinia로 설치후
//main.ts
import { createApp } from 'vue';
import { createPinia } from 'pinia';
import App from './App.vue';

const pinia = createPinia();
createApp(App).use(pinia).mount('#app');
연동해준다!
스토어 생성 및 사용
//store/count.ts
import { defineStore } from 'pinia';
export const useCountStore = defineStore('count', {
  state: () => ({
    count: 1
  }),
  getters: {
    double(state) {
      return state.count * 2;
    }
  },
  actions: {
    increase() {
      this.count++;
    },
    decrease() {
      this.count--;
    }
  }
});
<!-- App.vue -->
<script setup lang="ts">
import { useCountStore } from './store/count';
const countStore = useCountStore();
</script>
<template>
<h1>{{ countStore.count }}</h1>
<h2>{{ countStore.double }}</h2>
<button @click="countStore.increase">더하기</button>
<button @click="countStore.decrease">빼기</button>
</template>
잘 된다 ㅎㅎ
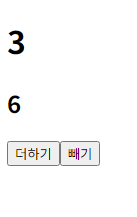
pinia엔 mutations가 없다. 그리고 actions에서 this에 접근 가능함!
=>context,commit등을 받아올 필요가 없다.
그리고 액션을 넘겨줄때도 <button @click="countStore.increase">처럼 그냥 함수를 갖다쓰면 됨ㅎㅎ
다만 상태추적이 어려울수 있다.
api받아올때 타입 자동 변환!
https://transform.tools/json-to-typescript 에서 할수있다!
어메이징!
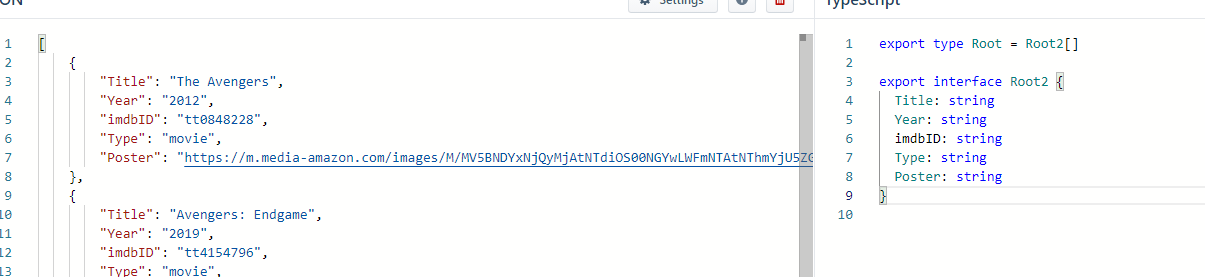
참고로 스토어에서 관리하는타입은 보통 밖에서 쓸일이 있기에 일단 내보내줌
export type Movies = Movie[];

export interface Movie {
  Title: string;
  Year: string;
  imdbID: string;
  Type: string;
  Poster: string;
}
스토어 상태 초기화
//x
state = ""
//o
state.$reset()pinia에선 이렇게 쓴다하더라!
헷갈리지말기 getters vs actions
- getters내부에서 state사용하려면 매개변수로 받아와야함.
- actions내부에서 state는
this로 접근
Vue Composition + TS 개요 및 빠른개발환경 구성
vercel serveless function
vercel을 이용해도 서버리스함수를 사용할수있다.
npm i -D vercel로 설치한뒤, 스크립트에
"vercel": "vercel dev"추가해주고 실행!
서버리스 함수가 들어갈 폴더이름은 무조건 api로 지어주어야한다! (연결을 바꿀순있음)
//api/hello.ts
import type { VercelRequest, VercelResponse } from '@vercel/node';

export default function (req: VercelRequest, res: VercelResponse) {
  res.status(200).json({
    name: 'kim',
    age: 20
  });
}

//호출할때
//서버리스 함수를 실행할땐 무조건 POST메소드로 넣어준다.
(async () => {
  const respone = await fetch('/api/hello', {
    method: 'POST'
  });
  const data = await respone.json();
  console.log(data);
})();
위처럼 서버리스함수에도 타입을 넣어준다. 단, 이때 TS버전충돌이 일어날수 있다. vite로 다운받은 버전과 vercel내부에서 사용하는 버전이 다를수 있어서...
버전을 맞춰주자.
package.json

  "devDependencies": {
	...,
  },
  "overrides": {
    "@vercel/node":{
      "ts-node":"10.9.1",
      "typescript":"5.2.2"
    }
}ts-node는 node에서 ts실행시켜주는 도구고
typescript의 버전을 명시해 @vercel/node내부의 ts버전을 업그레이드 시켜준다
이렇게하고 다시 npm i로 오버라이딩해서 설치해주면 끝!
vite에서 경로별칭 사용
내부적으로 웹팩이 아닌 롤업을 번들러로 사용하기에 롤업의 방식대로 경로별치을 사용함.
//vite.config.ts
export default defineConfig({
	...,
    alias: [
      {
        find: '~',
        replacement: '/src'
      }
    ]
  }
});
이렇게 경로별칭 해준다. 다만 TS내부에서도 경로별칭을 이해할 수 있게 만들어주어야한다.
/* tsconfig.json */
    "baseUrl": "./",
    "paths":{
      "~/*":["./src/*"]
    }
재사용 가능한 아이콘
- fonts.google.com에서 링크부분을 복사하여
index.html에 넣어줌
<link rel="stylesheet" href="https://fonts.googleapis.com/css2?family=Material+Symbols+Outlined:opsz,wght,FILL,GRAD@24,400,0,0" />slot태그를 이용하여 재사용 가능하게 짜줌.
클래스명(material...)은 구글에서 지정해줌
<template>
  <div class="icon">
    <span class="material-symbols-outlined">
      <slot></slot>
    </span>
  </div>
</template>- 밖에선 이런식으로 사용하면된다. 키워드만 삽입하면 알아서 나옴!
<template>
  <h1>나는 메인페이지</h1>
  <TheIcon>add</TheIcon>
</template>
깔쌈허군?
deep
scoped로 캡슐화된 컴포넌트는 스타일 하기가 까다로울수있다.
특히 자식컴포넌트에 스타일을 주입하려할때 문제가발생함.
scoped내부에서 선언된 스타일만 적용되기 때문!
이때 deep키워드를 사용한다. scss+vue에서 사용가능함.
:deep(클래스명){...}이렇게 사용한다!
깃..stash와 스위치..
초기세팅하고 조금 진행해둔거 다 날려먹고 하는 말
일단 강제스위칭은 조심하고...
잘못된 브랜치에서 작업하다가 옮겨야하는경우
커밋하고 stash올려두고 스위치로 브랜치 바꾼다음에 다시 stash불러와서 커밋한거 푸시하면된다..ㅋㅋ
main에 푸시할까봐 무서워서 커밋 안하다가 다 날아감
조심조심...
느낀점
강의도 긴데 과제도있으니 힘들다! 그래도 할만하다! 강의 후딱 해치우고 과제 해야겠음!