사다리 타기
토이프로젝트에 사다리타기 기능이 필요해서 구현을 시작했다. 단순하게 뚝딱 만들 수 있을 줄 알았는데, 살짝 어려워서 기록으로 남긴다.
사다리타기 정의
코딩테스트 문제 풀듯 한번 사다리 타기가 무엇인지 파악해보자.
- N개의 번호가 있고 N개의 수직선을 가진다.
- 각 수직선은 일정한 간격을 두고 존재한다.
- 최소 N-1개의 수평선을 가진다.
- 한 수직선에 동일한 Y값을 가진 수평선은 오직 하나다. (ㅡㅣㅡ처럼양쪽에 존재할 수 없음)
먼저 N개의 수직선을 그려보자.
사전지식) canvas
코드로 작성하기 전에, 사용할 Web API인 canvas에대해 간단히 알아보자.
canvas는 HTML Element이자 JS로 그래픽을 그리는데 사용된다. svg하고 비슷한 면이 있는데, 차이점은 다음과 같다.
- SVG는 기하를 변형해서 사용하거나, path를 지정하여 사용한다. Canvas는 SVG의 path를 지정하는 방식과 유사하게, 좌표를 지정해서 그린다.
- SVG는 확대-축소시 이미지 품질이 유지되는 벡터 이미지다. Canvas는 픽셀이미지다.
사용법은 아래와 같다.
//ref로 canvas를 참조해야함
<canvas ref={canvasRef} />

const draw = () => {
	const ctx = canvasRef.current?.getContext('2d');
  	if(!ctx) return;

  	//ctx는 드로잉 컨텍스트다.
}ctx변수가 참조중인 드로잉 컨텍스트를 이용하여 그래픽을 그릴 수있다.
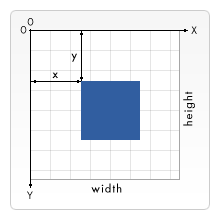
이때 canvas 좌표공간은 아래와 같다. 기존 함수의 x축과 같고, y축은 반대다.
출처 : https://developer.mozilla.org/ko/docs/Web/API/Canvas_API/Tutorial/Drawing_shapes
수직선 그리기
canvas에 대해서 간단히 알아보았다. 이제 코드로 N개의 수직선을 동일한 간격으로 배치해본다.
const drawLadder = () => {
    const canvas = canvasRef.current;
    if (!canvas) return;

    const ctx = canvas.getContext("2d");
    if (!ctx) return;

    const ladderWidth = 1000;
    const ladderHeight = 500;
    const ladderX = 100; //캔버스 좌표계 내부 기본 x값과 y값
    const ladderY = 50;
    const minHorizontalLines = userCount - 1; //N-1개의 최소 값
   //만약 4명이라면, 구간을 3개로 나누어 배치해야한다.
    const columnGap = ladderWidth / minHorizontalLines;

    ctx.clearRect(0, 0, canvas.width, canvas.height);

    for (let i = 0; i < userCount; i++) {
      const x = ladderX + i * columnGap;
      ctx.beginPath(); //새로운 경로를 시작한다
      ctx.moveTo(x, ladderY); //선분의 시작점을 찍는 메서드.
      ctx.lineTo(x, ladderY + ladderHeight); //선분의 끝 점을 찍는 메서드.
      ctx.stroke(); //선분의 종류를 지정해준다.
    }
}
먼저 사다리 타기의 너비와 높이를 정하고, 수직선이 기본적으로 생성될 x,y좌표인 ladderX, ladderY를 정의한다.
이후 구간을 나누 뒤 canvas의 메서드를 활용해 수직선을 그린다.
메서드중 moveTo는 이동하는 게 아닌, 시작점을 찍는 메서드다. 네이밍이 조금 적절치 않은 것 같기도 하고...?🤔
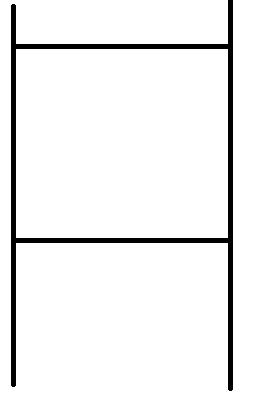
일단 수직선은 잘 그렸다. 이제 수평선을 그려보자
수평선 그리기
수평선은 최소 N-1개지만, 최대는 제한이 없을 것이다. 다만 편의상 N-1+1~10개로 축약하였다.
const horizontalLines = minHorizontalLines + Math.ceil(Math.random() * 10);

for (let i = 0; i < horizontalLines; i++) {
   const x = ladderX + (i % minHorizontalLines) * columnGap;
   let startY = ladderY + Math.random() * ladderHeight;
   ctx.beginPath();
   ctx.moveTo(x, startY);
   ctx.lineTo(x + columnGap, startY);
   ctx.stroke();
}
(i % minHorizontalLines) * columnGap이 수식을 이용하여 몇 번째 수직선에서 수평선을 그릴 것인지 정한다. 이때 x좌표를 이용한다.
또한 랜덤성을 위하여 Math.random()메서드를 이용해 수평선의 높이를 조절한다.
경로 그리기
경로를 그리려면 어떡해야할까?
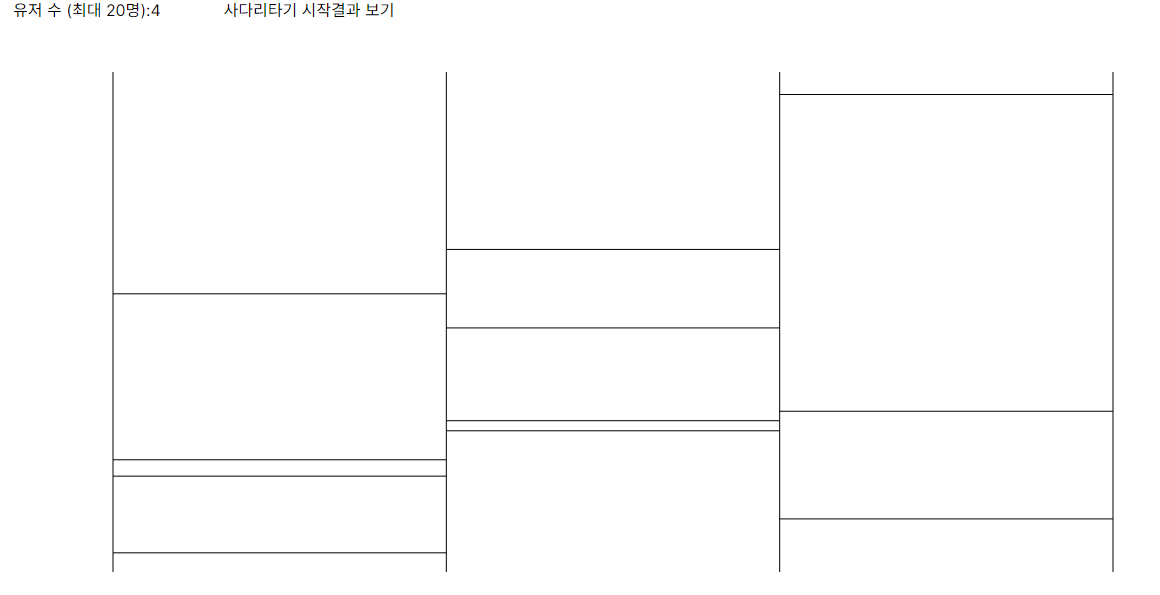
위와같은 경로가 존재한다고 가정해보자. 유저가 첫번째 수직선을 선택했다고 가정하면...

이렇게 사다리의 경로를 추적한다. 방향이 꺾이는건 결국 수평선때문이다.
따라서 경로추적의 핵심은 수평선의 좌표다.
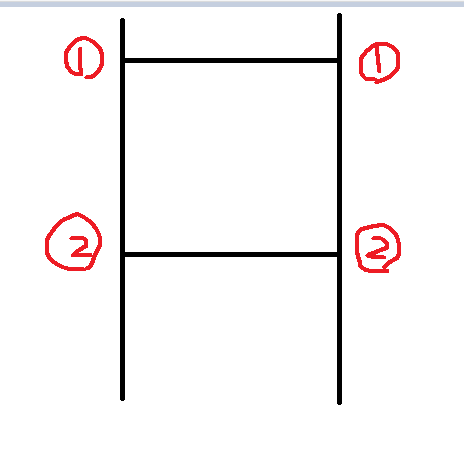
이때 수평선의 정보는 총 4개다. 첫번째 수직선과 두번째 수직선은 서로 연결되어있다.
따라서 연결된 수직선의 정보도 필요하다.
const [pathArray, setPathArray] = useState<LadderPathProps[][]>([]);

//수평선 그리는 로직
for (let i = 0; i < horizontalLines; i++) {
      const currentVerticalIndex = i % minHorizontalLines;
      const connectedVerticalIndex = currentVerticalIndex + 1;

      const x = ladderX + currentVerticalIndex * columnGap;
      const y = ladderY + Math.random() * ladderHeight;

      ctx.beginPath();
      ctx.moveTo(x, y);
      ctx.lineTo(x + columnGap, y);
      ctx.stroke();

      newPathArray[currentVerticalIndex].push({
        coord: { startX: x, endX: x + columnGap, y },
        connectedIndex: {
          vertical: connectedVerticalIndex,
        },
      });
      newPathArray[connectedVerticalIndex].push({
        coord: { startX: x + columnGap, endX: x, y },
        connectedIndex: {
          vertical: currentVerticalIndex,
        },
      });
    }

newPathArray.forEach((path) =>
   path.sort(({ coord: { y: ay } }, { coord: { y: by } }) => ay - by)
);x좌표를 startX, endX로 나누었다. 수평선을 그릴때, 아래처럼 좌표를 대입하기 편하기 때문이다.
ctx.moveTo(startX,y);
ctx.lineTo(endX,y);
...
또한 수평선을 공유하고 있는 수직선의 인덱스도 저장하였다. 저장된 배열은 모두 y축기준으로 오름차순 정렬되었다. 경로는 위에서 아래로 추적해야하는데, canvas 좌표계는 y값이 아래로 갈수록 커지기 때문이다.
전체로직은 아래와 같다.
const showResult = useCallback(
(e: MouseEvent, startPoint: number) => {
const canvas = canvasRef.current;
if (!canvas) return;
const ctx = canvas.getContext("2d");
if (!ctx) return;
ctx.clearRect(0, 0, canvas.width, canvas.height); // Clear the canvas
redrawLadder(); // Redraw the ladder
const userIndex = startPoint - 1;
let nextLine = pathArray[userIndex][0];
let prevX = ladderX + userIndex * columnGap;
let prevY = ladderY;
ctx.lineWidth = 5;
ctx.strokeStyle = "red";
let t = 0;
while (nextLine) {
++t;
if (t >= 1000) break; //혹시 모르는 예외처리...
const { startX, endX, y } = nextLine.coord;
const { vertical } = nextLine.connectedIndex;
// 수직 경로
ctx.beginPath();
ctx.moveTo(prevX, prevY);
ctx.lineTo(prevX, y);
ctx.stroke();
// 수평 경로
ctx.beginPath();
ctx.moveTo(startX, y);
ctx.lineTo(endX, y);
ctx.stroke();
const nextLineIndex = pathArray[vertical].findIndex(
({ coord }) =>
coord.startX === endX && coord.endX === startX && coord.y === y
);
//수직-수평경로를 모두 추적하였다. 이때 붙어있는 수직선도 현재 활용한 x,y좌표를 들고있다.
//따라서 인접한 수직선배열에서 사용된 좌표의 인덱스를 알면, 다음 수평선의 좌표를 알 수 있다.
const tempNextLine = pathArray[vertical]?.[nextLineIndex + 1];
if (tempNextLine && nextLineIndex !== -1) {
nextLine = tempNextLine;
prevX = endX;
prevY = y;
} else {
ctx.beginPath();
ctx.moveTo(endX, y);
ctx.lineTo(endX, ladderY + ladderHeight);
ctx.stroke();
}
}
setCurrentPath(userIndex);
},
[columnGap, pathArray]
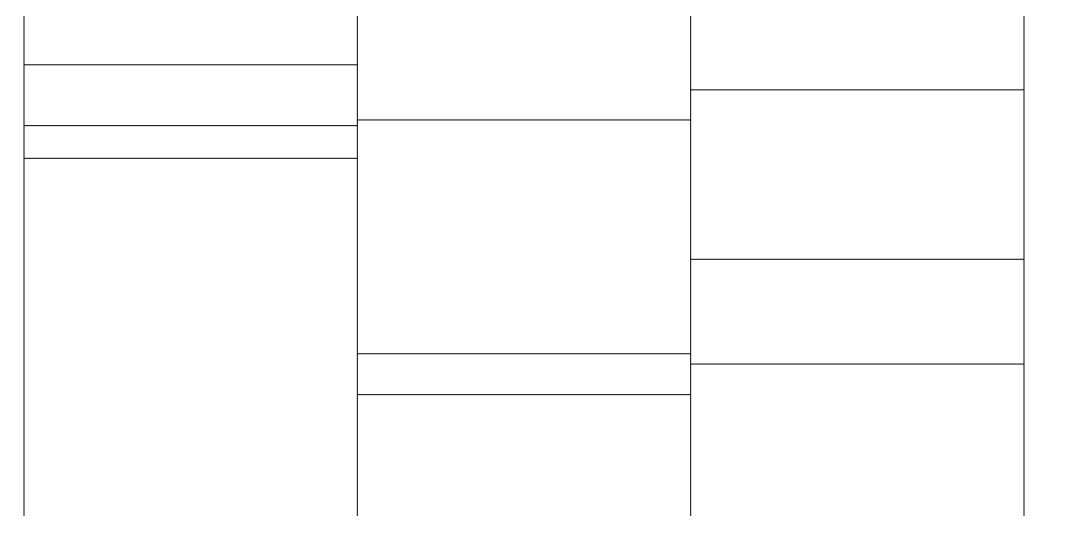
);결과

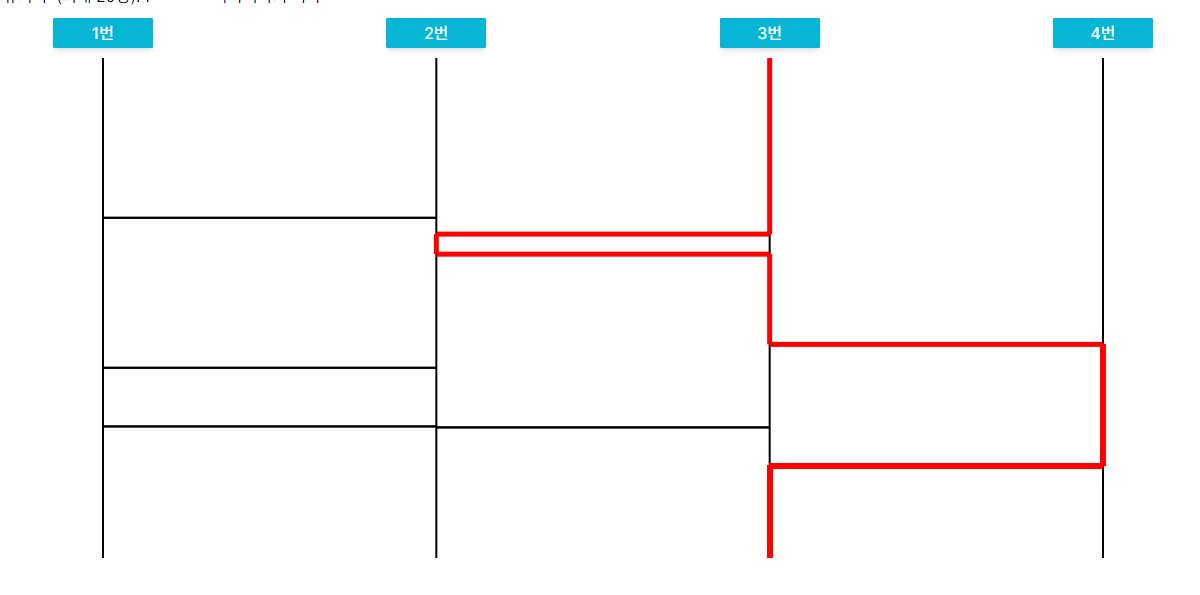
경로추적이 잘 된다!
느낀점
엄청 단순할줄 알았는데, 생각보단 단순하지 않아서 살짝 주춤했다. 기능을 만들어야하지만 이해를 하지 못했을땐, 최대한 잘게 쪼개서 생각하는 게 핵심이다. 분할 정복과 맞닿아 있는건가?😮