Youtube API
유튜브에서 제한이 있긴 하지만 무료로 제공해주는 API들이 존재한다.
이번에 진행하는 토이프로젝트에서 유튜브 댓글 추첨기능을 만들고 있었기에, 필연적으로 접하게되었음.
공식문서가 엄청 친절하고 자세하게 잘 되어있어서 초반 GoogleAPI 콘솔 액세스 등은 넘어간다.
CommentThread
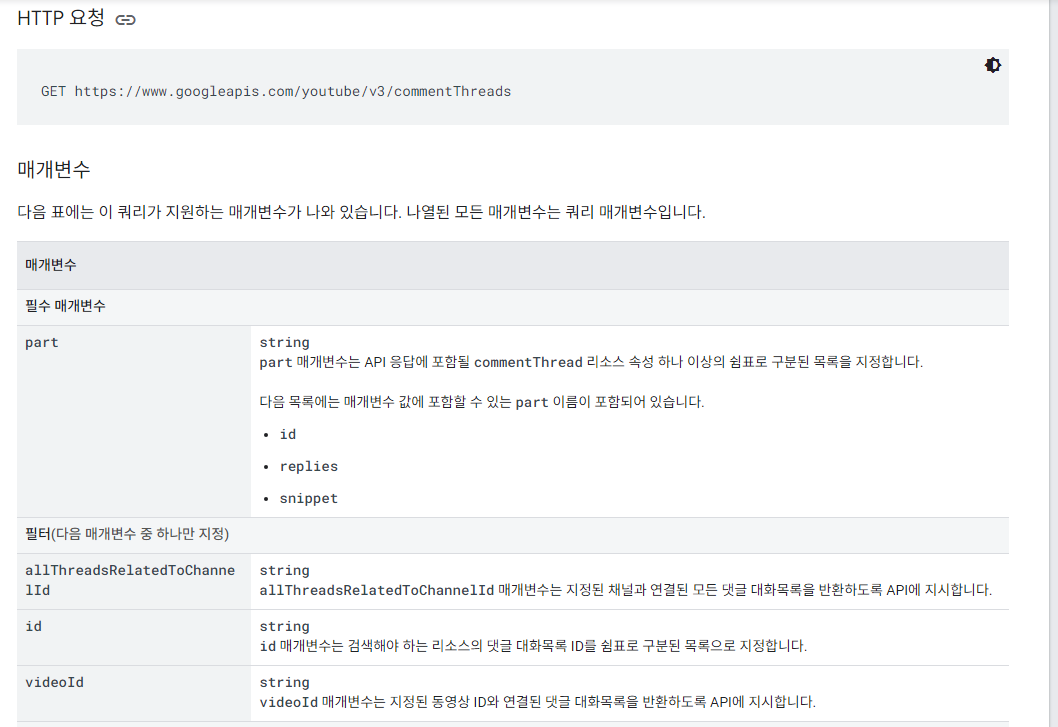
댓글의 대화목록을 반환하는 API다. 여기서 용어를 잠깐 정의하고 가면 좋다.
- 댓글(comment) : 글이 있으면 그 아래 달리는게 댓글이다.
- 답글(reply) : 댓글에 답장하는 기능이다. 즉, 댓글의 하위 집합이다.
여기서 대화 목록이란 특정 영상이나 특정 채널의 댓글 목록이다. 이때 답글을 제한된 수 만큼 반환해주긴 한다.
일단 기능을 한 번 사용해보자. 참고로 여기선 특정 채널 대신 특정 영상의 댓글 대화목록을 받아보겠다.
예시영상은 아래 링크를 사용해보겠음
https://www.youtube.com/watch?v=u05iuui3s6k
위 사진처럼 요청을 보내면 된다. 선택적 매개변수가 여럿 있지만, 특정 영상을 이용하여 snippet만 받아보겠다.
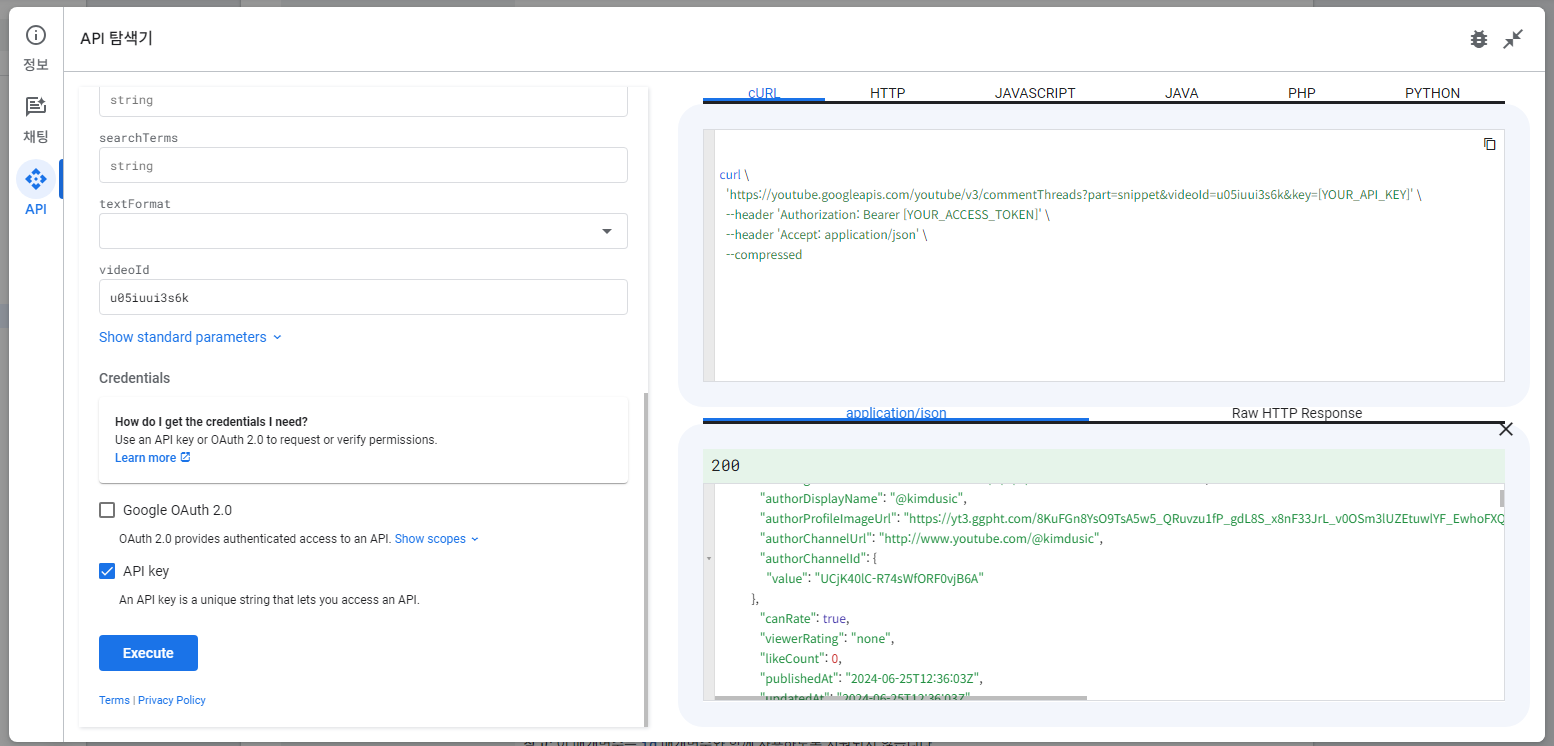
이렇게 값이 잘 들어온다. 이때 사용하는 video의 id는 다음과 같다.
https://www.youtube.com/watch?v=u05iuui3s6k링크의 v=다음에 오는 부분이다.
참고로 현재시간에 동영상url 복사하면 `https://youtu.be/u05iuui3s6k?t=2처럼 시간관련 파라미터도 들어있으니 유의해서 문자열처리를 해야한다.
commentThread 타입
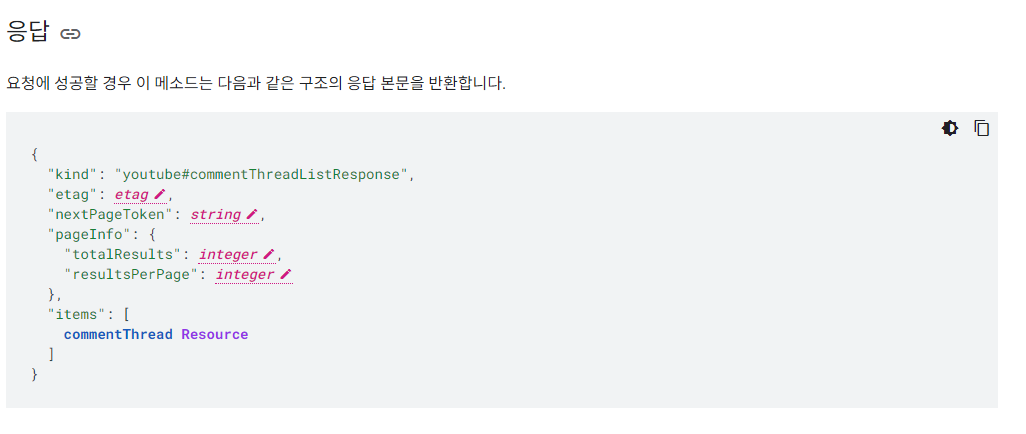
이렇게 반환해준다고 한다. 저기 나와있는 commentThread Resource는 링크다. 링크 타고 들어가면 내부 타입이 또 나온다.
Typescript 타입으로 변환해야하는 분들은...
export interface YoutubeCommentsThreadListResponse {
    kind: "youtube#commentListResponse",
    etag: string
    nextPageToken: string,
    pageInfo: {
      totalResults: number,
      resultsPerPage: number
    },
    items: YoutubeCommentThread[]
}

export interface YoutubeCommentThread {
    kind: "youtube#commentThread",
    etag: string
    id: string,
    snippet: {
      channelId: string,
      videoId: string,
      topLevelComment: YoutubeComments
      canReply: boolean,
      totalReplyCount: number
      isPublic: boolean
    },
    replies?: {
      comments: YoutubeComments[]
    }
}

export interface YoutubeComments {
  kind: "youtube#comment",
  etag: string,
  id: string,
  snippet: {
    authorDisplayName: string,
    authorProfileImageUrl: string,
    authorChannelUrl: string,
    authorChannelId: {
      value: string
    },
    videoId:string,
    channelId: string,
    textDisplay: string,
    textOriginal: string,
    parentId?: string,
    canRate: boolean,
    viewerRating: string,
    likeCount: number,
    moderationStatus?: string,
    publishedAt: string, // ISO 8601 formatted date type
    updatedAt: string // ISO 8601 formatted date type
  }
}

type YoutubeThumbnailKeyType = 'default' | 'high' | 'maxres' | 'medium' | 'standard'

export type YoutubeThunmbnailPropertyType = {
  url: string;
  width: number;
  height: number;
}

type YoutubeThumbnailType = {
  [key in YoutubeThumbnailKeyType] :YoutubeThunmbnailPropertyType
}
export interface YoutubeVideo {
  kind: "youtube#video";
  etag: string;
  id: string;
  snippet: {
    publishedAt: string;
    channelId: string;
    title: string;
    description: string;
    thumbnails: YoutubeThumbnailType;
    channelTitle: string;
    tags: string[];
    categoryId: string;
    liveBroadcastContent: string;
    defaultLanguage: string;
    localized: {
      title: string;
      description: string;
    };
    defaultAudioLanguage: string;
  };
  contentDetails: {
    duration: string;
    dimension: string;
    definition: string;
    caption: string;
    licensedContent: boolean;
    regionRestriction: {
      allowed: string[];
      blocked: string[];
    };
    contentRating: {
      [key: string]: string;
    };
    projection: string;
    hasCustomThumbnail: boolean;
  };
  status: {
    uploadStatus: string;
    failureReason: string;
    rejectionReason: string;
    privacyStatus: string;
    publishAt: string;
    license: string;
    embeddable: boolean;
    publicStatsViewable: boolean;
    madeForKids: boolean;
    selfDeclaredMadeForKids: boolean;
  };
  statistics: {
    viewCount: string;
    likeCount: string;
    dislikeCount: string;
    favoriteCount: string;
    commentCount: string;
  };
  player: {
    embedHtml: string;
    embedHeight: number;
    embedWidth: number;
  };
  topicDetails: {
    topicIds: string[];
    relevantTopicIds: string[];
    topicCategories: string[];
  };
  recordingDetails: {
    recordingDate: string;
  };
  fileDetails: {
    fileName: string;
    fileSize: number;
    fileType: string;
    container: string;
    videoStreams: {
      widthPixels: number;
      heightPixels: number;
      frameRateFps: number;
      aspectRatio: number;
      codec: string;
      bitrateBps: number;
      rotation: string;
      vendor: string;
    }[];
    audioStreams: {
      channelCount: number;
      codec: string;
      bitrateBps: number;
      vendor: string;
    }[];
    durationMs: number;
    bitrateBps: number;
    creationTime: string;
  };
  processingDetails: {
    processingStatus: string;
    processingProgress: {
      partsTotal: number;
      partsProcessed: number;
      timeLeftMs: number;
    };
    processingFailureReason: string;
    fileDetailsAvailability: string;
    processingIssuesAvailability: string;
    tagSuggestionsAvailability: string;
    editorSuggestionsAvailability: string;
    thumbnailsAvailability: string;
  };
  suggestions: {
    processingErrors: string[];
    processingWarnings: string[];
    processingHints: string[];
    tagSuggestions: {
      tag: string;
      categoryRestricts: string[];
    }[];
    editorSuggestions: string[];
  };
  liveStreamingDetails: {
    actualStartTime: string;
    actualEndTime: string;
    scheduledStartTime: string;
    scheduledEndTime: string;
    concurrentViewers: number;
    activeLiveChatId: string;
  };
  localizations: {
    [key: string]: {
      title: string;
      description: string;
    };
  };
}

export interface YoutubeVideoListResponse {
  kind: "youtube#videoListResponse";
  etag: string;
  nextPageToken: string;
  prevPageToken: string;
  pageInfo: {
    totalResults: number;
    resultsPerPage: number;
  };
  items: YoutubeVideo[];
}
상관없는 비디오 관련 타입도 들어있긴한데 필요하면 갖다 쓰시길...!
Next Server action
Next v13에 추가된 기능이다. Next의 N도 모르던 내가 이 기능을 왜 쓰게되었는가?
- Youtube API를 호출하기 위해서는 발급받은 API KEY를 파라미터로 넘겨주어야한다.
- API KEY는 네트워크탭에 노출된다.
- 예전vue를 잠깐 배울 때 serverless function을 이용하여 민감한 데이터를 숨긴 채 요청을 보낸 게 기억났다.
- 그러고보니 Server action이란게 있었는데...?
여기까지가 일련의 사고과정이다. 그러면 어떻게 사용하는 지 한 번 알아보자.
예제) form태그의 action 속성에 넘겨준다.
출처는 Next 공식문서 : https://nextjs.org/docs/app/building-your-application/data-fetching/server-actions-and-mutations
export default function Page() {
  async function createInvoice(formData: FormData) {
    'use server'

    const rawFormData = {
      customerId: formData.get('customerId'),
      amount: formData.get('amount'),
      status: formData.get('status'),
    }

    // mutate data
    // revalidate cache
  }

  return <form action={createInvoice}>...</form>
}
먼저 비동기 함수를 선언하고 내부에 'use server'라고 서버 액션임을 명시한다.
이후 <form/>태그 의 action속성에 함수를 전달한다. 그러면 끝! 사용법 자체는 간단하다.
내가 사용한 방법) serverless function처럼활용
serverless function처럼 사용하고싶어서, <form/>태그의 action에 넘기는 대신 onSubmit을 활용하였다.
 const handleSubmitYoutubeLink = async (e: React.FormEvent) => {
	...
    const videoData = await fetchYoutubeVideoMetadata(link);
  };

<form onSubmit={handleSubmitYoutubeLink}>
  ...
</form>

//server action
'use server' //여러 server action을 모듈화하여 파일 최상단에 선언함

export async function fetchYoutubeVideoMetadata(link:string):Promise<YoutubeVideoCustomData>{
  const {VIDEO:{API_END_POINT,PARTS}} = YOUTUBE_API;
  try{
    const videoId = parseVideoIdFromYoutubeLink(link);
    if(!videoId) throw new Error('유튜브 링크가 정확하지 않습니다!')

    const fetchUrl = `${API_END_POINT}?part=${PARTS}&id=${videoId}&key=${process.env.NEXT_PUBLIC_YOUTUBE_API_KEY}`
    const response = await fetch(fetchUrl);
    if(!response.ok) throw new Error('유튜브 api요청에 실패했습니다')

    const videoMetaData:YoutubeVideoListResponse = await response.json();
    const videoItem = videoMetaData.items[0];

    const {title,channelTitle,thumbnails:{standard}} = videoItem.snippet;
    const {commentCount, viewCount} = videoItem.statistics;

    return {
      title,
      channelTitle,
      thumbnail:standard,
      commentCount: +commentCount,
      viewCount: +viewCount
    }
  } catch(e){
    console.error(e)
    throw e
  }
}
놀랍게도 잘 작동했다. 공식문서를 읽어보니 굳이 <form/>태그에 국한되지도 않고 이벤트 핸들러나 useEffect등에서도 사용할 수 있다고 한다. 그냥 진짜 서버측에서 작동하는 함수다.
본래 클라이언트 => YoutubeAPI server요청을 보내던 걸, 클라이언트 => Next 서버(웹서버) => Youtube API server이렇게 요청보내게 되었다. 요청이 한 단계 늘어 단점도 있지만, 클라이언트에서 숨기지 못하는 API포함요청을 서버에 위임하여 숨긴 것에 만족!
여담
아직 완전히 알고 사용한 건 아니라, 모르는 부분이 많다. 공식문서에 나와있던 내용중 server action의 캐시나 쿠키를 활요하는 법, 보안등...첫 술에 배부를 순 없다! 사용하며 알아보자
next Image 컴포넌트

<img/>태그를 자동으로 최적화해주는 Next내장 컴포넌트다. 프레임워크에서 공식적으로 만든 컴포넌트라, 안 쓸 이유가 없다 생각하여 사용함. 이때 외부 url로 src를 넣어주는 경우, next.cofnig.ts에서 설정이 필요하다.
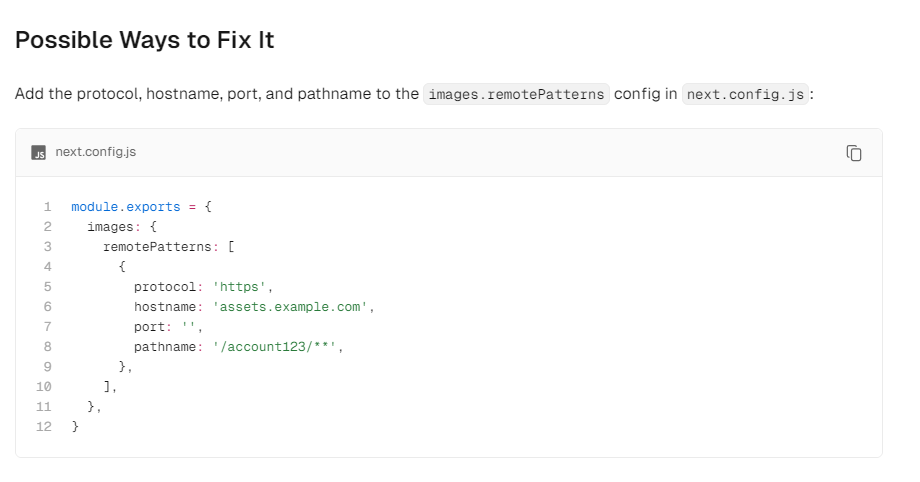
위 예시처럼 프로토콜, 호스트네임, 포트, 경로를 작성해주면 해결된다.
Vercel에 배포시 비용 관련 유의사항
vercel에서 배포하면 Next에 내장된 <Image/>컴포넌트 사용시 자동으로 이미지 최적화를 해준다.
이때 비용이 발생함. 자세한건 공식문서로...https://vercel.com/docs/image-optimization/limits-and-pricing#source-images
취미 프로젝트여서 비용생각은 없었다. 최적화를 없애려면, 컴포넌트에 unoptimized를 props로 넘겨주던가, 그냥 기존 <img/>태그를 사용하면 된다.