Overviews
플러터로 개발하면서 API 연결에 상당부분 코드를 작성하게 됩니다.
Bloc 페이지에 나와있는 아키텍처에 따르면 데이터를 받아와 작성하는 코드 아키텍처는
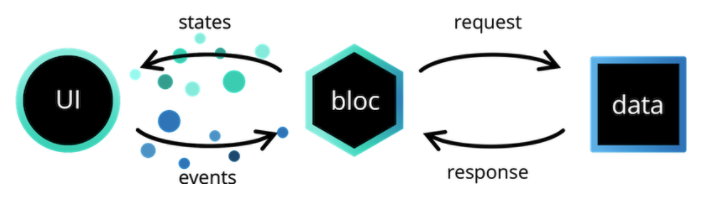
- Presentation
- Business Logic
- Data
- Repository
- DataProvider
구성으로 나뉩니다.
Data 영역은 우리가 서비스에 이용할 데이터를 가져오거나 전달하는 역할을 합니다.
크게 Repository, DataProvider 영역으로 나뉠 수 있습니다.
DataProvider는 서버 또는 로컬 DB로부터 Raw Data(또는 JSON) 형태의 데이터를 가져오는 역할을 합니다.
Repository는 DataProvider에서 받온 데이터를 토대로 우리가 모델링한 객체로 파싱하는 작업을 거칩니다.
Business Logic은 화면을 보여주기 전에 데이터를 비즈니스 규칙에 맞게 재가공하거나, 사용자의 입력을 받아 적절한 처리를 해주는 기능을 합니다.
오늘은 Data 영역에서 Graphql을 이용하여 어떻게 가공하는지를 알아볼 예정이기 때문에 Business Logic과 Presentation에 대한 자세한 설명은 Bloc 페이지에서 찾아보거나 검색을 해볼 것을 추천합니다.
목표
우리의 목표는 불필요한 코드 타이핑을 줄이는 것입니다.
- graphql 쿼리만 작성하면 알아서 쿼리 dart 파일을 생성한다.
- 생성된 dart 파일을 통해 객체를 래핑, 생성한다.
- 모델에 freezed를 연동하여 각종 유틸 기능을 이용할 수 있게 한다.
GraphQL 연결
artemis 라이브러리를 이용하려면 graphql 스키마가 필요합니다. 아직 endpoint 형태를 지원하지 않아, 서버에서 제공해주는 graphql 스키마를 파일로 만드는 선행작업이 필요합니다.
서버 엔드포인트에서 스키마를 JSON 또는 GRAPHQL 형태로 만들어주는 라이브러리는 JS 생태계에 많습니다. 따라서 플러터 프로젝트에 JS 실행환경을 만들어야합니다.
GraphQL Code Generator 라이브러리를 활용하여 서버 엔드포인트 스키마를 파일로 만드는 방법을 알아봅니다.
GraphqL 서버는 JSONPlaceholder의 graphql 버전인 GraphQLZero를 이용합니다.
flutter 프로젝트 루트 경로에서 다음을 실행합니다.
$ npm init -y
$ npm i graphql @graphql-codegen/cli @graphql-codegen/schema-ast
위 명령어를 실행하면 node_moudules 폴더가 생성됩니다. .gitignore에 해당 폴더를 추가해주어 깃에서 제외시킵니다.
...
# Android Studio will place build artifacts here
/android/app/debug
/android/app/profile
/android/app/release

node_modules # 추가
그리고 루트 경로에 codegen.yml 파일을 생성합니다.
overwrite: true
schema: 'https://graphqlzero.almansi.me/api'
generates:
  ./lib/schema.graphql:
    plugins:
      - schema-ast
위는 https://graphqlzero.almansi.me/api 엔드포인트의 graphql 스키마를 확인하여 schema.graphql 파일을 만들겠다는 설정입니다.
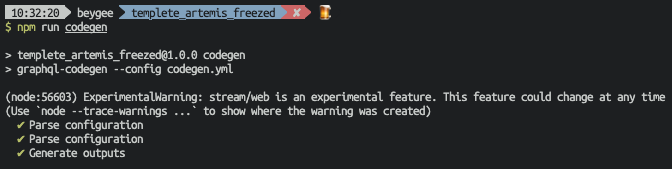
이후 package.json 스크립트에 다음 명령어를 추가합니다.
"scripts": {
  "codegen": "graphql-codegen --config codegen.yml"
},
마지막으로 터미널에서 npm run codegen을 입력하면 성공적으로 스키마 파일이 추가됩니다.
Artemis
이제 Flutter 진영으로 돌아옵니다. 생성된 스키마를 기반으로 dart 파일을 생성해보겠습니다.
먼저 pubspec.yaml에 의존성 설치를 합니다.
# ...
dependencies:
  # ...
  graphql_flutter: ^5.0.2-beta.2
  json_serializable: ^6.1.4

dev_dependencies:
  # ...
  build_runner: ^2.1.7
  artemis: ^7.1.0-beta.0
  freezed: ^1.0.2
먼저 artemis 설정을 해주어야합니다. 루트 경로에 build.yaml을 생성합니다.
targets:
  $default:
    builders:
      artemis:
        options:
          schema_mapping:
            - schema: lib/schema.graphql
              queries_glob: lib/graphql/*.graphql
              output: lib/generated/graphql_api.dart
그리고 user 쿼리를 호출하는 graphql을 작성합니다.
query user{
  user(id: 1) {
    id
    username
    email
    address {
      geo {
        lat
        lng
      }
    }
  }
}
이제 터미널에 flutter pub run build_runner build 명령어를 실행하면 쿼리를 호출할 수 있는 dart 파일이 생성됩니다.
graphql_flutter
데이터를 받아오는 쿼리 파일이 만들어졌으니, 이제 실제로 네트워크와 연결해야합니다. artemis 에서도 통신 API가 존재하지만, 실제로 큰 프로젝트에서는 graphql-flutter의 풍부한 기능을 이용해야할 때가 많습니다.
따라서 통신 부분은 graphql-flutter 라이브러리를 이용하여 구현합니다.
import 'package:graphql_flutter/graphql_flutter.dart';
import 'package:gql/src/ast/ast.dart';

class MyGraphQLClient {
  MyGraphQLClient() {
    _initClient();
  }

  static String hostUrl = "https://graphqlzero.almansi.me/api";

  final HttpLink _httpLink = HttpLink(hostUrl);

  late GraphQLClient _client;
  GraphQLClient get client => _client;

  Future<dynamic> query(
    DocumentNode document, {
    Map<String, dynamic>? data,
  }) async {
    var result = await _client.query(QueryOptions(
      document: document,
      variables: data ?? {},
    ));

    if (result.hasException) {
      var message = result.exception!.graphqlErrors.first.message;
      throw GraphQLError(message: message);
    }

    return result.data;
  }

  Future<dynamic> mutate(
    DocumentNode document, {
    Map<String, dynamic>? data,
  }) async {
    var result = await _client.mutate(MutationOptions(
      document: document,
      variables: data ?? {},
    ));

    if (result.hasException) {
      var message = result.exception!.graphqlErrors.first.message;
      throw GraphQLError(message: message);
    }

    return result.data;
  }

  void _initClient() async {
    _client = GraphQLClient(
      cache: GraphQLCache(),
      link: _httpLink,
      defaultPolicies: DefaultPolicies(
        query: Policies(
          fetch: FetchPolicy.noCache,
        ),
      ),
    );
  }
}

MyGraphQLClient graphQLClient = MyGraphQLClient();
이 graphQLClient를 이용하여 아까 생성했던 user query를 호출하여 데이터를 가져올 수 있습니다.
var data = await graphQLClient.query(UserQuery().document);
print(data["user"]);

// Restarted application in 489ms.
// flutter: {id: 1, username: Bret, email: Sincere@april.biz, address: {geo: {lat: -37.3159, lng: 81.1496}}}
print 되는 값은 다음과 같습니다.
{
  "user": {
    "id": "1",
    "username": "Bret",
    "email": "Sincere@april.biz",
    "address": {
      "geo": {
        "lat": -37.3159,
        "lng": 81.1496
      }
    }
  }
}
이런식으로 말이죠. 하지만 저 data는 Map<String, dynamic>형 이어서 타입추론도 되지않습니다. 이를 객체로 래핑하는 과정을 거치겠습니다.
freezed
User를 래핑할 모델을 만들겠습니다.
import 'package:freezed_annotation/freezed_annotation.dart';
import 'package:flutter/foundation.dart';
part 'user.freezed.dart';
part 'user.g.dart';
class User with _$User {
const User._();
const factory User({
required String id,
required String username,
required String email,
required Address address,
}) = _User;
factory User.fromJson(Map<String, dynamic> json) => _$UserFromJson(json);
}
class Address with _$Address {
const Address._();
const factory Address({
required Geo geo,
}) = _Address;
factory Address.fromJson(Map<String, dynamic> json) =>
_$AddressFromJson(json);
}
class Geo with _$Geo {
const Geo._();
const factory Geo({
required double lat,
required double lng,
}) = _Geo;
factory Geo.fromJson(Map<String, dynamic> json) => _$GeoFromJson(json);
}그리고 flutter pub run build_runner build 명령어를 다시 실행하여 freezed 파일을 만듭니다.
var data = await graphQLClient.query(UserQuery().document);
var user = User.fromJson(data["user"]);
print(user.username);
print(user.address);
print(user.toJson());
이제 Raw Data를 파싱하여 객체형태로 이용할 수 있게 되었습니다! freezed로 객체를 만들었기 때문에 copyWith, fromJson, toJson 등 다양한 유틸 기능을 이용할 수 있습니다.
정리
Data를 가져오는 DataProvider 역할을 artemis가 대신해주게 되면서 graphql만 신경쓰면 개발할 수 있게 되었습니다. 이후에 객체를 freezed로 파싱하는 부분을 따로 Repository를 만들어 이용하면 비즈니스 로직 개발에 더 집중 할 수 있습니다.
이후에 비즈니스 로직은 bloc 패턴을 이용하거나, getx를 이용하면 됩니다.
다만 아쉬운 점이 몇가지 있습니다. 😢
artemis에서 graphql 코드를 토대로 파일을 제너레이팅할 때, 스키마를 분석하여 freezed를 지원하는 모델을 만들어 준다면 시간을 더 절약할 수 있었을 겁니다.
그리고 dart에서 null safety가 도입되면서, freezed 모델을 작성할 때 각각의 속성 값이 required인지, nullable인지 정확히 맞춰서 개발하여야 합니다.
예를 들어, graphql에서는 age 속성이 없는데, freezed 모델에 required int age로 선언하면 그대로 프로그램이 죽습니다.. 😅
또한 리액트에서 주로 쓰는 훅 방식처럼 Flutter 진영에서 GraphQL Query를 위젯방식으로 사용하기에도 한계가 있습니다. 글로벌 상태관리가 되지 않기 때문입니다. 따라서 위 예제에서 했던 것처럼 함수 형태로 데이터를 받아와 bloc이든 provider에 데이터를 저장하는 것이 편한 것 같습니다.
References
- https://bloclibrary.dev/
- https://pub.dev/packages/artemis
- https://another-light.tistory.com/78
- https://medium.com/@v.ditsyak/ultimate-toolchain-to-work-with-graphql-in-flutter-13aef79c6484
- https://bartvwezel.nl/flutter/generating-models-for-a-graphql-endpoint-in-flutter/
- https://www.graphql-code-generator.com/
- https://graphqlzero.almansi.me