본 글은 Nest Docs Database를 토대로 공부하여 작성한 글입니다.
Overviews
nest.js는 SQL, no-SQL 데이터베이스 유명 라이브러리와 호환 가능합니다.
주로 많은 사람들이 TypeORM, Sequelize를 연동하여 사용하고 있습니다.
그 밖에 Prisma, MikroORM 등과 호환 가능합니다.
이 글에서는 TypeORM을 연결 할 시 실제 DB 테이블과 어떻게 연결되는 지를 중점으로 다뤄보도록 하겠습니다.
Installation
설치해서 세팅하는 법은 간단합니다.
$ npm install --save @nestjs/typeorm typeorm mysql2그리고 보통 AppModule에 TypeOrmModule을 넣어 초기화합니다.
import { Module } from '@nestjs/common'
import { TypeOrmModule } from '@nestjs/typeorm'

@Module({
  imports: [
    TypeOrmModule.forRoot({
      type: 'mysql',
      host: 'localhost',
      port: 3306,
      username: 'root',
      password: 'root',
      database: 'test',
      entities: [],
      synchronize: true,
    }),
  ],
})
export class AppModule {}
위 코드에서 forRoot에 들어가는 객체는 ormconfig.json에 들어가는 값과 같습니다.
프로젝트를 많이 만들다 보면 옵션 키 값 중 entities 속성이 말썽을 부릴 때가 많습니다. 보통 프로젝트 내에서 사용하는 모든 entity를 참조하기 위해 사용하는 관례 코드는 다음과 같습니다.
entities: './dist/**/*.entity.js'보통 nest.js 프로젝트를 타입스크립트로 작업하면, 개발환경에서 watch 모드로 실시간 빌드를 해주기 때문에 dist 폴더에 트랜스파일링된 js 파일들이 만들어집니다. 여기에서 entity 파일들을 스캔하여 엔티티들을 실제 DB와 연결해줍니다.
하지만 nest.js를 monorepo 방식으로 변경하여 작업하면, 웹팩 빌드로 변경되기 때문에 dist에 파일이 하나로 뭉쳐져서() 만들어집니다. 그럼 기존의 glob 방식으로 파일 경로로 entity 들을 스캔할 수 없게 됩니다.
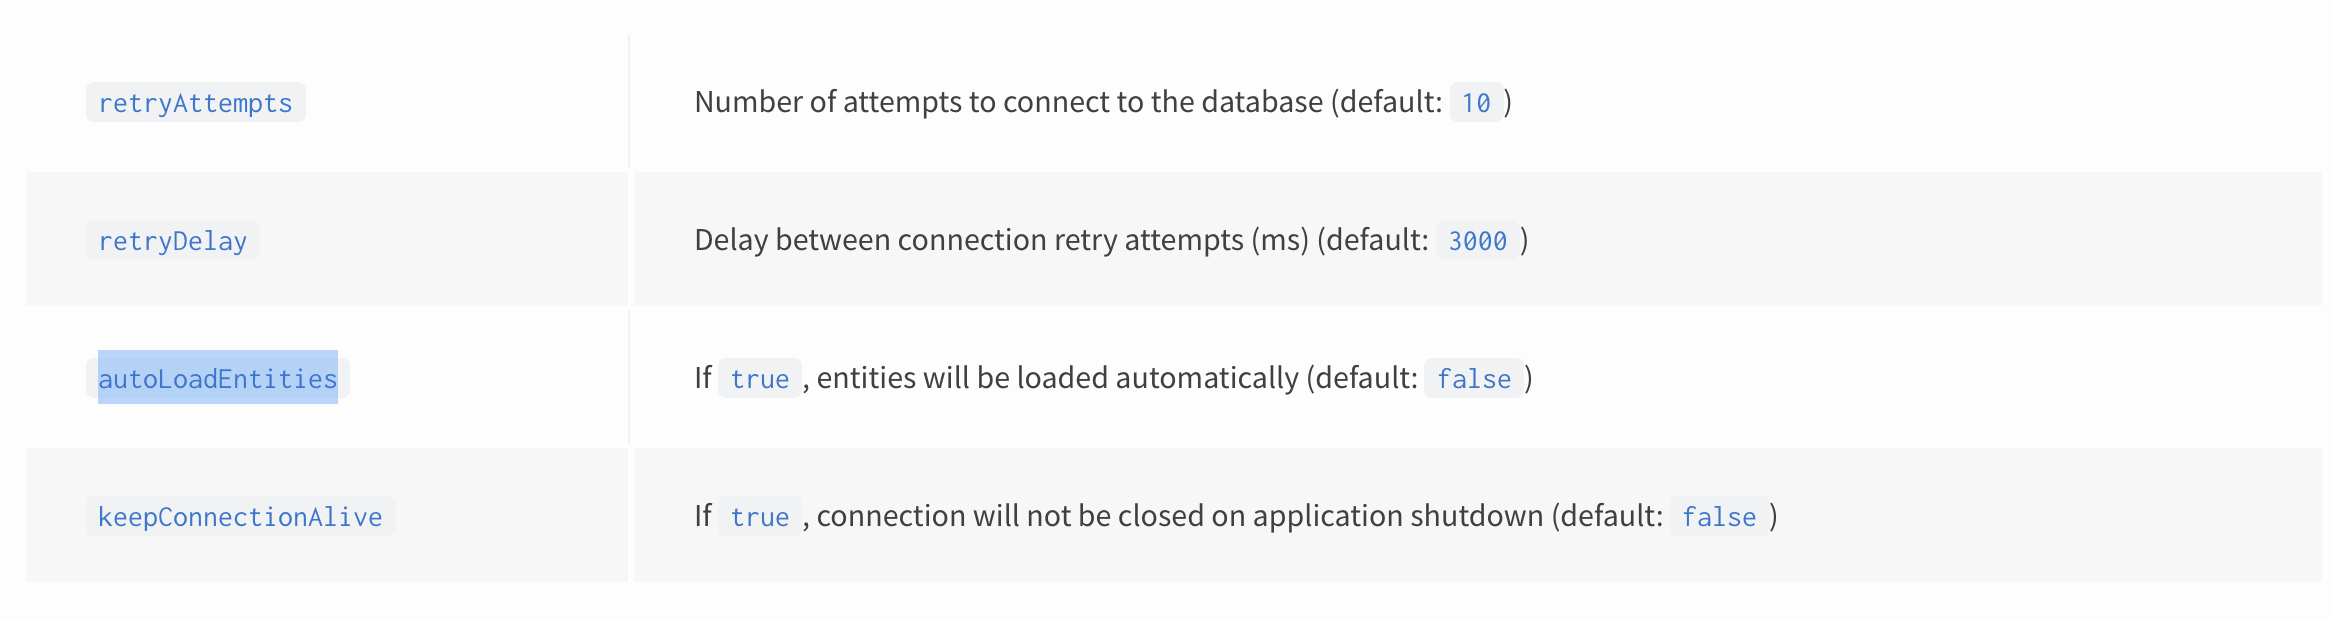
따라서 nest 팀은 이를 인지하고 @nestjs/typeorm 패키지에 autoLoadEntities 속성을 만들어 제공해주고 있습니다. 이를 이용하면 더 쉽게 엔티티를 연결할 수 있습니다.
@Module({
  imports: [
    TypeOrmModule.forRoot({
      ...
      autoLoadEntities: true,
    }),
  ],
})
그러면 대체 autoLoadEntities 속성은 어떻게 entity 들을 스캔하는 걸까요? 그리고 또 다른 방법은 없을까요?
코드베이스로 엔티티 참조
먼저 @nestjs/typeorm 소스를 보면 autoLoadEntities가 어떻게 구현되어 있는지 알 수 있습니다. 주석된 곳만 보세요
@nestjs/typeorm
private static async createConnectionFactory(
  options: TypeOrmModuleOptions,
  connectionFactory?: TypeOrmConnectionFactory,
): Promise<Connection> {
  const connectionToken = getConnectionName(options as ConnectionOptions);
  ...
      if (!options.autoLoadEntities) {
        return createTypeormConnection(options as ConnectionOptions);
      }
      // autoLoadEntities 옵션이 있을 경우 아래 코드를 수행
      let entities = options.entities;
      // entities 속성이 존재한다면 뒤에 붙여준다.
      if (entities) {
        // EntitiesMetadataStorage 라는 함수를 통해 엔티티 리스트를 가져와 추가해준다.
        entities = entities.concat(
          EntitiesMetadataStorage.getEntitiesByConnection(connectionToken),
        );
      } else {
        entities =
          EntitiesMetadataStorage.getEntitiesByConnection(connectionToken);
      }
      return createTypeormConnection({
        ...options,
        entities,
      } as ConnectionOptions);
   ...
위 코드를 보면 autoLoadEntities가 참일 시 EntitiesMetadataStorage.getEntitiesByConnection(connectionToken)를 호출하여 엔티티 리스트를 가져와 합쳐주는 것을 볼 수 있습니다.
함수명으로 짐작건대, EntitiesMetadataStorage라는 글로벌 저장소에서 엔티티를 가져올 것입니다.
위에서 사용된 EntitiesMetadataStorage 클래스도 @nestjs/typeorm에 구현되어 있습니다.
import { Connection, ConnectionOptions } from 'typeorm'
import { EntityClassOrSchema } from './interfaces/entity-class-or-schema.type'

type ConnectionToken = Connection | ConnectionOptions | string

export class EntitiesMetadataStorage {
  private static readonly storage = new Map<string, EntityClassOrSchema[]>()

  static addEntitiesByConnection(
    connection: ConnectionToken,
    entities: EntityClassOrSchema[]
  ): void {
    const connectionToken = typeof connection === 'string' ? connection : connection.name
    if (!connectionToken) {
      return
    }

    let collection = this.storage.get(connectionToken)
    if (!collection) {
      collection = []
      this.storage.set(connectionToken, collection)
    }
    entities.forEach((entity) => {
      if (collection!.includes(entity)) {
        return
      }
      collection!.push(entity)
    })
  }

  static getEntitiesByConnection(connection: ConnectionToken): EntityClassOrSchema[] {
    const connectionToken = typeof connection === 'string' ? connection : connection.name

    if (!connectionToken) {
      return []
    }
    return this.storage.get(connectionToken) || []
  }
}
EntitiesMetadataStorage 클래스는 정적 함수로만 이루어져있으며, 다음 두 함수가 있습니다.
addEntitiesByConnection: connectionToken 키 값에 Entity 리스트를 추가합니다.getEntitiesByConnection: connectionToken 키 값 안에 저장된 모든 Entity 리스트를 가져옵니다.
즉, 미리 addEntitiesByConnection를 통해 엔티티를 추가하고, getEntitiesByConnection로 가져와 엔티티들을 실제 DB와 연동합니다.
그럼 마지막으로 어디서 addEntitiesByConnection 함수를 호출하는지 살펴보겠습니다.
@Module({})
export class TypeOrmModule {
  ...
  static forFeature(
    entities: EntityClassOrSchema[] = [],
    connection: Connection | ConnectionOptions | string = DEFAULT_CONNECTION_NAME
  ): DynamicModule {
    const providers = createTypeOrmProviders(entities, connection)
    const customRepositoryEntities = getCustomRepositoryEntity(entities)
    // 함수 호출
    EntitiesMetadataStorage.addEntitiesByConnection(connection, [
      ...entities,
      ...customRepositoryEntities,
    ])
    return {
      module: TypeOrmModule,
      providers: providers,
      exports: providers,
    }
  }
  ...
}
TypeOrmModule.forFeature 함수를 통해 엔티티를 넣어주는군요.
우리는 보통 외부 API를 노출하기 위해 여러 커스텀 모듈을 만들고, 그 곳에 TypeOrmModule.forFeature 함수를 통해 엔티티나, 커스텀 레포지토리를 연동합니다.
그 내부 구현에서 EntitiesMetadataStorage에 엔티티를 넣어주는 것이었습니다.
그럼 우리가 작성한 forFeature 함수가 모두 실행되고 마지막으로 AppModule의 TypeOrmModule.forRoot가 실행되야 겠죠? 이는 어떻게 확인할 수 있을까요?
코드를 분석하며 찾아볼 수도 있겠지만, 더 쉬운 방법이 있습니다.
바로 dev 환경에서 console.log 코드에 넣어봐서 실행하는 것입니다.
먼저 app.module.ts 에 다음 코드를 삽입합니다.
@Module({
  imports: [
    TypeOrmModule.forRootAsync({
      useFactory: async () => {
        console.log(`forRoot 실행!`)
        return Object.assign(config, {
          autoLoadEntities: true,
        })
      },
    }),
  ]
})
그리고 node_modules 폴더 내부의 @nestjs/typeorm에 들어가 forFeature 구현부에 다음 소스를 추가합니다.
...
static forFeature(entities = [], connection = typeorm_constants_1.DEFAULT_CONNECTION_NAME) {
  const providers = typeorm_providers_1.createTypeOrmProviders(entities, connection);
  const customRepositoryEntities = get_custom_repository_entity_1.getCustomRepositoryEntity(entities);
  console.log(entities, customRepositoryEntities)
  entities_metadata_storage_1.EntitiesMetadataStorage.addEntitiesByConnection(connection, [
      ...entities,
      ...customRepositoryEntities,
  ]);
  return {
      module: TypeOrmModule_1,
      providers: providers,
      exports: providers,
  };
}
...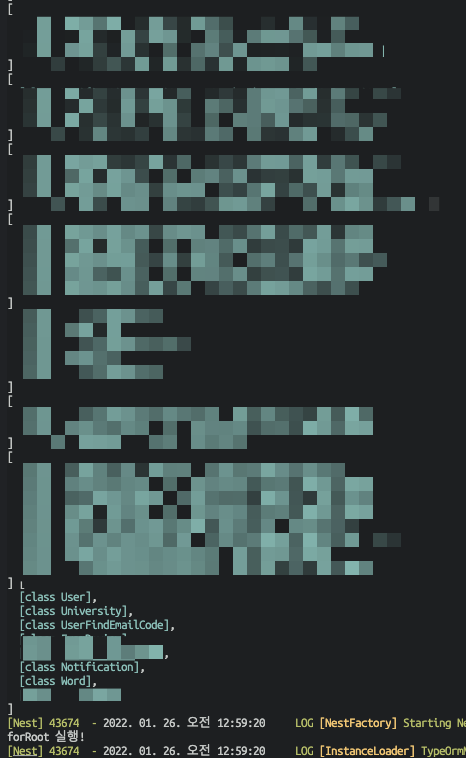
대충 엔티티가 먼저 잘 나오는군요
위와 같이 forRoot 전에 모든 엔티티가 잘 불러와진다는 것을 확인할 수 있습니다.
이렇게 @nestjs/typeorm에서 autoLoadEntities 값을 참으로 주면 엔티티 로드 프로세스는 다음과 같습니다.
forFeature를 통해EntitiesMetadataStorage글로벌 스토어에 엔티티를 추가합니다.- 모든
forFeature가 불린 후,forRoot함수가 실행되어EntitiesMetadataStorage에 저장된 엔티티 목록을 가져옵니다. - 해당 엔티티 리스트를
typeorm설정에 넣어 실제 DB와 연결합니다.
typeorm
@nestjs/typeorm를 쓰지 않고도 typeorm 패키지만 이용하여 구현 가능합니다. 사실 @nestjs/typeorm 에서 EntitiesMetadataStorage 글로벌 저장소를 이용하는게 typeorm 에서 구현된 코드와 비슷합니다.
먼저 결론만 말씀드리면 다음 코드로 엔티티를 호출 할 수 있습니다.
import { getMetadataArgsStorage } from 'typeorm'

@Module({
  imports: [
    TypeOrmModule.forRoot({
      entities: getMetadataArgsStorage().tables.map((tbl) => tbl.target),
    }),
  ],
})
getMetadataArgsStorage 가 글로벌 저장소 역할을 합니다. typeorm 소스를 보면 다음과 같습니다.
/**
 * Gets metadata args storage.
 */
export function getMetadataArgsStorage(): MetadataArgsStorage {
    const globalScope = PlatformTools.getGlobalVariable();
    if (!globalScope.typeormMetadataArgsStorage)
        globalScope.typeormMetadataArgsStorage = new MetadataArgsStorage();

    return globalScope.typeormMetadataArgsStorage;
}

export class MetadataArgsStorage {
    readonly tables: TableMetadataArgs[] = [];
    readonly trees: TreeMetadataArgs[] = [];
    readonly entityRepositories: EntityRepositoryMetadataArgs[] = [];
    ...
}getMetadataArgsStorage는 싱글톤 형태로 이루어져 있습니다.
MetadataArgsStorage 에는 tables 멤버 변수가 있으며, 이는 읽기 전용입니다. 하지만 해당 클래스 내부 어디에도 tables 변수에 엔티티를 추가하는 코드는 볼 수 없었습니다. (캡슐화가 이상하게 되어있네요 😅) 그래서 클래스 외부에서 찾아봤습니다.
찾아보니 typeorm의 Entity 데코레이터에서 추가하는 것을 확인할 수 있었습니다.
export function Entity(nameOrOptions?: string|EntityOptions, maybeOptions?: EntityOptions): ClassDecorator {
    const options = (typeof nameOrOptions === "object" ? nameOrOptions as EntityOptions : maybeOptions) || {};
    const name = typeof nameOrOptions === "string" ? nameOrOptions : options.name;

    return function (target) {
        getMetadataArgsStorage().tables.push({
            target: target,
            name: name,
            type: "regular",
            ...
        } as TableMetadataArgs);
    };
}
즉, Entity 데코레이터가 걸려있는 모든 엔티티는 로드되어 forRoot 함수 실행 시 실제 DB와 연동될 겁니다.

위처럼 Entity는 선언되어 있고, forFeature로 등록되지 않은 경우가 있다면, typeorm 방식으로 엔티티를 로드하면 될겁니다.
References

너무나도 궁금했던 내용이었는데, 잘 정리해주셔서 감사합니다 덕분에 좋은 정보 얻을 수 있었습니다!! 혹시 이 글을 참고해서 글을 작성하고 싶은데, 글을 참고해도 괜찮을까요?