
IoC (Inversion of Control) 개념
Inversion of Control (제어의 역전)
- 일반적인 프로그래밍에서, 프로그램의 제어 흐름 구조가 뒤바뀌는 것을 의미한다.
- 프로그래머가 작성한 프로그램이 재사용 라이브러리의 흐름 제어를 받게 되는 프로그래밍 원칙이다.
- 객체의 생성과 관리, 객체간의 의존성 처리 등을 프레임워크에서 대신 처리해주는 것이 대표적인 예이다.
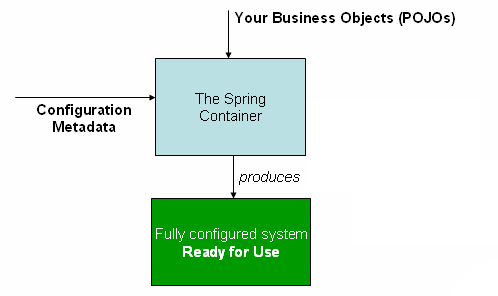
IoC Container
- IoC를 구현한 구체적인 프레임워크
- 객체를 관리하고, 객체의 생성을 책임지고, 의존성을 자동으로 관리하는 컨테이너
특징
- IoC 컨테이너는 객체의 생성을 책임지고, 의존성을 관리한다.
- POJO의 생성, 초기화, 서비스, 소멸에 대한 권한을 가진다.
- 개발자들이 직접 POJO를 생성할 수 있지만 컨테이너에게 맡긴다.
- 개발자는 비즈니스 로직에 집중할 수 있다.
- 객체 생성 코드가 없으므로 TDD가 용이하다.
Srping Framework의 IoC Container 👉 "Application Context"
Bean 이란?
- Bean은 Spring IoC Container에서 관리되는 객체이다.
Spring은 Bean을 생성하고, 초기화하고, 의존성 주입하고, 제거하는 등의 일을 IoC Container를 통해 자동으로 처리할 수 있다.
Bean Factory
- Bean의 생성, 초기화, 연결, 제거 등의 라이프사이클을 관리한다.
- Bean을 조회할 수 있는 getBean() 메소드가 정의되어 있다.
- BeanFactory 계열의 인터페이스만 구현한 클래스는 단순히 컨테이너에서 객체를 생성하고 DI를 처리하는 기능만 제공한다
- 보통은 BeanFactory를 바로 사용하지 않고, 이를 확장한 ApplicationContext를 사용한다.
Configuration MetaData
- BeanFactory가 IoC를 적용하기 위해 사용하는 설정 정보이다.
- 설정 메타 정보는 IoC 컨테이너에 의해 관리 되는 Bean 객체를 생성하고 구성할 때 사용된다.
Applicatioin Context
-
Bean을 등록, 생성, 조회, 반환 관리하는 기능 (BeanFactory를 확장한 IoC Container)
-
스프링의 각종 부가 기능을 추가로 제공한다.
BeanFactory보다 추가적으로 제공하는 기능
- 국제화가 지원되는 텍스트 메시지를 관리한다.
- 이미지같은 파일 자원을 로드할 수 있는 포괄적인 방법을 제공한다.
- 리스너로 등록된 빈에게 이벤트 발생을 알려 준다.
IoC Container 사용 방법 (Bean 등록하기)
✔️ 공통적으로 사용할 PersonDTO
@Data
@AllArgsConstructor
public class PersonDTO {
	private String name
    private int age
}
1. XML 방식
1) Bean 등록하기
<?xml version="1.0" encoding="UTF-8"?>
<beans xmlns="http://www.springframework.org/schema/beans"
xmlns:xsi="http://www.w3.org/2001/XMLSchema-instance"
xsi:schemaLocation="http://www.springframework.org/schema/beans
http://www.springframework.org/schema/beans/spring-beans.xsd">

  	<bean id="person" class="com.common.PersonDTO">
		<constructor-arg name="name" value="llocr"/>
      	<constructor-arg name="age" value="23"/>
	</bean>
</beans>
2) Bean 꺼내오기
public class Application {
	public static void main(String[] args) {
    	ApplicationContext context = new GenericXmlApplicationContext("section01/xmlconfig/spring-context.xml");

       	PersonDTO person = context.getBean("person", PersonDTO.class);

        System.out.println(person);
	}
2. Java Config 방식
1) Bean 등록하기
java class를 만들어서 Bean을 등록한다.
@Configuration
public class ContextConfiguration {
	 @Bean(name = "person") //Bean의 이름 지정, 지정하지 않으면 Bean의 이름이 '메소드의 이름'으로 정의됨
    public PersonDTO getHuman() {
        return new HumanDTO("박지성", 22);
    }
2) Bean 꺼내오기
public class Application {
	public static void main(String[] args) {
    	ApplicationContext context = new AnnotationConfigApplicationContext(ContextConfiguration.class);

       	PersonDTO person = context.getBean("person", PersonDTO.class);

        System.out.println(person);
	}
}
3-1. Annotation 방식 (XML - ComponentScan)
1) Bean 등록하기
- xml 파일에 component를 사용한다고 설정해준다.
<?xml version="1.0" encoding="UTF-8"?>
<beans xmlns="http://www.springframework.org/schema/beans"
       xmlns:xsi="http://www.w3.org/2001/XMLSchema-instance"
       xmlns:context="http://www.springframework.org/schema/context"
       xsi:schemaLocation="http://www.springframework.org/schema/beans http://www.springframework.org/schema/beans/spring-beans.xsd http://www.springframework.org/schema/context https://www.springframework.org/schema/context/spring-context.xsd">

    <context:component-scan base-package="com.section03"/>
</beans>- java class에 어노테이션으로 @Component 달아주기
@Component
public class PersonService {
	private final PersonDTO person;

    public PersonService() {
    	person = new PersonDTO("홍길동", 20);
   	}
}
2) Bean 꺼내오기
public class Application {
    public static void main(String[] args) {

        ApplicationContext context = new AnnotationConfigApplicationContext(PersonService.class);

        PersonService personService = context.getBean("personService", PersonService.class);
3-2. Annotation 방식 (Java - ComponentScan)
1) Bean 등록하기
@Component
public class PersonService {
	private final PersonDTO person;

    public PersonService() {
    	person = new PersonDTO("홍길동", 20);
   	}
}- @Component를 모두 찾아서 Bean으로 등록해준다.
@Configuration
@ComponentScan(basePackages="com.section03")
public class ContextConfiguration{}
2) Bean 꺼내오기
public class Application {
	public static void main(String[] args) {
    	ApplicationContext context = new AnnotationConfigApplicationContext(ContextConfiguration.class);

       	PersonDTO person = context.getBean("person", PersonDTO.class);

        System.out.println(person);
	}
}
정리
- XML 설정은 전통적으로 사용하던 방식으로 최근에는 Java 설정이 선호된다.
- 개발자가 직접 컨트롤 가능한 Class의 경우 @Component를 클래스에 사용하여 빈 스캐닝을 통한 자동 빈 등록을 한다.
- 개발자가 직접 제어할 수 없는 외부 라이브러리는 @Bean을 메소드에 사용하여 수동 빈 등록을 해야 한다.
- 다형성을 활용하고 싶은 경우에도 @Bean을 사용할 수 있다.

ᴘʜɪʟɪᴘᴘɪᴀɴs 3:14