어디서 사용하려고?
온라인
리액트를 온라인에서 실습할 수 있게 제공되는 웹페이지 Stackblitz
로컬
- create react app을 사용해서 시작
- node.js 필요 nodejs.org에 가서 설치
- vscode에서 terminal을 켠 후C:\React> creat-react-app. 입력 설치
- 완료되면 npm-start로 react를 실행!
수정 방법
설치를 마쳤으니 수정하는 방법을 알아야 한다.
리스트에서 가장 중요한 것은 src폴더와 index.js파일을 찾아 거기에 적혀 있는 것이 동작하게 되는 것
index.js
import App from './App';App.js
import logo from './logo.svg';
import './App.css';

function App() {
  return (
    <div className="App">
      <header className="App-header">
        <img src={logo} className="App-logo" alt="logo" />
        <p>
          Edit <code>src/App.js</code> and save to reload.
        </p>
        <a
          className="App-link"
          href="https://reactjs.org"
          target="_blank"
          rel="noopener noreferrer"
        >
          Learn React
        </a>
      </header>
    </div>
  );
}

export default App;
function App() {
return (
<div className="App">
Hello Dubu!
</div>
);
}index.js를 입구로 볼 수 있고 이곳에는 여러가지 전역 설정들이 들어가 있다index.css에는 index에 들어갈 디자인의 들어간다.App.js에는 화면에 들어갈 설정이 들어간다.App.css에서는 App.js 파일의디자인이 들어간다
그렇다면 App 위에 있는 id 가root인 건 무엇인가?
- 리엑트에서
root란, 리엑트 앱이 엘레멘트를 추가하고 추적하는 최상위 레벨의 데이터 구조이다.

index.js에서의 root
const root = ReactDOM.createRoot(document.getElementById('root'));
root.render(
<React.StrictMode>
<App />
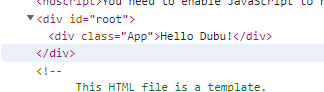
</React.StrictMode>public/index.html 에서의 root (수정 가능)
    <title>React App</title>
  </head>
  <body>
    <noscript>You need to enable JavaScript to run this app.</noscript>
    <div id="root"></div>
    <!--
      This HTML file is a template.
      If you open it directly in the browser, you will see an empty page.

      You can add webfonts, meta tags, or analytics to this file.
      The build step will place the bundled scripts into the <body> tag.

      To begin the development, run `npm start` or `yarn start`.
      To create a production bundle, use `npm run build` or `yarn build`.
    -->
  </body>
</html>
배포는 어떻게?
npm start를 이용해서 실행 시킨 페이지는 개발을 위한 application이다 실제로 서비스하기에는 용량도 크고 좋지 않다.
-
💡 terminal - npm run build -
build 라는 폴더가 생긴다.
-
공백마저 사라진 index.html이 나온다.
-
💡 npx serve -s build -
배포할 수 있게 나온다.

숲으로