Python 버전을 한 번 확인해봤다.

📌 Python 버전 관리 pyenv
아래 명령어로 pyenv를 설치할 수 있다.
$ git clone https://github.com/pyenv/pyenv.git ~/.pyenv
$ echo 'export PYENV_ROOT="$HOME/.pyenv"' >> ~/.profile
$ echo 'export PATH="$PYENV_ROOT/bin:$PATH"' >> ~/.profile
$ echo -e 'if command -v pyenv 1>/dev/null 2>&1; then\n  eval "$(pyenv init -)"\nfi' >> ~/.profile
$ source ~/.profile
$ git clone https://github.com/pyenv/pyenv-virtualenv.git $(pyenv root)/plugins/pyenv-virtualenv

$ sudo apt-get install -y libsqlite3-dev zlib1g-dev libssl-dev libffi-dev
$ sudo apt-get install -y python3-setuptools python3-pip
파이썬 설치
$ pyenv install 3.7.3사용할 버전 지정
$ pyenv global 3.7.3  # 항상 이 버전을 사용
$ pyenv shell 3.7.3  # 이 세션에서만 사용
virtual env 생성
$ pyenv virtualenv [venv 이름]virtual env 목록 확인
$ pyenv virtualenvsvirtual env 진입
$ pyenv activate [venv 이름]사용
([venv 이름]) pip3 install jupyterlab
([venv 이름]) pip3 install sklearn
$ export PATH="~/.pyenv/bin:$PATH"
$ eval "$(pyenv init -)"
$ eval "$(pyenv virtualenv-init -)"🧱 가상환경 구축해보기
- home 디렉터리로 이동해서 가상환경을 구축할 디렉터리를 생성한다.
- 아래 명령어로 가상환경을 구축할 수 있다.
python3 -m venv {가상환경 구축할 디렉터리명}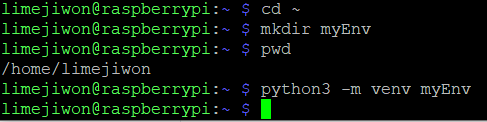
-
ls명령어로 가상환경이 잘 구축되었나 확인 가능

-
가상환경 진입 및 탈출
source bin/activate # 가상환경 진입
deactivate 			# 가상환경 탈출
- 가상환경 삭제 명령어
sudo rm -rf myEnv🚩 Tensorflow Lite Model Rasberrypi4 에서 돌려보기
📌 Preparing TFLite in RPi
TFLite Model을 라즈베리파이4에서 돌려보기 위한 테스트를 위해, MobileNet의 Lite version을 사용해본다.
TensorFlow Lite는 Tensorflow의 한 부분으로, Tensorflow 라이브러리를 설치하면 Lite 버전도 함께 설치된다.
여기에서는 이미지 분류만을 위해 TFLite model을 사용할 것이기 때문에 필요한 부분만 설치해서 실행해보자.
TFLite model을 사용하여 prediction(예측)을 수행하기 위해서는 Tensorflow에서 interpreter 클래스가 필요하고, tensorflow.lite.python.interpreter.Interpreter 형태로 접근 가능하다. 저장 공간 절약을 위해 이 클래스만 다운로드 받아보자.
tflite_runtim 이라는 패키지가 Interpreter 클래스를 포함하고 있고, tflite_runtime.interpreter.Interpreter로 접근 가능하다. tflite_runtime 패키지를 다운받기 위해 자신이 Python 버전에 알맞은 Python wheel을 설치해야 한다.
tflite_runtime-1.14.0-cp35-cp35m-linux_armv7l.whl 파일을 다운 받은 후, pip 명령어로 설치해준다.
pip3 install /{path_to_directory/tflite_runtime-1.14.0-cp35-cp35m-linux_armv7l.whl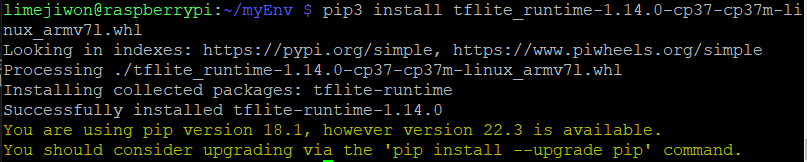
위처럼 성공적으로 설치된 것을 확인할 수 있다.
💡 주의할 점은 python 버전과 동일해야 한다는 점!
나의 경우, 기본으로 설치된 Python 버전이 3.9.2였고, 위 파일은 3.7와 호환되기 때문에 pyenv 명령어를 통해 Python 버전 변경을 해주었다.
After the tflite_runtime is installed successfully, you can check that everything is working properly by importing the Interpreter class according to the next line:
from tflite_runtime.interpreter import Interpreter아래처럼 잘 불러와지는 것을 확인할 수 있다.

tflite_runtim을 설치해서 prediction 수행할 수 있도록 준비했으니, 사용할 TFLite모델을 다운 받을 차례다.
📌 Download MobileNet
MobileNet 의 TFLite 버전을 아래처럼 다운받을 수 있다.
아래처럼 TFLite Model과 클래스 레이블이 포함되어있다.
mobilenet_v1_1.0_224_quant.tflite
labels_mobilenet_quant_v1_224.txt
Mobilenet에는 두 가지 버전이 있는데, 여기서는 Version 1을 사용한다. (224,224) 사이즈의 ㅣ미지를 허용하는 버전이다. quantized 됨으로써 model size와 latency of prediction을 축소시켜준다.
나는 아래 경로에 위치시켜 두었다.
/home/limejiwon/TFLite_MobileNet
	mobilenet_v1_1.0_224_quant.tflite
	labels_mobilenet_quant_v1_224.txt
	test.jpg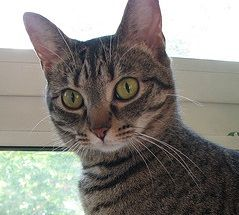
위는 test.jpg 이미지이다.
Model 불러오기
from tflite_runtime.interpreter import Interpreter
from PIL import Image
import numpy as np
import time

data_folder = "/home/pi/TFLite_MobileNet/"

model_path = data_folder + "mobilenet_v1_1.0_224_quant.tflite"
label_path = data_folder + "labels_mobilenet_quant_v1_224.txt"

interpreter = Interpreter(model_path)
print("Model Loaded Successfully.")interpreter.allocate_tensors()
_, height, width, _ = interpreter.get_input_details()[0]['shape']
print("Image Shape (", width, ",", height, ")")allocate_tensors(): memory alloction- `get_input_details()
# Load an image to be classified.
image = Image.open(data_folder + "test.jpg").convert('RGB').resize((width, height))
# Classify the image.
time1 = time.time()
label_id, prob = classify_image(interpreter, image)
time2 = time.time()
classification_time = np.round(time2-time1, 3)
print("Classificaiton Time =", classification_time, "seconds.")
# Read class labels.
labels = load_labels(label_path)
# Return the classification label of the image.
classification_label = labels[label_id]
print("Image Label is :", classification_label, ", with Accuracy :", np.round(prob*100, 2), "%.")classify_image(): Within it, the input tensor of the model is set equal to the test image according to the set_input_tensor() function. Next is to use the invoke() function to run the model and propagate the input to get the outputs. The outputs returned are the class index, in addition to its probability.
📌 Classifying a Single Image
📄 전체 코드
from tflite_runtime.interpreter import Interpreter
from PIL import Image
import numpy as np
import time
def load_labels(path): # Read the labels from the text file as a Python list.
with open(path, 'r') as f:
return [line.strip() for i, line in enumerate(f.readlines())]
def set_input_tensor(interpreter, image):
tensor_index = interpreter.get_input_details()[0]['index']
input_tensor = interpreter.tensor(tensor_index)()[0]
input_tensor[:, :] = image
def classify_image(interpreter, image, top_k=1):
set_input_tensor(interpreter, image)
interpreter.invoke()
output_details = interpreter.get_output_details()[0]
output = np.squeeze(interpreter.get_tensor(output_details['index']))
scale, zero_point = output_details['quantization']
output = scale * (output - zero_point)
ordered = np.argpartition(-output, 1)
return [(i, output[i]) for i in ordered[:top_k]][0]
data_folder = "/home/pi/TFLite_MobileNet/"
model_path = data_folder + "mobilenet_v1_1.0_224_quant.tflite"
label_path = data_folder + "labels_mobilenet_quant_v1_224.txt"
interpreter = Interpreter(model_path)
print("Model Loaded Successfully.")
interpreter.allocate_tensors()
_, height, width, _ = interpreter.get_input_details()[0]['shape']
print("Image Shape (", width, ",", height, ")")
# Load an image to be classified.
image = Image.open(data_folder + "test.jpg").convert('RGB').resize((width, height))

# Classify the image.
time1 = time.time()
label_id, prob = classify_image(interpreter, image)
time2 = time.time()
classification_time = np.round(time2-time1, 3)
print("Classificaiton Time =", classification_time, "seconds.")

# Read class labels.
labels = load_labels(label_path)

# Return the classification label of the image.
classification_label = labels[label_id]
print("Image Label is :", classification_label, ", with Accuracy :", np.round(prob*100, 2), "%.")
👉 참고: Window에서 Linux로 파일 전송 방법
나는 계속 ssh_init: Network error: Cannot assign requested address 에러가 떴는데 여기 보니까 아래처럼 -P 옵션으로 포트번호를 지정해줘야 한다고 알려줌.
pscp -P 22 c:\documents\foo.txt user@example.com:/tmp/foohttps://zzinise.tistory.com/13
https://seo-dh-elec.tistory.com/32
https://blog.paperspace.com/tensorflow-lite-raspberry-pi/
https://velog.io/@mythos/Raspberry-Pi-4-Python-%EB%B2%84%EC%A0%84-%EA%B4%80%EB%A6%AC
https://github.com/KU-BIG/nipa-connection-guide/issues/5