bootstrap 의 공백(Spacing)
부트스트랩 기반 템플릿을 사용하던 도중 여러가지 클래스들을 만나게 되었다. py-1 라는 클래스가 궁금해서 시작된 포스팅 😀😀
Box model 박스모델
bootstrap의 공백의 자세한 클래스들을 알아가기 전에, 먼저 박스 모델부터 잠깐 살펴보도록 하자! 박스 모델은 HTML의 엘리먼트들은 (사각형 모양을 의미하는)박스의 형태를 가지고 있는 것을 말한다. 박스의 크기와 박스간의 간격을 정의하는 다양한 속성이 있다.
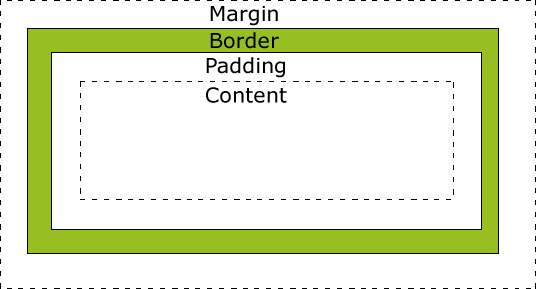
- margin : border를 기준으로 박스의 여백을 지정, 시각적인 요소는 없음
- border : 박스의 테두리
- padding : 테두리와 content간의 간격
- content : 엘리먼트 안에 포함되는 컨텐츠
M/P
-
M : Margin
-
P : Padding
t , b , l , r ,x , y
-
t : top
-
b : bottom
-
l : left
-
r : right
-
x : x축 -> left , right
-
y : y축 -> top , bottom
0, 1, 2, 3, 4, 5, auto
-
0 : 0
-
1 : .25rem( font-size가 16px이면, 4px) 크기
-
2 : .5rem( font-size가 16px이면, 8px) 크기
-
3 : 1rem( font-size가 16px이면, 16px) 크기
-
4 : 1.5rem( font-size가 16px이면, 24px) 크기
-
5 : 3rem( font-size가 16px이면, 48px) 크기
-
auto : margin의 자동으로 세팅
n1, n2, n3, n4, n5
-
n : negative을 의미
-
n1 : -.25rem( font-size가 16px이면, -4px) 크기
-
n2 : -.5rem( font-size가 16px이면, -8px) 크기
-
n3 : -1rem( font-size가 16px이면, -16px) 크기
-
n4 : -1.5rem( font-size가 16px이면, -24px) 크기
-
n5 : -3rem( font-size가 16px이면, -48px) 크기
Examples
<!DOCTYPE html>
<html lang="en">

<head>
    <meta charset="UTF-8">
    <meta name="viewport" content="width=device-width, initial-scale=1.0">
    <title>Document</title>

    <link rel="stylesheet" href="https://stackpath.bootstrapcdn.com/bootstrap/4.5.2/css/bootstrap.min.css" integrity="sha384-JcKb8q3iqJ61gNV9KGb8thSsNjpSL0n8PARn9HuZOnIxN0hoP+VmmDGMN5t9UJ0Z" crossorigin="anonymous">
    <script src="https://stackpath.bootstrapcdn.com/bootstrap/4.5.2/js/bootstrap.min.js" integrity="sha384-B4gt1jrGC7Jh4AgTPSdUtOBvfO8shuf57BaghqFfPlYxofvL8/KUEfYiJOMMV+rV" crossorigin="anonymous"></script>
    <script src="https://stackpath.bootstrapcdn.com/bootstrap/4.5.2/js/bootstrap.bundle.min.js" integrity="sha384-LtrjvnR4Twt/qOuYxE721u19sVFLVSA4hf/rRt6PrZTmiPltdZcI7q7PXQBYTKyf" crossorigin="anonymous"></script>
</head>

<body>
    <div class="container">
        <!-- 수평선 긋기 -->
        <hr class="my-5">
        <div class="bg-secondary">margin 테스트</div>
        <div class="m-1 bg-warning"> m-1 => top, bottom, left, right에 .25rem 만큼 margin </div>
        <div class="m-3 bg-primary"> m-3 => top, bottom, left, right에 1rem 만큼 margin </div>
        <div class="m-5 bg-success"> m-5 => top, bottom, left, right에 3rem 만큼 margin </div> <!-- 수평선 긋기 -->
        <hr class="my-2">
        <div class="bg-secondary">margin X,Y 테스트</div>
        <div class="mx-3 bg-primary"> m-3 => left, right에 1rem 만큼 margin </div>
        <div class="my-3 bg-success"> m-3 => top, bottom에 1rem 만큼 margin </div> <!-- 수평선 긋기 -->
        <hr class="my-2">
        <div class="bg-secondary">padding 테스트</div>
        <div class="p-1 bg-warning"> p-1 => top, bottom, left, right에 .25rem 만큼 padding </div>
        <div class="p-3 bg-primary"> p-3 => top, bottom, left, right에 1rem 만큼 padding </div>
        <div class="p-5 bg-success"> p-5 => top, bottom, left, right에 3rem 만큼 padding </div> <!-- 수평선 긋기 -->
        <hr class="my-2">
        <div class="bg-secondary">padding X ,Y 테스트</div>
        <div class="px-3 bg-success"> px-3 => left, right에 1rem 만큼 padding </div>
        <div class="py-3 bg-primary"> px-3 => top, bottom에 1rem 만큼 padding </div> <!-- 수평선 긋기 -->
        <hr class="my-2">
    </div>

</body>

</html>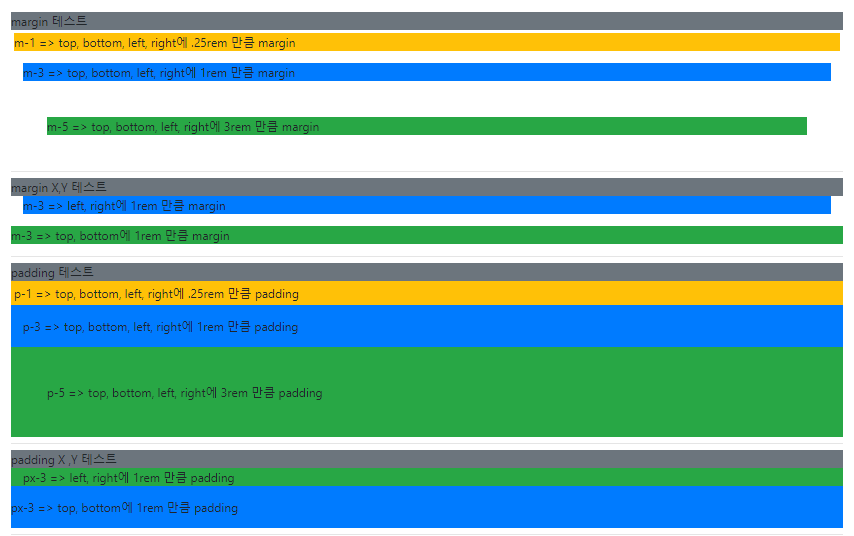
Reference::
https://opentutorials.org/course/837/6
https://minaminaworld.tistory.com/136# [미나미 블로그]
https://www.bootstrapcdn.com/
정말 감사합니다!!!!!!!!!