
Google OAuth 연동하기
1. 환경 설치
Node.js 설치 확인
$ node -v
// v18.13.0
NestJS 설치 및 프로젝트 생성
$ npm i @nestjs/cli		//전역옵션은 -g
$ nest new <프로젝트명>
2. Google API keys
Google Cloud Console (https://console.cloud.google.com/projectcreate)
- 아래 블로그를 참고하여 API key를 획득한다. 획득한 키는 잘 간직한다.
Setting and Get API keys
3. Google OAuth 연동
(1) 먼저 필요한 패키지들을 설치한다.
$ npm i --save @nestjs/passport passport passport-google-oauth20 @nestjs/config
$ npm i -D @types/passport-google-oauth20
(2) src 폴더 아래에 google.strategy.ts 파일을 생성한 후에, 다음과 같이 코드를 작성한다.
import { PassportStrategy } from '@nestjs/passport';
import { Strategy, VerifyCallback } from 'passport-google-oauth20';
import { Injectable } from '@nestjs/common';

@Injectable()
export class GoogleStrategy extends PassportStrategy(Strategy, 'google') {
  constructor() {
    super({
      clientID: process.env.GOOGLE_CLIENT_ID,
      clientSecret: process.env.GOOGLE_CLIENT_SECRET,
      callbackURL: 'http://localhost:3000/auth/google-redirect',
      scope: ['email', 'profile'],
    });
  }
  async validate(
    accessToken: string,
    refreshToken: string,
    profile: any,
    done: VerifyCallback,
  ): Promise<any> {
    const { name, emails, photos } = profile;
    const user = {
      email: emails[0].value,
      firstName: name.givenName,
      lastName: name.familyName,
      picture: photos[0].value,
      accessToken,
      refreshToken,
    };
    done(null, user);
  }
}
- 필요한 종속성을 가져온다.
PassportStrategy클래스는'@nestjs/passport'패키지의 모듈이다.GoogleStrategy라는 클래스는PassportStrategy를 확장한다.- 부모 메서드에서 생성자 함수에 클라이언트 ID와 Secret, 콜백URL, scope(범위) 속성을 인스턴스화한다.
- 클라이언트ID와 Secret key는 앱을 생성할 때 구글에서 제공되는 키들이다.
- 콜백URL은 구글이 사용자를 인증한 후 연결되는 앱, 즉 인증 후 열리는 다음 페이지를 의미한다.
- scope은 구글에서 반환하는 사용자 정보 배열이다.
(3) 상위 폴더에 .env 파일을 생성한 후, 위에 만들었던 클라이언트 ID와 Secret Keys를 넣어준다.
GOOGLE_CLIENT_ID= <클라이언트 ID>
GOOGLE_CLIENT_SECRET= <클라이언트 Secret Keys>
(4) src 폴더 아래에 google-oauth.guard.ts 파일을 생성한 후에, 다음과 같이 코드를 작성한다.
import { Injectable } from '@nestjs/common';
import { ConfigService } from '@nestjs/config';
import { AuthGuard } from '@nestjs/passport';

@Injectable()
export class GoogleOAuthGuard extends AuthGuard('google') {
  constructor(private configService: ConfigService) {
    super({
      accessType: 'offline',
    });
  }
}
인증에 성공한 후 구글에서 새로고침 토큰을 반환할 수 있도록 AccessType을 오프라인으로 지정한다.
(5) 기존에 있던 app.controller.ts 파일에 구글 인증과 인증 후에 Google을 콜백하는 코드를 작성한다.
import { GoogleOAuthGuard } from './google-oauth.guard';
import { Controller, Get, Request, UseGuards } from '@nestjs/common';
import { AppService } from './app.service';

@Controller('auth')
export class AppController {
  constructor(private readonly appService: AppService) {}

  @Get()
  @UseGuards(GoogleOAuthGuard)
  async googleAuth(@Request() req) {}

  @Get('google-redirect')
  @UseGuards(GoogleOAuthGuard)
  googleAuthRedirect(@Request() req) {
    return this.appService.googleLogin(req);
  }
}
(6) 기존에 있던 app.service.ts 파일에 로그인 후의 리턴값을 작성해 준다.
import { Injectable } from '@nestjs/common';

@Injectable()
export class AppService {
  googleLogin(req) {
    if (!req.user) {
      return 'No user from google';
    }

    return {
      message: 'User information from google',
      user: req.user,
    };
  }
}
googleLogin메소드는 인증에 실패하면 'No user from google'라는 오류 메시지를 반환하고, 인증에 성공하면 사용자 정보를 반환한다.
(7) app.module.ts 파일에서 GoogleStrategy 클래스를 가져오고, 공급자 배열에 서비스로 추가해 준다.
import { GoogleStrategy } from './google.strategy';
import { Module } from '@nestjs/common';
import { AppController } from './app.controller';
import { AppService } from './app.service';
import { ConfigModule } from '@nestjs/config';

@Module({
  imports: [ConfigModule.forRoot()],
  controllers: [AppController],
  providers: [AppService, GoogleStrategy],
})
export class AppModule {}
앱은 사용자가 알려줄 때까지
GoogleStrategy사용법을 알 수 없기 때문에app.module.ts파일에서GoogleStrategy클래스를 가져오고 공급자 배열에 서비스로 추가한다.
(8) 이제 실행을 시켜보자.
$ npm run start:dev
//주소는 google cloud console 에서 만들었던 주소값을 실행시키면 된다.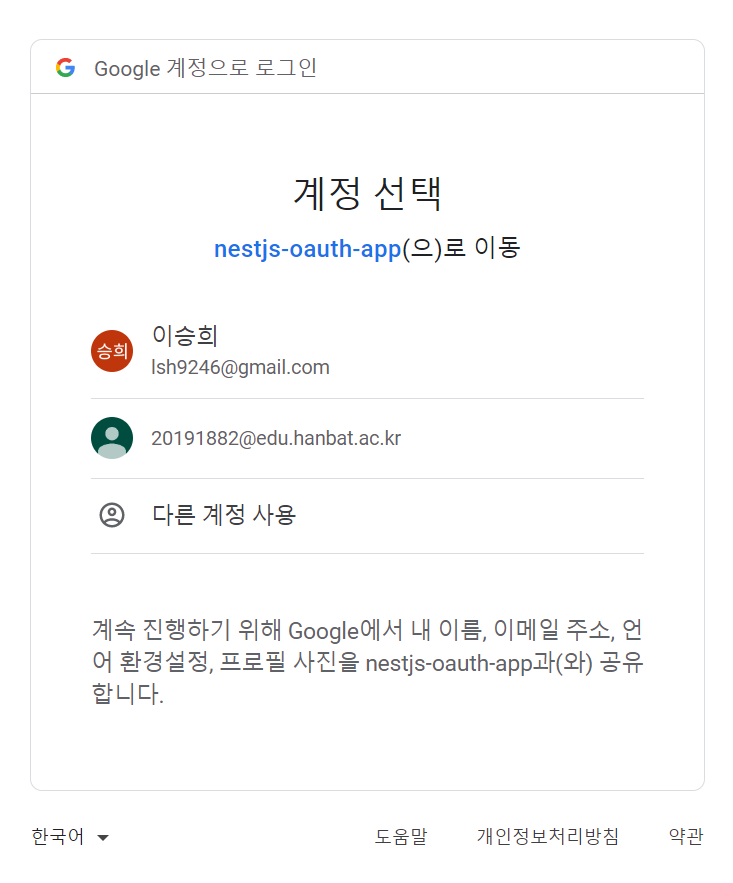
👍성 공 적 으로 로그인 페이지가 실행됨을 볼 수 있다.
참고한 자료
OAuth 2.0을 사용하여 Google API에 액세스하기
Implement Google OAuth in NestJS using Passport