React는 가상 DOM을 사용해 브라우저의 부담을 줄였다.
DOM 조작이 브라우저에 큰 무리를 주기 때문에 가상 DOM을 만들어 달라진 부분만 비교해 업데이트한다. (프레임워크 없이 최적화한 것보다는 느리지만 효율적이다)
가상이라는 특성을 활용해 리액트를 모바일과 데스크탑 애플리케이션에서도 사용 가능하다.
component는 재사용 가능할 정도로 쪼개서 사용하면 된다.
🔥 Component 🔥
component 란 웹 사이트의 각 객체 (DOM) 의 단위 (조각_
각자의 기능을 하는 완성품.
ZeroCho : "컴포넌트를 잘게 쪼개야 사이트 규모가 커졌을 때 코드 관리가 편해집니다. 하나의 컴포넌트가 하나의 기능만 하면 에러를 잡기도 쉽습니다."
출처 : 제로초 님
⭐️ class-components ⭐️
< react-hooks 가 배포되기 전 사용하던 방식 >
useState 함수를 통해 state를 가공하고 state가 변화되면 해당 component가 re-rendering 된다.
lifecycle 에 의한 매서드들을 이용해 component가 그려지는 순서 중 원하는 순서에 특정 동작을 하게 할 수 있다.
🔥 react-lifecycle 🔥
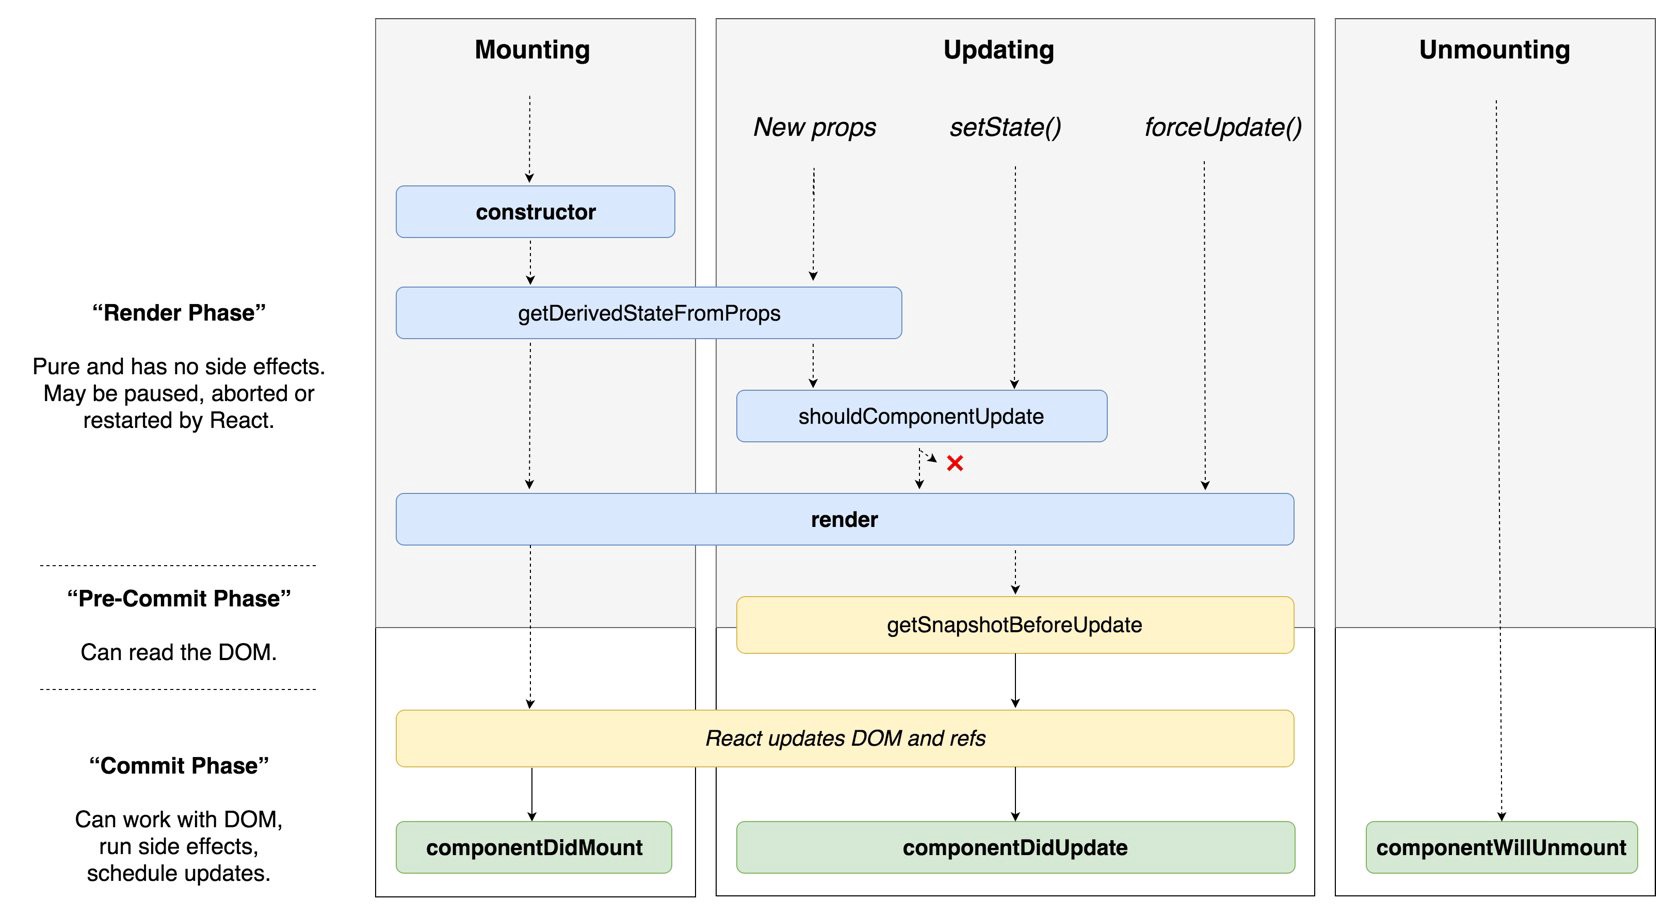
⭐️ Mount 과정 ⭐️
🔥 Mount 란? 🔥
component가 처음 실행될 때 그것을 Mount라고 한다. 컴포넌트가 시작되면 우선 context, defaultProps와 state를 저장한다.
- state, context, defaultProps 저장
- componentWillMount (react 17에서 삭제)
- render
- componentDidMount
👉🏻 render() {}
- render 가 반환하는 component가 실제로 보여지는 DOM (ex - page, button, box ... etc).👉🏻 componentDidMount() {}
- render 된 후 실행
DOM 에 접근할 수 있다. 주로 AJAX 요청을 하거나 setTimeout, setInterval 같은 행동을 한다.
⭐️ Props Update 과정 ⭐️
🔥 Props 란? 🔥
props 란 속성을 나타내는 데이터이다. component로 작성한 요소 (element) 를 JSX 속성 (attribute) 와 자식을 해당 component에 단일 객체로 전달한다. 이 객체를 props라고 한다
- componentWillReceiveProps (react 17에서 삭제)
- shouldComponentUpdate
- componentWillUpdate (react 17에서 삭제)
- render
- componentDidUpdate
👉🏻 shouldComponentUpdate(nextProps, nextState() {}
- state 가 변화 할 때 마다 실행된다.
false 를 반환하면 render 호출 X, componentDidUpdate 호출 X (default 값은 true).
props 또는 state 가 새로운 값으로 update 된 후 rendering 직전에 호출된다.
(현재 state나 props의 변화가 component의 출력 결과에 영향을 미치는지 판단 가능)👉🏻 render() {}
👉🏻 componentDidMount() {}
👉🏻 componentDidUpdate(prevProps, prevState, snapshot) {}
-> 최초 render 에는 실행 X, update가 된 직후에 실행된다. component가 update 되었을 때 DOM 을 조작할 때 사용. 이전과 현재 Props 를 비교하여 네트워크 요청 작업 등 시행. (props 가 변하지 않으면 네트워크 요청 필요 X)
⭐️ State Update 과정 ⭐️
- shouldComponentUpdate
- componentWillUpdate (react 17에서 삭제)
- render
- componentDidUpdate
👉🏻 shouldComponentUpdate(nextProps, nextState) {}
👉🏻 render () {}
👉🏻 componentDidUpdate() {}
출처 : 제로초 님
⭐️ class-components 사용해보기 ⭐️
npm 필요 👉🏻 npm install
$ npx create-react-app 폴더명
👉🏻 "폴더명"으로 react 프로젝트 생성
$ cd 폴더명
👉🏻 생성한 폴더로 이동
$ npm start
👉🏻 생성한 폴더에서 react 프로젝트 실행
브라우저에서 다음과 같은 화면이 켜지면 성공적으로 react 프로젝트를 설치하고 실행한 것이다.

🔥 버튼 클릭 시 숫자가 변화하는 Page 만들기 🔥
src/App.js새로 작성하는데 필요하지 않은 코드 삭제
import "./App.css";

function App() {
    return ();
}

export default App;
src/src 폴더에 page 폴더, component 폴더 생성
src/page
src/component
src/page/CountPage.jsxpage 폴더에서 CountPage.jsx 파일 생성
(동작이 이루어질 Page 생성)import React, { Component } from "react"; class CountPage extends Component { state = {} render() { return (); } } export default CountPage;
src/component/Buttons.jsxcomponent 폴더에 Buttons.js 생성
(Page에 사용할 버튼 컴포넌트 생성)import React, { Component } from "react"; class Buttons extends Component { state = {}; render() { return (); } } export default Buttons;
src/App.js생성한 CountPage 를 App.js 에 import 해준다
import CountPage from "./page/CountPage";
import "./App.css";

function App() {
    return <CountPage></CountPage>;
}

export default App;
src/page/CountPage.jsxButtons component를 import,
state 에 number 저장,
plus 함수 생성 - (클릭 시 number + 1 기능),
minus 함수 생성 - (클릭 시 number - 1 기능),
plus 와 minus 를 Buttons component 에 속성으로 (props) 으로 넘겨준다
import React, { Component } from "react";
import Buttons from "../component/buttons/Buttons";

class CountPage extends Component {
    state = {
        number: 1,
    };

    plus = () => {
        const { number } = this.state;
        this.setState({
            number: number + 1,
        });
    };

    minus = () => {
        const { number } = this.state;
        this.setState({
            number: number - 1,
        });
    };

    render() {
        const { number, name } = this.state;
        const { plus, minus } = this;

        return (
            <>
                <div>{number}</div>
                <Buttons funcPlus={plus} funcMinus={minus}></Buttons>
            </>
        );
    }
}

export default CountPage;
state 의 값(number)을 직접 변경하지 않고
(잘못된 예시)plus = () => { const { number } = this.state; // const number = this.state.number; 와 같은 의미 number = number + 1; }setState 함수를 사용해 state를 update 해준다
plus = () => {
  const { number } = this.state;
  this.setState({
    number: number + 1,
  })
}
state 의 값을 직접 변경하는 경우 값의 변화는 있지만 해당 component 가 re-rendering 이 되지 않는다
state가 update 되면 해당 component 가 re-rendering 된다
src/component/Buttons.jsxCountPage.jsx 에서 props 로 넘겨받은 funcPlus (즉 plus 함수) 와
funcMinus (즉 minus 함수) 를 각각 plus, minus 함수의 기능으로 사용하고
plus 버튼의 onClick event로 plus 함수,
minus 버튼의 onClick event로 minus 함수를 할당한다.import React, { Component } from "react"; class Buttons extends Component { state = {}; add = () => { this.props.funcPlus(); }; minus = () => { this.props.funcMinus(); }; render() { const { plus, minus } = this; return ( <> <button onClick={plus}>{"plus"}</button> <button onClick={minus}>{"minus"}</button> </> ); } } export default Buttons;
👉🏻 실행 화면