소개
지도에서 N개의 위치가 주어졌을 때 중간 위치를 지도해 표시해주는 서비스입니다.
기간
2021.09.30 ~ 10.01😇
기술
- Swift
- MVC Pattern
- MapKit
깃허브
https://github.com/sanghee-dev/Center-Map
특징
요구사항
- 코드베이스 오토레이아웃을 사용합니다.
- MapKit 사용합니다.
- 중간 위치 계산하는 모듈 별도 설계합니다(Singleton 패턴 사용).
- 중간 위치 계산 후에 추가된 위치 좌표가 모두 화면에 들어오도록 Zoom-Out 혹은 Zoom-In 처리합니다.
위치 추가 방법
- 최대 개수는 10개입니다.
- 지도에서 특정 위치를 길게 터치시 Alert를 띄웁니다.
- 위치가 추가될 때마다 중간 위치를 계산해 중간 위치를 수정합니다.
- 추가된 위치와 중간 위치 모두 마커로 표시하며 색은 모두 다르게 지정합니다.
위치 제거 방법
- 추가된 위치 마커를 터치시 Alert를 표시합니다.
- 삭제할 때마다 중간 위치를 계산해 중간 위치를 수정합니다.
- 위치 마커가 하나 이하일 경우 중간 위치 마커도 사라집니다.
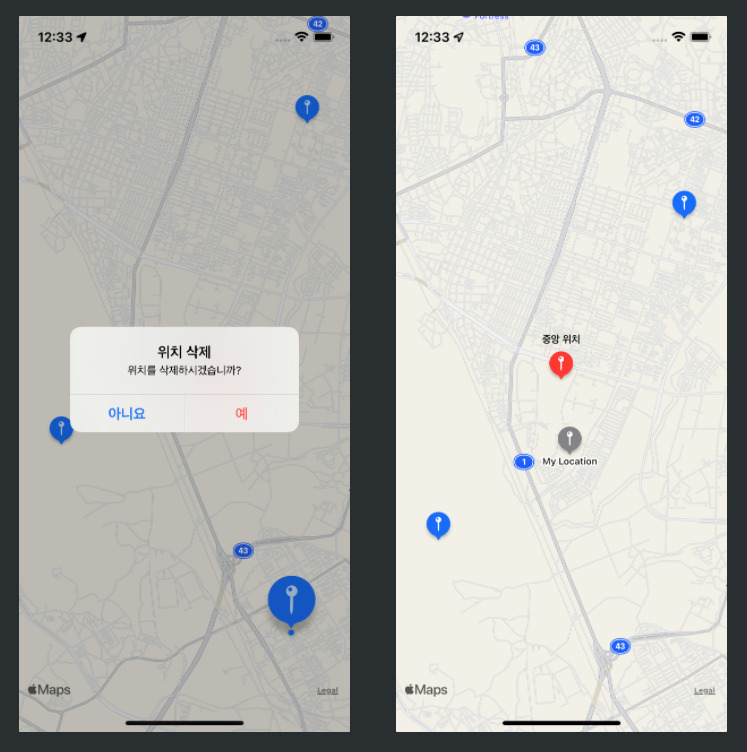
화면
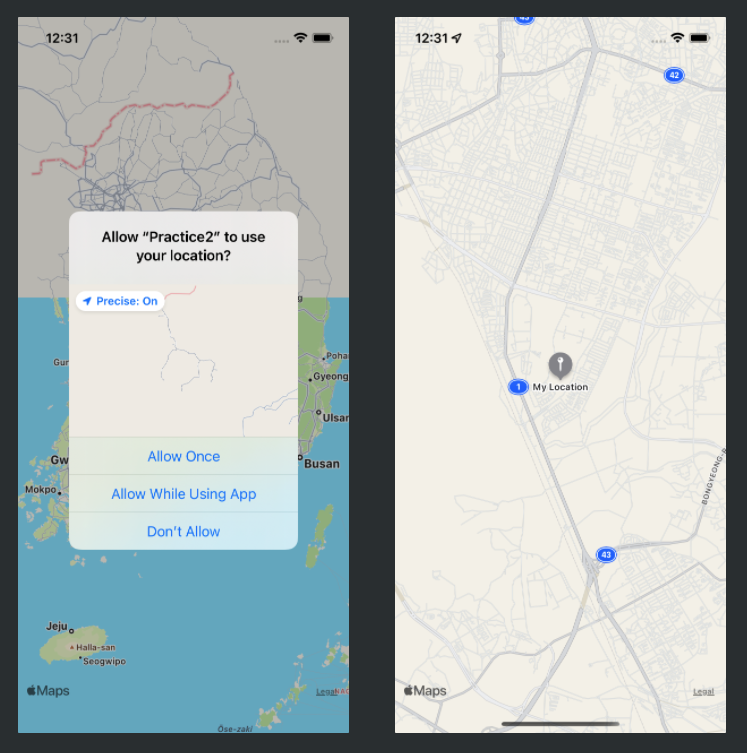
시작 화면
- 위치를 요청한 이후 유저의 위치를 기준으로 지도를 확대합니다.
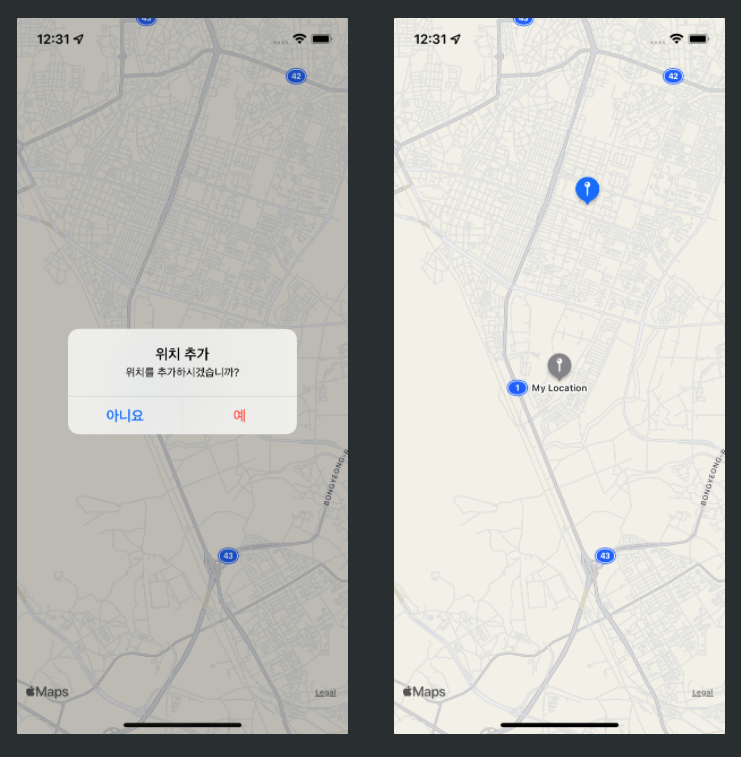
위치 추가
- 지도에서 특정 위치를 길게 터치시 Alert를 띄웁니다.
- 예를 선택하면 해당 위치에 마커를 추가합니다.
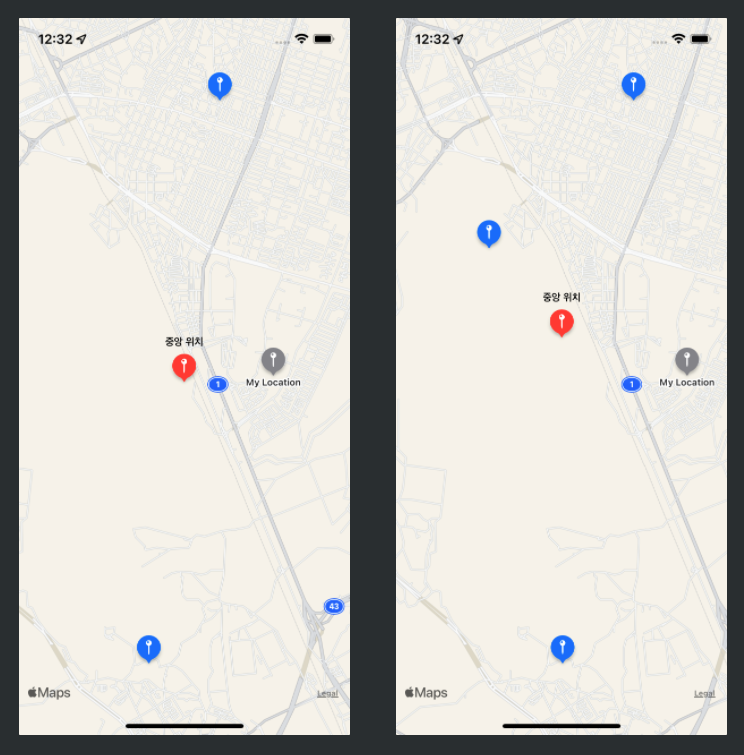
중앙 마커
- 위치가 2개 이상일 시에 중간 거리를 계산하여 마커가 표시됩니다.
- 위치가 추가되면 중앙 거리를 다시 계산해 중앙 마커를 수정합니다.
위치 삭제
- 마커를 터치시 Alert를 띄웁니다.
- 예를 선택하면 마커가 삭제됩니다.
- 마커가 삭제되면 중앙 거리를 다시 계산해 중앙 마커를 수정합니다.
코드 설명
더욱 자세한 코드는 깃허브에서 확인해주세요.
MapViewController
변수, 상수 선언
locationManager와 annotationManager를 가져온다. 싱글톤 패턴으로 작성하였으므로 ~.shared로 이미 생성된 것에 접근한다. annotations에는 프로퍼티 옵저버를 사용하였는데, 값이 세팅되면 세 함수들을 실행한다. 그리고 centerAnnotation에서 위치 마커가 변경될 때마다 중앙 마커또한 변경된다. 변경될 때, 이전의 중앙 마커는 삭제해야 한다. 따라서 didSet을 사용하여 새로운 중앙 마커가 저장되면, 이전 중앙 마커는 삭제한다. 이전 마커는 didSet에서 oldValue로 접근 가능하다. 마지막으로 mapView를 생성한다.
class MapViewController: UIViewController {
    private let locationManager = LocationManager.shared
    private let annotationManager = AnnotationManager.shared
    private let mapView = MKMapView()

    private var annotations: [MKPointAnnotation] = [] {
        didSet {
            showAnnotations()
            addCenterAnnotation()
            zoomMapView()
        }
    }
    private var centerAnnotation: MKPointAnnotation? {
        didSet {
            if let oldValue = oldValue {
                deleteAnnotation(oldValue)
            }
        }
    }
길게 터치시 위치값 얻기
viewDidLoad가 되면 길게 터치하는 제스처를 인식하는 것을 뷰에 추가한다. 길게 터치시 getCoordinate 함수를 실행시킨다. 이 함수는 우리가 기존에 생성한 mapView에서의 터치 위치를 coordinate로 변환한 이후에 annotations 배열에 추가한다.
private func addLongGesture() {
    let longGesture = UILongPressGestureRecognizer(target: self, action: #selector(getCoordinate))
    view.addGestureRecognizer(longGesture)
}

@objc
private func getCoordinate(_ longGesture: UILongPressGestureRecognizer) {
    let touchPoint = longGesture.location(in: mapView)
    let coordinate = mapView.convert(touchPoint, toCoordinateFrom: mapView)
    addAnnotation(coordinate)
}
위치 마커들을 포함하여 맵뷰를 줌인, 줌아웃하기
일단은 마커가 없거나 하나 이하일 때는 함수를 실행하지 않는다(하나가 추가되었을 때 줌인하는 것은 어색하다). space라는 값은 view와의 padding값이라고 생각하면 된다. annotations으로 zoomRect라는 사각형을 만든다. 그리고 이 사각형이 보이도록 mapView를 세팅한다.
private func zoomMapView() {
    guard annotations.count > 1 else { return }

    var zoomRect: MKMapRect = MKMapRect.null
    let padding: CGFloat = 50

    for annotation in annotations {
        let point = MKMapPoint(annotation.coordinate)
        let rect = MKMapRect(x: point.x, y: point.y, width: 0.1, height: 0.1)

        zoomRect = zoomRect.isNull ? rect : zoomRect.union(rect)
    }

    mapView.setVisibleMapRect(zoomRect, edgePadding: UIEdgeInsets(top: padding, left: padding, bottom: padding, right: padding), animated: true)
}
시작시 유저 위치를 중심으로 지도 확대
유저의 위치는 mapView에 있는 userLocation 변수로 얻는다. 이 위치를 중심으로 확대한다.
func mapView(_ mapView: MKMapView, didUpdate userLocation: MKUserLocation) {
    let region = MKCoordinateRegion(center: userLocation.coordinate, span: MKCoordinateSpan(latitudeDelta: 0.05, longitudeDelta: 0.05))
    mapView.setRegion(region, animated: true)
}
Utility
LocationManager
중간 위치 계산하는 모듈 별도 설계하였고 Singleton 패턴을 사용하였다. 싱글톤 패턴이란 특정 용도로 객체를 하나만 생성하여, 공용으로 사용하고 싶을 때 사용하는 디자인 패턴이다. shared라는 변수에 한번 생성하고 전체 코드에서 LocationManager.shared로 접근하여 사용한다. 그리고 추가로 다시 생성되지 못하게 init함수에 private을 붙여 외부와의 접근을 막는다. 위치권한에 따라 요청을 다르게 하였다.
import CoreLocation

class LocationManager: NSObject, CLLocationManagerDelegate {
    static let shared = LocationManager()
    private var manager: CLLocationManager = CLLocationManager()

    private override init() {
        super.init()
        manager.delegate = self
    }

    func locationManager(_ manager: CLLocationManager, didChangeAuthorization status: CLAuthorizationStatus) {
        if status == .authorizedWhenInUse {
            askLocation()
        }
    }

    func askLocation() {
        switch manager.authorizationStatus {
        case .authorizedAlways: manager.startUpdatingLocation()
        case .authorizedWhenInUse: manager.requestAlwaysAuthorization()
        case .notDetermined: manager.requestWhenInUseAuthorization()
        case .restricted, .denied: break
        @unknown default: break
        }
    }
}
AnnotationManager
AnnotationManager 역시 싱글톤 패턴을 사용하였다. 이 매니저는 annotations배열을 받아 중앙 위치를 반환한다.
import MapKit
import UIKit

class AnnotationManager {
    static let shared = AnnotationManager()

    private init() {}

    func getCenterCoordinate(_ annotations: [MKAnnotation]) -> CLLocationCoordinate2D {
        let count = Double(annotations.count)
        let latitude = annotations.map({ $0.coordinate }).map({ $0.latitude }).reduce(0, +) / count
        let longitude = annotations.map({ $0.coordinate }).map({ $0.longitude }).reduce(0, +) / count
        let coordinate = CLLocationCoordinate2D(latitude: latitude, longitude: longitude)

        return coordinate
    }
}
Extensions
코드베이스 오토레이아웃
SnapKit이 아닌 코드베이스 오토레이아웃을 사용하였기에 UIView에서 레이아웃을 지정하는 anchor과 center, centerX, centerY라는 함수를 생성하였다. padding의 간격의 경우에는 0을 기본으로 한다. 그 이후에 constaints를 업데이트한다. 이 함수는 updateConstraints 메소드 호출을 시스템에게 요청한다. 실제로 출력해보면 needsUpdateConstraints()를 출력해보면 true에서 false로 바뀌는 것을 확인할 수 있다.
extension UIView {
    func anchor(top: NSLayoutYAxisAnchor? = nil,
                left: NSLayoutXAxisAnchor? = nil,
                ...
                paddingTop: CGFloat = 0,
                paddingLeft: CGFloat = 0,
                ...) {
        translatesAutoresizingMaskIntoConstraints = false

        if let top = top {
            topAnchor.constraint(equalTo: top, constant: paddingTop).isActive = true
        }
        if let left = left {
            leftAnchor.constraint(equalTo: left, constant: paddingLeft).isActive = true
        }
        ...
        updateConstraintsIfNeeded()
    }

    func center(inView view: UIView, constant: CGFloat = 0) {
        translatesAutoresizingMaskIntoConstraints = false
        centerXAnchor.constraint(equalTo: view.centerXAnchor, constant: constant).isActive = true
        centerYAnchor.constraint(equalTo: view.centerYAnchor, constant: constant).isActive = true
        updateConstraintsIfNeeded()
    }
    ...
}
extension CLLocationCoordinate2D
CLLocationCoordinate2D는 Equtable이 채택되지 않은 타입이다. Equatable은 프로토콜로 값이 동일한 지 여떤지를 비교할 수 있다. 이 타입에 해당하는 값들을 비교하여 같은지 확인하고 싶기 때문에 extension == 함수를 생성하였다.
import CoreLocation

extension CLLocationCoordinate2D: Equatable {
    public static func == (lhs: CLLocationCoordinate2D, rhs: CLLocationCoordinate2D) -> Bool {
        return lhs.latitude == rhs.latitude && lhs.longitude == rhs.longitude
    }
}
PrintFn
디버깅시에만 출력되도록 print 함수를 덮어씌웠다. 만약 object을 출력한다면 "DEBUG: (object)"으로 출력되어, 다른 정보들과 섞이지 않아 출력결과를 보기 수월하다.
public func print(_ object: Any) {
    #if DEBUG
    Swift.print("DEBUG: \(object)")
    #endif
}
고생 많앗네!