FCM, Firebase Cloud Messagin 연동 에서 이어지는 내용이기 때문에, fcm 관련 세팅이 완료되어있어야 합니다.
1. token 값 가져오기
- 각 디바이스에는 고유한 fcm token이 존재합니다. 이 token 값을 알아야 해당 디바이스에 알림을 보낼 수 있습니다.
token = await FirebaseMessaging.instance.getToken();2. 코드
사실 저번에 진행했던 세팅이 완료되면 앱에서 알림보내는것은 어렵지 않았다.
class FCMController {
  final String _serverKey = "your serverKey";

  Future<void> sendMessage({
    required String userToken,
    required String title,
    required String body,
  }) async {

    http.Response response;

    NotificationSettings settings =
        await FirebaseMessaging.instance.requestPermission(
      alert: true,
      announcement: false,
      badge: true,
      carPlay: false,
      criticalAlert: false,
      provisional: false,
      sound: false,
    );

    if (settings.authorizationStatus == AuthorizationStatus.authorized) {
      print('User granted permission');
    } else if (settings.authorizationStatus ==
        AuthorizationStatus.provisional) {
      print('User granted provisional permission');
    } else {
      print('User declined or has not accepted permission');
    }

    try {
      response = await http.post(
          Uri.parse('https://fcm.googleapis.com/fcm/send'),
          headers: <String, String>{
            'Content-Type': 'application/json',
            'Authorization': 'key=$_serverKey'
          },
          body: jsonEncode({
            'notification': {'title': title, 'body': body, 'sound': 'false'},
            'ttl': '60s',
            "content_available": true,
            'data': {
              'click_action': 'FLUTTER_NOTIFICATION_CLICK',
              'id': '1',
              'status': 'done',
              "action": '테스트',
            },
            // 상대방 토큰 값, to -> 단일, registration_ids -> 여러명
            'to': userToken
            // 'registration_ids': tokenList
          }));
    } catch (e) {
      print('error $e');
    }
  }
}
- _serverKey는 firebase 홈페이지 -> 프로젝트 설정 -> 클라우드 메시징 -> 서버 키 에서 확인이 가능합니다.
- sendMessage를 통해 알림을 보낼 상대방의 fcm token값과 title, body 를 받아와서 알림을 보냅니다.
3. onMessageOpenedApp
- 우리는 어플의 알림을 받고 클릭하면 해당 앱이 켜지면서 원하는 페이지로 이동한다. 그 기능은 공식문서 의 예시를 보면 onMessageOpenedApp로 구현이 가능하다.
 @override
  void initState() {
    FirebaseMessaging.onMessage.listen((RemoteMessage message) async {
      RemoteNotification? notification = message.notification;
      AndroidNotification? android = message.notification?.android;
      var androidNotiDetails = AndroidNotificationDetails(
        channel.id,
        channel.name,
        channelDescription: channel.description,
      );
      var iOSNotiDetails = const IOSNotificationDetails();
      var details =
          NotificationDetails(android: androidNotiDetails, iOS: iOSNotiDetails);
      if (notification != null) {
        flutterLocalNotificationsPlugin.show(
          notification.hashCode,
          notification.title,
          notification.body,
          details,
        );
      }
    });

    onMessageOpenedApp((message) {
      print("onMessage ${message.data["action"].toString()}");
    });

    super.initState();
  }
- 알림을 클릭하면 onMessageOpenedApp 이 실행되는데 해당 알림의 message를 값으로 받아온다. 그 message data 를 통해 자신이 원하는 값을 확인하고 그 값에 맞게 페이지로 이동시키면 될 것 같다.
- 보낼 수 있는 메시지의 종류나 형태는 공식문서 1 과 공식문서 2 를 참고하자.
4. 주의할 점
When does a FCM token expire? 을 확인해보면 FCM 토큰 값은 다음 중 하나가 발생하면 자체적으로 갱신이 된다고 한다.
- 앱이 인스턴스 ID를 삭제합니다.
- 앱이 새 기기에서 복원됩니다.
- 사용자가 앱을 제거/재설치합니다.
- 사용자가 앱 데이터를 지웁니다.
token 값이 바뀌면 알림이 보내지지 않기 때문에 token 값 관리가 매우 중요하다.
5. 결과
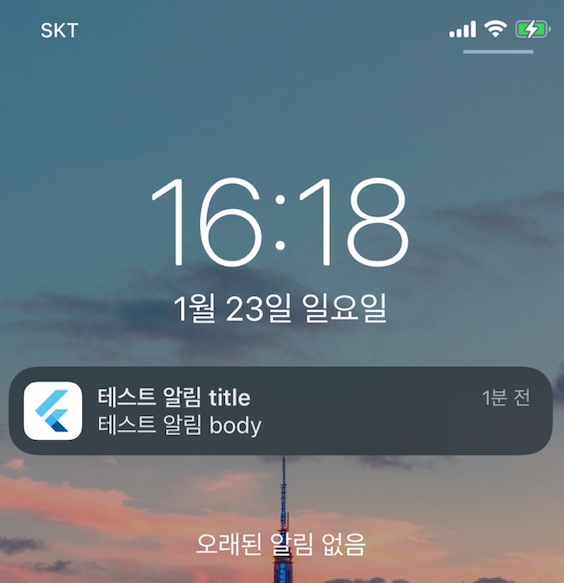
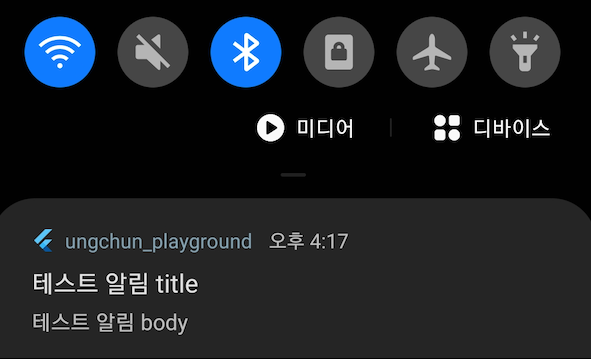
- 정상적으로 알림이 오는 모습을 볼 수 있다.