[KDT]FCFE - 7주4일 React ( Hooks )

React
Hooks
hooks 이전
-
컴포넌트 내부에 상태가 있다면? class
-
컴포넌트 내부에 상태가 없다면?
- 라이프사이클을 사용해야 한다면? class
- 라이프사이클에 관계 없다면? function
class component
import React from 'react';

class ClassComponent extends React.Component {
  render(){
    return (<div>Hello</div>);
  }
}

ReactDOM.render(
  <ClassComponent/>,
  document.querySelector('#root')
)
function component
import React from 'react';

function FunctionComponent () {
  return (<div>Hello</div>);
}

ReactDOM.render(
  <FunctionComponent/>,
  document.querySelector('#root')
)
const FunctionComponent = () => <div>Hello</div>;
ReactDOM.render(
<FunctionComponent/>,
document.querySelector('#root')
)createElement
-
첫번째 인자 type ( 태그 이름 문자열 , 리액트 컴포넌트 , React.Fragment )
-
두번째 인자
[props]( 리액트 컴포넌트에 넣어주는 데이터 객체 ) -
세번째 인자
[...children]( 자식으로 넣어주는 요소들 )
// 1. 태그이름 문자열 type

ReactDOM.render(
  React.createElement('h1', null, 'type 이 " 태그 이름 문자열 " 입니다. ' ),
  document.querySelector("#root")
)
// 2. 리액트 컴포넌트 type
const Component = () => {
return React.createElement('p', null, `type이 "React 컴포넌트" 입니다.`)
}
ReactDOM.render(
React.createElement(Component, null, null),
document.querySelector("#root")
)// 3. React.Fragment ( tag 없이 넣기 )
ReactDOM.render(
React.createElement(React.Fragment, null, `type이 "React Fragment" 입니다.`),
document.querySelector("#root")
)// 4. 복잡한 리액트 엘리먼트 모임
ReactDOM.render(
React.createElement(
'div',
null,
React.createElement(
'div',
null,
React.createElement(
'h1',
null,
'주제'
),
React.createElement(
'ul',
null,
React.createElement(
'li',
null,
'React'
),
React.createElement(
'li',
null,
'Vue'
),
),
)
),
document.querySelector("#root")
)- 더 복잡한 작업시에 사용하기위해 컴파일러를 사용한다. ! ( babel )
JSX
-
가독성 좋음
-
문법적 오류를 인지하기 쉬움
문법
-
최상위 요소가 하나여야 한다.
-
최상위 요소를 리턴하는 경우, ()로 감싸야 한다.
-
자식들을 바로 랜더링하고 싶으면
<>자식들</>를 사용한다 => Fragment -
자바스크립트 표현식을 사용하려면, {표현식}를 이용한다.. (${} 를 {})
-
if문은 사용할 수 없다. ( 삼항 연산자 혹은 &&를 사용한다. )
-
style 을 이용해 인라인 스타일링이 가능합니다.
-
class 대신 className 을 사용해 class 를 적용할 수 있다.
-
자식요소가 있으면, 꼭 닫아야 하고, 자식요소가 없으면 열면서 닫아야 한다. (
<br/>)
Props 와 State
: Props 는 컴포넌트 외부에서 컴포넌트에게 주는 데이터이다.
: State 는 컴포넌트 내부에서 변경할 수 있는 데이터이다.
-
둘 다 변경이 발생하면, 랜더가 다시 일어날 수 있다.
-
Render 함수는 Props와 State를 바탕으로 컴포넌트를 그린다.
-
Props와 State가 변경되면, 컴포넌트를 다시 그린다.
-
컴포넌트를 그리는 방법을 기술하는 함수가 랜더 함수이다.
Props
- 함수형
function Component(props){
  return (
    <div>
      <h1>{props.message} 이것은 함수로 만든 컴포넌트 입니다.</h1>
    </div>
  )
}

ReactDOM.render(
  <Component message="안녕하세요!!!"/>,
  document.querySelector("#root")
)- class 형
class Component extends React.Component {
  render(){
    return (
      <div>
        <h1>{this.props.message} 이것은 클래스로 만든 컴포넌트 입니다.</h1>
      </div>
    )
  }
}

ReactDOM.render(
  <Component message="안녕하세요!!!"/>,
  document.querySelector("#root")
)- default props (props 지정하지 않았을때 값을 설정)
function Component(props){
  return (
    <div>
      <h1>{props.message} 이것은 함수로 만든 컴포넌트 입니다.</h1>
    </div>
  )
}

Component.defaultProps = {
  message: "기본값",
};

ReactDOM.render(
  <Component message="안녕하세요!!!"/>,
  document.querySelector("#root")
)
class Component extends React.Component {
render(){
return (
<div>
<h1>{this.props.message} 이것은 클래스로 만든 컴포넌트 입니다.</h1>
</div>
)
}
}
Component.defaultProps = {
message: "기본값",
};
ReactDOM.render(
<Component/>,
document.querySelector("#root")
)class Component extends React.Component {
render(){
return (
<div>
<h1>{this.props.message} 이것은 클래스로 만든 컴포넌트 입니다.</h1>
</div>
)
}
static defaultProps = {
message: "기본값2",
}
}
ReactDOM.render(
<Component/>,
document.querySelector("#root")
)state
-
class 에서 state 는 항상 객체 형태
-
state 변경은 setState() 를 통해 한다.
class Component extends React.Component {

  // state = {
  //   count:0,
  // };

  constructor(props){
    super(props);
    this.state={count:0}
  }

  render(){
    return (
      <div>
        <h1>{this.props.message} 이것은 클래스로 만든 컴포넌트 입니다.</h1>
        <p>{this.state.count}</p>
      </div>
    )
  }

  componentDidMount(){
    setTimeout(()=>{
          this.setState(
          // {
          //   count: this.state.count +1
          // }
          (previousState)=>{
            const newState= {count: previousState.count +1}
            return newState;
          }
        )
      }, 1000
    )
  }

  static defaultProps = {
    message: "기본값2",
  }
}


ReactDOM.render(
  <Component/>,
  document.querySelector("#root")
)
babel
: ECMAScript 여러 버전에서 사용할 수 있도록 하는 컴파일러
<div>Hello</div>v 컴파일!
React.createElemnet("div", null, "Hello");Event Handling
-
HTML DOM 에 클릭 이벤트가 발생하면 그에 맞는 변경이 일어나도록 해야한다.
-
JSX에 이벤트를 설정할 수 있다.
-
camelCase 로만 사용할 수 있다.(onClick, onMouseEnter)
-
이벤트에 연결된 자바스크립트 코드는 함수 이다. (이벤트 = {함수} 와 같이 쓴다.)
-
실제 DOM 요소들에만 사용 가능하다.(리액트 컴포넌트에 사용하면, 그냥 props로 전달한다.)
함수형 사용
function Component(props){
  return (
    <div>
      <button onClick={()=>{console.log("click!!")}}>클릭!</button>
    </div>
  )
}

ReactDOM.render(
  <Component/>,
  document.querySelector("#root")
)
class형 사용
class Component extends React.Component {

  state = {
    count: 0,
  };

  render(){
    return (
       <div>
         <p>{this.state.count}</p>
         <button
           onClick={() => {
             console.log("click!!");
             this.setState((state) => {
               console.log(state);
               return {
                 ...state,
                 count: state.count + 1,
               };
             });
           }}
         >
           클릭!
         </button>
       </div>
     );
  }

  click(){
    console.log("click!!")
    this.setState((state)=>({...state, count: state.count +1,}))
  }
}

ReactDOM.render(
  <Component/>,
  document.querySelector("#root")
)- 메소드 만들고 this 바인딩 하기
class Component extends React.Component {

  state = {
    count: 0,
  };

  constructor(props){
    super(props);
    this.click = this.click.bind(this);
  }

  render(){
    return (

      <div>
        <p>{this.state.count}</p>
        <button onClick={this.click}>클릭!</button>
      </div>
    )
  }

  click(){
    console.log("click!!")
    this.setState((state)=>({...state, count: state.count +1,}))
  }
}

ReactDOM.render(
  <Component/>,
  document.querySelector("#root")
)
Component Lifecycle
: 리액트 컴포넌트는 탄생부터 죽음까지 여러지점에서 개발자가 작업이 가능하도록 메서드를 오버라이딩 할 수 있게 해준다.
Declarative (선언형)
-
라이프 사이클의 각 위치에 선언해놓은 메소드를 활용한다.
-
v16.3 이전 lifecycle
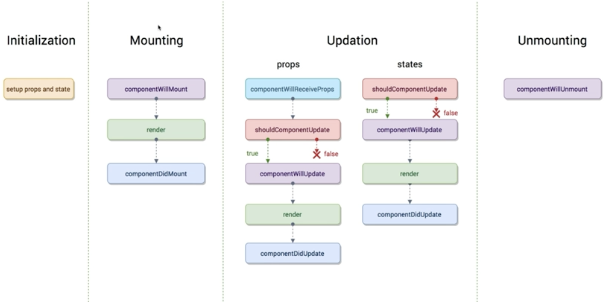
-
initialization : contructor 가 불려진다. (props, state 가 설정된다.)
-
render를 기준으로 직전(componentWillMount)과 직후(componentDidMount)에 선언되어 있다.
-
updation은 props, states 가 변경되었을때 재 랜더시의 시점에 선언되어있다.
-
props와 states 에서의 차이는 componentWillReciveProps 의 존재 하나이다.
-
shouldComponentUpdate 에서 넘겨주는 boolean 값이 중요하다.( 불필요한 렌더 방지-성능계선 )
-
최초 render 될 때를 mount 라고 한다.
componentWillReceiveProps
-
props 를 새로 지정했을때 바로 호출된다.
-
state의 변경에 반응하지 않는다.
-
props의 값에 따라 state를 변경해야 한다면 setState를 이용해 state를 변경한다.
( 다음 이벤트로 각각 가는것이 아니라 한번에 변경된다.)
shouldComponentUpdate
- props 만 변경되어도
- state 만 변경되어도
- props & state 둘다 변경되어도
- newProps 와 new State 를 인자로 해서 호출
- return type 이 boolean 이다. 기본값은 true
( true면 render, false면render가 호출되지 않는다.)
Component 라이프사이클 변경
mount
- constructor
componentWillMount-> getDerivedStateFromProps- render
- componentDidMount
updation
componentWillReceiveProps-> getDerivedStateFromProps- shouldcomponentUpdate
- render
componentWillUpdate-> getSnapshotBeforeUpdate ( snapshot으로 리턴값 출력 )- (dom에 적용)
- componentDidUpdate ( 3번째 인자로 snapshot 받아서 사용.)
component 에러 캐치
componentDidCatch(error, info){this.setState({hasError: true});}
-
ErrorBoundary ( 최상위에서 감싼다. )
-
스스로의 에러는 캐치되지 않는다.
class App extends React.Component {
  state = {
    hasError : false,
  };
  render(){
    if(this.state.hasError){
      return <div>예상치 못한 에러가 발생했다.</div>;
    }
    return <WebService/>;
  }
  componentDidCatch(error, info){
    this.setState({ hasError: true});
  }
}

ReactDOM.render(<App name="Mark"/>, document.querySelector('#root'));