Reverse Proxy
한 회사에 두 가지의 서버가 있습니다.
192.168.1.20 이라는 사설 ip를 가진 서버와 192.168.1.21 이라는 사설 ip를 가진 서버입니다. 회사에서는 각각의 서버에 다른 웹서버를 가동하고 싶습니다. 외부에서 내부로 서버에 연결해 주기 위해서는 제가 사용한 포트포워딩과 같은 방법이 있습니다만, 포트포워딩은 너무 직접적으로 연결을 공개해놓는 것 같고, 이제 url 뒤에 포트 붙히는 건 너무너무 싫습니다.
그럴때 다른 해결 방안이 있습니다. Proxy 서버를 두는 것 입니다. Proxy에는 두 가지 종류가 있는데, Forward와 Reverse 입니다.
Forward Proxy는 클라이언트(사용자)가 인터넷에 직접 접근하게 하지 않고 대신 요청을 받아 인터넷에 연결하여 결과를 클라이언트에 전달 해줍니다.
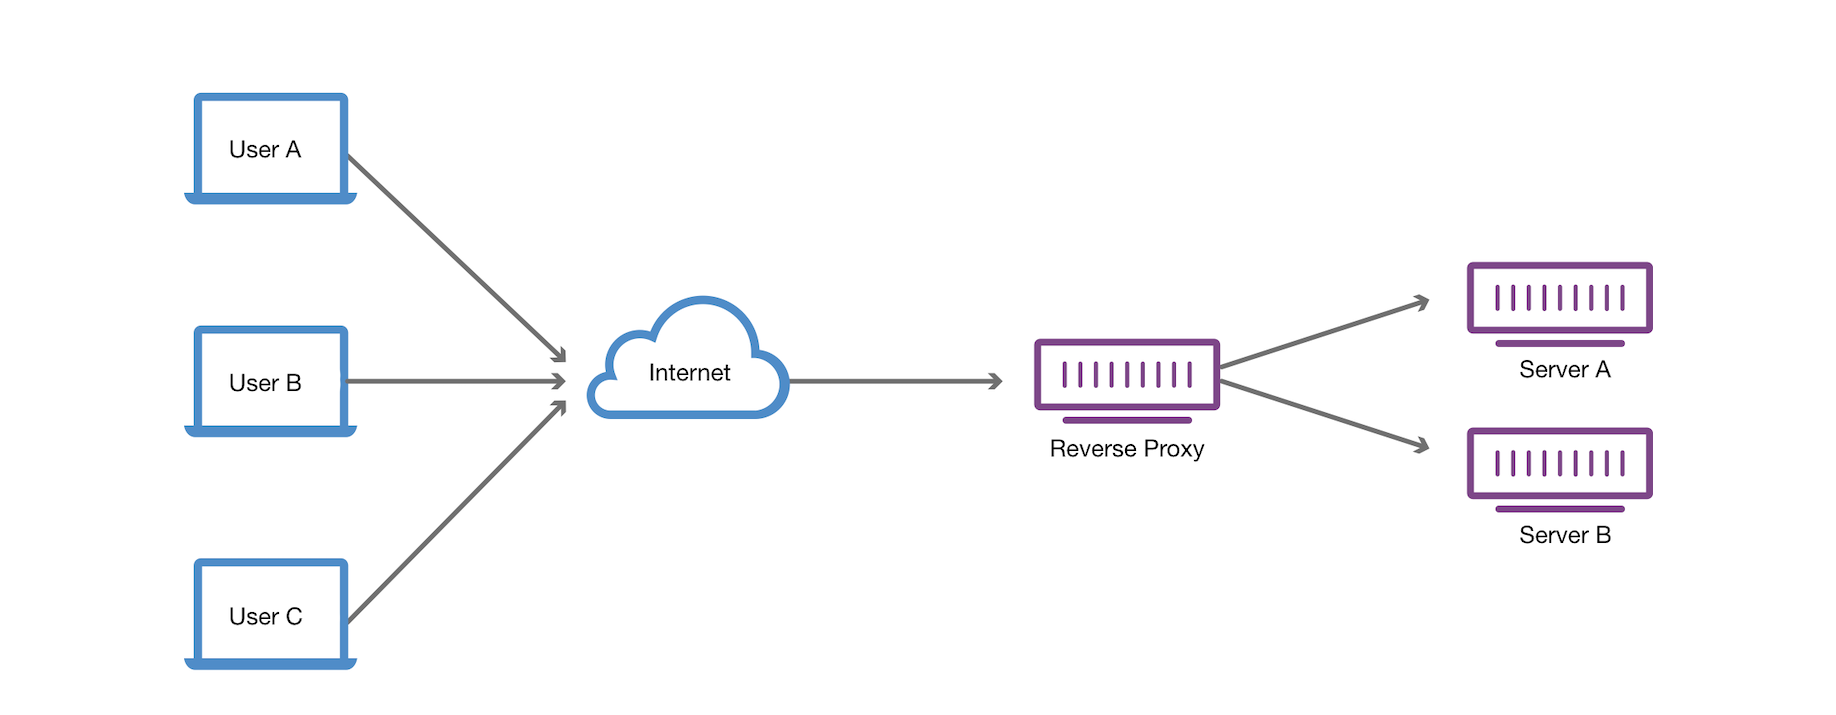
역으로 클라이언트가 인터넷에 데이터를 요청하면, Reverse Proxy는 이 요청을 받아 내부 서버에서 데이터를 받은 후 클라이언트에 전달합니다. 저희에게 필요한 경우가 딱 이 Reverse Proxy입니다.
예를 들어, example.com 이라는 도메인이 저희의 공인 아이피와 연결되어 있다 했을 때, 이 도메인의 호스트가 a, b, 즉 a.example.com 이나 b.example.com 인지에 따라서 192.168.1.20 쪽이나 192.168.1.21 쪽으로 요청을 재설정 할 수 있겠습니다. SSL 인증이 끝나는 시점은 이 프록시 서버를 만나는 지점이기 때문에 'HTTPS 사용 안 함'의 경고를 피할 수 있으리라 생각 합니다.
Envoy 개념 살피기
ENVOY IS AN OPEN SOURCE EDGE AND SERVICE PROXY, DESIGNED FOR CLOUD-NATIVE APPLICATIONS
클라우드 컴퓨팅 도메인에서는 CNCF(Cloud-Native Computing Foundation)라는 재단이 존재 합니다. 재단은 클라우드 네이티브에 사용되는 기술들을 이 사이트에 정리하여 표로 보여주고 있습니다.
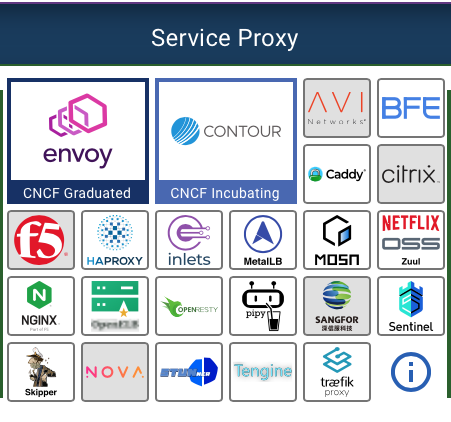
그 중 Service Proxy 파트를 살펴보면 반가운 이름들이 많습니다. HAProxy Nginx 등등이 있네요. 그런데 그 중에 진한 파란색 테두리로 CNCF Graduated 체크가 되어 있는 envoy 라는 친구가 가장 눈에 띕니다. 이미 쿠버네티스 애드온 중에서는 이 envoy를 활용한 케이스들이 많이 있다고 알고 있습니다. 대표적으로 Emissary Ingress 입니다.
이번 기회에 envoy를 한 번 경험해보고자 합니다.
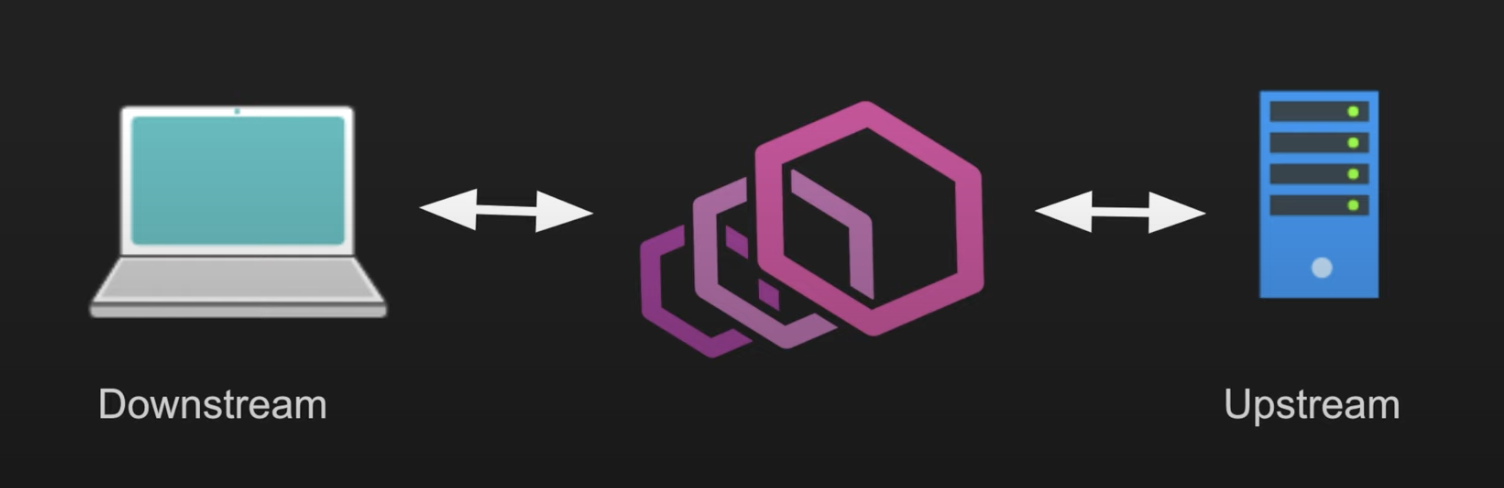
- (참고) Upstream 과 Downstream 이라는 용어가 존재합니다.
- Anything in front of Envoy is Downstream (클라이언트 쪽)
- Anything in back of Envoy is Upstream (서버 쪽)
Quick start
Install Envoy
Getting Started를 참고해봅시다.
sudo yum install yum-utils
sudo rpm --import 'https://rpm.dl.getenvoy.io/public/gpg.CF716AF503183491.key'
curl -sL 'https://rpm.dl.getenvoy.io/public/config.rpm.txt?distro=el&codename=7' > /tmp/tetrate-getenvoy-rpm-stable.repo
sudo yum-config-manager --add-repo '/tmp/tetrate-getenvoy-rpm-stable.repo'
sudo yum makecache --disablerepo='*' --enablerepo='tetrate-getenvoy-rpm-stable'
sudo yum install getenvoy-envoy
Run Envoy
아래 과정 역시 Envoy 문서를 따라간 내용 입니다.
# 버전 확인
$ envoy --version
envoy  version: d362e791eb9e4efa8d87f6d878740e72dc8330ac/1.18.2/clean-getenvoy-76c310e-envoy/RELEASE/BoringSSL
# => 1.27 버전으로 업데이트 필요 ? -> 도커 이미지를 사용하면, 쉽게 가능. 리눅스 자체 설치는 아직 공식 repo를 지원 안 하는 듯

# 명령어 확인
$ envoy --help

# 데모 컨피그 다운로드
$ wget https://www.envoyproxy.io/docs/envoy/latest/_downloads/92dcb9714fb6bc288d042029b34c0de4/envoy-demo.yaml
envoy-demo.yaml ⇒ 튜토리얼에서 다운 받은 그대로 사용하면 에러가 나옵니다. connect_timeout 를 추가 해주세요.
static_resources:

  listeners:
  - name: listener_0
    address:
      socket_address:
        address: 0.0.0.0
        port_value: 10000
    filter_chains:
    - filters:
      - name: envoy.filters.network.http_connection_manager
        typed_config:
          "@type": type.googleapis.com/envoy.extensions.filters.network.http_connection_manager.v3.HttpConnectionManager
          stat_prefix: ingress_http
          access_log:
          - name: envoy.access_loggers.stdout
            typed_config:
              "@type": type.googleapis.com/envoy.extensions.access_loggers.stream.v3.StdoutAccessLog
          http_filters:
          - name: envoy.filters.http.router
            typed_config:
              "@type": type.googleapis.com/envoy.extensions.filters.http.router.v3.Router
          route_config:
            name: local_route
            virtual_hosts:
            - name: local_service
              domains: ["*"]
              routes:
              - match:
                  prefix: "/"
                route:
                  host_rewrite_literal: www.envoyproxy.io
                  cluster: service_envoyproxy_io

  clusters:
  - name: service_envoyproxy_io
    type: LOGICAL_DNS
		connect_timeout: 5s # 이 부분 추가 바람.
    # Comment out the following line to test on v6 networks
    dns_lookup_family: V4_ONLY
    load_assignment:
      cluster_name: service_envoyproxy_io
      endpoints:
      - lb_endpoints:
        - endpoint:
            address:
              socket_address:
                address: www.envoyproxy.io
                port_value: 443
    transport_socket:
      name: envoy.transport_sockets.tls
      typed_config:
        "@type": type.googleapis.com/envoy.extensions.transport_sockets.tls.v3.UpstreamTlsContext
        sni: www.envoyproxy.io
# 서버 가동 됨. => 새로운 터미널 오픈 / 종료는 ctrl + c
$ envoy -c envoy-demo.yaml
# => 직접 브라우저에서도 확인 가능 (엔보이 홈페이지가 나옴)
$ curl -v localhost:10000envoy-override.yaml 파일을 다음과 같이 만들어서 --config-yaml 을 통해 envoy-demo.yaml 설정을 override 할 것입니다.
admin:
  address:
    socket_address:
      address: 127.0.0.1
      port_value: 9902
$ envoy -c envoy-demo.yaml --config-yaml "$(cat envoy-override.yaml)"
$ curl -v localhost:9902envoy에서도 쿠버네티스의 dry-run과 같이 실제 서버 실행 없이 설정을 확인하는 법이 있습니다.
$ envoy --mode validate -c envoy-demo.yaml만약 설정이 괜찮다면, configuration 'envoy-demo.yaml' OK 메세지가 나옵니다.
envoy의 로그는 기본적으로 /dev/stderr 로 보내지만, --log-path 를 통해 경로를 바꿀 수 있습니다.
Networking은 IPv4와 IPv6 을 모두 지원합니다. 만약 환경이 IPv6를 지원하지 않는다면 dns_lookup_family: V4_ONLY 설정으로 비활성화 시킬 수 있습니다.
Debugging 기능도 존재합니다. 가능한 로그의 레벨은 다음과 같습니다. 디폴트는 info입니다.
trace, debug, info, warning/warn, error, critical, off
더해 특별한 상황만을 보여주는 --component-log-level 옵션이 존재합니다. 예를 들어 다음과 같이 envoy를 실행하면 upstream 과 connection 만 로그가 나오게 됩니다.
$ envoy -c envoy-demo.yaml -l off --component-log-level upstream:debug,connection:traceConfiguration: Static
Envoy의 static configuration에는 listeners 와 static_resources 로서의 clusters를 명시해야 합니다. 만약 Envoy를 모니터링 하기 위해서는 admin section 또한 추가 해 줄 수 있습니다. 위의 데모 파일에서 그 부분들을 확인 할 수 있습니다.
Configuration: Dynamic from filesystem
xDS protocol 가 implement 된 파일들을 사용하면, dynamic configuration을 사용할 수 있습니다. 파일 시스템 상에서 파일이 변경(edit이 아닌 move)되면, Envoy는 자동적으로 이 설정을 업데이트 합니다.
프록시 노드를 명시하는 node 와 설정 파일이 어디있는지 설정하는 dynamic_resources를 구체화하면 이를 사용할 수 있습니다. dynamic_resources 도 결국 listeners와 clusters 에 대한 내용입니다.
Envoy admin interface
Envoy는 statistics, change the behaviour of the server, and tap traffic according to specific filter rules 의 정보를 제공 하는 인터페이스 옵션을 가지고 있습니다. 아래는 관련 요소들에 대한 간략한 설명입니다.
admin : 관리자 서버 설정을 위한 영역
admin:
  address:
    socket_address:
      address: 0.0.0.0
      port_value: 9901
stat_prefix : HttpConnectionManager 를 설정하기 위함. 데모 파일에서 이 영역 확인 가능
config_dump : Envoy’s runtime configuration를 json 형식으로 얻기 위한 관리자 엔드포인트
# config_dump 사용 예제
$ curl -s http://localhost:9901/config_dump?resource=dynamic_listeners | jq '.configs[0].active_state.listener.address'
{
  "socket_address": {
    "address": "0.0.0.0",
    "port_value": 10000
  }
}
stats : 관리자 엔드포인트에서 retrieve runtime information 를 보여줌
# 사용 예제
$ curl -s http://localhost:9901/stats | cut -d. -f1 | sort | uniq
cluster
cluster_manager
filesystem
http
http1
listener
listener_manager
main_thread
runtime
server
vhost
workers

# 사용 예제 : 정규 표현식으로 필터링
$ curl -s http://localhost:9901/stats?filter='^http\.ingress_http'
http.ingress_http.downstream_cx_active: 0
http.ingress_http.downstream_cx_delayed_close_timeout: 0
http.ingress_http.downstream_cx_destroy: 3
...

# 사용 예제 : json 포맷으로 추출
$ curl -s "http://localhost:9901/stats?filter=http.ingress_http.rq&format=json" | jq '.stats'
Envoy admin web UI : 간단한 대시보드 제공
Securing Envoy
HTTP, Websockets, TCP 통신에 대해 TLS 을 지원합니다.
또한 JWT, RBAC, OAuth 와 같은 HTTP-based 프로토콜을 제공합니다.
- Upstream and downstream TLS contexts listeners 쪽에는 donwstream (클라이언트) 에 관련한 TLS 설정을 할 수 있습니다. 반대로 clusters 쪽에서는 upstream에 관련한 TLS 설정입니다.
- Validate an endpoint’s certificates when connecting
- Use mutual TLS (mTLS) to enforce client certificate authentication
- Use mutual TLS (mTLS) to connect with client certificates
- Provide multiple TLS domains at the same IP address with SNI
SNIis an extension to theTLSprotocol which allows multiple domains served from the sameIPaddress to be secured withTLS.
- Connect to an endpoint with SNI
Sandbox
https://www.envoyproxy.io/docs/envoy/latest/start/sandboxes/#start-sandboxes
여러가지 예제들이 존재합니다. 완전한 상황을 만들어보기 위해선 도커-컴포즈를 필요로 합니다.
코드만 보고 싶다면 공식 레포지토리를 확인해 보시면 좋습니다.
Configuration generator
Envoy의 설정은 상대적으로 복잡합니다. Jinja 기반의 설정 생성기 코드와, 세 가지의 예제 템플릿을 제공 합니다.
- Generator script: configs/configgen.py
- Service to service template: configs/envoy_service_to_service.template.yaml
- Front proxy template: configs/envoy_front_proxy.template.yaml
- Double proxy template: configs/envoy_double_proxy.template.yaml
필요 기능 정리
- https 핸들링
- http 요청 https 로 redirecting
- local rate limit 걸기 (dos 공격 방지)
- admin page 추가
- build
다음 게시 글부터 예시 코드 내용을 따라, 당장 필요로 하는 다섯 가지의 기능 예시를 정리 해보겠습니다.