트랜잭션이 도대체 뭐지?
하고 찾는 도중에 이미 여기에 정리 해놓았었다. 어떻게 한달밖에 안됐는데 새까맣게 잊어버릴 수 있을까?
어쨋든, 다시 정리한거 보면서 복습하는데 이론적으로는 무슨 말인지는 알겠는데 실제 코드로 어떻게 동작하는지는 아직도 잘 모르겠더라.
트랜잭션에 대해서 잘 설명된 문서를 보면서 코드 따라적어보며 좀 이해를 해보았다.
특히 plain JDBC에서 트랜잭션을 어떻게 만드는지부터 배우니까 좋았다.
Transaction in plain JDBC
import java.sql.Connection;

Connection connection = dataSource.getConnection(); // (1)

try (connection) {
    connection.setAutoCommit(false); // (2)
    // execute some SQL statements...
    connection.commit(); // (3)

} catch (SQLException e) {
    connection.rollback(); // (4)
}- 먼저 첫번쨰로 트랜잭션을 시작하기 위해서는 connection이 필요하다
connection.setAutoCommit(false)부분은 자바에서 유일하게 데이터베이스 트랜잭션을 시작할수 있는 방법이고, 트랜잭션을 조작할 수 있는 방법이다. 만약에false를true로 변경하면 SQL문 하나하나 트랜잭션으로 모두 wrap한다.- 중간에 원하는 SQL 실행문들을 넣고 commit한다.
- 예외발생시 롤백한다.
스프링에 @Transactional을 붙였을 때 하는 일이 단순화하면 위에 코드들이다.
Transaction in Spring
스프링에서는 트랜잭션을 어떻게 사용할까? plain JDBC에서는 단 한가지 방법 밖에 없었지만, Spring은 다양하고 편리한 많은 방법들을 제공한다. 게중에 하나가 @Transactional 이라는 선언적 방법이다.
Programmatic Transaction Management
프로그래밍적인 방법은 드물게 사용된다. TransactionTemplate이나 PlatformTransactionManager를 사용해서 할 수 있다. TransactionTemplate을 사용하면 아래 코드처럼 사용할 수 있따.
@Service
public class UserService {

    @Autowired
    private TransactionTemplate template;

    public Long registerUser(User user) {
        Long id = template.execute(status ->  {
            // execute some SQL that e.g.
            // inserts the user into the db and returns the autogenerated id
            return id;
        });
    }
}
plain JDBC와 다른점은 아래와 같다.
- 데이터베이스 커넥션을 열고 닫는 코드를 작성할 필요없다(try-finally).
- 예외처리를 안해도 된다. 스프링에서는 이런 예외들을 런타임 익셉션으로 바꾼다.
Declarative Transaction Management
XML configuration
예전에는 스프링 프로젝트에서 XML로 하는 설정이 표준이었을 때는 선언적 트랜잭션을 XML에서 설정해줬다고 한다.
XML에서 아래 이미지처럼 꽤 복잡한 설정을한 뒤에,
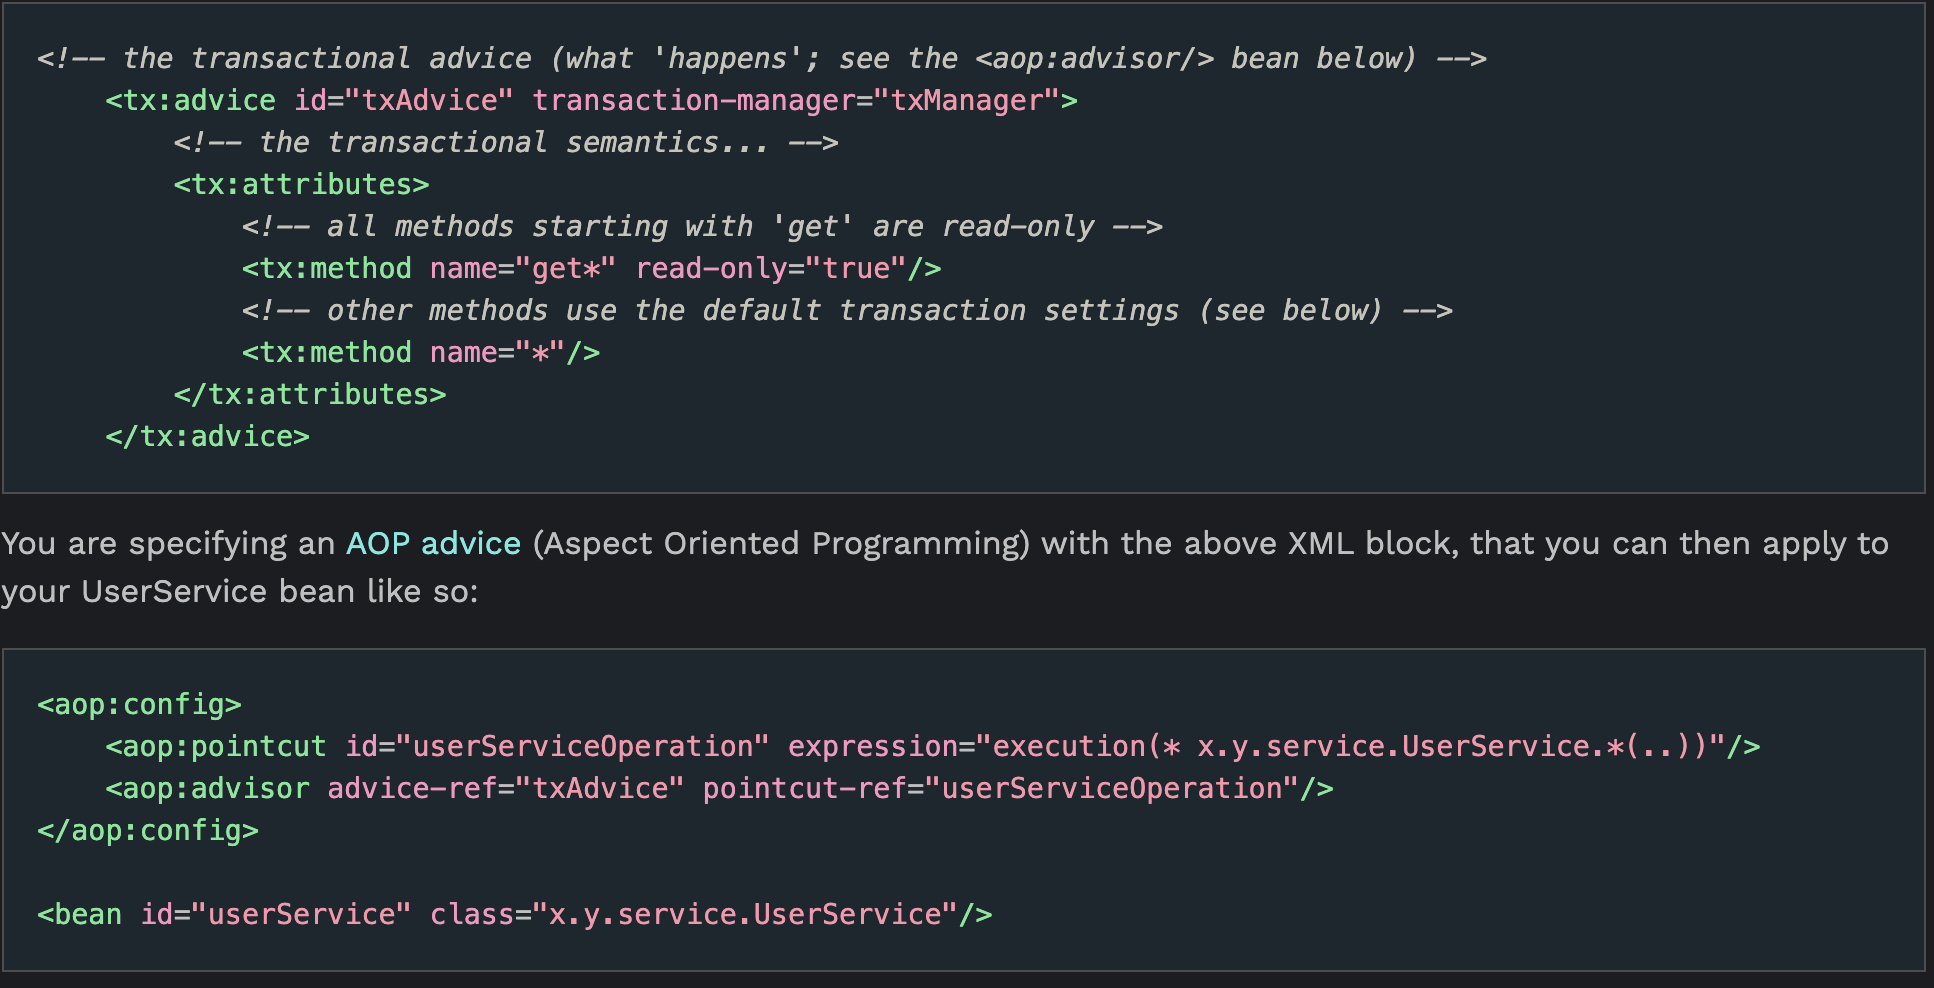
코드는 다음과 같이만 하면 트랜잭션을 만들 수 있엇다.
public class UserService {

    public Long registerUser(User user) {
        // execute some SQL that e.g.
        // inserts the user into the db and retrieves the autogenerated id
        return id;
    }
}
@Transactional annotaion
지금 현대의 Spring transaction management는 프로젝트에서 사용해왔듯이 이렇게 사용할 수 있다.
public class UserService {

    @Transactional
    public Long registerUser(User user) {
       // execute some SQL that e.g.
        // inserts the user into the db and retrieves the autogenerated id
        // userDao.save(user);
        return id;
    }
}
이렇게 어노테이션으만 붙인게 아까 plain JDBC에서 했던 그 코드들 (아래의 1번 코드들)을 자동을 전부 처리해주고 내가 직접 쓰는 코드는 userDao.sava(user); 뿐이게 될 수 있다.
public class UserService {

    public Long registerUser(User user) {
        Connection connection = dataSource.getConnection(); // (1)
        try (connection) {
            connection.setAutoCommit(false); // (1)

            // execute some SQL that e.g.
            // inserts the user into the db and retrieves the autogenerated id
            // userDao.save(user); <(2)

            connection.commit(); // (1)
        } catch (SQLException e) {
            connection.rollback(); // (1)
        }
    }
}
참고 : https://www.marcobehler.com/guides/spring-transaction-management-transactional-in-depth
