
props와 state
휴대폰을 예로 들어보자.
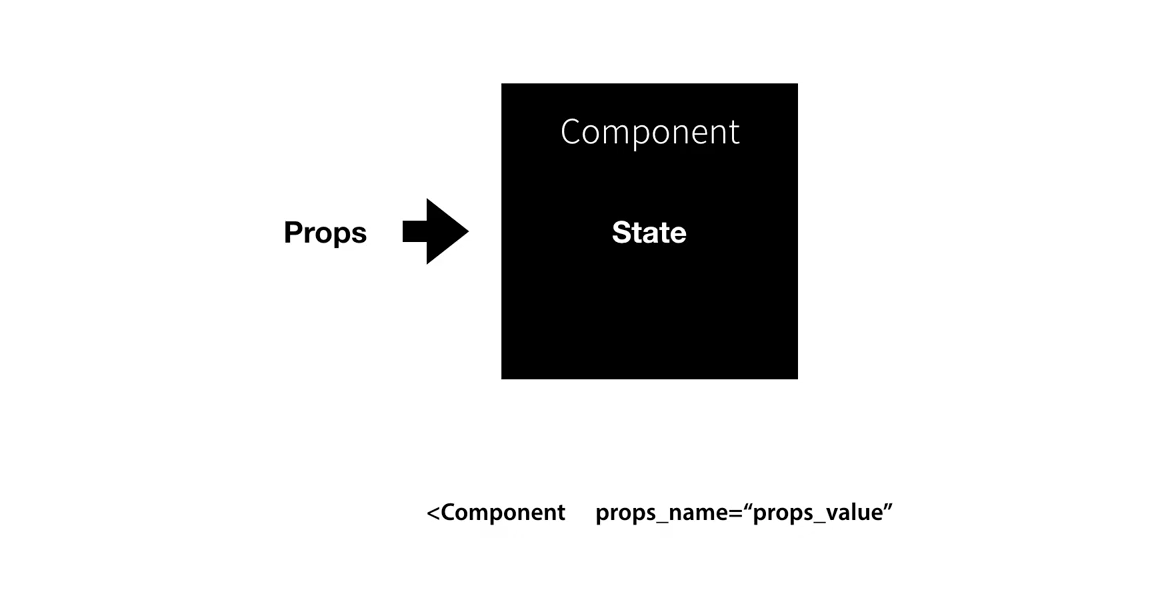
props는 사용자가 화면에서 보는 UI를 조작하는 장치이며,
state는 제품을 열었을 때 내부적 조작 장치 매커니즘이라고 할 수 있다.
출처: 생활코딩
- 즉, props는 컴포넌트를 사용할 때 사용자에게 중요한 외부적 정보이며, state는 props의 값에 따라 내부 구현에 필요한 데이터이다.
- 컴포넌트가 중요한 부품이 되기 위해서는 외부의 props와 내부의 state 정보가 철저하게 분리되어 있어야 한다. 사용하는 쪽, 구현하는 쪽을 철저하게 분리해 양쪽의 편의성을 각자 도모하는 것이 핵심!
State
- 컴포넌트 내부에서 갖고 있는 컴포넌트의 상태값
- state는 화면에 보여줄 컴포넌트의 UI정보(상태)를 갖는 객체이다.
- component 간 이동이 자유로운 props와 달리, state는 컴포넌트 내부에서 정의하고 사용하며 데이터 객체를 변경할 수 있다.
- component가 state를 갖으려면 state property를 준다. 이 때
constructor()메서드 안에 선언해주어야 한다.
class Example extends React.Component {
  constructor(props) {
    super(props);
    this.state = { mood: 'decent' };
  }

  render() {
    return (
      <h1>
      I'm feeling {this.state.mood}!
      </h1>
  }
}
<Example />this.state는 객체로 되어있고, 이 객체는 어떤한 컴포넌트 인스턴스의 초기 "상태"를 의미한다.constructor와super는 ES6 문법으로 React만의 특징은 아니다. state를 초기화 시키기 위해서는 React component는 constructor 안에 super가 셋업 되어야 한다.render()보다 먼저 실행이 되면서 그 컴포넌트를 초기화 시켜주고 싶은 코드를constructor()안에 넣으면 된다.- component state에 접근하기 위해서는
render()안 body에this.state.name-of-property를 준다.
(정리) state 사용
- state에서 상태값을 설정하는 이유는 컴포넌트 안의 요소에서 변경된 데이터 값을 반영해 효율적으로 화면에 나타내기 위함이다.
<h1 style={{ color: this.state.color }}>Class Component </h1>

// this: 해당 컴포넌트
// this.state: 해당 컴포넌트의 state 객체
// this.state.color: state 객체의 특정 key(color)값
state 업데이트
컴포넌트는 자신의 상태를 읽는 것 뿐 아니라 상태를 변경(change)할 수 있다.
- 앱이 최초로 실행될 때 실행되는 생성자 함수(constructor())를 정의한 후 상태를 변경해야하는 경우,
- 즉 컴포넌트 동적으로 상태를 변경할 때,
this.setState()함수를 쓴다. this.setState()는 두개의 인자를 가져온다. 1) 컴포넌트의 상태를 업데이트 할 객체, 2) 콜백 (optional)this.setState()의 객체는 현재 컴포넌트 상태(state)와 통합(merge)되어 새로운 상태가 반영된다.
다른 함수에서 this.setState 불러오기
this.setState()를 불러오는 가장 일반적인 방법은this.setState()call로 구성된 custom function을 불러오는 것이다.
class Example extends React.Component {
  constructor(props) {
    super(props);
    this.sate = { weather: 'sunny' };
    this.makeSomeFog = this.makeSomeFog.bind(this);
  }

  makeSomeFog() {
    this.setState({
      weather: 'foggy'
    });
  }
}makeSomeFog()함수 안에this.setState()를 포함하고 있다.this.makeSomeFog = this.makeSomeFog.bind(this);부분은 this를 포함하기 때문에 필수적이다. (#cf 1 참조)
=> ⚠️this를 사용해 이벤트 핸들러를 정의할 때 constructor 함수에this.methodName = this.methodName.bind(this)를 넣어줘야한다는 것!this.setState()는render()안에 올 수 없다.
(#cf 2 참조)
cf 1. bind를 쓰는 이유
import React from 'react';
import ReactDOM from 'react-dom';

const green = '#39D1B4';
const yellow = '#FFD712';

class Toggle extends React.Component {
  constructor(props) {
    super(props)
    this.state = {color: green}
    this.changeColor = this.changeColor.bind(this);
  }
  changeColor() {
    const newColor = this.state.color == green ? yellow : green;
    this.setState({ color: newColor });
  }
  render() {
    return (
      <div style={{background:this.state.color}}>
        <h1>
          Change my color
        </h1>
        <button onClick={this.changeColor}> Change color </button>
      </div>
    );
  }
}

ReactDOM.render(<Toggle />, document.getElementById('app'))
JSX를 callback할 때 this의 뜻에 주의해야한다.
- JavaScript의 class 메서드에서는 값을 자동적으로 binding 해주지 않는다.
- 만약
this.changeColor를 bind 해주는 것을 잊고, onClick에 넘겨버리면,this는 undefined를 불러올 것이다. - 이는 JavaScript의 함수 작동방식과 관련이 있다. 대체적으로 '()'로 정의하지 않은 메소드는 bind 해줘야 한다고 생각하면 된다.
onClick={this.changeColor} - bind를 사용하고 싶지 않다면
arrow function을 쓸 수 있다.<button onClick={() => this.changeColor()}>
대부분의 경우 잘 작동하지만, 다른 컴포넌트에서 prop으로 사용할 경우 추가적인 리렌더링 작업을 해야할 수 있다.
=> 걍 bind 쓰는게 좋다!
cf 2. render()에 this.setState()를 쓰지 않는 이유
- 위의 예시에서
.changeColor()의this.setSate()call만으로는 원하는 전체 효과를 가져올 수 없다. 변화가 일어나기 위해서는 Toggle이 렌더링되어야 한다. - 이같은 역할을 render funciton 안에 있는
<div style={{background:this.sate.color}}가 수행하는데, virtual DOM 객체 속성을 새로this.state.color로 바꿔주면서 스크린에도 보여준다.
=>.changeColor()를render()에서 한번 더 쓰지 않고도 구현할 수 있는 이유는 this.setState()는 자동적(AUTOMATICALLY)으로 render()를 부르기 때문이다.
