Dropdown menu를 만드는 DOM 프로젝트를 통해 event 등 기본적인 사용법과 동작원리를 익혀본다.
*출처: 김버그(kimbug)의 Youtube DOM 강의를 듣고, 개인 학습자료를 더해 정리했습니다.(버그님 최고!)
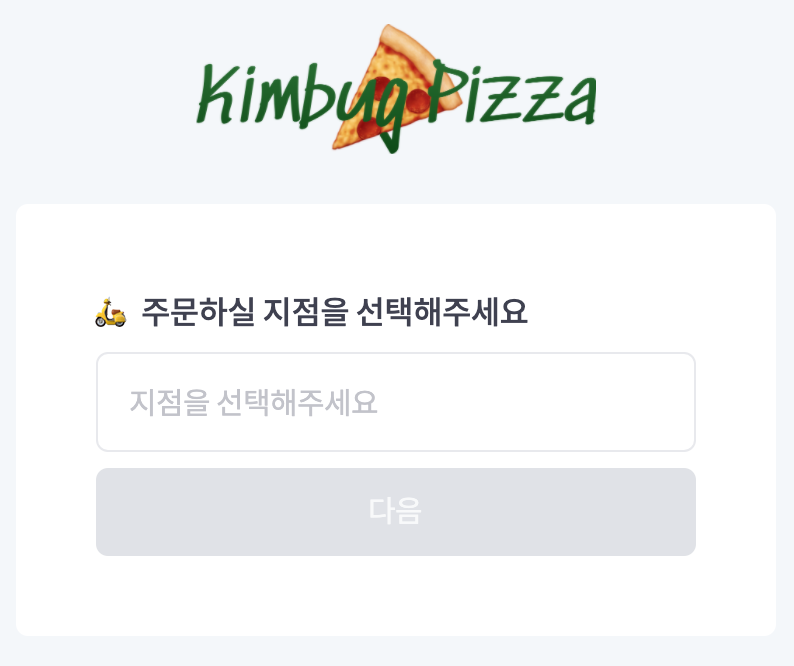
예시(dropdown menu)
1. 요소 노드(Element node) 가져오기
const dropdownForm = document.querySelector(".drowpdown");
const dropdownBtn = document.querySelector(".dropdown-toggle");
const menuList = document.querySelector(".dropdown-menu");
const itemList = document.querySelector(".dropdown-item");
const optionBtn = document.querySelectorAll(".dropdown-option");
const submit = document.querySelector(".next-button");- 요소(element)는 HTML tag를 의미한다.
Document.prototype/Element.prototype.querySelector/querySelectorAll메서드는 인수로 전달한 CSS 선택자를 만족시키는 하나의 요소 노드/모든 요소 노드를 탐색하여 반환한다.querySelector,querySelectorAll메서드는getElementby***메서드보다 다소 느리다는 단점이 있지만, 좀 더 구체적인 조건과 일관된 방식으로 요소 노드를 취득할 수 있다**는 장점이 있다.
=> 따라서, id 어트리뷰트가 있는 요소 노드를 가져올 경우에는getElementByID를 사용하고, 그 외의 경우querySelector,querySelectorAll메서드 사용을 권장하고 있다.
2. flowchart 그려보기(기획)
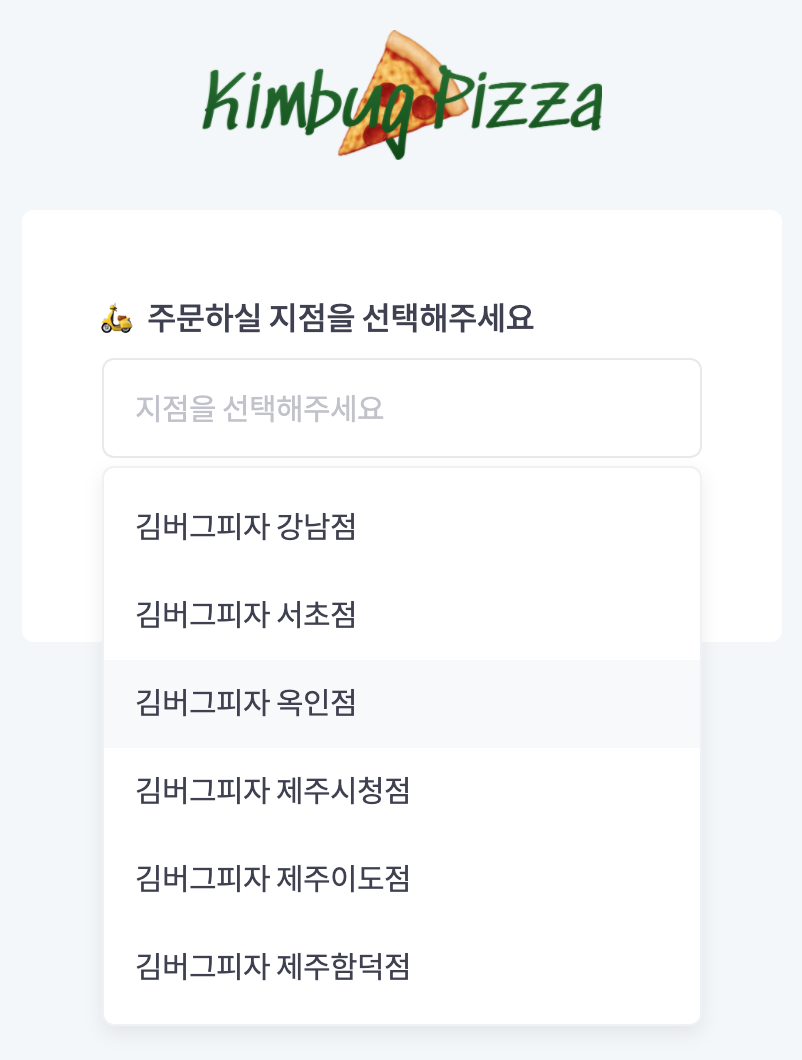
1. 'dropdownBtn'을 클릭하면, 'menuList'가 나온다.
2. 'itemList' 중 하나를 선택하면, 'menuList'는 사라진다.
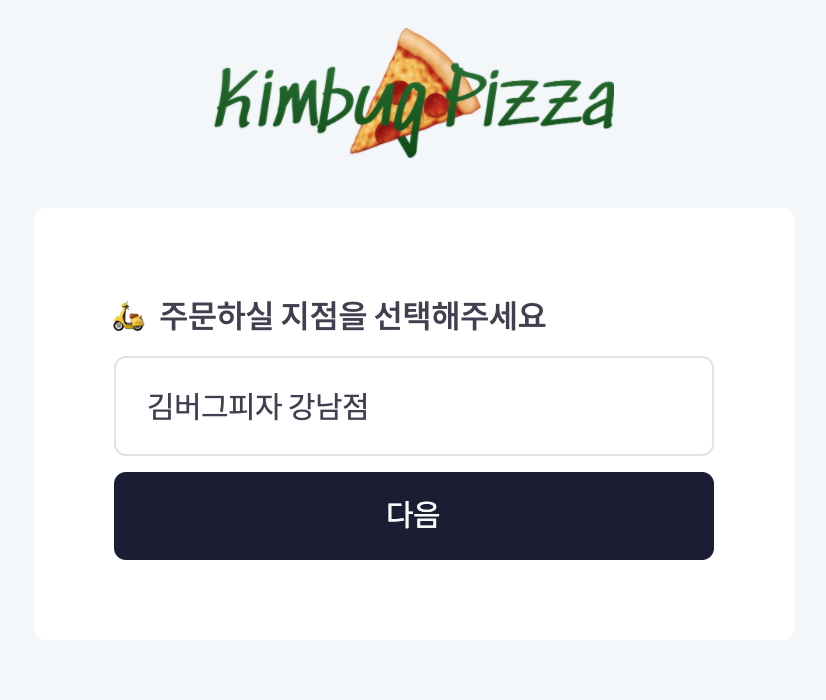
3. 선택한 item이 input에 출력된다.
4. 'submit' 버튼이 활성화된다. - 사용자의 인터랙션 생각하며 순서(flow)와 그에 따른 동작(action)을 세부적으로 상세하게 나누어본다. (디테일하게 나누지 않으면 코드 하나씩 빼먹는다.. 마치 '1+1'만 쓰고 '=' 빼먹어서 '왜 안되지?' 하는 격..)
3. flowchart에 따른 code 생각하기
1. 'dropdownBtn'을 클릭하면, 'menuList'가 나온다.
- CSS의 dropdown-menu.show 활성화
2. 'itemList' 중 하나를 선택하면, 'menuList'는 사라진다.
- toggle에서 remove 설정
3. 선택한 item이 input에 출력된다.
- 선택 값 지정
- 지정 값 출력
- 디자인 변화 (CSS .selected 활성화)
4. 'submit' 버튼이 활성화된다.
- button tag의 'disabled' attribute 제거- HTML, CSS 태그 구성에 따라 어떤 이벤트를 어디에 적용할 것인지, 이벤트를 걸면 어떻게 되는지 대략적으로 생각해본다.
4. 신나게 DOM 쓰기
// dropdownBtn 클릭하면, menuList 나온다
dropdownBtn.addEventListener("click", function () {
  menuList.classList.toggle("show");
});

// menuList는 사라진다
dropdownBtn.addEventListener("blur", function () {
  menuList.classList.remove("show");
});

// menuList 중 하나를 클릭하면,
optionBtn.forEach(function (item) {
  item.addEventListener("click", function (e) {
    // 선택한 값 지정
    const selectValue = e.currentTarget.textContent.trim();
    // 지정 값 출력
    dropdownBtn.textContent = selectValue;
    // 색깔 변화
    dropdownBtn.classList.add("selected");
    // 버튼 생성
    submit.removeAttribute("disabled");
  });
});
Questions & Learned
function(e)'e'는 해당 동작에 해당하는 이벤트 객체를 가져다 준다.- currentTarget은 사용자가 입력한 input value를 확인할 때 쓴다. 뒤에 value, name, id, textContent(innerText) 등을 붙여 확인할 수 있다.
- 동작 해제 시, 단순 해제(remove)하는 것과 blur event를 쓰는 것의 차이?
-> 'blur'는 요소의 focus가 해제되었을 때, 발생하는 이벤트로 동작하는 공간 외 다른 공간을 클릭했을 때에 자연스럽게 종료될 수 있어 UX적으로 편리하다. (단순 해제만 했을 경우 해당 동작을 하지 않을 경우 해제되지 않는다.) - 속성을 없앨 때는 'removeAttribute'를 써준다.
- re) foreach로 모든 li에 이벤트를 걸어주는 것보다 부모 요소인 ul에 이벤트를 한 번만 거는 것이 효율적이다. (그런데 내가 하면 안된다. 성공 버전 다시 올리겠다.)
- value를 text로 받을 때 'trim'을 써주면 공백 없이 깔끔하게 값을 받을 수 있다.(디테일..)
- HTML, CSS를 잘 짜야 자바스크립트가 편하다..
- console을 계속 찍어보면서 어떻게 동작하는지 확인하는 습관을 기르자!
HTML Source Code
<!DOCTYPE html>
<html lang="ko">
  <head>
    <meta charset="UTF-8" />
    <meta name="viewport" content="width=device-width, initial-scale=1.0" />
    <title>Form</title>
    <link
      href="https://spoqa.github.io/spoqa-han-sans/css/SpoqaHanSansNeo.css"
      rel="stylesheet"
      type="text/css"
    />
    <link rel="stylesheet" href="./style.css" />
  </head>
  <body>
    <h1 class="title">
      <img src="./logo.png" alt="김버그 피자" />
    </h1>
    <form action="">
      <h1>🛵 주문하실 지점을 선택해주세요</h1>
      <div class="dropdown">
        <button type="button" class="dropdown-toggle">
          지점을 선택해주세요
        </button>
        <ul class="dropdown-menu">
          <li class="dropdown-item">
            <button type="button" value="1" class="dropdown-option">
              김버그피자 강남점
            </button>
          </li>
          <li class="dropdown-item">
            <button type="button" value="2" class="dropdown-option">
              김버그피자 서초점
            </button>
          </li>
          <li class="dropdown-item">
            <button type="button" value="3" class="dropdown-option">
              김버그피자 옥인점
            </button>
          </li>
          <li class="dropdown-item">
            <button type="button" value="4" class="dropdown-option">
              김버그피자 제주시청점
            </button>
          </li>
          <li class="dropdown-item">
            <button type="button" value="5" class="dropdown-option">
              김버그피자 제주이도점
            </button>
          </li>
          <li class="dropdown-item">
            <button type="button" value="6" class="dropdown-option">
              김버그피자 제주함덕점
            </button>
          </li>
        </ul>
      </div>
      <button type="submit" class="next-button" disabled>다음</button>
    </form>
    <script src="./script.js"></script>
  </body>
</html>
CSS Source Code
* {
  box-sizing: border-box;
  margin: 0;
}

body {
  display: flex;
  flex-direction: column;
  align-items: center;
  justify-content: center;
  width: 100%;
  height: 100vh;
  padding-bottom: 30px;
  font-family: "Spoqa Han Sans Neo", "sans-serif";
  color: #3f4150;
  background-color: #f4f7fa;
}

ul,
li {
  list-style-type: none;
  padding-left: 0;
  margin-left: 0;
}

button {
  font-family: "Spoqa Han Sans Neo", "sans-serif";
  font-size: 15px;
  line-height: 1;
  letter-spacing: -0.02em;
  color: #3f4150;
  background-color: #fff;
  border: none;
  cursor: pointer;
}

button:focus,
button:active {
  outline: none;
  box-shadow: none;
}

.title {
  width: 200px;
  margin-bottom: 16px;
}

.title img {
  width: 100%;
  height: auto;
}

form {
  padding: 40px;
  background-color: #fff;
  border-radius: 6px;
}

form h1 {
  margin-bottom: 8px;
  font-size: 16px;
  font-weight: 500;
  letter-spacing: -0.02em;
  color: #3f4150;
}

.dropdown {
  position: relative;
  z-index: 1;
  width: 300px;
  margin-bottom: 8px;
}

.dropdown-toggle {
  width: 100%;
  height: 50px;
  padding: 0 16px;
  line-height: 50px;
  color: rgba(133, 136, 150, 0.5);
  text-align: left;
  border: 1px solid rgba(224, 226, 231, 0.75);
  border-radius: 6px;
  transition: border-color 100ms ease-in;
}

.dropdown-toggle.selected {
  color: #3f4150;
  border-color: rgba(224, 226, 231, 1);
}

.dropdown-toggle:active {
  border-color: rgba(224, 226, 231, 1);
}

.dropdown-menu {
  position: absolute;
  z-index: 2;
  top: calc(100% + 4px);
  left: 0;
  width: 100%;
  max-height: 0;
  overflow: hidden;
  background-color: #fff;
  border: 1px solid transparent;
  border-radius: 6px;
  transition: border-color 200ms ease-in, padding 200ms ease-in,
    max-height 200ms ease-in, box-shadow 200ms ease-in;
}

.dropdown-menu.show {
  padding: 8px 0;
  max-height: 280px;
  border-color: rgba(224, 226, 231, 0.5);
  box-shadow: 0 4px 9px 0 rgba(63, 65, 80, 0.1);
}

.dropdown-option {
  width: 100%;
  height: 44px;
  padding: 0 16px;
  line-height: 44px;
  text-align: left;
}

.dropdown-option:hover {
  background-color: #f8f9fa;
}

.next-button {
  display: block;
  width: 100%;
  height: 44px;
  padding: 0 16px;
  line-height: 44px;
  color: #f8f9fa;
  background-color: #1b1c32;
  border-radius: 6px;
  transition: background-color 150ms ease-in;
}

.next-button:disabled {
  background-color: #e0e2e7;
  cursor: not-allowed;
}
