목표
Reusable and Editable Table 구현하기
결과물
기본 사용법
설치
yarn add @tanstack/react-table
or
npm install @tanstack/react-table
Data
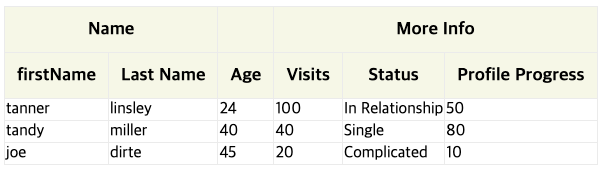
const data: Person[] = [
  {
    firstName: 'tanner',
    lastName: 'linsley',
    age: 24,
    visits: 100,
    status: 'In Relationship',
    progress: 50,
  }
	...
]
테이블에 그려질 데이터. 객체의 key가 column 의 accessorKey와 매칭된다.
Columns
const columns: ColumnDef<Person>[] = [
 {
	accessorKey: 'firstName',  // necessary
	id: 'FIRSTNAME',           // optional
	header: 'First Name',      // optional
	cell, footer, columns etc  // optional
 }
  ...
]- ColumnDef
- 테이블 컬럼 기본 데이터 모델을 구축하는 객체.
- 헤더, 푸터, 셀 등 해당 컬럼이 테이블에서 어떻게 그려질 지를 나타낸다.
- 정렬, 필터, 그룹화 등을 포함한 모든 것에 사용된다.
- Accessor Column, Display Column, Grouping Column 이 존재한다.
- Accessor Column
- 데이터를 그리기 위한 컬럼.
- accessorKey 또는 accessorFn 값이 필수로 입력되어야한다. 이 외의 값은 전부 optional.
- header, footer : 테이블 헤더, 테이블 푸터의 해당 컬럼 문구.
- cell
- 테이블 셀.
- 보여줄 데이터를 가공하거나, 특정 셀에 input을 나타내기 위해선 이 속성을 이용해야한다.
- 기본값은 renderValue로 셀 데이터를 그대로 보여준다.
- Grouping Column : 컬럼 그룹화를 위한 컬럼.
- Display Column : 데이터와 관련이 없는 컬럼.
- createColumnHelper 를 이용하면 컬럼 생성, 그룹화도 쉽게 가능하다.
const columnHelper = createColumnHelper<Person>();

const columns = [
  columnHelper.display({
    id: 'actions',
    cell: props => <RowActions row={props.row} />,
  }),
  columnHelper.group({
    header: 'Name',
    columns: [
      columnHelper.accessor('firstName'),
      columnHelper.accessor(row => row.lastName, {
        header: () => <span>Last Name</span>,
      }),
    ],
  })
  columnHelper.accessor('age', {
    header: () => 'Age',
  }),
	...
];
Table 생성 및 렌더링
// Table.tsx
...
const table = useReactTable({ data, columns, getCoreRowModel: getCoreRowModel(), });

return <table>
  <thead>
    {table.getHeaderGroups().map(headerGroup => (
      <tr key={headerGroup.id}>
        {headerGroup.headers.map(header => (
          <th key={header.id}>
            {header.isPlaceholder
              ? null
              : flexRender(
                  header.column.columnDef.header,
                  header.getContext()
                )}
          </th>
        ))}
      </tr>
    ))}
  </thead>
  <tbody>
    {table.getRowModel().rows.map(row => (
      <tr key={row.id}>
        {row.getVisibleCells().map(cell => (
          <td key={cell.id}>
            {flexRender(cell.column.columnDef.cell, cell.getContext())}
          </td>
        ))}
      </tr>
    ))}
  </tbody>
</table>

// Usage
<Table data={data} columns={columns} />- useReactTable 에 앞서 정의한 data, columns에 getCoreRowModel을 추가로 입력하여 table 객체를 생성한다.
- 세 값은 모두 필수값이며 getCoreRowModel 은 테이블의 핵심 행 모델을 계산해주는 팩토리 함수이다.
- getHeaderGroup, getRowModel을 통해서 최종 header, row 모델을 가져온다.
- 위에서 컬럼 그룹화를 했다면
<th key={header.id} colSpan={header.colSpan} />으로 해당 테이블 헤더의 colSpan을 입력해준다.
Feature
Editable Table
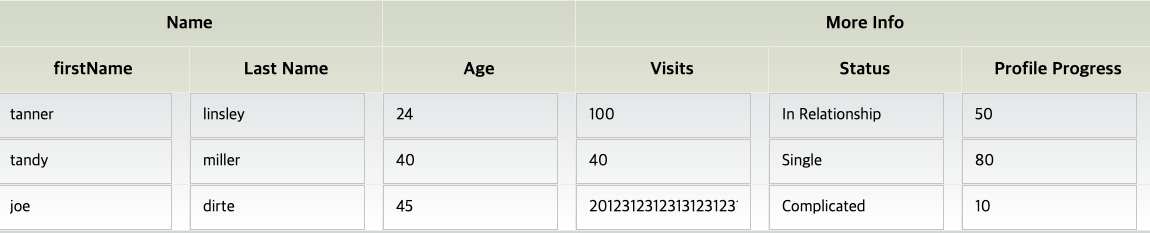
const columns = [
  {
	accessorKey: 'firstName',
	cell: ({ getValue, row, column, table }) => {
      const initialValue = getValue();
      const [value, setValue] = React.useState(initialValue);

      const onBlur = () => {
        table.options.meta?.updateData(row.index, column.id, value);
      };

      React.useEffect(() => {
        setValue(initialValue);
      }, [initialValue]);

      return <input value={value as string} onChange={e => setValue(e.target.value)} onBlur={onBlur} />
    },
  }
  ...
]
firstName 컬럼의 셀을 input 으로 변경했다.
셀 기본값을 input value state로 사용하였고, 수정 사항을 반영하기 위해 인풋 onBlur를 사용하여 업데이트 시켜주었다. 여기서의 table.options.meta 는 useReactTable 의 meta 옵션을 의미한다.
export interface TableMeta<TData extends RowData> {
}
패키지 타입선언 파일을 보면 meta 내부 형식은 비어져있다. 아무거나 정의해서 사용하면 될 것 같다.
useTable({
  ...
  meta: {
    test: () => console.log('test'),
  }
}
위와 같이 작성하면 table.options.meta?.test() 로 사용이 가능하지만 test의 타입을 지정해 주지 않아서 타입에러가 발생한다.
declare module '@tanstack/react-table' {
  interface TableMeta<TData extends RowData> {
    test: () => void;
	updateData: (rowIndex: number, columnId: string, value: unknown) => void;
  }
}
tanstack-react-table-config.d.ts 같은 타입선언 파일로 따로 작성 하게되면, 패키지의 타입 전체가 이 파일로 덮어씌워지기 때문에 useTable 훅을 사용하는 파일 상단 부분에 정의해주자.
const updateData = (rowIndex: number, columnId: string, value: string) => {
  const updatedData = data.map((row, index) => {
    if (index === rowIndex) {
      return {
        ...data[rowIndex],
        [columnId]: value,
      };
    }
    return row;
  });
  setData(updatedData);
};
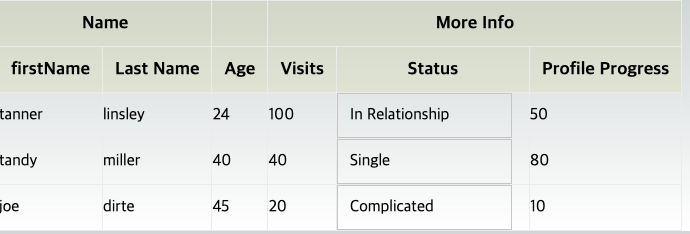
특정 셀만 적용
interface ShowInputCondType {
  rows?: string[];
  columns?: string[];
}

cell: ({ getValue, row, column, table, renderValue }) => {
  ...
  const showInput = shouldShowInput(row.id, column.id, showInputCond);
  return showInput ? (
    <input value={value as string} onChange={e => setValue(e.target.value)} onBlur={onBlur} />
  ) : (
    renderValue()
  );
}

function shouldShowInput(rowId: string, columnId: string, showInputCond?: ShowInputCondType): boolean {
  if (!showInputCond) {
    return false;
  }
  const { columns = [], rows = [] } = showInputCond;
  return (rows.length === 0 || rows.includes(rowId)) && (columns.length === 0 || columns.includes(columnId));
}
input을 보여줄 row를 담은 배열 rows, column을 담은 배열 columns을 가진 showInputCond 가 있다.
- showInputCond 가 없으면 모두 기본 셀
- columns 또는 rows만 있으면 해당 columns 또는 rows만 input셀
- 둘다 있다면 겹치는 부분만 input셀
Reusable Table
hooks/useTable.tsx
interface ShowInputCondType {
  columns?: string[];
  rows?: string[];
}

function useTable<T extends object>(data: T[], showInputCond?: ShowInputCondType) {
  const keysOfData = Object.keys(data[0]);
  const [cpyData, setCpyData] = React.useState(data);
  const rows = React.useMemo(() => data, [data]);
  const columns = React.useMemo<ColumnDef<T>[]>(
    () =>
      keysOfData.map(key =>
        Object.assign({
          accessorKey: key,
          header: startCase(key),
          cell: ({ getValue, row, column, table, renderValue }) => {
            const initialValue = getValue();
            const [value, setValue] = React.useState(initialValue);

            const onBlur = () => {
              // table.options.meta?.updateData(row.index, column.id, value);
              updateCpyData(row.index, column.id, value);
						};

            React.useEffect(() => {
              setValue(initialValue);
            }, [initialValue]);

            const showInput = shouldShowInput(row.id, column.id, showInputCond);
            return showInput ? (
              <input value={value as string} onChange={e => setValue(e.target.value)} onBlur={onBlur} />
            ) : (
              renderValue()
            );
          },
        } as ColumnDef<T>),
      ),
    [data],
  );
  const updateCpyData = (rowIndex: number, columnId: string, value: string) => {
    const updatedCpyData = cpyData.map((row, index) => {
      if (index === rowIndex) {
        return {
          ...cpyData[rowIndex],
          [columnId]: value,
        };
      }
      return row;
    });
    setCpyData(updatedCpyData);
  };

  if (!data || data.length === 0) return {};
  return { cpyData, columns, rows };
}

function shouldShowInput(rowId: string, columnId: string, showInputCond?: ShowInputCondType): boolean {
  if (!showInputCond) {
    return false;
  }
  const { columns = [], rows = [] } = showInputCond;
  return (rows.length === 0 || rows.includes(rowId)) && (columns.length === 0 || columns.includes(columnId));
}

export default useTable;- 입력받은 data의 key를 이용하여 columns를 생성해주었다.
- data의 특정 값이 2depth, 3depth로 이루어져 있다면 사용할 수 없다. table에 보여질 부분을 flat하게 가공해서 사용하자.
- 원본 값을 변경하지 않기위해 cpyData라는 state를 추가했다. input onBlur 이벤트가 트리거 되면 cpyData가 업데이트 될 것이다. meta 옵션을 사용하지 않아도 된다.
components/Table.tsx
interface TableProps<T extends object> {
  data: T[];
  columns: ColumnDef<T>[];
}

function Table<T extends object>({ data, columns }: TableProps<T>) {
  const table = useReactTable({
	data,
    columns,
    getCoreRowModel: getCoreRowModel(),
  });
  ...
}

export default Table;
pages/test.tsx ( usage )
const getData = async () => {
const res = await axios.get<Products>('https://dummyjson.com/products');
return res.data;
};
export default function TestPage() {
const { data } = useQuery<Products>(['Products'], getData);
const tableData = data?.products ?? [{} as Product];
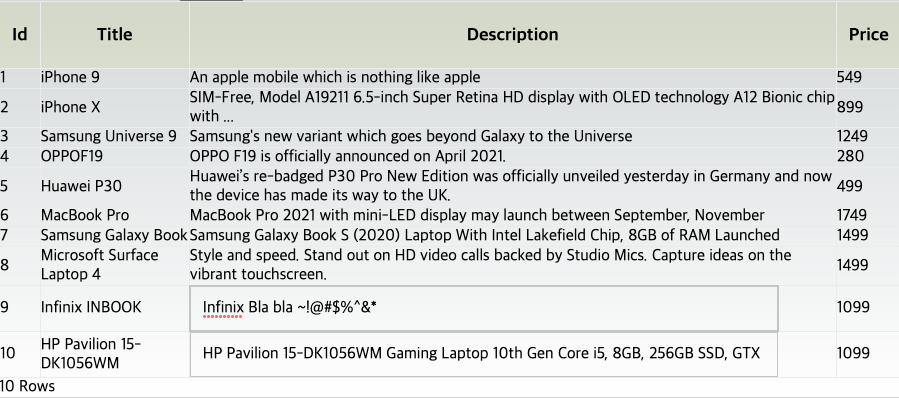
const showInputCond = {
columns: ['description'],
rows: ['8', '9'],
};
const { cpyData, columns, rows } = useTable(tableData, showInputCond);
if (!data) return <Loading />
return (
<>
<Table<Product> columns={columns} data={rows} />
</>
);
}
참고

FE Developer