내용
단위 테스트, 위젯 테스트, 통합 테스트, 테스트 커버리지 등을 이해하기 쉬운 예제와 함께 이 글에서 모두 살펴보세요!
Step 1 — ARRANGE(준비하기)!
테스트 작성을 시작하기 전에 이전 파트를 읽어보시길 적근 권장합니다!
Packages
이 프로젝트에서는 더 쉬운 테스트를 위해 리버팟과 목테일 패키지를 사용하겠습니다.
그리고 테스트를 위한 flutter_test와 integration_test는 물론 뿐만아니라 HTTP요청을 위한 dio도 사용할 것입니다.
폴더구조
테스트폴더의 구조는 lib와 동일합니다. 이렇게 하면 테스트를 훨씬 더 쉽게 추적할 수 있습니다!
이 예제에서는 UI에 데이터를 표시하는 4단계가 있습니다.
DIO => PostRepository => PostProvider => PostList
또한 알다시피 테스트는 기본적으로 3단계로 구성됩니다
Arrange => Act => Assert
기본적으로
- Arrange : 테스트를 위한 환경 준비(예 : 즐겨찾기 버튼 만들기)
- Act : 항목 테스트(버튼 클릭)
- Assert : 테스트 결과가 예상한대로인지 테스트합니다(예 : 버튼이 빨간색으로 바뀔것으로 예상)
모든 종류의 테스트에 이 단계를 사용할 예정!
Step2 - ACT
DioService - (단위테스트)
dio_service.dart
final dioService = Provider((_) {
  const baseUrl = 'https://jsonplaceholder.typicode.com';
  final dio = Dio(BaseOptions(baseUrl: baseUrl));
  return dio;
});
dio_service_test.dart
test('DioService initialized correctly with a correct baseUrl', () {
  // ARRANGE
  // Create a ProviderContainer to get provider
  final container = ProviderContainer();
  // Get the dioService via provider
  final dio = container.read(dioService);

  // ASSERT
  // expect Dio object is created
  expect(dio, isA<Dio>());
  // expect the baseUrl of the object is correct.
  expect(dio.options.baseUrl, 'https://jsonplaceholder.typicode.com');
});
서비스 테스트는 의심스럽습니다 대부분 사용하는 서비스에 대한 테스트를 작성할 필요는 없지만 백앤드 담당자를 신뢰하지 않는다면 앱에서도 서비스 테스트를 작성해야 한다고 생각합니다.
post_repository.dart
final postRepository = Provider((ref) => PostRepository(ref));

class PostRepository {
  final Ref ref;

  const PostRepository(this.ref);

  Future<List<Post>> getPosts() async {
    try{
      final res = await ref.read(dioService).get('/posts/);
      final List list = res.data;
      return list.map((e) => Post.fromJson(e)).toList();
    } catch (e){
      rethrow;
    }

}
post_repository_test.dart
class MockDio extends Mock implements Dio{}
class MockDioResponse<T> extends Mock implements Response<T> {}
class MockDioError extends Mock implements DioError {}

test('getPosts', () async {
  // Arrange
  // 테스트를 위한 더미데이터
  final jsonResponse = {'userId': 1, 'id': 1, 'title': '', 'body': ''};

  // PostRepository는 dio 인스턴스에 의존하지만 우리가 알다시피 테스트는 다른것에 의존해서는 안됩니다.
  // 그래서 Dio와 Response클래스를 포밍하는겁니다.
  // 가짜 응답 객체를 만들수도 있지만 모킹을 하면 훨씬 시워지니 굳이 귀찮게 할 이유가 없죠
  final mockDio = MockDio();
  final mockResponse = MockResponse();

  // 누군가 response.data를 요청하면 jsonResponse를 반환합니다.
  when(() => mockResponse.data).thenReturn([jsonResponse]);
  // 누군가 내부에서 get 메서드를 호출하면 모의 응답을 반환합니다
  when(() => mockDio.get(any())).thenAnswer((_) async => mockResponse);;

  // 저장소를 격리하기 위해 모킹된 Dio 객체로 dioService를 재정의해야 합니다.
  // 여기서는 더이상 백엔드에 의존하지 않습니다.
  final container = ProviderContainer(
    overrides:[
      dioService.overrideWtihValue(mockDio);
    ]
  );

  // ACT
  // 레포지토리 인스턴스를 가져와서 getPosts 메서드를 호출하여 테스트하기만 하면 됩니다.!
  final result = await container.read(postRepository).getPosts();

  // ASSERT
  // 마지막으로 예상한것과 동일한 결과를 기대해야 합니다.
  expect(
    result,
    isA<List<Post>>().having((list) => list.first.id, 'first element id', 1);
  );
  // 그리고 dio가 '/posts' 경로로 get 메서드를 호출했는지 여부도 확인할 수 있습니다.
  verify(() => mockDio.get('/posts/).called(1));
});

test('getPosts - got an exception from dio', () async {
  // ARRANGE
  final mockDio = MockDio();
  final mockError = MockDioError();

  when(() => mockDio.get(any())).thenThrow(mockError);

  final container = ProviderContainer(
    overrides: [
      dioService.overrideWithValue(mockDio),
    ],
  );

  expect(
    // ACT
    () async => await container.read(postRepository).getPosts(),
    throwsA(isA<DioError>());
  );

  verify(() => mockDio.get('/posts/')).called(1);
});
setUp, tearDown 메소드를 사용하거나 맨위에 인스턴스 하나만 사용하고 다시 사용할 수도 있는데 왜 인스턴스를 다시 만들었냐고 생각할 수 있습니다.
제 대답은 예, 그럴수도 있지만 테스트에서 코드 반복은 괜찮으며 중요한것은 테스트를 분리하고 읽기쉽고 추적가능한 코드를 작성하는 것입니다. 약간 논란의 여지가 있는 주제입니다. 저는 그냥 이 방식을 선호할 뿐입니다.
Post - 단위 테스트
프로젝트에서 100% 커버리지를 얻으려면 데이터 클래스에 대한 테스트도 작성해야 합니다!
post.dart
class Post {
  Post({
    required this.userId,
    required this.id,
    required this.title,
    required this.body,
  });

  final int userId;
  final int id;
  final int title;
  final int body;

  factory Post.fromJson(Map<String, dynamic> json) => Post(
        userId: json["userId"],
        id: json["id"],
        title: json["title"],
        body: json["body"],
      );

  Map<String, dynamic> toJson() => {
        "userId": userId,
        "id": id,
        "title": title,
        "body": body,
      };
}
post_test.dart
test('fromJson', (){
  // ARRANGE
  final jsonResponse = {'userId': 1, 'id': 1, 'title': '', 'body': ''};

  // ACT
  final post = Post.fromJson(jsonResponse);

  // ASSERT
  expect(post, isA<Post>().having((e) => e.id, 1));
});

test('toJson', (){
  // ARRANGE
  final postData = Post(id: 1, userId: 1, title: '', body: '');

  // ACT
  final json = postData.toJson();

  // ASSERT
  expect(json, isA<Map<String, dynamic>>().having((e) => e['id'], 'id', 1));
});
PostsProvider - 단위 테스트
레포지토리에서 데이터를 가져와 UI에 제공하는 역할을 하는 PostProvider. 이 시나리오에서는 FutureProvider를 사용합니다. 오류 처리 및 로딩 상태와 같은 지루한 프로세스를 모두 줄여주기 때문입니다.
post_provider.dart
final postsProvider = FutureProvider((ref) {
  return ref.read(postRepository).getPosts();
});
post_provider_test.dart
test('getPosts', () async {
  // ARRANGE
  // 의존성을 위한 목 생성
  final mockPostRepository = MockPostRepository();

  // 의존성에 대한 동작 설정
  when(mockPostRepository.getPosts).thenAnswer((_) async => <Post>[]);

  // override the dependencies
  final container = ProviderContainer(
    overrides: [
      postRepository.overrideWithValue(mockPostRepository),
    ],
  );

  // ASSERT
  // 초기값이 AsyncLoading인지 확인합니다.
  expect(container.read(postsProvider), const AsyncLoading<List<Post>>());

  // ACT
  // futureProvider를 호출하고 기다립니다.
  await container.read(postsProvider.future);

  // ASSERT
  // then expect data is arrived correctly
  expect(container.read(postsProvider), isA<AsyncData<List<Post>>>());

  verify(mockPostRepository.getPosts).called(1);
});

// 에러 시나리오도 테스팅 한다
test('return AsyncValue.error when got an error', async {
  // ARRANGE
  final exception = Exception();

  final mockPostRepository = MockPostRepository();

  when(mockPostRepository.getPosts).thenThrow(exception);

  final container = ProviderContainer(
    overrides: [
      postRepository.overrideWithValue(mockPostRepository),
    ],
  );

  // ASSERT
  expect(container.read(postsProvider), isA<AsyncError<List<Post>>>().having((e) => e.error, 'error', exception));

  verify(mockPostRepository.getPosts).called(1);
});
PostList - 위젯테스트 - BDD Example
PostList는 postProvider의 상태를 보여주는 위젯일 뿐입니다.
이제 BDD 메서드를 사용한 이 시나리오를 살펴보겠습니다.
Feature: Get data from 'postRepository' and display them on the UI according to the process
Scenario: User opens [HomePage]
Given List of posts
When data is fetching
Then [PostList] should display a loading widget
When the data is ready
Then [PostList] should display a list of posts

Given an error to throw
When data is fetching
Then [PostList] should display a loading widget
When get an error while fetching the data
Then [PostList] should display an error message
post_list.dart
class PostList extends ConsumerWidget {
const PostList({super.key});
Widget build(BuildContext context, WidgetRef ref){
final asyncPosts = ref.watch(postsProvider);
return asyncPosts.when(
data: (list) => ListView.builder(
itemCount: list.length,
itemBuilder: (_, i) => PostCard(list[i]),
),
error: (_, __) => const Center(child: Text('error')),
loading: () => const Center(child: CircularProgressIndicator()),
);
}
}post_list_test.dart
testWidgets('list the given data', (WidgetTester tester) async {
  // ARRANGE
  final list = [
    Post(id: 1, userId: 1, title: '', body: '');
    Post(id: 2, userId: 2, title: '', body: '');
    Post(id: 3, userId: 2, title: '', body: '');
  ];

  await tester.pumpWidget(
    ProviderScope(
      overrides: [
        postProvider.overrideWithProvider(
          FutureProvider((_) async => list),
        ),
      ],
      child const MaterialApp(
        home: PostList(),
      ),
    ),
  );

  // ASSERT
  expect(find.byType(CircularProgressIndicator), findsOneWidget);
  expect(find.byType(ListView), findsNothing);

  // ACT
  await tester.pumpAndSettle();

  // ASSERT
  expect(find.byType(CircularProgressIndicator), findsNothing);
  expect(find.byType(ListView), findsOneWidget);
});

testWidgets('display error', (WidgetTester tester) async {
  // ARRANGE
  await tester.pumpWidget(
    ProviderScope(
      overrides: [
        postsProvider.overrideWithProvider(
          FutureProvider((_) => Future.error('error')),
        ),
      ],
      child: const MaterialApp(
        home: PostList(),
      ),
    ),
  );

  // ASSERT
  expect(find.byType(CircularProgressIndicator), findsOneWidget);
  expect(find.text('error'), findsNothing);

  // ACT
  await tester.pumpAndSettle();

  // ASSERT
  expect(find.byType(CircularProgressIndicator), findsNothing);
  expect(find.text('error'), findsOneWidget);

});
PostCard - 위젯 테스트
class PostCard extends StatelessWidget {
final Post post;
const PostCard(this.post, {Key? key}) : super(key: key);
Widget build(BuildContext context) {
return GestureDetector(
onTap: () {
Navigator.push(
context,
MaterialPageRoute(builder: (_) => DetailsPage(post)),
);
},
child: Card(
child: ListTile(
title: Text(post.title),
subtitle: Text(post.body),
trailing: Consumer(builder: (_, ref, __) {
final favs = ref.read(favoritesProvider.notifier);
final isFavorited = ref.watch(
favoritesProvider.select((list) => list.contains(post)),
);
return IconButton(
icon: Icon(
Icons.favorite,
color: isFavorited ? Colors.red : Colors.grey,
),
onPressed: () => favs.favorite(post),
);
}),
),
),
);
}
}post_card_test.dart
class MockNavigatorObserver extends Mock implements NavigatorObserver {}
class FakeRoute extends Fake implements Route {}

testWidgets('PostCard - navigate to details page', (tester) async {
  // ARRANGE
  registerFallbackValue(FakeRoute());

  final post = Post(id: 1, userId: 1, title: '', body: '');

  final mockObserver = MockNavigatorObserver();

  await tester.pumpWidget(
    ProviderScope(
      child: MaterialApp(
        home: PostCard(post),
        navigatorObservers: [mockObserver],
      ),
    ),
  );

  final button = find.byType(PostCard);

  // ASSERT
  expect(button, findsOneWidget);

  // ACT
  await tester.tap(button);
  await tester.pumpAndSettle();

  // ASSERT
  verify(() => mockObserver.didPush(any(), any()));

  expect(find.byType(DetailsPage, findOneWidget);
});

testWidgets('PostCard - favorite button', (tester) async {
  // ARRANGE
  final post = Post(id: 1, userId: 1, title: '', body: '');

  await tester.pumpWidget(
    ProviderScope(
      child: MaterialApp(
        home: PostCard(post),
      ),
    ),
  );

  final button = find.byType(IconButton);

  // ASSERT
  expect(tester.widget<Icon>(find.byType(Icon)).color, Colors.grey);

  // ACT
  await tester.tap(button);
  await tester.pumpAndSettle();

  // ASSERT
  expect(tester.widget<Icon>(find.byType(Icon)).color, Colors.red);

  // ACT
  await tester.tap(button);
  await tester.pumpAndSettle();

  // ASSERT
  expect(tester.widget<Icon>(find.byType(Icon)).color, Colors.grey);
});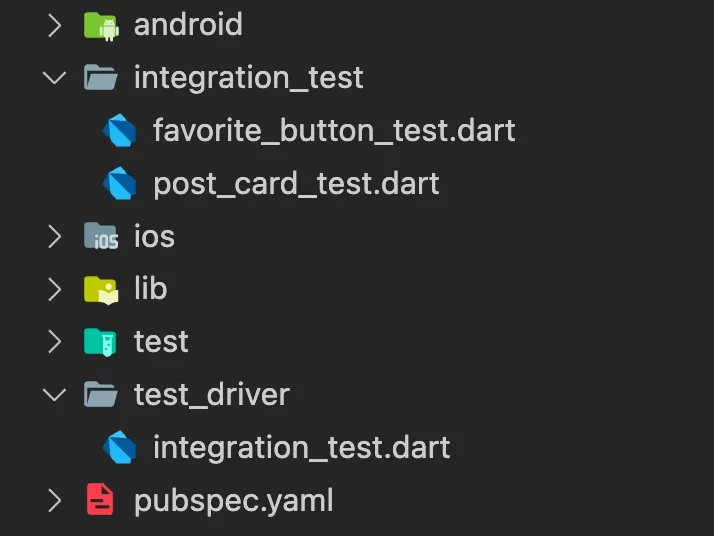
보시다시피 통합 테스트와 테스트 드라이버가 테스트 폴더에 없습니다.
그 이유는 대부분 성능에 관한 것이지만 범위가 다른 등의 다른 이유도 있습니다.
이에 대한 자세한 내용은 여기에서 확인할 수 있습니다.
또한 공식 문서도 마찬가지입니다!
그렇기 때문에 우리도 분리해야 합니다!
integration_test.dart
Future<void> main() asnyc {
  try{
    // 스크린샷을 얻기 위해 드라이버를 초기화
    await integrationDriver(
      // (Optional): 모든 스크린샷에 의해 트리거된다
      onScreenshot: (String name, List<int> bytes) async {
        final path = 'screenshots/$name.png';
        final image = await File(path).create(recursive:true);
        image.writeAsBytesSync(bytes);
        return true;
      }
    );
  } catch (e) {
    if(kDebugMode) print('Error occured: $e');
  }
}
favorite_button_test.dart
void main() asnyc {
  final binding = IntegrationTestWidgetsFlutterBinding.ensureInitialized();