
💻 MAC OS STS(Spring Tool Suite)설치
-
STS사이트 접속해서 Spring Tools 4 for Eclipse 중 MACOS 다운
→ M1은 ARM_64, 그 외는 X86_64 다운 -
.app 끌어서 Applications 폴더로 넣기
💻 Java EE 연동
- STS프로그램 실행 후 폴더연결하면 Eclipse와 똑같은 화면 볼 수 있음
- Help → Install New Software
→ Work with : Latest Eclipse Release - https://download.eclipse.org/releases/latest
→ 아래 Name 중 Web, XML, Java EE and OSGi Enterprise Development 체크 후 Next해서 설치
📖 Spring MVC 구조
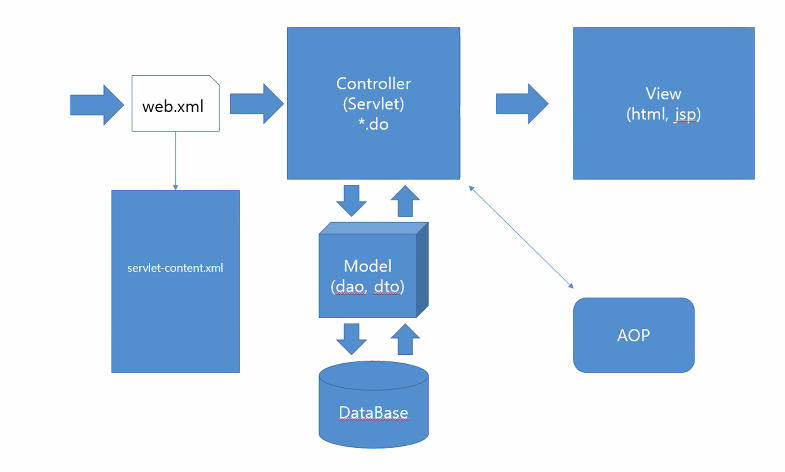
web.xml에서 가장 먼저 servlet-content.xml을 읽은 후 controller를 거쳐 view로 감
그 경로를 따라 그려보면 모양이 꼭 스프링같이 생겼음
📌 Settings
pom.xml 생성
- Dynamic Web Project 생성
- Project에서 오른쪽 마우스 클릭
Configure → Conver to Maven Project - pom.xml 생성
pom.xml 셋팅
- MavenRepository 에서 검색 후 코드 복사하여 pom.xml에 붙여넣기
Java Resources → Libraries → Maven Dependencies 에서 확인 가능
<project xmlns="http://maven.apache.org/POM/4.0.0" xmlns:xsi="http://www.w3.org/2001/XMLSchema-instance" xsi:schemaLocation="http://maven.apache.org/POM/4.0.0 https://maven.apache.org/xsd/maven-4.0.0.xsd">
  <modelVersion>4.0.0</modelVersion>
  <groupId>spsample1</groupId>
  <artifactId>spsample1</artifactId>
  <version>0.0.1-SNAPSHOT</version>
  <packaging>war</packaging>
  <build>
    <plugins>
      <plugin>
        <artifactId>maven-compiler-plugin</artifactId>
        <version>3.8.1</version>
        <configuration>
          <release>17</release>
        </configuration>
      </plugin>
      <plugin>
        <artifactId>maven-war-plugin</artifactId>
        <version>3.2.3</version>
      </plugin>
    </plugins>
  </build>

  <dependencies>
	 <!-- https://mvnrepository.com/artifact/org.springframework/spring-webmvc -->
	<dependency>
	    <groupId>org.springframework</groupId>
	    <artifactId>spring-webmvc</artifactId>
	    <version>5.3.25</version>
	</dependency>

	<!-- https://mvnrepository.com/artifact/log4j/log4j -->
	<dependency>
	    <groupId>log4j</groupId>
	    <artifactId>log4j</artifactId>
	    <version>1.2.17</version>
	</dependency>

	<!-- https://mvnrepository.com/artifact/org.slf4j/slf4j-simple -->
	<dependency>
	    <groupId>org.slf4j</groupId>
	    <artifactId>slf4j-simple</artifactId>
	    <version>1.7.36</version>
	</dependency>

  </dependencies>
</project>
web.xml 생성
- Java EE Tools → Generate Deployment Descriptor Stub 클릭
src/main/webapp/WEB-INF/web.xml 생성
web.xml 셋팅
<?xml version="1.0" encoding="UTF-8"?>
<web-app xmlns:xsi="http://www.w3.org/2001/XMLSchema-instance" xmlns="http://xmlns.jcp.org/xml/ns/javaee" xsi:schemaLocation="http://xmlns.jcp.org/xml/ns/javaee http://xmlns.jcp.org/xml/ns/javaee/web-app_4_0.xsd" version="4.0">
  <display-name>spSample1</display-name>
  <welcome-file-list>
    <welcome-file>index.html</welcome-file>
    <welcome-file>index.htm</welcome-file>
    <welcome-file>index.jsp</welcome-file>
    <welcome-file>default.html</welcome-file>
    <welcome-file>default.htm</welcome-file>
    <welcome-file>default.jsp</welcome-file>
  </welcome-file-list>

  <servlet>
    <servlet-name>dispatcherServlet</servlet-name>
    <servlet-class>
  		org.springframework.web.servlet.DispatcherServlet
  	</servlet-class>

    <init-param>
      <param-name>contextConfigLocation</param-name>
      <param-value>
  			/WEB-INF/spring/servlet-context.xml		<!-- 경로틀리지않도록 주의! -->
  		</param-value>
    </init-param>
    <load-on-startup>1</load-on-startup>
  </servlet>

  <servlet-mapping>
    <servlet-name>dispatcherServlet</servlet-name>
    <url-pattern>/</url-pattern>
  </servlet-mapping>

</web-app>
servlet-context.xml 생성
- webapp → WEB-INF 에서 오른쪽 마우스 클릭 후 spring 폴더 생성 후 servlet-context.xml 생성
servlet-context.xml 셋팅
<?xml version="1.0" encoding="UTF-8"?>
<beans xmlns="http://www.springframework.org/schema/beans"
   xmlns:xsi="http://www.w3.org/2001/XMLSchema-instance"
   xmlns:context="http://www.springframework.org/schema/context"
   xmlns:mvc="http://www.springframework.org/schema/mvc"
   xsi:schemaLocation="http://www.springframework.org/schema/mvc http://www.springframework.org/schema/mvc/spring-mvc-4.3.xsd
      http://www.springframework.org/schema/beans http://www.springframework.org/schema/beans/spring-beans.xsd
      http://www.springframework.org/schema/context http://www.springframework.org/schema/context/spring-context-4.3.xsd">

<!-- 	spring MVC annotation(주석문, 지시문)을 사용하기 위한 설정-->
	<context:annotation-config />
	<!--

		view폴더의 위치, 확장자명을 설정
		(자바로 했을 경우 아래와 동일함)
		InternalResourceViewResolver viewResolver = new InternalResourceViewResolver();
		viewResolver.prefix = "/WEB-INF/views/"

	 -->
	<bean id="viewResolver" class="org.springframework.web.servlet.view.InternalResourceViewResolver">
		<property name="prefix" value="/WEB-INF/views/" />
		<property name="suffix" value=".jsp" />
	</bean>

	<!-- 공통 패키지(경로) -->
	<context:component-scan base-package="mul.cam.a" />


</beans>
📌 Ex.
Controller ←→ View
src → main → java 에서 오른쪽 마우스 클릭 후 pakages생성 → 이름.이름.이름 으로 생성하면
패키지안에 패키지안에 패키지로 생성할 수 있음
Controller
Controller.java
dto 폴더 생성하여 HumanDto로 이름, 나이 받게 해두었음
package mul.cam.a;

import java.util.ArrayList;
import java.util.Date;
import java.util.List;

import org.slf4j.Logger;
import org.slf4j.LoggerFactory;
import org.springframework.stereotype.Controller;
import org.springframework.ui.Model;
import org.springframework.web.bind.annotation.RequestMapping;
import org.springframework.web.bind.annotation.RequestMethod;

import mul.cam.a.dto.HumanDto;

@Controller
public class HelloController {

    // 로그 관리
	private static Logger logger = LoggerFactory.getLogger(HelloController.class);

	@RequestMapping(value = "home.do", method = RequestMethod.GET) // get/post 설정해주는 부분
	public String homeMethode() {
//		System.out.println("HelloController homeMethod()" + new Date());
		logger.info("HelloController homeMethod()" + new Date());

		return "home";
	}
	@RequestMapping(value = "hello.do", method = RequestMethod.GET) // get/post 설정해주는 부분
	public String hello(Model model) {
		// 짐싸기
		String name = "홍길동";
		model.addAttribute("name", name);	// == request.setAttribute

		//잘가!
		return "home";
	}
	@RequestMapping(value = "world.do", method = RequestMethod.POST)
	public String world(String name, int age) {
		logger.info("HelloController world()" + new Date());

		System.out.println("이름:" + name);
		System.out.println("나이:" + age);

		return "home";
	}
	@RequestMapping(value = "main.do", method = RequestMethod.POST)
	public String mainMethod(HumanDto human) {
		logger.info("HelloController mainMethod()" + new Date());

		System.out.println(human.toString());

		return "home";
	}
	@RequestMapping(value = "mylist.do", method = { RequestMethod.GET, RequestMethod.POST }) // post,get상관없이 받을 수 있음
	public String listMethod(String message, Model model) {

		logger.info("HelloController mylist()" + new Date());

		List<HumanDto> list = new ArrayList<>();

		list.add(new HumanDto("홍길동", 24));
		list.add(new HumanDto("성춘향", 16));
		list.add(new HumanDto("일지매", 22));

		model.addAttribute("list", list);

		return "home";
	}

}
view
<%@page import="mul.cam.a.dto.HumanDto"%>
<%@page import="java.util.List"%>
<%@ page language="java" contentType="text/html; charset=UTF-8"
    pageEncoding="UTF-8"%>
<!DOCTYPE html>
<html>
<head>
<meta charset="UTF-8">
<title>Insert title here</title>
</head>
<body>
<h1>home</h1>
<br>

<a href="hello.do">hello</a>
<br>
<%
	String name = (String)request.getAttribute("name");	// 컨트롤러에서 짐싸준거 받아서 풀기

	if(name != null && !name.equals("")) {
	%>
		이름:<%=name %>
	<%
	}
%>
<br><br>
<!-- View에서 Controller로 전송 -->
<!-- form과 a태그 보낼 때 차이는 post로 보낼수 있느냐 없느냐의 차이. a태그는 get으로만 보낼 수 있음 -->
<form action="world.do" method="post">
이름 : <input type="text" name="name"><br>
나이 : <input type="text" name="age">
<input type="submit" value="world로 이동">
</form>
<br><br>

<form action="main.do" method="post">
이름 : <input type="text" name="name"><br>
나이 : <input type="text" name="age">
<input type="submit" value="main로 이동">
</form>

<!--
	mylist.do

	-> list
	-> 출력 table
 -->

<a href="mylist.do?message=hihi">mylist</a>
<br><br>
<!-- Controller에서 data 전송해서 view에서 받음 -->
<%
	List<HumanDto> list = (List<HumanDto>)request.getAttribute("list");
	if(list != null && list.isEmpty() == false) {
	%>
		<table border="1">
			<thead>
				<tr>
					<th>번호</th>
					<th>이름</th>
					<th>나이</th>
				</tr>
			</thead>
			<tbody>
		<%
			for(int i = 0; i < list.size(); i++) {
				HumanDto dto = list.get(i);
		%>
			<tr>
				<td><%= i+1 %></td>
				<td><%= dto.getName() %></td>
				<td><%= dto.getAge() %></td>
			</tr>
		<%
			}
		%>
			</tbody>
		</table>
	<%
}
%>
</body>
</html>