
Apple HealthKit
- 내가 구현한 것은 아니지만 회사 QA에 걸음수가 핸드폰과 비교했을 때 다르다는 QA가 올라왔다.
- QA가 내게 할당되었다. 왜 불길한 예감은 한 번도 틀린 적이 없는지
- 걸음 수의 차이가 많이 나는 사람들을 조사해보니 대부분 애플워치의 이용자들이었다.
- Apple 공식 문서와 WWDC강의를 참고해서 문제를 해결했다.
WWDC2020 : Getting started with HealthKit
WWDC2020 : Synchronize health data with HealthKit
2020 : Beyond counting steps
HealthKit Officail Document
HealthKit Article : Setting Up HealthKit
Check Your Device first
override func viewDidLoad() {
        super.viewDidLoad()
 	if HKHealthStore.isHealthDataAvailable() {

 	}
}- 상기의 코드에서 첫번째 if문을 보면 디바이스의 헬스키트 사용 가능 여부를 체크해준다.
Request Authorization To User EveryTime
override func viewDidLoad() {
        super.viewDidLoad()
        if HKHealthStore.isHealthDataAvailable() {

            let healthStore = HKHealthStore()
            let readDataTypes : Set = [HKObjectType.quantityType(forIdentifier: HKQuantityTypeIdentifier.stepCount)!,
                                       HKObjectType.quantityType(forIdentifier: HKQuantityTypeIdentifier.distanceWalkingRunning)!
            ]

            healthStore.requestAuthorization(toShare: nil, read: readDataTypes) { (success, error) in
                if !success {
                    // Handle the error here.
                } else {
                    // Enter your logic here.
                }
            }
        }
- 기기가 헬스키트가 사용 가능하다면, HKHealthStore의 인스턴스를 생성해주고
- 유저에게 요청할 데이터 타입과 타입 안에서 원하는 목록을 선택해준다 ex) stepcount, distanceWalking Running
- request Autorization을 시작하면 하단에서 애플의 권한 승인 창이 올라온다.
Do Not Think User Use Your App as You Think
- 여기서 커다란 착각을 하는 게 유저들이 권한을 열어줄 것을 전제로 앱을 만들면 안 된다.
- 최근 유저들은 굉장히 방어적이고, 알람이나 권한을 대부분 꺼놓는다.
- 정말 필요한 앱만 겨우겨우 권한을 열어놓는다.
- 첫 번째로 우리 앱에서 구현되었던 스탭카운터의 문제 이 권한 쪽에서 발생했다.
걸음수와 운동시간을 HealthKit로 쿼리해오면서 두가지 데이터를 각각 쿼리하고 걸음수가 있으면 당연히 걸은 시간이 존재하기 마련이니 Combine Zip을 이용해 두 가지 데이터를 묶었다. 데이터 정제를 끝내면 걸음수와 걸은 시간을 각각 Send했는데 유저가 걸은 시간이나 거리에 대해서 권한을 승인을 안 하면 Zip이 제 기능을 안 하면서 데이터가 저장되지 않는 현상이 발생했다. - 애플의 공식 문서에서는 자료를 요청할 때 마다 권한을 항상 확인하라고 명시해놨다.
- 유저가 언제든 앱 사용 초기든 중간이든 권한을 열고 닫을 수 있으니 이에 대해 유연하게 로직을 만들라고 했다.
Then, Can I Check What Authorization User Permitted?
- 대답은 그렇지 않다.
- 그렇다면 로직의 도입 부분에서 유저의 권한을 체크해서 분기를 나누면 될 줄 알았다.

- HealthKit authorizationStatus(for:)
- 상기의 굉장히 유저의 권한을 체크해줄 것 만 같은 기능을 발견했고 모든 구현을 마쳤다.
- 상기의 기능을 구현하면 하기의 상태값을 주는 것만 같았다.
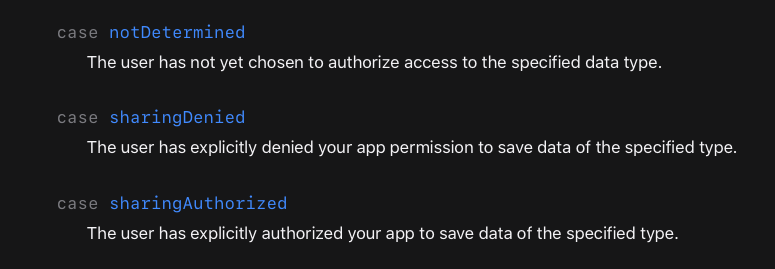
- 그치만 계속 notDetermined 값만 로그에 남았다.
- 애플 놈들이 또 유저를 생각해버린게 틀림없다.
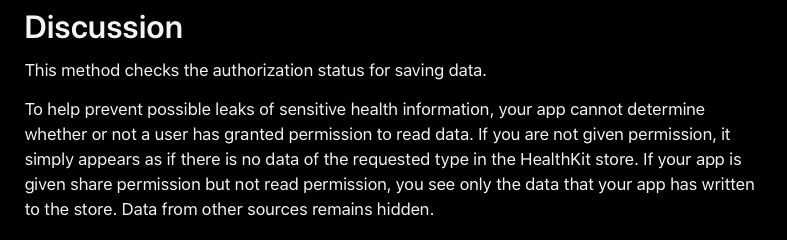
- 예민한 건강 정보의 유출 가능성 예방을 돕고자, 우리가 만드는 앱은 유저가 권한을 부여했는지 안 했는지 알 수 없다. 만약 허가를 못 받았다면 간단하게 없는대로 보여주지 말고 만들..

- 앞으론 discussion을 꼭 읽어야겠다.
- 그렇다면 날짜를 날짜까지만 컨버팅 한 후 milliSecondSince1970 형태로 바꿔서 primaryKey를 만들고
- Realm 의 insert update 와 데이터 유무 체크로 분기를 나누면 될 듯 하다.
    let sampleType = HKSampleType.quantityType(forIdentifier: HKQuantityTypeIdentifier.stepCount)
        let today = Date()
        let startDate = Calendar.current.date(byAdding: .day, value: -7, to: today)
        let predicate = HKQuery.predicateForSamples(withStart: startDate, end: today, options: HKQueryOptions.strictEndDate)
        let query = HKSampleQuery.init(sampleType: sampleType!,
                                       predicate: predicate,
                                       limit: HKObjectQueryNoLimit,
sortDescriptors: [NSSortDescriptor(key: HKSampleSortIdentifierStartDate, ascending: false)])- 상기의 부분이 대부분의 코드랩에서 나와있는 HKSampleType을 이용한 쿼리다.
Apple Document : HKSampleType
   /// Mark: -  한달의 걸음 수와 걸은 시간을 날짜별로 가져오는 함수
    func getOneMonthStepCountAndWalkingTimePerDay() {
        var realmWalking : [Walking] = []
        let sampleType = HKSampleType.quantityType(forIdentifier: HKQuantityTypeIdentifier.stepCount)
        let today = Date()
        let startDate = Calendar.current.date(byAdding: .day, value: -7, to: today)
        let predicate = HKQuery.predicateForSamples(withStart: startDate, end: today, options: HKQueryOptions.strictEndDate)
        let query = HKSampleQuery.init(sampleType: sampleType!,
                                       predicate: predicate,
                                       limit: HKObjectQueryNoLimit,
                                       sortDescriptors: [NSSortDescriptor(key: HKSampleSortIdentifierStartDate, ascending: false)]) { (query, results, error) in

            var dateOneIndexBeforeBuffer : Date? = nil
            var walkingDataBuffer : Walking = Walking()
            var stepCountBuffer : Int = 0
            var walkingSecondBuffer : Double = 0.0

            print("------------------------------------------------------------------------------------")
            results?.compactMap{
                $0
            }.forEach{ stepCountInfo in


                // Apple Watch와 중복 계산을 막아준다.
                if !stepCountInfo.description.contains("Watch"){
                    // Day 구분을 위해 StartDate에서 시간을 지워준다.
                    let startDate = convertStringToDate(dateString: (convertDateToString(date: stepCountInfo.startDate, format: "yyMMdd")), format: "yyMMdd")

                    // 하나 전 인덱스와 비교해준다.
                    if dateOneIndexBeforeBuffer != nil {
                        // 시작일이 전 인덱스의 시작일과 다르다면 날짜가 바뀐 것.

                            print("RESULT :: \(stepCountInfo.description)")
                        if startDate < dateOneIndexBeforeBuffer! {

                            // 날짜가 바뀌면 해당 날짜와, 해당 일의 걸음 수 걸음 시간 각각의 총 합을 객체에 넣어준다.
                            // 인덱스 (인덱스는 날짜로 선언한다 가변적인 데이터에 대응하기 위해 같은 날짜의 데이터는 Realm에서 Update & Insert를 진행한다.
                            walkingDataBuffer.id = dateOneIndexBeforeBuffer!.millisecondsSince1970
                            print("*** WALKING DATE PER CELL  :: \(walkingDataBuffer.id)")

                            // 걸음 수
                            walkingDataBuffer.walkingCount = stepCountBuffer
                            print("*** TOTAL WALKING COUNT PER CELL  :: \(walkingDataBuffer.walkingCount)")

                            // 운동 시간
                            walkingDataBuffer.walkingSecond = Int(round(walkingSecondBuffer))
                            print("*** TOTAL WALKING TIME PER CELL  :: \(walkingDataBuffer.walkingSecond)")
                            print("------------------------------------------------------------------------------------")

                            // 리셋 버퍼 벨류
                            walkingSecondBuffer = 0.0
                            stepCountBuffer = 0

                            // DB에 들어갈 객체에 넣어준다.
                            realmWalking.append(walkingDataBuffer)
                        }

                    }

                    // 걸은 시간
                    // 운동을 마친 시간과 시작 시간의 timeIntervalSinceReferenceDate 값을 빼주면 운동을 한 시간이 계산된다.
                    let walkingSecond = stepCountInfo.endDate.timeIntervalSince1970 - stepCountInfo.startDate.timeIntervalSince1970

                    // 걸은 시간을 더해준다.
                    walkingSecondBuffer += walkingSecond

                    // 걸음 수
                    let stepCount = Int(stepCountInfo.description.components(separatedBy: " count")[0])

                    // 걸음 수를 더해준다.
                    stepCountBuffer += stepCount ?? 0

                    // 다음 인덱스에서 확인할 수 있게 Date를 dateOneIndexBeforeBuffer 에 저장해준다.
                    dateOneIndexBeforeBuffer = startDate
                }

            }

        }
        healthStore.execute(query)
    }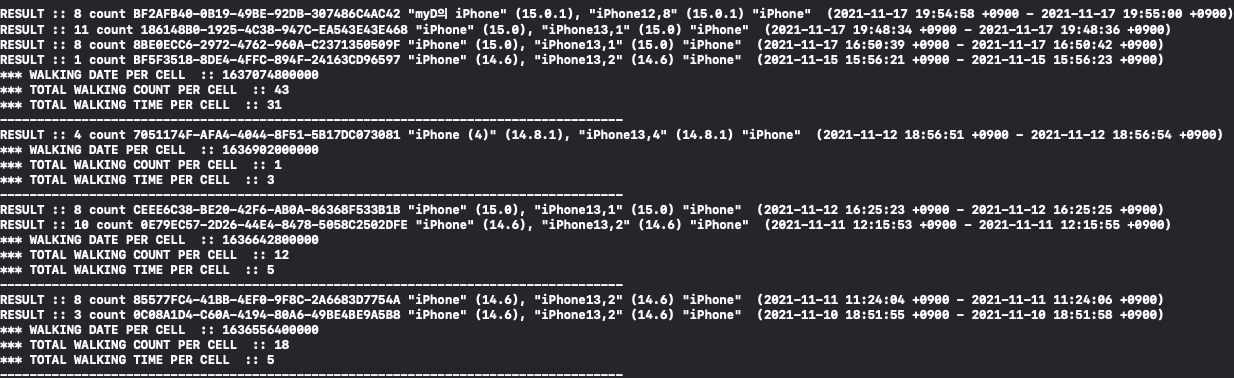
- 로그를 확인해 보면 iPhone12, iPhone13 등등 내 아이디가 등록되어있는 모든 기기들에서
- 걸음 수, 걷기 시작한 시간, 걷기가 끝난 시간 등이 나온다.
- 하루에 한 데이터가 나오는 게 아니라 감지된 모든 데이터가 나온다
- 상기의 로그를 찍은 디바이스는 회사에서 쓰는 테스트폰이어서 로그가 많이 안 찍히고 데이터의 갯수가 적지만
- 일반 사용자의 핸드폰으로 로그를 찍으면 앱이 꺼질 정도로 많은 양의 데이터가 들어온다.
- 여기서 우리 앱은 Device 에 관계 없이 모든 데이터를 더하기 때문에 거리 차이가 났다.
- 애플 워치를 차고있는 사람과는 거의 2배 가량의 걸음수 차이를 보여줬다.
- 이유는 애플디바이스는 디바이스간 싱크를 내부에서 맞춰서 건강 앱에서 보여주지만
- 우리는 싱크를 맞추지 않았기 때문이다.
if !stepCountInfo.description.contains("Watch")- 상기의 코드를 사용하여 Apple Watch 디바이스의 데이터를 제외하고 합을 구했지만
- 100 - 200 걸음의 오차는 계속 생겼다.
- 95%의 코드랩 자료들은 상기와 같은 연산을 사용했다.
- 그렇지만 이렇게 하면 정확한 자료를 얻기는 어렵다.
   ///  설정한 기간동안의 걸음 수를 조회할 수 있는 쿼리.
    /// - Parameter completion: cumulative parameter sum
    func getTodaysSteps(completion: @escaping (Double) -> Void) {
        let stepsQuantityType = HKQuantityType.quantityType(forIdentifier: .stepCount)!

        let now = Date()
        let startDate = Calendar.current.date(byAdding: .day, value: -6, to: Date())!
        let predicate = HKQuery.predicateForSamples(
            withStart: startDate,
            end: now,
            options: .strictStartDate
        )

        let query = HKStatisticsQuery(
            quantityType: stepsQuantityType,
            quantitySamplePredicate: predicate,
            options: .separateBySource
        ) { _, result, _ in
            guard let result = result, let sum = result.sumQuantity() else {
                print("Step Zero")
                completion(0.0)
                return
            }
            print("result check \(result)")
            completion(sum.doubleValue(for: HKUnit.count()))
        }
        healthStore.execute(query)
}- 상기의 데이터는 HKStatisticsQuery를 사용한 데이터인데
- 정해진 기간의 데이터를 더하거나, 축적연산을 하는 것 위주로 가능했다.
- 내가 원하는 것은 통계 데이터를 콜렉션 형태로 보는 것 이다.
- 데이터는 정확하나 정제가 안 되므로 HKStatisticsQuery는 사용하지 않기로 했다.
- Apple Doc : HKStatisticsQuery
// 날짜별 스탭카운트 얻기
    func getStepCountPerDay(finishCompletion: @escaping () -> Void){

        guard let sampleType = HKObjectType.quantityType(forIdentifier: .stepCount)
            else {
                return
        }
        let calendar = Calendar.current
        var dateComponents = DateComponents()
        dateComponents.day = 1

        var anchorComponents = calendar.dateComponents([.day, .month, .year], from: Date())
        anchorComponents.hour = 0
        let anchorDate = calendar.date(from: anchorComponents)

        let stepsCumulativeQuery = HKStatisticsCollectionQuery(quantityType: sampleType, quantitySamplePredicate: nil, options: .cumulativeSum, anchorDate: anchorDate!, intervalComponents: dateComponents
        )

        // Set the results handler
        stepsCumulativeQuery.initialResultsHandler = {query, results, error in
            let endDate = Date()
            let startDate = calendar.date(byAdding: .day, value: -30, to: endDate, wrappingComponents: false)
            if let myResults = results{
                myResults.enumerateStatistics(from: startDate!, to: endDate as Date) { [self] statistics, stop in
                    if let quantity = statistics.sumQuantity(){
                        let date = statistics.startDate
                        let steps = quantity.doubleValue(for: HKUnit.count())
                        print("START DATE :: \(statistics.startDate)")
                        print("STEP COUNT :: \(steps)")
                        print("-------------------------------------------------------------")
                    }
                }
            } else {
                print("STEP COUNT DATA NIL")
            }
        }
        HKHealthStore().execute(stepsCumulativeQuery)
        finishCompletion()
    }
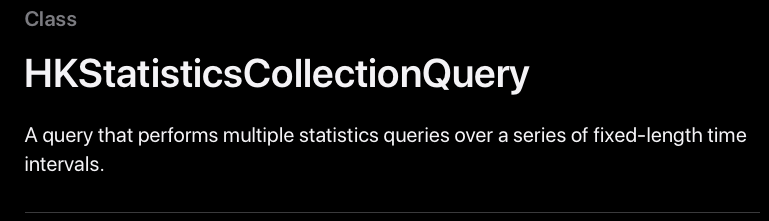
- 연속적인 고정된 인터벌의 기간 으로 여러개의 통계적인 데이터를 콜렉션 형태로 가져오는 쿼리타입
- 각 일자에 있는 걸음수의 통계적 합을 나타내기 위해
if let quantity = statistics.sumQuantity()- 상기의 코드를 작성해서 각 일자의 통계적 합을 구합니다.
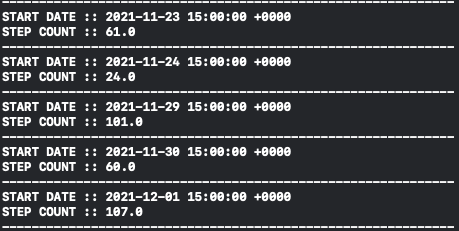
- 로그를 찍어보면 고정된 시작 일자와
- 하루 걸은 걸음수의 총합을 보여줍니다.
- 이 데이터를 확인해 보면 정확히 건강 앱의 데이터와 일치하는 것을 확인 할 수 있습니다.
Tip
- 공식문서를 찾아보면서 이것 저것 클릭하다보니 엄청 중요한 내용을 봤다.
AHIG: AppleHealthKit - 대략적으로 어떻게 프로그램 해야하는지 미리 잘 알려주고
- 해도 되는 것 안 해야하는 것을 미리 보여주기 때문에 반드시 미리 읽고 구현하기 바란다.
- 아이콘에 대해서도 어떻게 사용해야 하는지 알려주는데 이게 생각보다 중요하다.
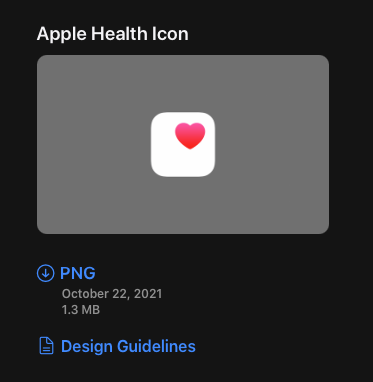
- 상기의 사진 처럼 애플에서 제공해주는 아이콘만을 써야하며, 그림자나 보더등을 주면 심사에서 떨어질 수 있다.
- 그리고 클라이언트 쪽에 HealthKit이라는 단어는 쓰면 안 되며, HealthKit은 어디까지나 개발자를 위해서 만든 용어이므로, 아이콘 사용과 마찬가지로 지키지 않을 시에는 심사에서 떨어질 수 있다.
Conclusion
- 블로그 자료들에는 한계가 분명했다.
- 결국 공식 문서를 참고해야 제시하는 원칙을 지켜가면서 개발할 수 있다.
- 코드랩을 참고하더라도, 반드시 공식문서가 숙지되어 있는 상태에서 진행하는 게 좋다.
- 개발하기 전에 Native앱과 연동할 때에는 AHIG 미리 확인하면 시간을 많이 줄일 수 있다.
- 유저를 많이 생각하기 때문에 개발자 입장에서는 조금 힘들 수 있다.
- 그래도 문서를 읽어가는 힘을 기를 수 있어서 너무 좋은 경험이었다.
