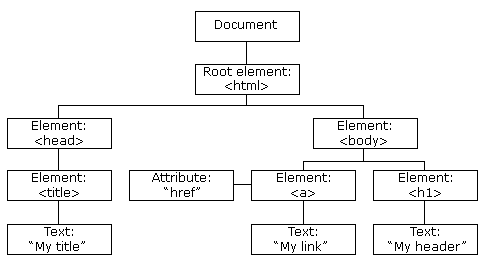
🌈 DOM 안에서 Node탐색
참고: https://lifeandit.tistory.com/70, https://hianna.tistory.com/712
- 태그를 표현하는
Element Node - 문자를 표현하는
Text Node - 주석을 표현하는
Comment Node
previousSibling() > Element는 물론 #text와 주석까지 node로 카운트하여 반환
previousElementSibling() > Element(태그)만 카운트하여 반환
🌃 요소 노드에 대한 프로퍼티 (태그)
- 부모 요소 탐색
parentElement: 부모 요소(element)를 리턴합니다.
- 자식 요소 탐색
children: 자식 요소(element) 목록을,HTMLCollection형태로 리턴합니다.childrenElement이 아닙니다 주의!!!
firstElementChild: 자식 요소(element) 중, 첫번째 요소를 리턴합니다.
lastElementChild: 자식 요소(element) 중, 마지막 요소를 리턴합니다.
- 형제 요소 탐색
previousElementSibling: 같은 레벨의 요소(element) 중, 이전 요소를 리턴합니다.
nextElementSibling: 같은 레벨의 요소(element) 중, 다음 요소를 리턴합니다.
🌃 모든 노드에 대한 프로퍼티 (text노드 등 다 포함)
- 부모 노드 탐색
parentNode : 부모 노드를 리턴합니다.
- 자식 노드 탐색
childNodes : 자식 노드 목록을NodeLis형태로 리턴합니다.
firstChild : 자식 노드 중, 첫번째 자식 노드를 리턴합니다.
lastChild : 자식 노드 중, 마지막 자식 노드를 리턴합니다.
- 형제 노드 탐색
previousSibling : 같은 레벨의 노드 중, 이전 노드를 리턴합니다.
nextSibling : 같은 레벨의 노드 중, 다음 노드를 리턴합니다.
🌈 이벤트
🌃 이벤트 객체
이벤트가 발생하면 브라우저는 이벤트 객체(event object)라는 것을 만듭니다. 여기에 이벤트에 관한 상세한 정보를 넣은 다음, 핸들러에 인수 형태로 전달합니다.
핸들러는 리스너함수/콜백함수입니다.
<button class="btn-first" type="button">버튼1</button>

<script>
	const btnFirst = document.querySelector('.btn-first');
    //발생한 이벤트에대한 정보를 담은 객체, 자동으로들어옴
    //우리는 클릭만했는데 클릭에대한 여러가지 정보를 제공해줍니다
  btnFirst.addEventListener('click', (event) => {
        console.log(event);
        //콘솔로그된 이벤트를 살펴뵤면
        //target: button.btn-first, type:'click' 등 이벤트에관한 여러 정보가 있어요
  });
</script>
🌃 이벤트 흐름
브라우저 화면에서 이벤트가 발생하면 브라우저는 가장 먼저 이벤트 대상을 찾기 시작합니다.
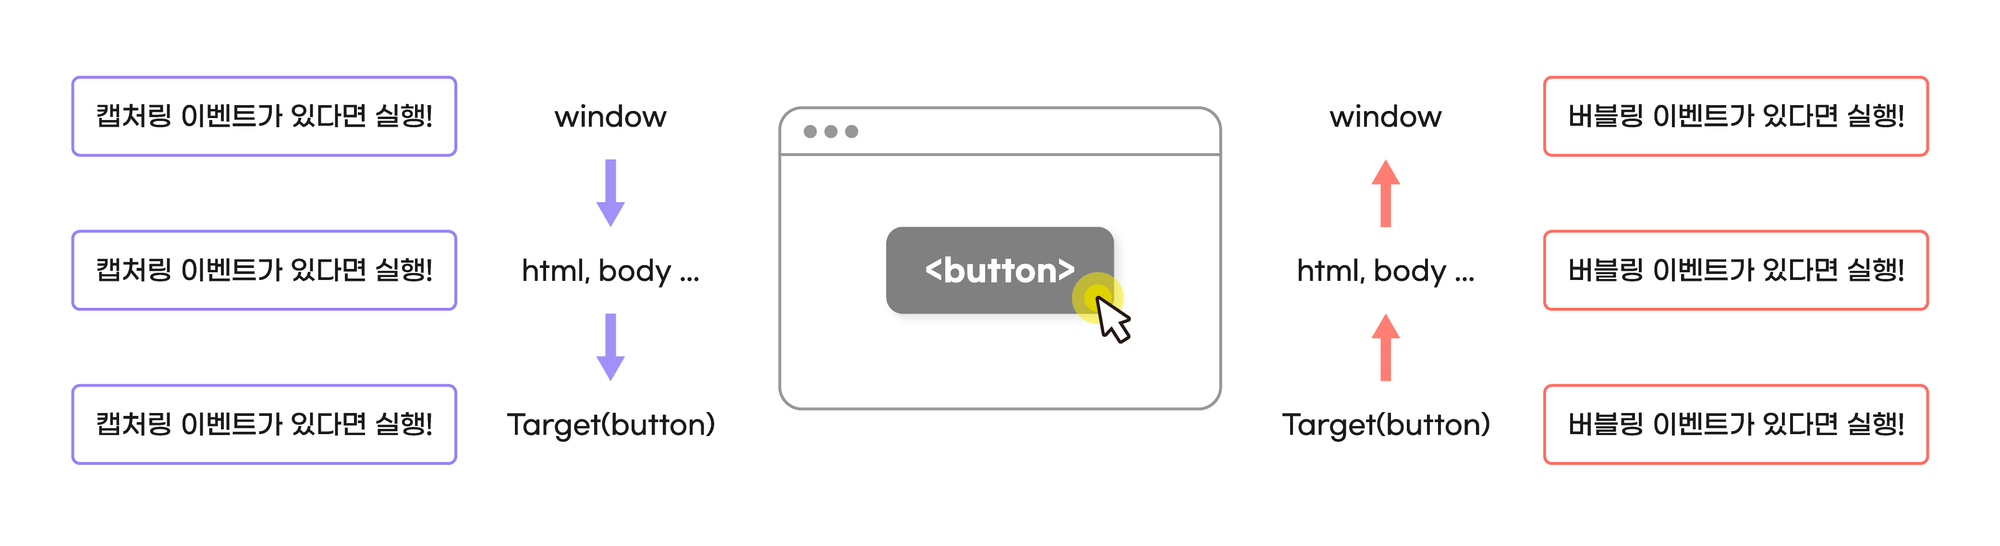
브라우저가 이벤트 대상을 찾아갈 때는 가장 상위의 window 객체부터 document, body 순으로 DOM 트리를 따라 내려갑니다. 이를 캡처링 단계라고 합니다.
이때 이벤트 대상을 찾아가는 과정에서 브라우저는 중간에 만나는 모든 캡처링 이벤트 리스너를 실행시킵니다. 그리고 이벤트 대상을 찾고 캡처링이 끝나면 이제 다시 DOM 트리를 따라 올라가며 만나는 모든 버블링 이벤트 리스너를 실행합니다. 이를 이벤트 버블링 단계라고 합니다.
그리고 이러한 과정에서 이벤트 리스너가 차례로 실행되는것을 이벤트 전파(event propagation)라고 합니다.
예제
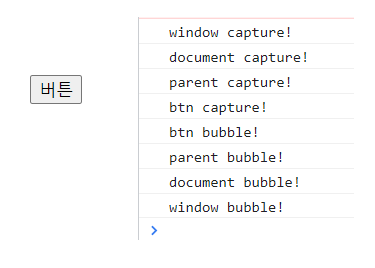
나는 버튼을 눌렀을 뿐인데 저게 다 실행이 됩니다..!
<article class="parent">
        <button class="btn" type="button">버튼</button>
</article>


<script>
        const parent = document.querySelector('.parent');
        const btnFirst = document.querySelector('.btn');

      ----------------캡처링 이벤트--------------------------
        window.addEventListener('click', () => {
            console.log("window capture!");
        }, true); // true : 캡처링 단계의 이벤트가 발생하도록 합니다.

        document.addEventListener('click', () => {
            console.log("document capture!");
        }, true);

        parent.addEventListener('click', () => {
            console.log("parent capture!");
        }, true);

        btnFirst.addEventListener('click', (event) => {
            console.log("btn capture!");
        }, true);

		-----------------버블링 이벤트----------------
        //이벤트는 전파된다
        btnFirst.addEventListener('click', (event) => {
            console.log("btn bubble!");
        })

        parent.addEventListener('click', () => {
            console.log("parent bubble!");
        });

        document.addEventListener('click', () => {
            console.log("document bubble!");
        });

        window.addEventListener('click', () => {
            console.log("window bubble!");
        });


        //우리가지금까지썻던건 버블링단계의 이벤트 입니다.
        //다 실행됩니다
    </script>
🌃 이벤트 target, currentTarget
target 속성에는 이벤트가 발생한 진원지의 정보가 담겨 있습니다. target 속성을 통해 이벤트 리스너가 없는 요소의 이벤트가 발생했을 때도 해당 요소에 접근 할 수 있습니다.
currentTarget 속성에는 이벤트 리스너가 연결된 요소가 참조되어 있습니다.
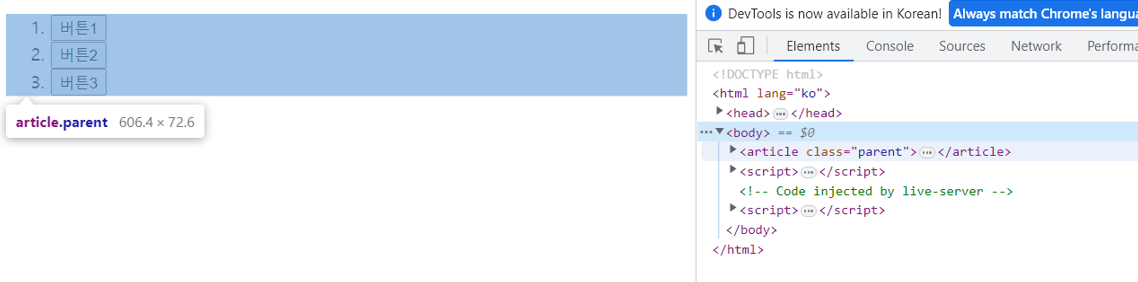
 <article class="parent">
        <ol>
            <li><button class="btn-first" type="button">버튼1</button></li>
            <li><button type="button">버튼2</button></li>
            <li><button type="button">버튼3</button></li>
        </ol>
    </article>

<script>
  const parent = document.querySelector('.parent');
  const btn = document.querySelector('.btn-first')

   parent.addEventListener('click', function (event) {
         console.log(event.target); //버튼1을 클릭하면 버튼1이 찍힘
         console.log(event.currentTarget); // parent

  })
</script>
버튼1을 누르면 parent에 걸어놓은 이벤트가 작동합니다. 왜냐면 위 사진처럼 버튼1이 parent 영역 안에 속해있기 때문이죠.
🌃 이벤트 위임
앞에서 우리는 이벤트의 흐름을 통해 이벤트 리스너가 없는 요소의 이벤트가 발생했을 때도 해당 요소에 접근 할 수 있다는 것을 알게 되었습니다.
이를 이용해 이벤트 리스너가 없어도 마치 리스너가 있는 것 처럼 사용 할 수 있습니다.
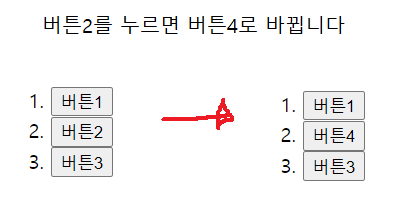
<script>
 const parent = document.querySelector('.parent');

 parent.addEventListener('click', function (event) {
       console.log(event.target); //버튼 1 클릭하면 버튼1이 찍힘.
       if (event.target.nodeName === "BUTTON") {
       event.target.innerText = "버튼4";   //target은 이벤트가 발생한 지점

            }
 })
 //nodeName은 여기서 태그이름을 지칭, 꼭 대문자로 씁시다
</script>
예제 submit form 다시하기