
Introduction
쿠버네티스를 처음 배우고 접했을 때, DB를 쿠버네티스 위에 올리는 것은 추천하지 않는다고 배웠다. 하지만, 이제는 여러곳에서 쿠버네티스에 DB를 올려서 안정적으로 운영 중이라는 발표가 심심치 않게 들린다.
이번 포스팅은 나의 한 줄기 희망이자 빛인 DOIK 스터디에서 배운 MySQL Operator for Kubernetes에 대해서 실습을 해보겠다.
MySQL Operator for Kubernetes
[Official Github] https://github.com/mysql/mysql-operator
The MySQL Operator for Kubernetes is an operator for managing MySQL InnoDB Cluster setups inside a Kubernetes Cluster. It manages the full lifecycle with set up and maintenance that includes automating upgrades and backup.
그림출처: https://dev.mysql.com/doc/mysql-operator/en/mysql-operator-introduction.html
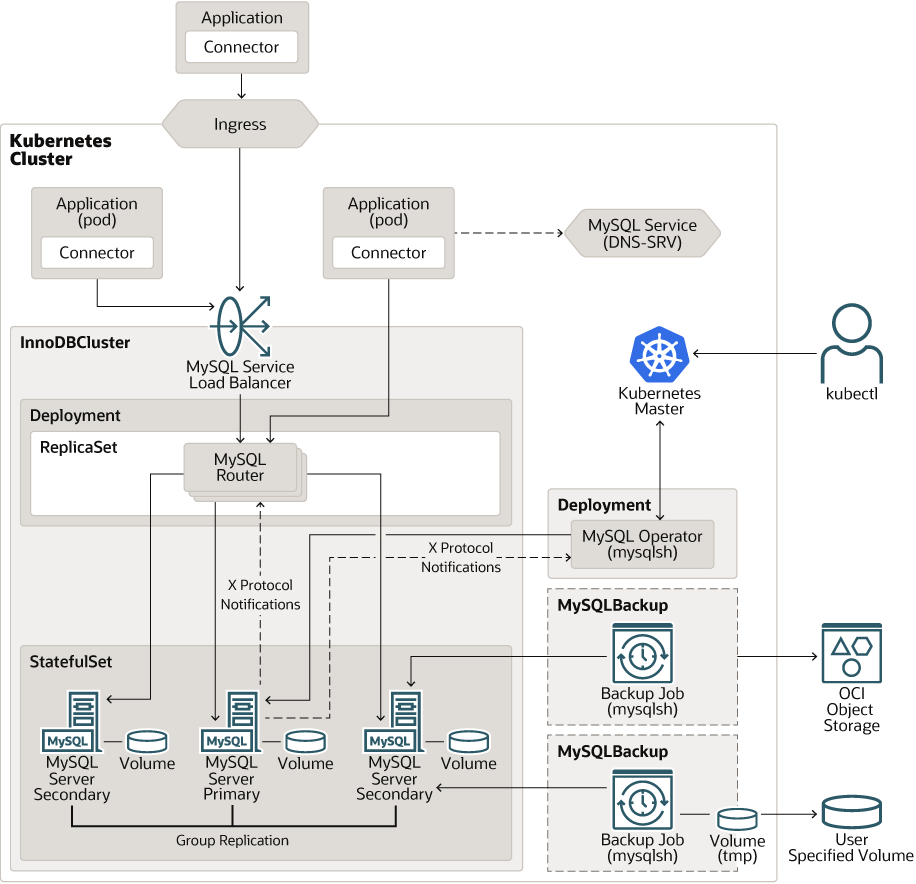
직역해보면, 쿠버네티스 클러스터에서 MySQL InnoDB 클러스터를 관리해주는 Operator이다.
그런데 무려 RPO(Recovery Point Object)가 0이다.
아키텍처를 보면, Operator가 알아서 Backup, Recovery의 기능을 제공하는 것으로 보인다. 상태를 저장해야 하는 DB이므로 statefulset을 볼 수 있다.
Installation
설치는 Helm으로 하는데, 엄청나게 편하고 쉽다. 설치는 MySQL Operator와 InnoDB Cluster 총 2가지 Helm차트를 설치한다.
1. MySQL Operator 설치
# Repo 추가
helm repo add mysql-operator https://mysql.github.io/mysql-operator/
helm repo update

# Result
Hang tight while we grab the latest from your chart repositories...
...Successfully got an update from the "mysql-operator" chart repository
...Successfully got an update from the "strimzi" chart repository
Update Complete. ⎈Happy Helming!⎈


# 차트 설치 : 차트 버전(--version 2.0.4), 애플리케이션 버전(8.0.29-2.0.4)
helm install mysql-operator mysql-operator/mysql-operator --namespace mysql-operator --create-namespace --version 2.0.4

# Result
NAME: mysql-operator
LAST DEPLOYED: Fri Jun 10 08:04:50 2022
NAMESPACE: mysql-operator
STATUS: deployed
REVISION: 1
TEST SUITE: None
NOTES:
Create an InnoDB Cluster by executing:
1. When using a source distribution / git clone: `helm install [cluster-name] -n [ns-name] ~/helm/mysql-innodbcluster`
2. When using Helm repos :  `helm install [cluster-name] -n [ns-name] mysql-innodbcluster`

master-k8s:~# helm ls -n mysql-operator
NAME          	NAMESPACE     	REVISION	UPDATED                                	STATUS  	CHART               	APP VERSION
mysql-operator	mysql-operator	1       	2022-06-10 08:04:50.800321997 +0000 UTC	deployed	mysql-operator-2.0.4	8.0.29-2.0.4
설치가 1분이내로 끝난다. 쿠버네티스, 도커를 처음 썻을 때 가장 좋았던건 이렇게 한 번에 패키지로 설치가 가능한게 정말 신기했다.
2. InnoDB Cluster 설치
# 차트 설치
helm install mycluster mysql-operator/mysql-innodbcluster --set credentials.root.password='sakila' --set tls.useSelfSigned=true --namespace mysql-cluster --create-namespace
NAME: mycluster
LAST DEPLOYED: Fri Jun 10 17:40:54 2022
NAMESPACE: mysql-cluster
STATUS: deployed
REVISION: 1
TEST SUITE: None

# 확인
$ kubectl get InnoDBCluster -n mysql-cluster
NAME        STATUS   ONLINE   INSTANCES   ROUTERS   AGE
mycluster   ONLINE   1        3           1         67s

위 겱하에서 ONLINE이 3개가 되면 설치가 완료된 것이다.
3. MySQL 서버 접속하기
실습에서는 svc가 clusterIP Type이다. 실무에서 사용할 때는 loadbalancer 또는 ingress로 라우팅하자.

$ kubectl get svc -n mysql-cluster
NAME                  TYPE        CLUSTER-IP     EXTERNAL-IP   PORT(S)                                                  AGE
mycluster             ClusterIP   10.200.1.142   <none>        3306/TCP,33060/TCP,6446/TCP,6448/TCP,6447/TCP,6449/TCP   12m
mycluster-instances   ClusterIP   None           <none>        3306/TCP,33060/TCP,33061/TCP                             12m

mycluster-instances 는 Headless 서비스로 세팅되어있다.

#접속주소 변수지정
 - 쿠버네티스 svc의 dns 규칙: <서비스명>.<네임스페이스>.svc.cluster.local

MIC=mycluster.mysql-cluster.svc.cluster.local
MDB1=mycluster-0.mycluster-instances.mysql-cluster.svc.cluster.local
MDB2=mycluster-1.mycluster-instances.mysql-cluster.svc.cluster.local
MDB3=mycluster-2.mycluster-instances.mysql-cluster.svc.cluster.local

#MySQL 라우터를 통해 MySQL 파드 접속
$ kubectl exec -it -n mysql-operator deploy/mysql-operator -- mysqlsh mysqlx://root@$MIC --password=sakila --sqlx --execute='show databases;'

# result
Database
information_schema
mysql
mysql_innodb_cluster_metadata
performance_schema
sys

# 개별 MySQL 파드 접속 - Headless SVC 기능
$ kubectl exec -it -n mysql-operator deploy/mysql-operator -- mysqlsh mysqlx://root@$MDB1 --password=sakila --sqlx --execute='SELECT @@hostname;'

# result
@@hostname
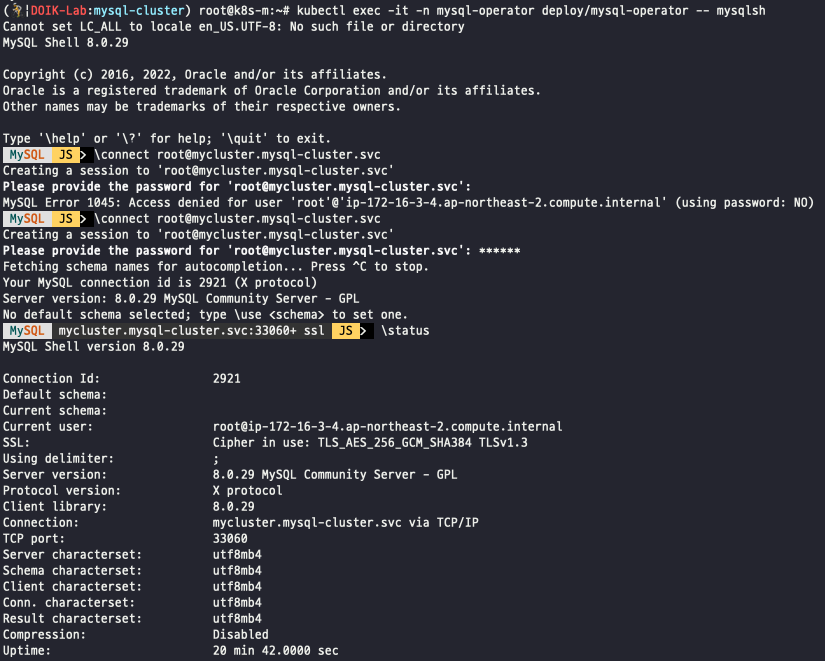
4. MySQL Shell 접속
$ kubectl exec -it -n mysql-operator deploy/mysql-operator -- mysqlsh
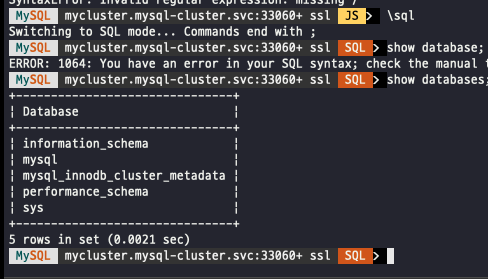
# 접속 후 \connect root@mycluster.mysql-cluster.svc 로 InnoDB Cluster 접속, 암호: sakila[DB 상태확인]
[databases 확인]
5. WordPress 설치
이제 설치한 MySQL과 WordPress를 연동해본다.
#mysql client 설치
$ apt install mysql-client-core-8.0

# MySQL 에 데이터베이스 생성
MYSQLIP=$(kubectl get svc -n mysql-cluster mycluster -o jsonpath={.spec.clusterIP})
mysql -h $MYSQLIP -uroot -psakila -e "create database wordpress;"
mysql -h $MYSQLIP -uroot -psakila -e "show databases;"


# Helm으로 wordpress 설치
helm repo add bitnami https://charts.bitnami.com/bitnami
helm repo update

# 설치 : MySQL 접속 주소(mycluster.mysql-cluster.svc), MySQL 데이터베이스 이름 지정 참고(wordpress)
helm install my-wordpress \
  --set wordpressUsername=admin \
  --set wordpressPassword=password \
  --set service.type=NodePort \
  --set mariadb.enabled=false \
  --set externalDatabase.host=mycluster.mysql-cluster.svc \
  --set externalDatabase.user=root \
  --set externalDatabase.password=sakila \
  --set externalDatabase.database=wordpress \
    bitnami/wordpress --version 14.0.7

# 접속해보기
svc가 노드포트로 노출되어있으므로, 마스터 노드 또는 워커노드의 ip로 접속이 가능하다.

$ kubectl get svc
NAME                  TYPE        CLUSTER-IP     EXTERNAL-IP   PORT(S)                                                  AGE
my-wordpress          NodePort    10.200.1.183   <none>        80:31506/TCP,443:31083/TCP                               15m
랜덤으로 생성된 port는 31506이다.
http://{NODE-IP}:31506/admin 으로 접속하여 helm 설치 시 세팅한 id/pw로 로그인을 해보자.
--set wordpressUsername=admin \
--set wordpressPassword=password \
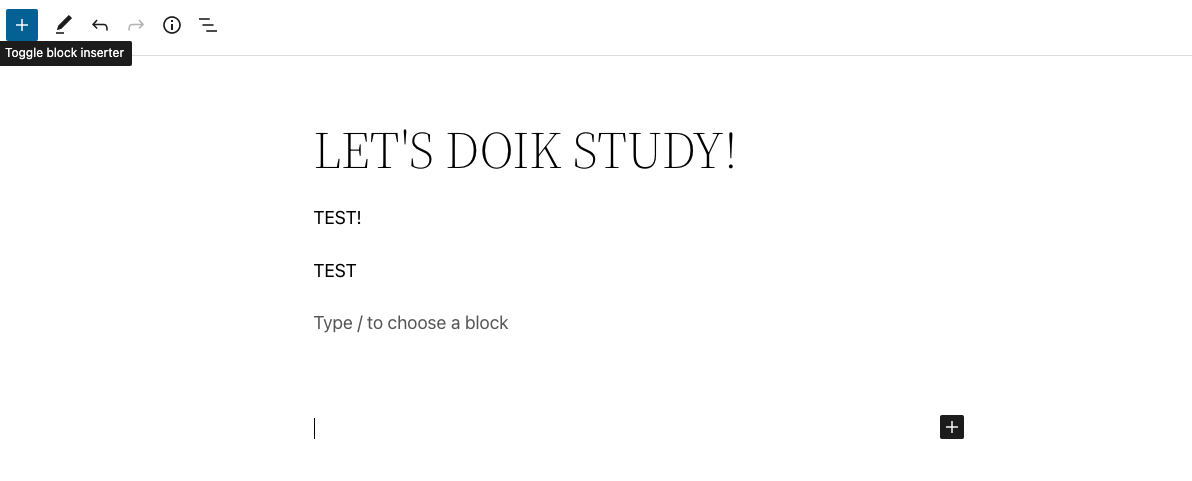
글을 하나 작성해본다..
데이터베이스를 확인해보면 category 카운트가 늘어난 것을 볼 수 있다.
mysql -h $MYSQLIP -uroot -psakila -e "USE wordpress;SELECT * FROM wp_term_taxonomy;"
mysql: [Warning] Using a password on the command line interface can be insecure.
+------------------+---------+----------+-------------+--------+-------+
| term_taxonomy_id | term_id | taxonomy | description | parent | count |
+------------------+---------+----------+-------------+--------+-------+
|                1 |       1 | category |             |      0 |     3 |
|                2 |       2 | wp_theme |             |      0 |     1 |
+------------------+---------+----------+-------------+--------+-------+
자, 여기까지 MySQL Oprator를 Kubernetes에서 실행시키고 WordPress 까지 연동시키는 실습을 진행해보았다. 듣기로는 가장 안전한건 AWS, Azure와 같은 퍼블릭 클라우드에서 제공하는 DB라고 들었는데, MySQL Oprator는 운영에서 쓸 수 있을까?
다음 포스팅에서 장애상황과 복구를 진행해보겠다.