이번 포스팅에서는 kubernetes 보안에 대해 다뤄보겠다. 본 포스팅은 PKOS 스터디에서 '24단계 실습으로 정복하는 쿠버네티스' 책과 함께 진행되는 내용임을 밝힌다.
마지막 PKOS 스터디인데, 이번에도 너무나 좋은 기회를 주신 가시다님께 무한 감사드립니다.🙏🏽
Preperation
kops를 통해 AWS상에 k8s 클러스터를 설치해준다. 배포되는 EC2는 t3.small & 노드 t3.xlarge (vCPU 4, Memory 16GiB) 이다.
# YAML 파일 다운로드
curl -O https://s3.ap-northeast-2.amazonaws.com/cloudformation.cloudneta.net/K8S/kops-oneclick-f1.yaml

# CloudFormation 스택 배포 : 노드 인스턴스 타입 변경 - MasterNodeInstanceType=t3.medium WorkerNodeInstanceType=c5d.large
aws cloudformation deploy --template-file kops-oneclick-f1.yaml --stack-name mykops --parameter-overrides KeyName=kp-gasida SgIngressSshCidr=$(curl -s ipinfo.io/ip)/32  MyIamUserAccessKeyID=AKIA5... MyIamUserSecretAccessKey='CVNa2...' ClusterBaseName='gasida.link' S3StateStore='gasida-k8s-s3' MasterNodeInstanceType=t3.xlarge WorkerNodeInstanceType=t3.xlarge --region ap-northeast-2

# CloudFormation 스택 배포 완료 후 kOps EC2 IP 출력
aws cloudformation describe-stacks --stack-name mykops --query 'Stacks[*].Outputs[0].OutputValue' --output text

# 13분 후 작업 SSH 접속
ssh -i ~/.ssh/kp-gasida.pem ec2-user@$(aws cloudformation describe-stacks --stack-name mykops --query 'Stacks[*].Outputs[0].OutputValue' --output text)

# EC2 instance profiles 에 IAM Policy 추가(attach) : 처음 입력 시 적용이 잘 안될 경우 다시 한번 더 입력 하자! - IAM Role에서 새로고침 먼저 확인!
aws iam attach-role-policy --policy-arn arn:aws:iam::$ACCOUNT_ID:policy/AWSLoadBalancerControllerIAMPolicy --role-name masters.$KOPS_CLUSTER_NAME
aws iam attach-role-policy --policy-arn arn:aws:iam::$ACCOUNT_ID:policy/AWSLoadBalancerControllerIAMPolicy --role-name nodes.$KOPS_CLUSTER_NAME
자세한 설치 방법은 지난 포스팅을 참조하자.
1. Pod Metadata 조회 취약점
1-1.Metadata란?
Instance metadata is data about your instance that you can use to configure or manage the running instance. Instance metadata is divided into categories, for example, host name, events, and security groups.
쉽게 말해, 인스턴스의 각종 정보를 담고 있는 데이터라고 할 수 있다. 특이한건 AWS나 Azure나 metadata를 호출하는 IP가 169.254.169.254 로 같다.
그럼 이제 보안에 취약한 Pod 배포를 위해 kops 세팅을 수정해보자.
#
kops edit ig nodes-ap-northeast-2a
---
# 아래 3줄 제거
spec:
  instanceMetadata:
    httpPutResponseHopLimit: 1
    httpTokens: required
---

# 업데이트 적용 : 노드1대 롤링업데이트
kops update cluster --yes && echo && sleep 3 && kops rolling-update cluster --yes
kops의 인스턴스그룹 중 하나의 세팅을 바꿔주는 것인데, Metadata 관련 보안을 해제하는 것이다.
1-2.Metadata 조회하기
netshoot Pod 2개를 생성하면, 각 노드에 분산하여 스케줄링 된다. 위에서 한 개의 노드에서 metadata 조회 취약점을 오픈했기 때문에 한 개의 Pod에서는 metadata가 조회가 될 것 이다.
# netshoot-pod 생성
cat <<EOF | kubectl create -f -
apiVersion: apps/v1
kind: Deployment
metadata:
  name: netshoot-pod
spec:
  replicas: 2
  selector:
    matchLabels:
      app: netshoot-pod
  template:
    metadata:
      labels:
        app: netshoot-pod
    spec:
      containers:
      - name: netshoot-pod
        image: nicolaka/netshoot
        command: ["tail"]
        args: ["-f", "/dev/null"]
      terminationGracePeriodSeconds: 0
EOF

# 파드 이름 변수 지정
PODNAME1=$(kubectl get pod -l app=netshoot-pod -o jsonpath={.items[0].metadata.name})
PODNAME2=$(kubectl get pod -l app=netshoot-pod -o jsonpath={.items[1].metadata.name})

# EC2 메타데이터 정보 확인
kubectl exec -it $PODNAME1 -- curl 169.254.169.254 ;echo
kubectl exec -it $PODNAME2 -- curl 169.254.169.254 ;echo

# 파드1에서 EC2 메타데이터 정보 확인
kubectl exec -it $PODNAME1 -- curl 169.254.169.254/latest ;echo
kubectl exec -it $PODNAME1 -- curl 169.254.169.254/latest/meta-data/iam/security-credentials/ ;echo
kubectl exec -it $PODNAME1 -- curl 169.254.169.254/latest/meta-data/iam/security-credentials/nodes.$KOPS_CLUSTER_NAME | jq

# 파드2에서 EC2 메타데이터 정보 확인
kubectl exec -it $PODNAME2 -- curl 169.254.169.254/latest ;echo
kubectl exec -it $PODNAME2 -- curl 169.254.169.254/latest/meta-data/iam/security-credentials/ ;echo
kubectl exec -it $PODNAME2 -- curl 169.254.169.254/latest/meta-data/iam/security-credentials/nodes.$KOPS_CLUSTER_NAME | jq

# 메타데이터 메모해두기
{
  “Code”: “Success”,
  “LastUpdated”: “2023-04-07T01:53:28Z”,
  “Type”: “AWS-HMAC”,
  “AccessKeyId”: “xxxxxxxxxxxxxxxxxxx”,
  “SecretAccessKey”: “+n1lxxxxxxxxxxf+GLxxxxxqr91",
  “Token”: “IQoJb3JpZ2luX2VjEFIaDmxxxxxxxxxxxxxx“,
  “Expiration”: “2023-04-07T08:29:20Z”
}
Metadata 조회를 통해서 노드의 AWS AccessKey가 노출되었다. Pod를 탈취 당하면, 이 키를 이용해서 노드에 할당된 권한을 사용할 수 있는 것이다.
실제로 Pod가 탈취당했음을 가정하고, 위에서 획득한 AccessKey를 사용해보자.
# awscli 파드 생성
cat <<EOF | kubectl create -f -
apiVersion: apps/v1
kind: Deployment
metadata:
  name: awscli-pod
spec:
  replicas: 2
  selector:
    matchLabels:
      app: awscli-pod
  template:
    metadata:
      labels:
        app: awscli-pod
    spec:
      containers:
      - name: awscli-pod
        image: amazon/aws-cli
        command: ["tail"]
        args: ["-f", "/dev/null"]
      terminationGracePeriodSeconds: 0
EOF

# 파드 이름 변수 지정
APODNAME1=$(kubectl get pod -l app=awscli-pod -o jsonpath={.items[0].metadata.name})
APODNAME2=$(kubectl get pod -l app=awscli-pod -o jsonpath={.items[1].metadata.name})

---

# 파드 bash 실행 : 임시자격증명을 직접 입력하는 거라서 아무곳에서나 해도됨 >> 즉 별도의 ec2 1대를 신규 생성 후 임시자격증명 설정 후 확인해보자
# 실행하는 파드는 메타데이터 사용 시 Token이 필요한 노드에 배치된 파드에서 해볼 것!
kubectl get pod -owide
kubectl exec -it $APODNAME1 -- bash
kubectl exec -it $APODNAME2 -- bash

# 위에서 출력된 AccessKeyId , SecretAccessKey , SessionToken 으로 임시자격증명 적용
export AWS_ACCESS_KEY_ID="xxxxxxxxxxxxxxxxxxx"
export AWS_SECRET_ACCESS_KEY="+n1lxxxxxxxxxxf+GLxxxxxqr91"
export AWS_SESSION_TOKEN="IQoJb3JpZ2luX2VjEFIaDmxxxxxxxxxxxxxx“"

# ec2 정보 확인
bash-4.2# aws ec2 describe-instances --region ap-northeast-2 | head
{
    "Reservations": [
        {
            "Groups": [],
            "Instances": [
                {
                    "AmiLaunchIndex": 0,
                    "ImageId": "ami-035e3e44dc41db6a2",
                    "InstanceId": "i-0361c01ba6f60c417",
                    "InstanceType": "t3.xlarge",

# vpc 정보확인
bash-4.2# aws ec2 describe-vpcs --region ap-northeast-2 | head

An error occurred (UnauthorizedOperation) when calling the DescribeVpcs operation: You are not authorized to perform this operation.
1-3. Metadata 조회 막기
IRSA
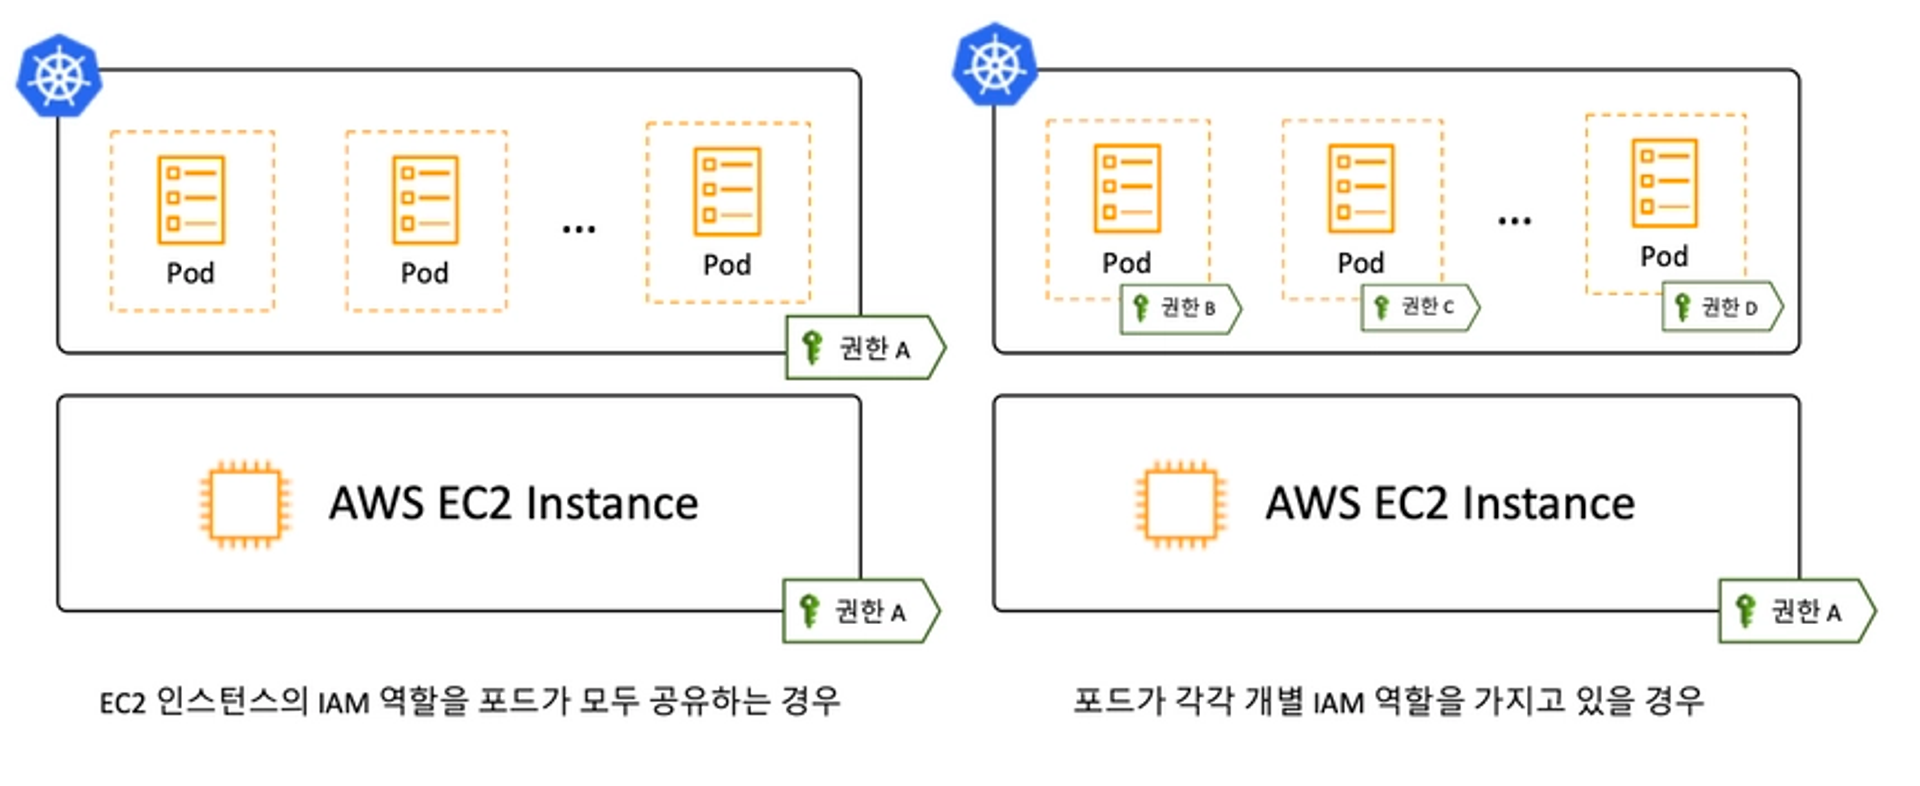
그림출처: https://tech.devsisters.com/posts/pod-iam-role/
먼저 IRSA를 활용해서 Pod의 권한이 노드 레벨이 아닌 Pod 단위 별로 제어하는 것이다. 이렇게해서 Metadata 조회 취약점 뿐 만 아니라 각 Pod 성격에 맞게 권한제어를 할 수 있다.
Azure에서도 AD Pod Identity 를 통해 구현이 가능한 것 같다.
NetworkPolicy
두 번째 방법은 NetworkPolicy를 활용해서 Pod에서 metadata endpoint 연결을 차단하는 것이다.
apiVersion: networking.k8s.io/v1
kind: NetworkPolicy
metadata:
  name: restrict-instance-metadata
spec:
  podSelector:
    matchLabels: {}
  policyTypes:
  - Egress
  egress:
  - to:
    - ipBlock:
        cidr: 0.0.0.0/0#example
        except:
        - 169.254.169.254/32
참고로, networkPolicy는 namespace 별로 제어가 됨에 주의하자. AKS를 사용 중이라면 최초 클러스터 생성 시 networkPolicy 사용 유무를 설정해 주지 않으면, 클러스터 내에서 networkPolicy 세팅을 할 수가 없다!
이미 생성된 클러스터의 설정을 바꿀 수 없으므로 주의하도록 하자.(방법이 있긴 있는데, daemonset으로 구현된 npm(node policy manager)를 설치하는 것이다.
그런데 뭔가 정책 적용이 잘안되는 것 같으니, 맘 편하게 클러스터 만들 때 주의하도록 하자.
2.Kubescape
An open-source Kubernetes security platform for your IDE, CI/CD pipelines, and clusters
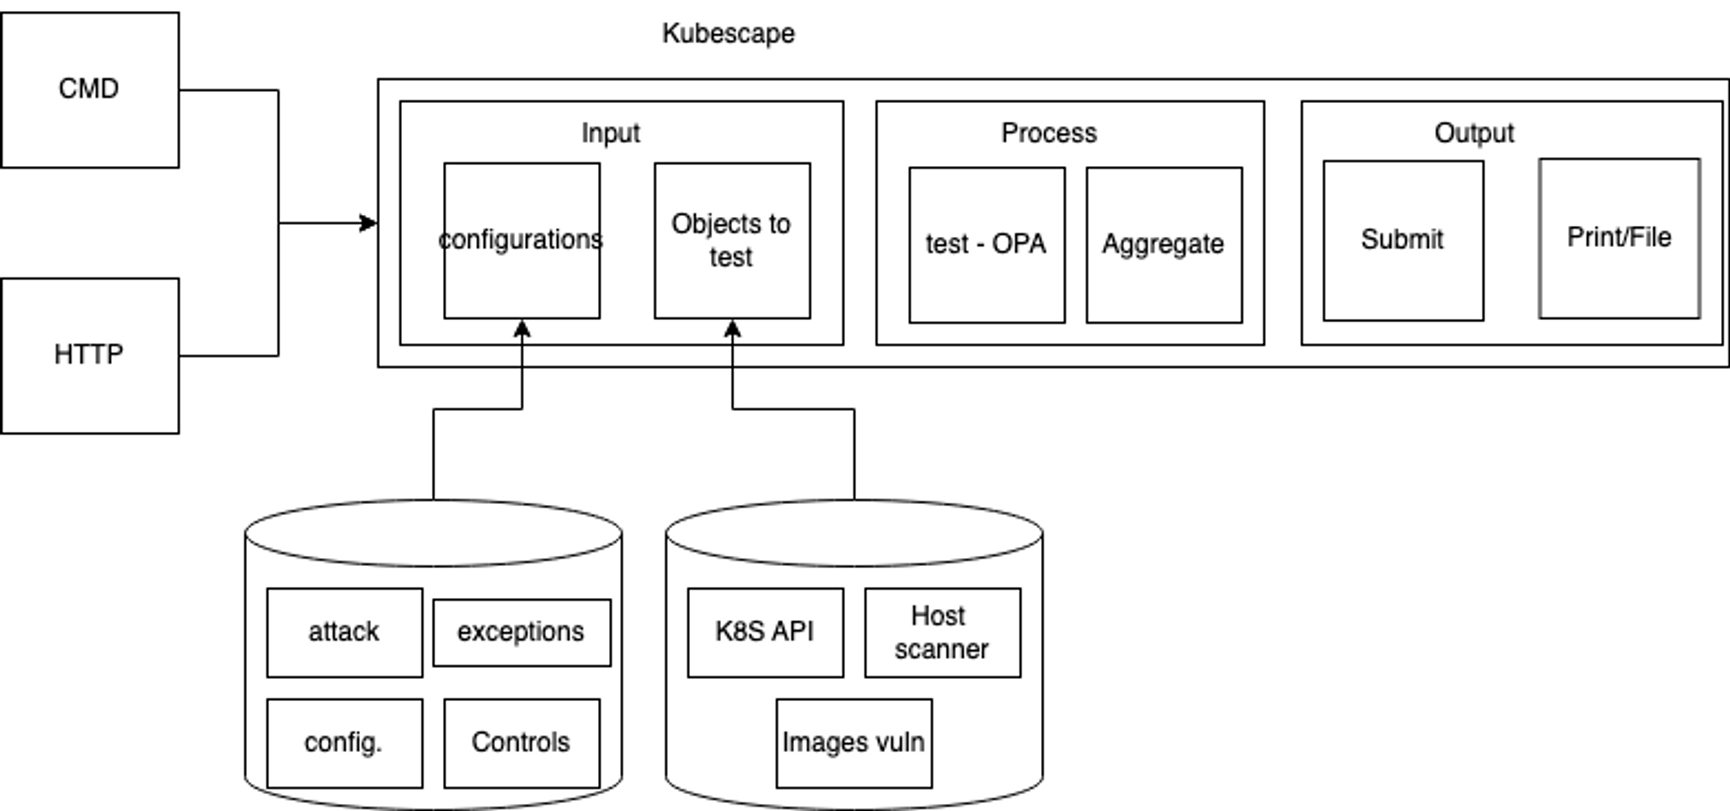
kubescape를 통해서 클러스터의 전반적인 취약점에 대해 조회가 가능하다.
# 설치
curl -s https://raw.githubusercontent.com/kubescape/kubescape/master/install.sh | /bin/bash

# Download all artifacts and save them in the default path (~/.kubescape)
kubescape download artifacts
tree ~/.kubescape/
cat ~/.kubescape/attack-tracks.json | jq

# 제공하는 보안 프레임워크 확인
kubescape list frameworks --format json | jq '.[]'
"AllControls"
"ArmoBest"
"DevOpsBest"
"MITRE"
"NSA"
"cis-eks-t1.2.0"
"cis-v1.23-t1.0.1"

# 제공하는 통제 정책 확인
kubescape list controls

# 모니터링
watch kubectl get pod -A

# 클러스터 스캔
# Deploy Kubescape host-sensor daemonset in the scanned cluster. Deleting it right after we collecting the data.
# Required to collect valuable data from cluster nodes for certain controls.
# Yaml file: https://github.com/kubescape/kubescape/blob/master/core/pkg/hostsensorutils/hostsensor.yaml
kubescape scan --help
kubescape scan --enable-host-scan --verbose
+----------+-------------------------------------------------------+------------------+---------------+---------------------+
| SEVERITY |                     CONTROL NAME                      | FAILED RESOURCES | ALL RESOURCES |    % RISK-SCORE     |
+----------+-------------------------------------------------------+------------------+---------------+---------------------+
| Critical | Disable anonymous access to Kubelet service           |        0         |       0       |  Action Required *  |
| Critical | Enforce Kubelet client TLS authentication             |        0         |       0       |  Action Required *  |
| High     | Forbidden Container Registries                        |        0         |      21       | Action Required *** |
| High     | Resources memory limit and request                    |        0         |      21       | Action Required *** |
...
+----------+-------------------------------------------------------+------------------+---------------+---------------------+
|          |                   RESOURCE SUMMARY                    |        47        |      204      |        8.78%        |
+----------+-------------------------------------------------------+------------------+---------------+---------------------+
FRAMEWORKS: AllControls (risk: 9.17), NSA (risk: 11.82), MITRE (risk: 6.94)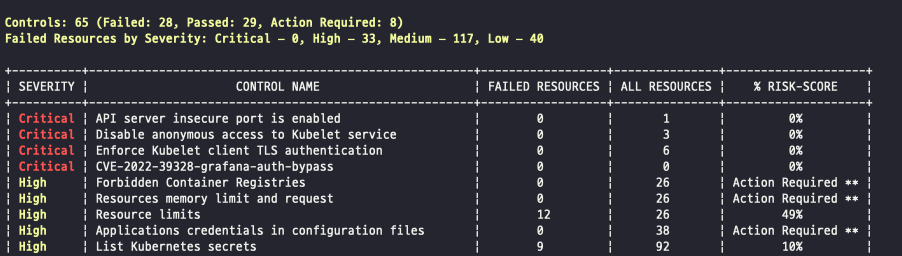
Prometheus Exporter도 제공되고, vsCode 플러그인, 파이프라인과도 연동이 되니, 나중에 한 번 써봐야겠다.
3.Pod/Container 보안
Pod 또는 Container 단위로 보안 설정을 할 수 있다. 실제 운영 중인 리소스에는 매우 중요한 설정들이므로 잘 학습해두는 게 좋다. 이번 포스팅에서는 Container, Pod 각각에 대해 몇가지 예만 살펴보겠다.
3-1. Container 보안
Pod 레벨이 아닌 Container 레벨에서의 보안이다. 한 개의 Pod에 성격이 다른 여러 Container가 있을 수 있으므로, 디테일 하게 세팅이 가능하다.
| 종류 | 개요 |
|---|---|
| privileged | 특수 권한을 가진 컨테이너로 실행 |
| capabilities | Capabilities 의 추가와 삭제 |
| allowPrivilegeEscalation | 컨테이너 실행 시 상위 프로세스보다 많은 권한을 부여할지 여부 |
| readOnlyRootFilesystem | root 파일 시스템을 읽기 전용으로 할지 여부 |
| runAsUser | 실행 사용자 |
| runAsGroup | 실행 그룹 |
| runAsNonRoot | root 에서 실행을 거부 |
| seLinuxOptions | SELinux 옵션 |
readOnlyRootFilesystem : root 파일 시스템을 읽기전용으로 만들기
#
cat <<EOF | kubectl create -f -
apiVersion: v1
kind: Pod
metadata:
  name: rootfile-readonly
spec:
  containers:
  - name: netshoot
    image: nicolaka/netshoot
    command: ["tail"]
    args: ["-f", "/dev/null"]
    securityContext:
      readOnlyRootFilesystem: true
  terminationGracePeriodSeconds: 0
EOF

# 파일 생성 시도
kubectl exec -it rootfile-readonly -- touch /tmp/text.txt
touch: /tmp/text.txt: Read-only file system
command terminated with exit code 1


# 파드 상세 정보 확인
**kubectl get pod** rootfile-readonly **-o jsonpath={.spec.containers[0].securityContext} | jq**
{
  "readOnlyRootFilesystem": true
}
파일쓰기, 삭제 권한을 이용해서 Pod에 악의적인 영향을 끼칠 수 있으므로, root 파일시스템에 대해 읽기권한만 주는 것이다.
3-2.Pod 보안
Pod 레벨에 대한 보안 설정인데, Container 보안과 정책이 중복될 경우, Container 보안이 우선시 된다.
| 종류 | 개요 |
|---|---|
| runAsUser | 실행 사용자 |
| runAsGroup | 실행 그룹 |
| runAsNonRoot | root 에서 실행을 거부 |
| supplementalGroups | 프라이머리 GUI에 추가로 부여할 GID 목록을 지정 |
| fsGroup | 파일 시스템 그룹 지정 |
| systls | 덮어 쓸 커널 파라미터 지정 |
| seLinuxOptions | SELinux 옵션 지정 |
runAsNonRoot : root 유저로 Pod 실행을 막는다.
#
cat <<EOF | kubectl create -f -
apiVersion: v1
kind: Pod
metadata:
  name: nonroot
spec:
  securityContext:
    runAsNonRoot: true
  containers:
  - name: netshoot
    image: nicolaka/netshoot
    command: ["tail"]
    args: ["-f", "/dev/null"]
  terminationGracePeriodSeconds: 0
EOF

# 이벤트 확인
kubectl events --for pod/nonroot

(kimchigood:default) [root@kops-ec2 ~]# kubectl events --for pod/nonroot
LAST SEEN         TYPE      REASON      OBJECT        MESSAGE
4s                Normal    Scheduled   Pod/nonroot   Successfully assigned default/nonroot to i-084a4146ad69e639d
3s                Normal    Pulled      Pod/nonroot   Successfully pulled image "nicolaka/netshoot" in 1.294825541s
2s (x2 over 4s)   Normal    Pulling     Pod/nonroot   Pulling image "nicolaka/netshoot"
0s (x2 over 3s)   Warning   Failed      Pod/nonroot   Error: container has runAsNonRoot and image has non-numeric user (root), cannot verify user is non-root (pod: "nonroot_default(2bcf111a-5241-46b8-9709-566f3a43289e)", container: netshoot)
0s                Normal    Pulled      Pod/nonroot   Successfully pulled image "nicolaka/netshoot" in 1.311117069s


default       nonroot     0/1     CreateContainerConfigError   0      	79s
netshoot Pod는 기본적으로 root 실행이 되므로, Pod에서 위와 같이 runAsNonRoot 세팅을 하였을 경우 에러가 발생하는 것이다.
4.Polaris
Polaris is an open source policy engine for Kubernetes that validates and remediates resource configuration.

Polaris 는 k8s 클러스터 전체를 스캔해서 보안 점수를 메겨주는 대시보드이다. kubescape에 비해 UI를 제공하므로 더 직관적이고 호스팅해서 사용하는 오픈소스다.
# 설치
kubectl create ns polaris

#
cat <<EOT > polaris-values.yaml
dashboard:
  replicas: 1
  service:
    type: LoadBalancer
EOT

# 배포
helm repo add fairwinds-stable https://charts.fairwinds.com/stable
helm install polaris fairwinds-stable/polaris --namespace polaris --version 5.7.2 -f polaris-values.yaml

# CLB에 ExternanDNS 로 도메인 연결
kubectl annotate service polaris-dashboard "external-dns.alpha.kubernetes.io/hostname=polaris.$KOPS_CLUSTER_NAME" -n polaris

# 웹 접속 주소 확인 및 접속
echo -e "Polaris Web URL = http://polaris.$KOPS_CLUSTER_NAME"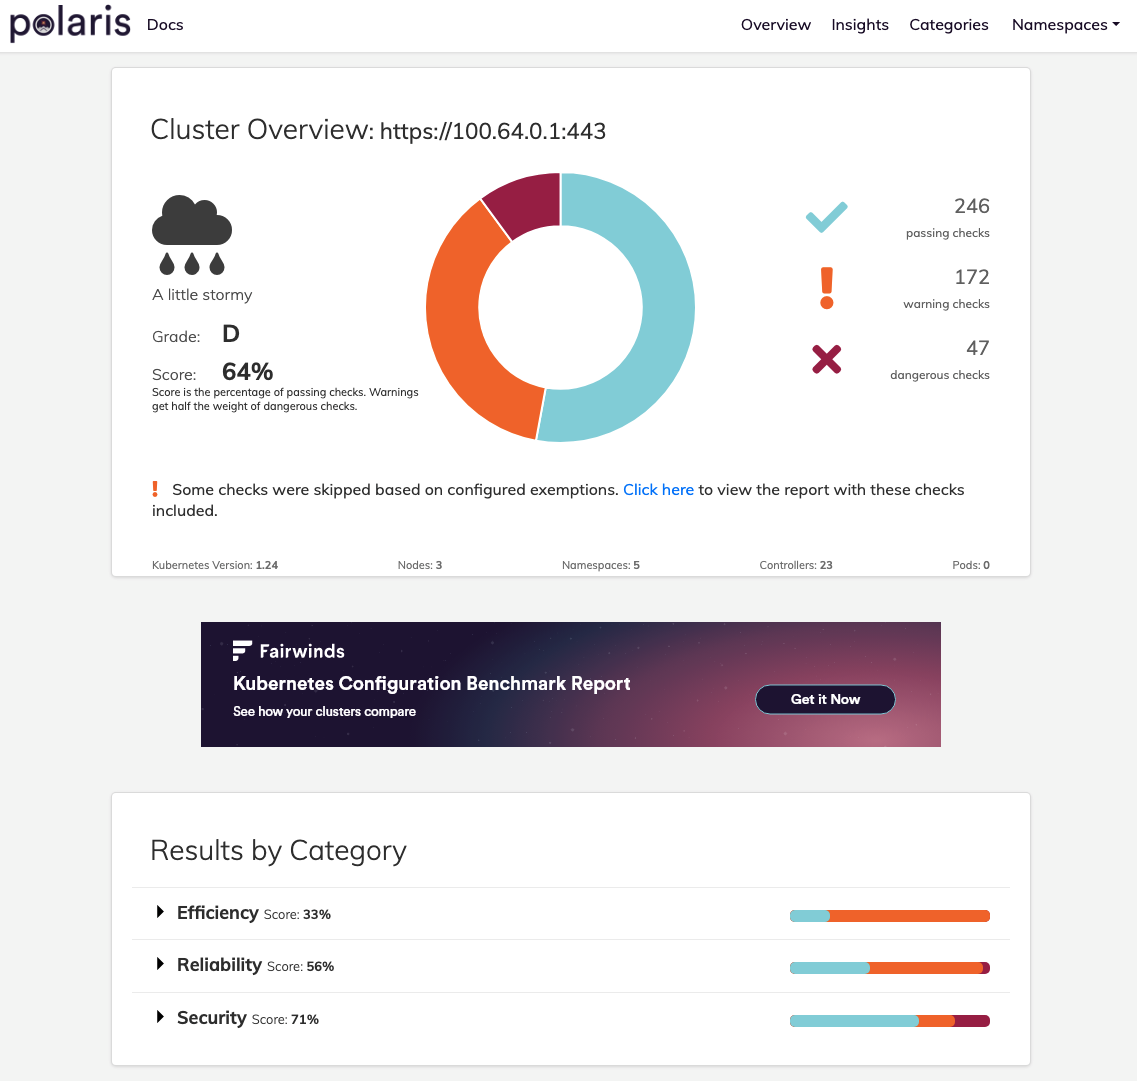
현재 설치한 kops k8s 클러스터는 D등급이 나왔다. 아파트로 치면 재건축급인건가...?
네임스페이스 별로 취약점 체크를 할 수 있는데,
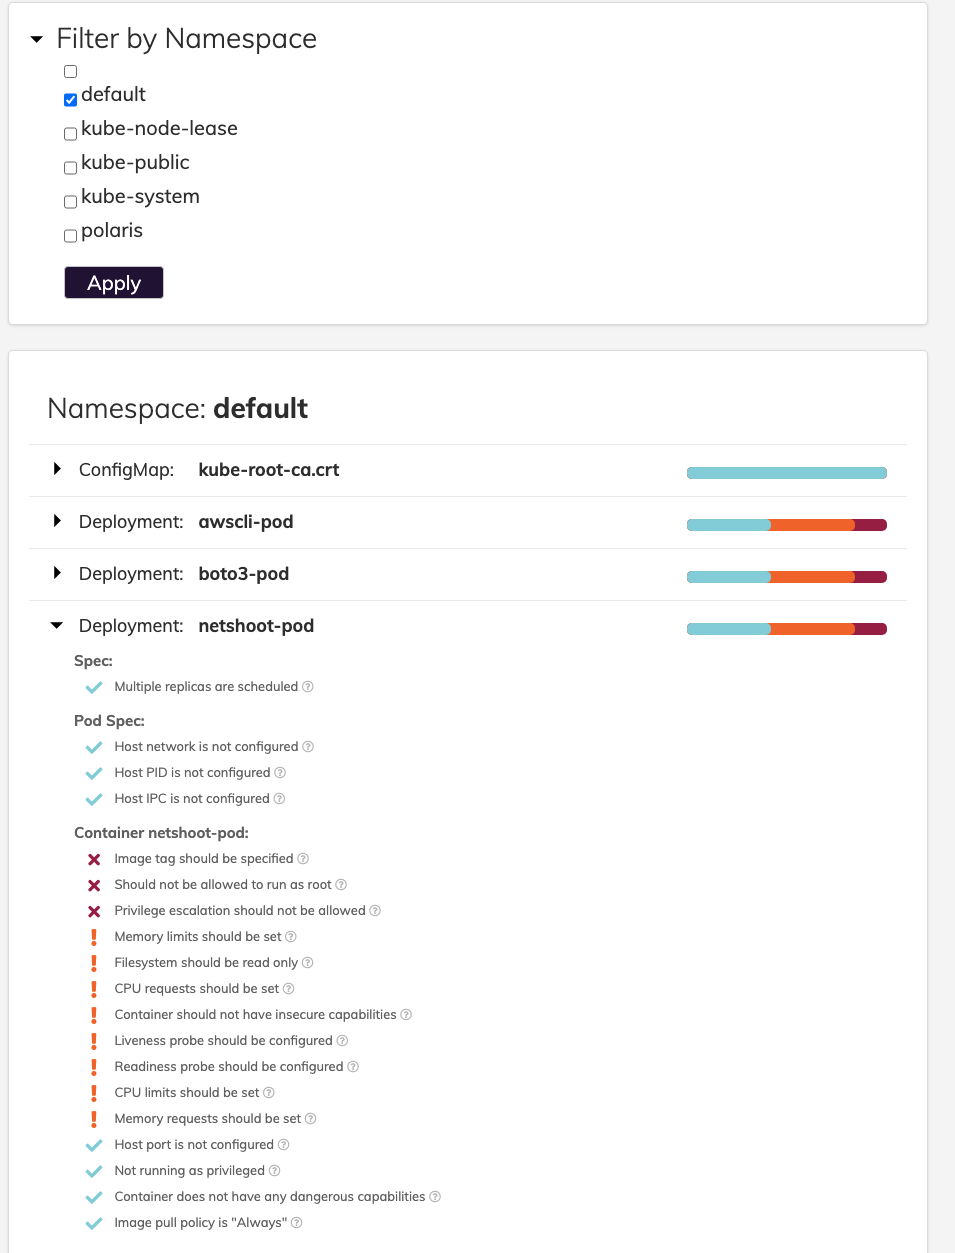
4-1. 취약점 해결하기
현재 배포된 netshoot Deployment의 취약점을 해결해 보자. 먼저 Image tag!
위 실습에서 metadata 가져올 때 배포한 netshoot deployment인데, Image tag가 지정되어 있지 않다.
tag가 없는 경우 latest 버전을 가져오는데, netshoot같은 테스트용 도구는 문제가 없겠지만, 실제로 운영서버에서 사용중이고, 타 시스템과 dependency가 존재하는 Pod의 경우, 운영자 모르게 새로운 버전이 배포되서 호환성에 이슈가 생길 여지가 있다.
그래서 tag를 특정해야 하는 것이다.
cat <<EOF | kubectl create -f -
apiVersion: apps/v1
kind: Deployment
metadata:
  name: netshoot-pod
spec:
  replicas: 1
  selector:
    matchLabels:
      app: netshoot-pod
  template:
    metadata:
      labels:
        app: netshoot-pod
    spec:
      containers:
      - name: netshoot-pod
        image: nicolaka/netshoot:v0.9
        command: ["tail"]
        args: ["-f", "/dev/null"]
      terminationGracePeriodSeconds: 0
EOF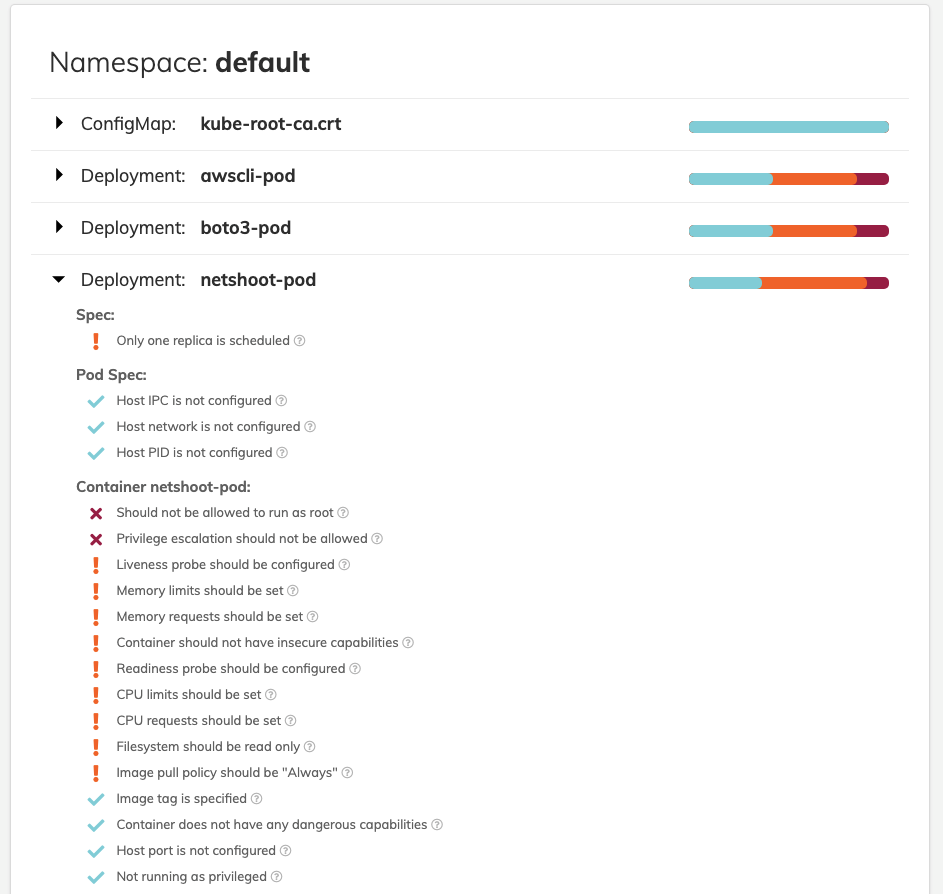
Image tag를 붙이고 다시 검사해보면 관련된 취약점이 사라진 것이 보인다.
그럼 나머지 2개의 취약점도 해결해보자. 권한위임과 root가 아닌 유저로 실행하는게 필요하다. kubectl edit deploy 로 바로 수정해보자.
    spec:
      containers:
      - args:
        - -f
        - /dev/null
        command:
        - tail
        image: nicolaka/netshoot:v0.9
        imagePullPolicy: IfNotPresent
        name: netshoot-pod
        resources: {}
        securityContext:
          allowPrivilegeEscalation: false
          runAsUser: 2000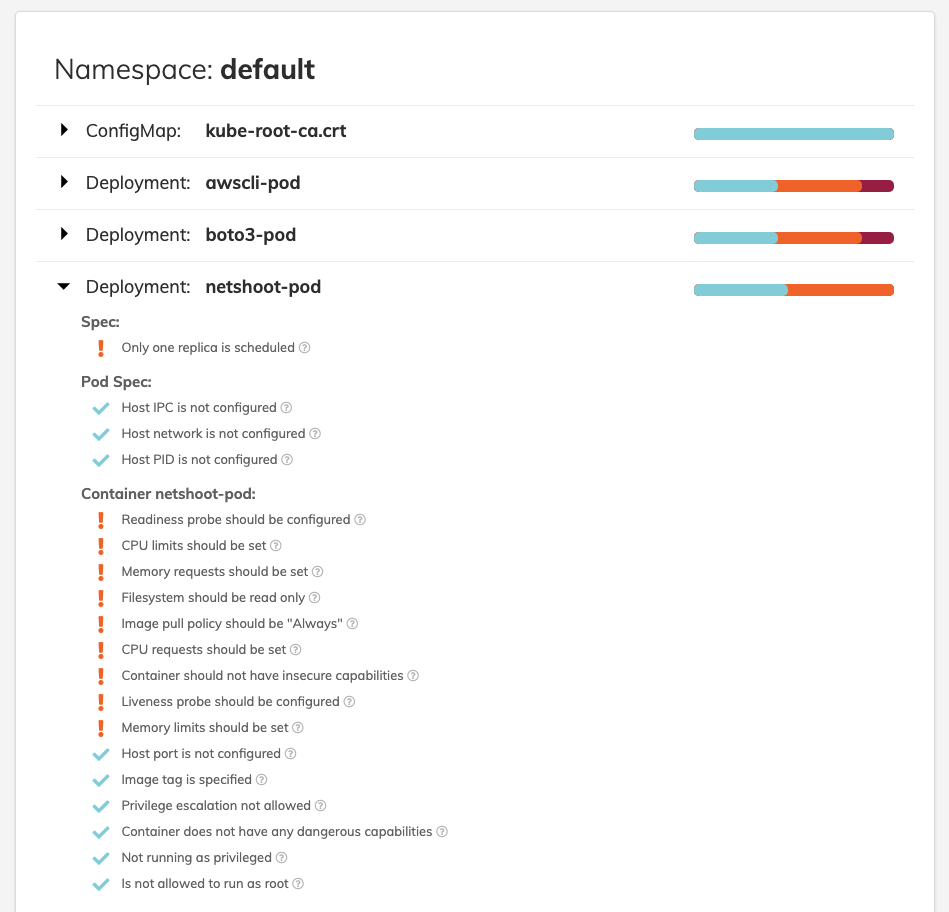
취약점이 사라진 것을 볼 수 있다. k8s는 워낙 복잡하기도 한데, 보안까지 신경쓰기는 정말 어려운 것 같다. Polaris를 통해서 이렇게 꼭 처리해줘야하는 것들은 꼭 살펴보도록 하자.
Wrap up
이번 포스팅에서는 k8s 보안에 대해 알아보았다. 정말 보안은 또다른 하나의 카테고리이다. 아무리 잘만들어 놓은 어플리케이션도 보안이 털리면 끝장이나는 것이다.
계속 보안을 공부해 나가면서, k8s, container 등에 대한 보안 지식을 늘려나가야 겠다.