
1996년 캘리포니아 대학교에서 릴리즈 하였고, 현재는 PostgreSQL Global Development Group 산하에서 개발 중인 오픈소스 RDB이다.
![]()
자, 그럼 이번 포스팅에서는 PostgreSQL Operator를 다뤄보도록 하겠다.
Cloud Native PostgreSQL

참조 : https://cloudnative-pg.io
이름 그대로 Cloud Native 환경에서 사용할 수 있게 만든 PostgreSQL이다. EDB사에서 개발하였고, 100% 오픈소스이다.
Architecture
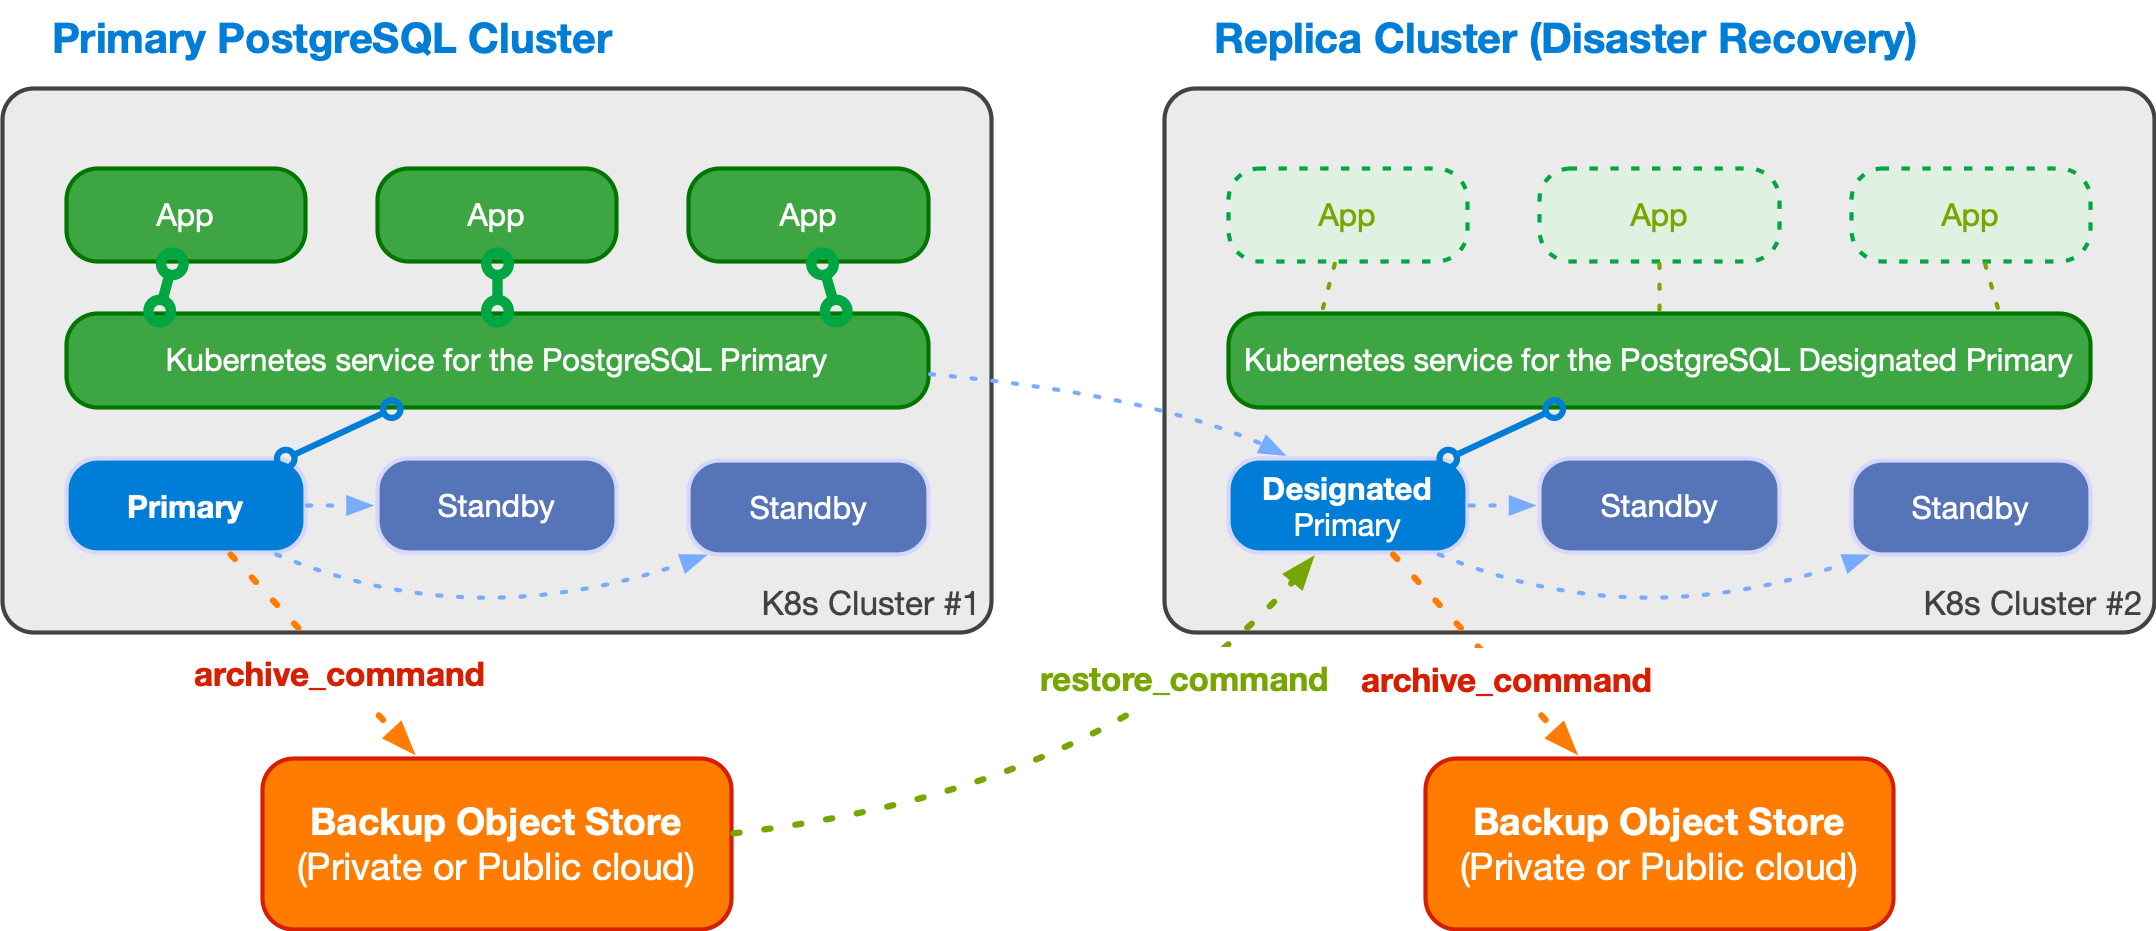
HA를 위해 Primary와 Standby 인스턴스로 구성되어있다. Operator에 의한 Election을 통해 Primary 인스턴스를 선정하게 되고, 장애 발생 시 Primary 인스턴스를 교체한다. MySQL 의 InnoDB Cluster의 역할과 비슷하다.
각 요청 종류 별 workload를 보자.
- Read-Write 요청이 오면, Primary 인스턴스로 요청을 전달한다.
- Read Only 요청은 Standby 인스턴스로 Round Robin 방식을 통해 전달한다.
- Multi Kubernetes Cluster : Primary 클러스터와 Replica 클러스터가 존재하며, Backup Object를 통해 Primary에서 Replica로 복제를 한다.
Installation
PostgreSQL 역시 helm으로 설치가 가능하다.
1. Operator 및 Cluster 설치
# Repo 추가
helm repo add cnpg https://cloudnative-pg.github.io/charts

# 오퍼레이터 설치
cat ~/DOIK/5/values.yaml

       │ File: /root/DOIK/5/values.yaml
───────┼───────────────────────────────────────────────────────────────────────────────────────────────────────────────────────────────────────────────────────────────────────────────────────────────────────────────────────────────────────────────
   1   │ nodeSelector: {kubernetes.io/hostname: k8s-m}
   2   │ tolerations: [{key: node-role.kubernetes.io/master, operator: Exists, effect: NoSchedule}]

마스터 노드 배포를 위해서 현재 실습 내용에 필요한 nodeSelector와 toleration을 value값을 적용하였다.

helm install cnpg cnpg/cloudnative-pg -f ~/DOIK/5/values.yaml

# 설치된 crd 확인
(🚴|kubernetes-admin@kubernetes:default) root@k8s-m:~# kubectl get crd
NAME                                  CREATED AT
backups.postgresql.cnpg.io            2022-06-23T07:44:06Z
clusters.postgresql.cnpg.io           2022-06-23T07:44:06Z
poolers.postgresql.cnpg.io            2022-06-23T07:44:07Z
scheduledbackups.postgresql.cnpg.io   2022-06-23T07:44:06Z

# 클러스터 설치 : timezone, worker process, hba 등의 config를 세팅할 수 있다.

(🚴|kubernetes-admin@kubernetes:default) root@k8s-m:~# cat ~/DOIK/5/mycluster1.yaml
───────┬───────────────────────────────────────────────────────────────────────────────────────────────────────────────────────────────────────────────────────────────────────────────────────────────────────────────────────────────────────────────
       │ File: /root/DOIK/5/mycluster1.yaml
───────┼───────────────────────────────────────────────────────────────────────────────────────────────────────────────────────────────────────────────────────────────────────────────────────────────────────────────────────────────────────────────
   1   │ # Example of PostgreSQL cluster
   2   │ apiVersion: postgresql.cnpg.io/v1
   3   │ kind: Cluster
   4   │ metadata:
   5   │   name: mycluster
   6   │ spec:
   7   │   imageName: ghcr.io/cloudnative-pg/postgresql:14.2
   8   │   instances: 3
   9   │   storage:
  10   │     size: 3Gi
  11   │   postgresql:
  12   │     parameters:
  13   │       max_worker_processes: "40"
  14   │       timezone: "Asia/Seoul"
  15   │     pg_hba:
  16   │       - host all postgres all trust
  17   │   primaryUpdateStrategy: unsupervised
  18   │   enableSuperuserAccess: true
  19   │   bootstrap:
  20   │     initdb:
  21   │       database: app
  22   │       encoding: UTF8
  23   │       localeCType: C
  24   │       localeCollate: C
  25   │       owner: app
───────┴─────────────────

kubectl apply -f ~/DOIK/5/mycluster1.yaml

# 클러스터 설치 확인
(🚴|kubernetes-admin@kubernetes:default) root@k8s-m:~# k get cluster
NAME        AGE   INSTANCES   READY   STATUS                     PRIMARY
mycluster   36m   3           3       Cluster in healthy state   mycluster-1

인스턴스, Status, Primary 인스턴스를 알 수 있다.

# cnpg 플러그인 설치 - https://cloudnative-pg.io/documentation/1.15.1/cnpg-plugin/
postgresql 클러스터를 kubectl로 관리할 수 있는 강력한 플러그인이다.

curl -sSfL \
  https://github.com/cloudnative-pg/cloudnative-pg/raw/main/hack/install-cnpg-plugin.sh | \
  sudo sh -s -- -b /usr/local/bin

# 클러스터 상태 조회

(🚴|kubernetes-admin@kubernetes:default) root@k8s-m:~# kubectl cnpg status mycluster
Cluster Summary
Name:               mycluster
Namespace:          default
System ID:          7112338541820059668
PostgreSQL Image:   ghcr.io/cloudnative-pg/postgresql:14.2
Primary instance:   mycluster-1
Status:             Cluster in healthy state
Instances:          3
Ready instances:    3
Current Write LSN:  0/6000060 (Timeline: 1 - WAL File: 000000010000000000000006)

Certificates Status
Certificate Name       Expiration Date                Days Left Until Expiration
----------------       ---------------                --------------------------
mycluster-ca           2022-09-21 07:40:24 +0000 UTC  89.97
mycluster-replication  2022-09-21 07:40:24 +0000 UTC  89.97
mycluster-server       2022-09-21 07:40:24 +0000 UTC  89.97

Continuous Backup status
Not configured

Streaming Replication status
Name         Sent LSN   Write LSN  Flush LSN  Replay LSN  Write Lag  Flush Lag  Replay Lag  State      Sync State  Sync Priority
----         --------   ---------  ---------  ----------  ---------  ---------  ----------  -----      ----------  -------------
mycluster-2  0/6000060  0/6000060  0/6000060  0/6000060   00:00:00   00:00:00   00:00:00    streaming  async       0
mycluster-3  0/6000060  0/6000060  0/6000060  0/6000060   00:00:00   00:00:00   00:00:00    streaming  async       0

Instances status
Name         Database Size  Current LSN  Replication role  Status  QoS         Manager Version
----         -------------  -----------  ----------------  ------  ---         ---------------
mycluster-1  33 MB          0/6000060    Primary           OK      BestEffort  1.15.1
mycluster-2  33 MB          0/6000060    Standby (async)   OK      BestEffort  1.15.1
mycluster-3  33 MB          0/6000060    Standby (async)   OK      BestEffort  1.15.1
Cloud Native PostgreSQL이 특이한 점은 Statefulset이 없다는 것이다. Kubernetes 위에 올라가는 데이터베이스 관련 파드는 STS로 관리가 되는게 보통인데, Operator에서 자체적으로 파드를 생성해서 관리한다고 한다.
그리고 PV를 조회해봤는데, Reclaim Policy가 Delete로 되어있다.
(🚴|kubernetes-admin@kubernetes:default) root@k8s-m:~# k get pv
NAME                                       CAPACITY   ACCESS MODES   RECLAIM POLICY   STATUS   CLAIM                 STORAGECLASS   REASON   AGE
pvc-403d00c6-eb92-4309-b9cf-8742342cb23e   3Gi        RWO            Delete           Bound    default/mycluster-3   local-path              36m
pvc-620648ef-571d-4e63-92d1-a2ec40d75f71   3Gi        RWO            Delete           Bound    default/mycluster-1   local-path              39m
pvc-6e9a6d44-bee8-49cb-b619-7b14f3d9af3f   3Gi        RWO            Delete           Bound    default/mycluster-2   local-path              36m
이 정책은 PVC가 삭제되면 PV도 날아가고 실제로 연결된 Disk도 삭제될 수 있는데, 왜 이렇게 되어있는지 궁금하다. 현업에서는 보통 안전하게 Retain 정책을 사용해서 세팅하고 있다. 참고하자.
참조: Reclaim Policy
2. PostgreSQL 접속 테스트
클러스터 설치가 되었으니 이제 작동이 잘되는지 확인해보자. 여기서는 PostgreSQL Client를 파드로 설치해서 접속하고 테스트한다.
2-1. 클라언트 파드 설치 및 접속
# 2개의 자격 증명이 저장된 secret 확인 (클러스터 설치할 때 같이 생성됨)
(🚴|kubernetes-admin@kubernetes:default) root@k8s-m:~# kubectl get secret -l cnpg.io/cluster=mycluster
NAME                  TYPE                       DATA   AGE
mycluster-app         kubernetes.io/basic-auth   3      73m
mycluster-superuser   kubernetes.io/basic-auth   3      73m

# base64 디코딩으로  id/password 확인
(🚴|kubernetes-admin@kubernetes:default) root@k8s-m:~# kubectl get secrets mycluster-superuser -o jsonpath={.data.username} | base64 -d ;echo
postgres
(🚴|kubernetes-admin@kubernetes:default) root@k8s-m:~# kubectl get secrets mycluster-superuser -o jsonpath={.data.password} | base64 -d ; echo
xxxxxxx

# myclient 파드 2대 배포 : envsubst 활용
(🚴|kubernetes-admin@kubernetes:default) root@k8s-m:~# cat ~/DOIK/5/myclient.yaml
───────┬───────────────────────────────────────────────────────────────────────────────────────────────────────────────────────────────────────────────────────────────────────────────────────────────────────────────────────────────────────────
       │ File: /root/DOIK/5/myclient.yaml
───────┼───────────────────────────────────────────────────────────────────────────────────────────────────────────────────────────────────────────────────────────────────────────────────────────────────────────────────────────────────────────
   1   │ apiVersion: v1
   2   │ kind: Pod
   3   │ metadata:
   4   │   name: ${PODNAME}
   5   │   labels:
   6   │     app: myclient
   7   │ spec:
   8   │   nodeName: k8s-m
   9   │   containers:
  10   │   - name: ${PODNAME}
  11   │     image: bitnami/postgresql:${VERSION}
  12   │     command: ["tail"]
  13   │     args: ["-f", "/dev/null"]
  14   │   terminationGracePeriodSeconds: 0
───────┴─────────────────────────────────────

(🚴|kubernetes-admin@kubernetes:default) root@k8s-m:~# for ((i=1; i<=2; i++)); do PODNAME=myclient$i VERSION=14.3.0 envsubst < ~/DOIK/5/myclient.yaml | kubectl apply -f - ; done

# [myclient1] superuser 계정으로 mycluster-rw 서비스 접속 및 각종 정보 확인
(🚴|kubernetes-admin@kubernetes:default) root@k8s-m:~# kubectl exec -it myclient1 -- psql -U postgres -h mycluster-rw -p 5432
psql (14.3, server 14.2 (Debian 14.2-1.pgdg110+1))
SSL connection (protocol: TLSv1.3, cipher: TLS_AES_256_GCM_SHA384, bits: 256, compression: off)
Type "help" for help.

postgres=# \conninfo
You are connected to database "postgres" as user "postgres" on host "mycluster-rw" (address "10.200.1.128") at port "5432".
SSL connection (protocol: TLSv1.3, cipher: TLS_AES_256_GCM_SHA384, bits: 256, compression: off)
postgres=# SELECT * FROM pg_timezone_names WHERE name = current_setting('TIMEZONE');
    name    | abbrev | utc_offset | is_dst
------------+--------+------------+--------
 Asia/Seoul | KST    | 09:00:00   | f
(1 row)

postgres=#     name    | abbrev | utc_offset | is_dst
postgres-# \l
                             List of databases
   Name    |  Owner   | Encoding | Collate | Ctype |   Access privileges
-----------+----------+----------+---------+-------+-----------------------
 app       | app      | UTF8     | C       | C     |
 postgres  | postgres | UTF8     | C       | C     |
 template0 | postgres | UTF8     | C       | C     | =c/postgres          +
           |          |          |         |       | postgres=CTc/postgres
 template1 | postgres | UTF8     | C       | C     | =c/postgres          +
           |          |          |         |       | postgres=CTc/postgres
(4 rows)

# 빠져나오기
postgres-# \q
2-2. Data Insert 및 복제 확인
PostgreSQL에서 제공하는 샘플로 data를 넣어보자.
# 다운로드
curl -LO https://www.postgresqltutorial.com/wp-content/uploads/2019/05/dvdrental.zip
apt install unzip -y && unzip dvdrental.zip

# myclient1 파드에 dvdrental.tar 복사
(🚴|kubernetes-admin@kubernetes:default) kubectl cp dvdrental.tar myclient1:/tmp

# [myclient1] superuser 계정으로 mycluster-rw 서비스 접속 후 데이터베이스 생성
(🚴|kubernetes-admin@kubernetes:default) kubectl exec -it myclient1 -- createdb -U postgres -h mycluster-rw -p 5432 dvdrental
(🚴|kubernetes-admin@kubernetes:default) kubectl exec -it myclient1 -- psql -U postgres -h mycluster-rw -p 5432 -l

# DVD Rental Sample Database 불러오기
(🚴|kubernetes-admin@kubernetes:default) kubectl exec -it myclient1 -- pg_restore -U postgres -d dvdrental /tmp/dvdrental.tar -h  mycluster-rw -p 5432

# DVD Rental Sample Database 에서 actor 테이블 조회
(🚴|kubernetes-admin@kubernetes:default) kubectl exec -it myclient1 -- psql -U postgres -h mycluster-rw -p 5432 -d dvdrental -c "SELECT * FROM actor"

 actor_id | first_name  |  last_name   |      last_update
----------+-------------+--------------+------------------------
        1 | Penelope    | Guiness      | 2013-05-26 14:47:57.62
        2 | Nick        | Wahlberg     | 2013-05-26 14:47:57.62
        3 | Ed          | Chase        | 2013-05-26 14:47:57.62
        4 | Jennifer    | Davis        | 2013-05-26 14:47:57.62
        5 | Johnny      | Lollobrigida | 2013-05-26 14:47:57.62
        6 | Bette       | Nicholson    | 2013-05-26 14:47:57.62
        7 | Grace       | Mostel       | 2013-05-26 14:47:57.62
        8 | Matthew     | Johansson    | 2013-05-26 14:47:57.62
        9 | Joe         | Swank        | 2013-05-26 14:47:57.62
       10 | Christian   | Gable        | 2013-05-26 14:47:57.62
       11 | Zero        | Cage         | 2013-05-26 14:47:57.62
       .
       .
       .
데이터가 잘들어갔다. 그럼 아까봤던 아키텍처대로 standby 인스턴스에 잘 복제되었는지 확인해보자.
클러스터의 인스턴스가 총 3개 이므로 아래와 같이 세팅해준다.

# 파드IP 변수 지정
POD1=$(kubectl get pod mycluster-1 -o jsonpath={.status.podIP})
POD2=$(kubectl get pod mycluster-2 -o jsonpath={.status.podIP})
POD3=$(kubectl get pod mycluster-3 -o jsonpath={.status.podIP})

# 파드별 actor 테이블 카운트 조회
(🚴|kubernetes-admin@kubernetes:default) root@k8s-m:~# kubectl exec -it myclient1 -- psql -U postgres -h $POD1 -p 5432 -d dvdrental -c "SELECT COUNT(*) FROM actor"
 count
-------
   200
(1 row)

(🚴|kubernetes-admin@kubernetes:default) root@k8s-m:~# kubectl exec -it myclient1 -- psql -U postgres -h $POD2 -p 5432 -d dvdrental -c "SELECT COUNT(*) FROM actor"
 count
-------
   200
(1 row)

(🚴|kubernetes-admin@kubernetes:default) root@k8s-m:~# kubectl exec -it myclient1 -- psql -U postgres -h $POD3 -p 5432 -d dvdrental -c "SELECT COUNT(*) FROM actor"
 count
-------
   200
(1 row)
2-3. rw, ro, any, r 확인
read-write, read-only, any, read는 PostgreSQL에서의 transaction 방식의 종류이다. Oracle, MySQL 등에서도 성능 또는 동시성 제어를 하기위해 transaction 방식을 선택할 수 있다.
현재 포스팅의 Architecture를 보면 각각 방식의 transaction의 workload를 참고하자. (any, read는 Primary, Standby 중 랜덤하게 라우팅된다)
- read-write : Primary instance
- read-only : Standby instance
- any, read : Random
자, 그럼 아래 테스트를 통해 확인해보자.
# endpoint 조회
(🚴|kubernetes-admin@kubernetes:default) root@k8s-m:~# kubectl get svc,ep,endpointslices -l cnpg.io/cluster=mycluster
NAME                    TYPE        CLUSTER-IP     EXTERNAL-IP   PORT(S)    AGE
service/mycluster-any   ClusterIP   10.200.1.66    <none>        5432/TCP   4h56m
service/mycluster-r     ClusterIP   10.200.1.246   <none>        5432/TCP   4h56m
service/mycluster-ro    ClusterIP   10.200.1.135   <none>        5432/TCP   4h56m
service/mycluster-rw    ClusterIP   10.200.1.128   <none>        5432/TCP   4h56m

NAME                      ENDPOINTS                                         AGE
endpoints/mycluster-any   172.16.1.6:5432,172.16.2.4:5432,172.16.3.4:5432   4h56m
endpoints/mycluster-r     172.16.1.6:5432,172.16.2.4:5432,172.16.3.4:5432   4h56m
endpoints/mycluster-ro    172.16.1.6:5432,172.16.3.4:5432                   4h56m
endpoints/mycluster-rw    172.16.2.4:5432                                   4h56m

NAME                                                 ADDRESSTYPE   PORTS   ENDPOINTS                          AGE
endpointslice.discovery.k8s.io/mycluster-any-bnxr7   IPv4          5432    172.16.2.4,172.16.3.4,172.16.1.6   4h56m
endpointslice.discovery.k8s.io/mycluster-r-wpxgc     IPv4          5432    172.16.2.4,172.16.3.4,172.16.1.6   4h56m
endpointslice.discovery.k8s.io/mycluster-ro-vvbcx    IPv4          5432    172.16.3.4,172.16.1.6              4h56m
endpointslice.discovery.k8s.io/mycluster-rw-8krkq    IPv4          5432    172.16.2.4                         4h56m

(🚴|kubernetes-admin@kubernetes:default) root@k8s-m:~# k get po -owide -l  postgresql=mycluster
NAME          READY   STATUS    RESTARTS   AGE     IP           NODE     NOMINATED NODE   READINESS GATES
mycluster-1   1/1     Running   0          4h57m   172.16.2.4   k8s-w3   <none>           <none>
mycluster-2   1/1     Running   0          4h55m   172.16.3.4   k8s-w2   <none>           <none>
mycluster-3   1/1     Running   0          4h54m   172.16.1.6   k8s-w1   <none>           <none>

(🚴|kubernetes-admin@kubernetes:default) root@k8s-m:~# kubectl cnpg status mycluster

Instances status
Name         Database Size  Current LSN  Replication role  Status  QoS         Manager Version
----         -------------  -----------  ----------------  ------  ---         ---------------
mycluster-1  49 MB          0/8000000    Primary           OK      BestEffort  1.15.1
mycluster-2  48 MB          0/8000000    Standby (async)   OK      BestEffort  1.15.1
mycluster-3  48 MB          0/8000000    Standby (async)   OK      BestEffort  1.15.1
각 cluster 파드 IP가 endpoint에 등록되어 있는 것을 보면,
- endpoints/mycluster-rw : Primary
- endpoints/mycluster-ro : Standby
- endpoints/mycluster-any, service/mycluster-r : Primary, Standby
Architecture Diagram에 나온대로 매핑되는 것을 확인할 수 있다.
그럼 실제로 라우팅이 그렇게 되는 지 테스트해보자.
# read-write
(🚴|kubernetes-admin@kubernetes:default) root@k8s-m:~# for i in {1..30}; do kubectl exec -it myclient1 -- psql -U postgres -h mycluster-rw -p 5432 -c "select inet_server_addr();"; done | sort | uniq -c | sort -nr | grep 172
     30  172.16.2.4

# read-only
(🚴|kubernetes-admin@kubernetes:default) root@k8s-m:~# for i in {1..30}; do kubectl exec -it myclient1 -- psql -U postgres -h mycluster-ro -p 5432 -c "select inet_server_addr();"; done | sort | uniq -c | sort -nr | grep 172
     18  172.16.1.6
     12  172.16.3.4

# r, any
(🚴|kubernetes-admin@kubernetes:default) root@k8s-m:~# for i in {1..30}; do kubectl exec -it myclient1 -- psql -U postgres -h mycluster-r -p 5432 -c "select inet_server_addr();"; done | sort | uniq -c | sort -nr | grep 172
     11  172.16.1.6
     10  172.16.3.4
      9  172.16.2.4

(🚴|kubernetes-admin@kubernetes:default) root@k8s-m:~# for i in {1..30}; do kubectl exec -it myclient1 -- psql -U postgres -h mycluster-any -p 5432 -c "select inet_server_addr();"; done | sort | uniq -c | sort -nr | grep 172
     15  172.16.2.4
     10  172.16.1.6
      5  172.16.3.4
30번 호출 시 라우팅된 enpoint를 확인해보면, Architecture Diagram의 내용과 같음을 확인할 수 있다.
장애테스트는 다음 포스팅에 이어서 작성하겠다.