
드림코딩 Javascript
📌 목차
- 1) Variable
- 2) Operator
- 3) Function
- What is Function
- Function Declaration
- Parameter
- Default Parameter
- Rest Parameter
- Local Scope
- Early Return
- Function Expression
- Function Declaration
- Arrow Function
- 4) Class
- 5) Object
- 6) Array
- 7) Array APIs
- 8) JSON
- 9) Callback
- 10) Promise
- 11) Async & Await
📌 Variable
자바스크립트 3. 데이터타입, data types, let vs var, hoisting | 프론트엔드 개발자 입문편 (JavaScript ES5+)
let
- added in ES6
- 변수를 선언하는 키워드
let name = 'ellie';
console.log(name);
name = 'hello';
console.log(name);
- 어플리케이션마다 제한적인 저장공간을 갖고 있다
let이라는 키워드를 통해서 변수를 지정하면, 저장공간 하나를 차지하는 포인터가 된다
Block Scope
- 중괄호(
{ })를 사용하여 블럭 안에 내용을 작성하게 되면, 블럭 밖에서는 해당 내용을 사용할 수 없게 된다 - 블럭 밖에서
console.log메서드를 사용하면 제대로 작동하지 않는다 - 블럭 밖에서 바로 정의해서 사용하는 변수를 Global Scope 라고 한다
- 정말 필요한 경우가 아니라면 Global Scope를 쓰는 경우는 제외하자
var
- ES6 이전에 변수를 선언하는 키워드로 이젠 사용하지 말아야 함
age = 4;
console.log(age);
var age;- Block Scope가 적용되지 않음
- 키워드로 변수를 선언하기도 전에 값을 할당하는 미친짓이 가능하다
- var hoisting 이라고 불리는 이것은
var키워드를 사용하여 변수를 선언하는 순간 스크립트 맨 위로 올린다 - 일시적으로 유연성있게 사용하기에는 좋겠지만, 프로젝트의 규모가 커지게 되면 헷갈리게 할 상황을 야기함
- ES6이 적용됨에 따라
var대신let을 사용함이 지당하다!
- var hoisting 이라고 불리는 이것은
const
- 변수는 가리키고 있는 포인터가 잠겨 있다
- 따라서 할당한 값을 임의로 변경할 수 없다(Immutable)
const daysInWeek = 7;
const maxNumber = 5;- favor immutable data type always(변경할 수 없는 데이터 타입을 사용해라)
- security
- thread safety
- reduce human mistakes
Variable Types
-
Primitive Type(Single Item) :
number, string, boolean, null, undefined, symbol- 더 이상 나눠질 수 없는 작은 한 가지의 타입
- 숫자, 문자 등
-
number
- Javascript에서는 다양한 숫자 타입을 모두 number로 통일하며, 타입을 정의하지 않아도 동적으로 결정한다
const count = 17; // integer const size = 17.1; // decimal number- 숫자가 아닌 밸류 중 infinity, -infinity, NaN 이 있다
- infinity : 무한대. 1을 0으로 나눔
- -infinity : -무한대. -1을 0으로 나눔
- NaN(Not a Number) : 숫자가 아닌 것을 숫자로 나눔
const infinity = 1 / 0; const negativeInfinity = -1 / 0; const nAn = 'not a number' / 2; -
string
- Javascript에서는 문자 하나와 문자열 모두 string으로 통일한다
const char = 'c'; const brendan = 'brendan'; const greeting = 'hello' + brendan; const helloBob = `hi ${brendan}!`;- 문자열을 더하기를 하는 것으로 붙일 수 있다
- 백틱(
${ })을 사용하여 변수를 넣어줄 수 있다
-
boolean
- 참과 거짓을 표현하는 타입이다
- 거짓 : flase, 0, null, undefined, NaN, ‘’
- 참 : 이외의 다른 value
const canRead = true; const test = 3 < 1; // false -
null
- 명확하게 비어있는 empty 값이라고 지정함
let nothing = null;
-
undefined
- 키워드를 통해 변수를 선언했지만, 값이 할당되어 있지 않은 상태
let x = undefined; let x; // 둘 다 undefined임 -
symbol
- 고유한 식별자가 필요할 때 사용함
const symbol1 = Symbol('id')
const symbol2 = Symbol('id')
console.log(symbol1 === symbol2);
-
Object Type(Box Container)
- 위의 Single Item을 하나로 묶어 관리할 수 있게 해줌
- 오브젝트를 선언하면 하나의 포인터에 각각의 오브젝트 요소를 할당함
const ellie = {name:'ellie', age:20}- const 로 정의된 오브젝트 ellie는 다른 오브젝트로 할당할 수 없음
- 그러나 내부의 ellie.name, ellie.age 의 값은 다른 값으로 할당이 가능함
- 변경할 수 없는 것은 선언된 오브젝트(다른 오브젝트로의 변경이 불가한 것)이므로 오브젝트 내부에서 따로 자리를 내어 할당한 값 자체는 변경이 가능함
-
Function(First-Class Function)
- 변수에 함수를 담기 가능
- 함수의 인자에 함수 담기 가능
Dynamic Typing
- Javascript는 Dynamically Typed Language 라고 부름
- 선언할 때 어떤 타입인지 선언하지 않고, 프로그램이 실행될 때 할당된 값에 따라서 타입이 변경될 수 있음을 말함
let text = 'hello' //**string 'hello'**
text = 1; // string -> **number 1**
text = '7' + 5; // string + number -> **string '75'**
text = '8' / '2' // string(number) / string(number) -> **number 4**- 타입이 자주 변경된다면, 내가 원래 목적으로 작성했던 코드의 자료형이 아니게 되어 수 많은 오류와 싸움을 하게 될 것이다 → 해소하기 위해 생긴 것이 Type Script
📌 Operator
자바스크립트 4. 코딩의 기본 operator, if, for loop 코드리뷰 팁 | 프론트엔드 개발자 입문편 (JavaScript ES6)
String Concatenation
console.log('my' + 'cat');
console.log('1' + 2);
console.log(`string literals: 1 + 2 = $- 더하기(
+) 기호를 사용해서 문자, 문자열과 숫자를 더해서 문자열로 만드는 기능 - 백틱(
${ })을 활용하여 다양한 특수문자와 변수를 문자열로 한꺼번에 써주는 것이 가능하다
Numeric Operators
- 산술 연산자로 사칙연산을 포함한 다양한 연산을 가능하게 해줌
console.log(1+1) // add 덧셈
console.log(1-1) // substract 뺄셈
console.log(1/1) // divide 나눗셈
console.log(1*1) // multiply 곱셈
console.log(5%2) // remainder 나머지
console.log(2**3) // exponentiation 제곱
Increment and Decrement Operators
- Increment : 변수 앞, 뒤에 ++를 붙여주는 것으로 값을 1 증가시킴
- Decrement : 변수 앞, 뒤에 — 를 붙여주는 것으로 값을 1 감소시킴
let counter = 2;
const preIncrement = ++counter;
// counter = counter + 1; **3**
// preIncrement = counter; **3**

const postIncrement = counter++;
// postIncrement = counter; **3**
// counter = counter + 1; **4**
Assignment Operators
- 할당 연산자는 등호(
=)를 사용하는 것으로 변수에 값을 할당(저장)하는 것을 의미한다 - 일반적으로 사용하는 변수 초기화 방법
let x = 3;
let y = 6;
Comparison Operators
- 비교연산자는 비교를 위해 사용한다
- 부등호(
≤, ≥, <, >)를 사용한다
console.log(10 < 6);
console.log(10 > 6);
console.log(10 <= 6);
console.log(10 >= 6);
Logical Operators
- 논리 연산자는 OR, AND, NOT 을 사용하여 값이 참인지 거짓인지를 판별한다
- OR 연산자(
||) 는 하나라도 참이라면 참을 리턴하며, 모두 거짓이어야 거짓을 리턴한다- OR의 속성을 사용하여 읽는 속도가 빠른 변수를 앞에 배치하고 뒤에 속도가 느린 함수를 배치한다
- AND 연산자(
&&)는 모두 참이어야 참을 리턴하며, 하나라도 거짓이면 거짓을 리턴한다- AND의 속성을 사용하여 상대적으로 속도가 느린 함수를 뒤에 배치한다
- NOT 연산자(
!)는 값을 반대로 변경한다
const value1 = true;
const value2 = 4 < 2;

// || (or) finds the first truthy value
console.log(`or: ${value1 || value2 || check()}`);

// && (and) finds the first falsy value
console.log(`and: ${value1 && value2 && check()}`);

function check() {
	for (let i=0; i<10; i++) {
		console.log('^~^');
	}
	return true;
}

// ! (not)
console.log(!value1);
Equality
- 두 값이 동일한지 검사하는 연산자. 참, 거짓 값을 리턴한다
- loose equality : 두 개의 등호(
==)로 검사해 같은지, (!=)를 사용해 다른지 검사한다- 타입이 다르더라도 값이 같아면 참을 리턴
- strict equality: 세 개의 등호로(
===)로 검사해 같은지, (!==)를 사용해 다른지 검사한다- 타입까지 확인해 값이 같아도 거짓을 리턴
- 값을 면밀하게 따지기에 좋기 때문에 strict equality를 사용해 검사하는 편이 좋다
const stringFive = '5';
const nubmerFive = 5;

// == loose eqality, with type conversion
console.log(stringFive == numberFive);
console.log(stringFive != numberFive);

// === strict eqality, no type conversion
console.log(stringFive === numberFive);
console.log(stringFive !== numberFive);

console.log(0 == false); // true
console.log(0 === false); // false
console.log('' == false); // true
console.log('' === false); // false
console.log(null == undefined); // true
console.log(null === undefined); // false<<<- 오브젝트의 경우 포인터로 다른 값을 가리키고 있기 때문에 같아보이더라도 다른 값
===를 사용해 검사하면 false가 나오게 된다
const ellie1 = {name: 'ellie'};
const ellie2 = {name: 'ellie'};
const ellie3 = ellie1;
console.log(ellie1 == ellie2); // false
console.log(ellie1 === ellie2); // false
console.log(ellie1 === ellie3); // true
Conditional Operators
- 조건문은 여러 조건에 따른 분기마다 다른 값을 리턴한다
- if 조건에 해당하면if 조건 블럭에 해당하는 내용이 실행된다
- if 조건에 해당하지 않는데 else if 조건에 해당하면 else if 조건 블럭이 실행된다
- 모두 해당하지 않는다면 else 블럭이 실행된다
const name = 'ellie';
if (name === 'ellie') {
	console.log('Welcome, Ellie!);
} else if (name === 'coder') {
	console.log('You are amazing coder');
} else {
	console.log('unknown');
}
Ternary Operator
- 한 줄로 가볍게 적을 수 있는 조건문을 축약시킨 연산자
condition ? value1 : value2;형식으로 사용한다
console.log(name === 'ellie' ? 'yes' : 'no');- 길게 쓰게 될 조건문이라면 이 형식이 오히려 가독성을 떨어뜨릴 수가 있다
Switch Operators
- 스위치 오퍼레이터는 확인해야 할 값이 여러 개일 때 사용한다
- enum과 같은 밸류를 체크할 때 사용한다
const browser = 'IE';
switch (browser) {
	case 'IE':
		console.log('go away!');
		break;
	case 'IE':
		console.log('go away!');
		break;
	case 'Chrome':
			console.log('love you!');
			break;
	case 'Firefox':
			console.log('love you!');
			break;
	default:
		console.log('same all!');
		break;
	}
Loops
-
while
- false 값이 나오기 전까지 무한 루프하는 구문
let i = 3; while (i > 0) { console.log(`while: ${i}`); i--; } -
do-while
- 블럭을 실행한 다음 반복할 조건 검사
do { console.log(`do while: ${i}`); i--; } while (i > 0); -
for-loop
- 어디부터 어디까지 반복할 지를 정하고 시작하는 반복문
for(시작; 조건; 단계;)의 방식으로 반복문을 설계함
for (i=3; i>0; i--) { console.log(`for: ${i}`); } -
nested-loop
- for 문 안에 또 for 문을 이중으로 작성하는 이중 반복문을 의미함
- 반복에 반복을 사용하여 여러 문제를 처리할 수 있음
- 시간 복잡도가 O(N²) (상당히 높은 시간이 걸림)이므로 되도록 피해주는 것이 좋다
for (let i=0; i<10; i++) { for (let j=0; j<10; j++) { console.log(`i: ${i}, j: ${j}`); } } -
break, continue
- break
- 구문을 완전히 종료함
- continue
- 지금 것만 넘기고, 다음 구문을 실행함
for (let i=0; i<10; i++) { if (i%2 === 0) { continue; }; console.log(i); } for (let j=0; j<10; j++) { console.log(j); if (j===8) { break } } - break
📌 Function
자바스크립트 5. Arrow Function은 무엇인가? 함수의 선언과 표현 | 프론트엔드 개발자 입문편(JavaScript ES6)
What is Function
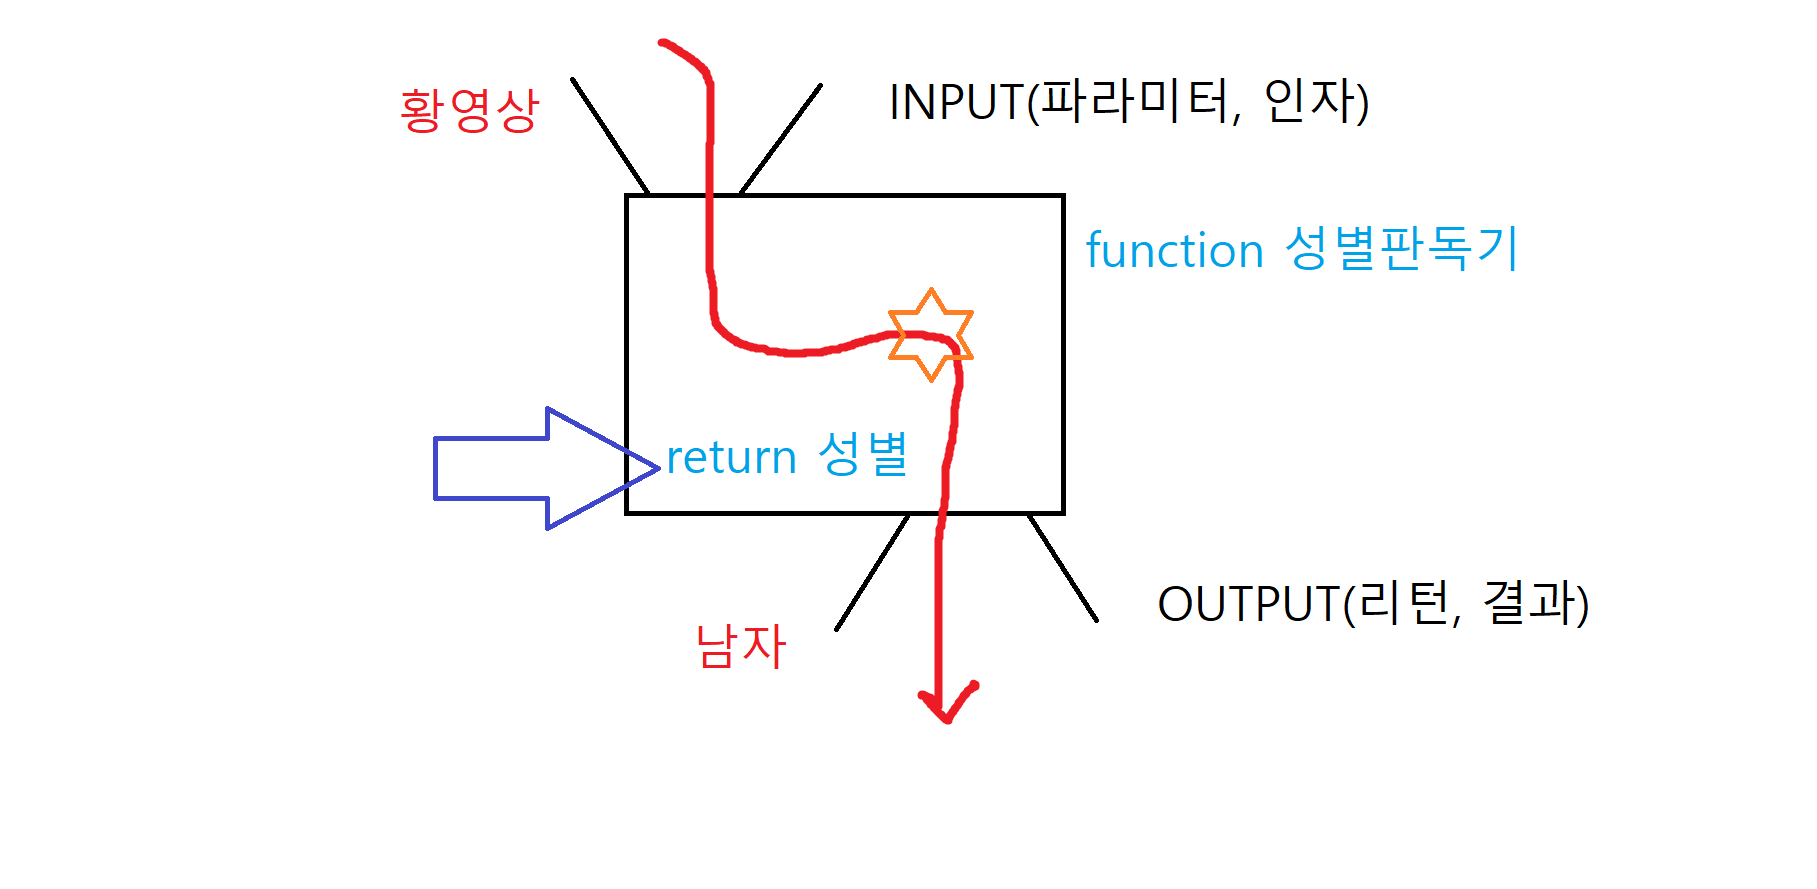
- 함수의 역할
- 사용자가 사용하고, 개발자가 개발하는 프로그램들은 저마다 고유한 기능들이 있고, 기능을 수행하는 함수들이 있음
- 절차적 언어에는 함수가 프로그램에서 굉장히 중요한 부분을 담당한다
- javascript는 oop(객체지향 프로그래밍) 언어가 아니지만 가짜로 function을 중요하게 수행해 낸다.
- 함수는 Input을 받아서 처리한뒤 Output을 돌려준다.
- 함수의 정의
- 함수는 프로그램을 구성하는 근본적인 빌딩 블럭이다
- 하나의 설계된 함수는 여러 번 재사용할 수 있다
- 하나의 태스크를 수행하거나 계산하기 위해 만들어진다
- → 하나의 함수는 하나의 기능만을 담는 것이 좋다!
Function Declaration
- 함수를 선언하기 위해서는
function 함수이름(파라미터1, 파라미터2..) { 내용.. 리턴; }과 같은 방식을 사용한다 - 함수의 이름은 어떤 행위를 수행하는 것인지 동사로 네이밍해주는 것이 좋다
- 이름이 잘 지어지지 않는다면, 하나의 기능을 과연 수행하고 있었는지 고민해봅시다
- Javascript에서 function은 오브젝트 형식이다.
- 함수를 변수에 할당 가능
- 함수를 파라미터에 할당 가능
- 함수를 리턴할 수 있음
- 함수를 선언하고,
함수이름()형식으로 함수를 호출할 수 있다
function printLog(message) {
	console.log(message)
}
log('Hello@');
Parameter
- 함수를 전달하는 파라미터는 primitive 혹은 object 타입이 들어갈 수 있다.
- primitive 타입의 경우 : value가 전달됨(정수, 문자)
- object 타입의 경우 : reference가 전달됨
- 함수 안에서 오브젝트 내부의 값이 변경되면 같이 변경됨
function changeName(obj) {
	obj.name ='coder';
}
const ellie = {name: 'ellie'};
changeName(ellie);
console.log(ellie);
Default Parameter
- 함수에서 파라미터가 전달되지 않을 경우를 대비한 방법
파라미터=’디폴트값’으로 초기화를 해두면 값이 없을 때, 이 디폴트 값을 사용- 디폴트 값을 사용할 경우는 일반적 상황에서 그냥 지나칠 수도 있는 파라미터 이거나, 특수한 케이스를 대비한 셈이다
function 불고기버거(주문, 소스='불고기소스'){
	console.log('오더 들어왔어요', 주문, 소스);
}
불고기버거('1개', '케첩');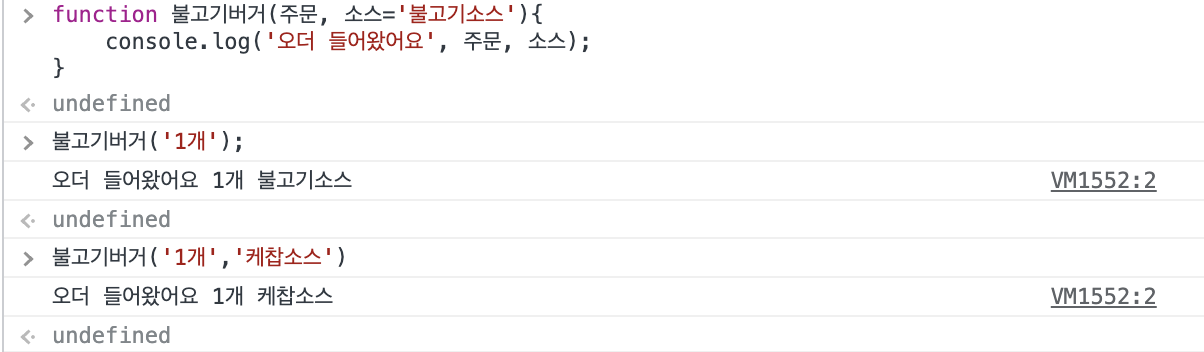
Rest Parameter
- 입력한 값을 배열 형태로 묶어주는 방식의 파라미터
…args형태로 파라미터를 작성한다- 입력한 값을 배열(리스트)로 묶어서 사용하게 될 경우에 작성한다
function 조립_햄버거(...속재료){
	console.log("참깨빵 위에");
	for (i=0; i<속재료.length; i++) {
		// i = 0일때,
		console.log(속재료[i]);
	}
	console.log("따란딴딴딴!"):
}
조립_햄버거('순쇠고기 패티 두 장', '특별한 소스', '양상추', '치즈', '피클', '양파까지')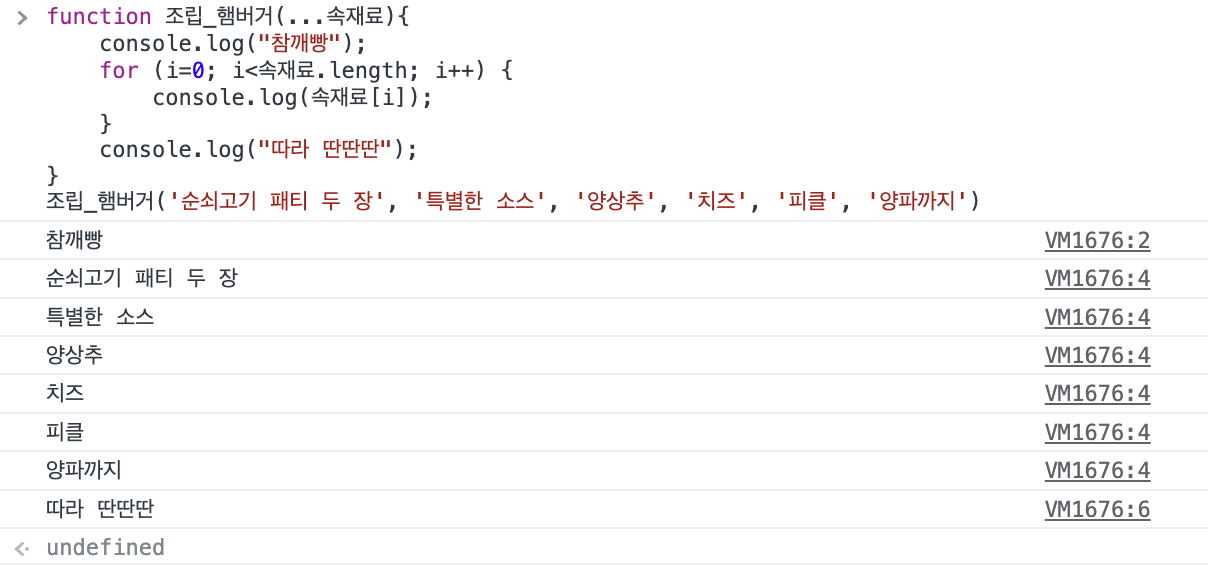
Local Scope
밖에서는 안이 보이지 않고, 안에서만 밖을 볼 수 있다. - 드림코딩 엘리
자식 이기는 부모 없다 - 김태인
- Block Level Scope : 중괄호(
{ })를 사용하여 만든 블럭 내부에 있는 변수- Global Level Scope: 블럭 외부에 있는 변수

let globalMessage = 'global';

function printMessage() {
	let message = 'hello'; // local variable
	console.log(message);
	console.log(globalMessage);
	function printAnother() {
		console.log(message);
		let childMessage = 'babo';
        console.log(childMessage);
	}
  printAnother()
}
printMessage()- 블럭 안에서 사용된 변수는 밖에서는 사용할 수 없다.
- 함수 내부의 함수에서 바깥에서 사용한 변수는 참조 가능하지만
- 부모 함수에서는 자식 함수에서 사용한 변수를 사용할 수 없다
Return
- 함수에서 파라미터를 받아 계산된 값을 리턴할 수 있음
function sum(num1, num2) {
	return num1 + num2
}
let result = sum(1,2);
Early Return
- 조건이 많아 여러 블럭 안에 로직을 많이 작성해 많은 분기를 처리하게 된다면 가독성이 떨어진다
- 따라서 특정 조건에 맞는 값을 빨리 리턴해버리는 Early Return을 사용하면 여러 블럭을 만들 필요 없이 조건문을 짧게 작성할 수 있다
function 공룡등장(내일배움캠퍼) {
	if (내일배움캠퍼 == "입실체크완료") {
		return "잘했어요^^";
	}
	console.log("저를 화나게 하지 마세요!");
}

let 황영상 = "입실체크완료";
공룡등장(황영상);
Function Expression
- Javascript에서 function은 First-class(1급시민)
- 변수에 function을 할당 가능
- function의 parameter에 function을 할당 가능
- 다른 function의 return에 function 할당 가능
- function expression은 이러한 first-class 를 표현하는 방식
Function Declaration
- 함수를 변수에 할당하는 것을 Function Declaration 이라고 한다
- 변수에 함수를 지정하면 함수의 기본 선언형태를 따르지만,
- 이름을 적어주지 않아도 변수 이름을 함수이름으로 인식하여
변수이름()의 형태로만 호출이 가능하다 → Anonymous Function - 변수에 함수를 선언한 변수를 초기화하여 재사용할 수 있다.
- 함수를 일일이 선언하고 호출하고 값에 담는 일련의 줄이 길어지는 과정을 단축시킨다
const print = function(){console.log('프린트');} // anonymous function
const print = function print_sentences(){console.log('프린트');} // named function

print();
const print_again = print;
print_again();

// 우리끼리 적어본 식
const source_sum = [1,2]
const result_sum = function(source_sum){return source_sum[0] + source_sum[1]}

const result_sul = (source_sum) => source_sum[0] + source_sum[1]- function declaration은 function hoisting 기능을 여전히 가지고 있다
- 함수를 선언한 순간, 스크립트는 함수부터 읽는다.(함수가 코드 맨 위로 올라감)
- 따라서 함수코드가 밑에 있어도, 위에서 함수를 실행할 수가 있게 된다!
Callback Function
- 함수 안의 parameter는 value를 받지만, function도 받을 수 있다
- 인자로 함수를 받아 호출한 함수를 Callback Function이라고 한다
function 쓰레기(고철, 버리자, 버리지말자){
	if (고철 === '깡통'){
		버리자();
	} else {
		버리지말자();
	}
}
const 버리자 = function () {
	console.log('갖다버려 그냥 쓰레기야')
};
const 버리지말자 = function () {
	console.log('버리지말자 쓰레기 아닌거같애')
};
쓰레기('깡통', 버리자, 버리지말자)
Arrow Function
- 함수를 간결하게 만들어주는 expression
- Arrow Function은 항상 Anonymous Function 이다
변수 = (parameter) ⇒ return;형식으로 Arrow Function을 사용한다- 내용이 추가적으로 필요해 블럭을 사용한다면 평소처럼 return 키워드를 작성해줘야 return이 된다
- 왜 쓰느냐? 라고 물어본다면 → 기존의 선언, 호출을 통한 절차를 줄여주고, 코드 길이를 줄여주어 가독성과 효율을 늘리기 위해서!
// 블럭은 열고 리턴은 없는 버전
const 버스카드찍기 = (age) => {
	if (age > 20){console.log("감사합니다");}
	else {console.log("안녕하세요");}
}
버스카드찍기(21);

// 블럭을 안열고 리턴이 있는 버전
const 입실체크 = (했니) => console.log(했니);
const 했니 = "했어";
입실체크(했니);

// 블럭을 열고 내용과 리턴이 있는 버전
const 복약관리 = (질병) => {
	let 약;
	if (질병 == "피로") {약="피로회복제";}
	else if (질병 == "고혈압") {약="혈압약";}
	else {약="당신은 건강하시네요!"}
	return 약
}
console.log(복약관리("고혈압"));
const simple = () => console.log('simplesimple');
simple()
const 나머지 = (a, b) => {
return a % b;
};
나머지(10,3)const mix =()=>리턴 값;
// 정답을 보고 썻네.......
const add = (a, b) => a + b;퀴즈. command, num1, num2를 인자로 받는 계산기 함수를 작성해보시오. Arrow Function을 사용하시오.
const calculator = (command, num1, num2) => {
	switch(command) {
		case 'add':
			return num1 + num2;
		case 'substract':
			return num1 - num2;
		case 'multifly':
			return num1 * num2;
		case 'divide':
			return num1 / num2;
		case 'remainder':
			return num1 % num2;
		default:
			throw Error('unkown command')
	}
}
caculator("add", 1,2);
IIFE
- 함수를 선언하고 괄호를 묶고, 뒤에 괄호를 써주면 바로 함수를 실행할 수 있다
(function hello(){console.log('IIFE');})();📌 Class
자바스크립트 6. 클래스와 오브젝트의 차이점(class vs object), 객체지향 언어 클래스 정리 | 프론트엔드 개발자 입문편 (JavaScript ES6)
What is Class?
- 클래스는 조금 더 연관있는 데이터를 묶어놓은 일종의 컨테이너
- 만약 클래스가 없었다면, 규모있는 프로젝트를 진행하기가 힘들었을 것이다
- 클래스는 캡슐화, 상속 등을 통해서 객체지향적 프로그래밍을 지향한다
- 클래스
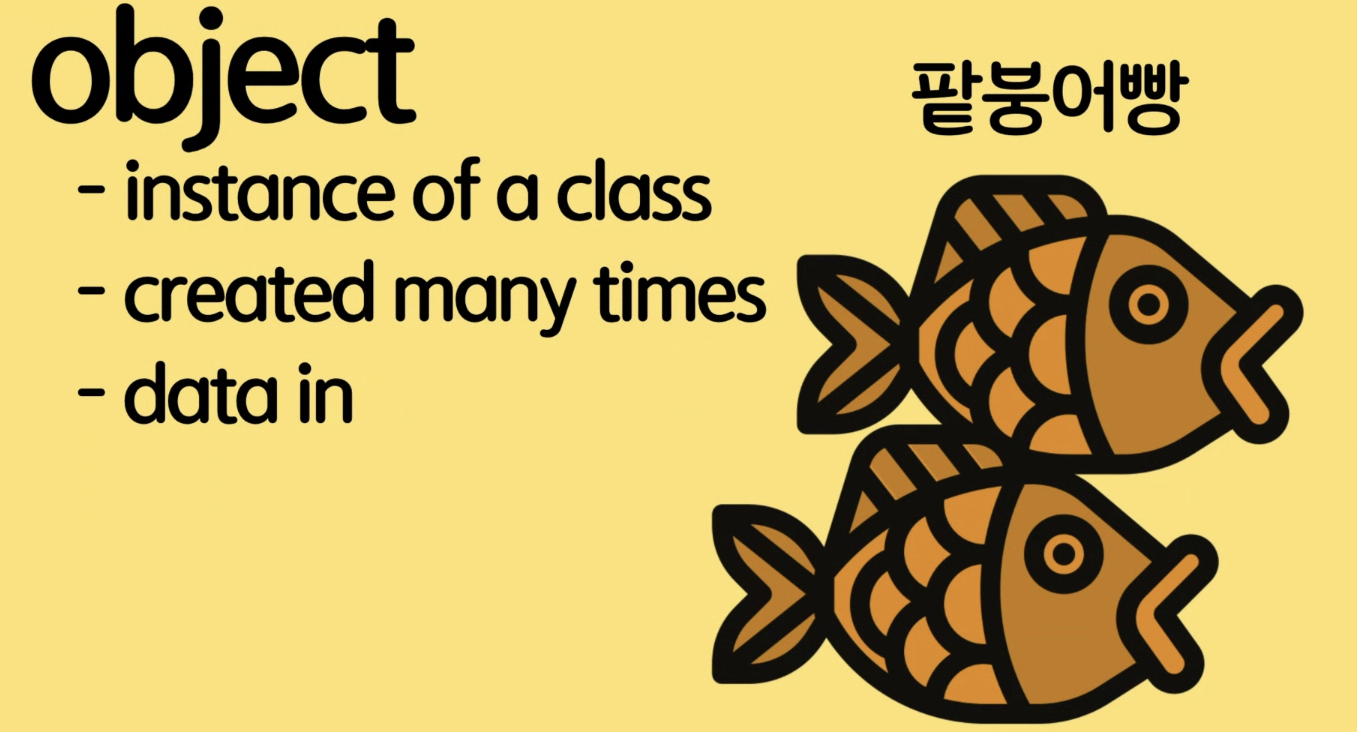
- 클래스는 붕어빵틀이다
- 클래스는 여러 번 재사용 가능하게 하는 템플릿과 같은 역할을 수행한다
- 클래스는 단 한 번 선언하면 된다
- 클래스 자체에는 데이터가 들어있지 않다- 오브젝트
- 클래스를 이용해서 데이터를 넣은 것을 오브젝트라고 한다
- 클래스는 메모리에 들어가지 않지만, 인스턴스로 생성한 오브젝트는 데이터 메모리에 할당된다
- 붕어빵 틀에 내용물을 넣고 만들어낸 붕어빵이 오브젝트에 해당한다
Class Declaration
- 클래스는 템플릿이며, 클래스의 인스턴스를 오브젝트라고 한다
- 클래스 선언
- 클래스는
키워드 , 이름, 생성자, 필드, 메서드를 선언하여 작성한다
class 클래스{
	생성자(필드1, 필드2){
		this.필드1 = 필드1;
		this.필드2 = 필드2;
	}
	메서드(){
		메서드 내용
	}
}- 오브젝트 선언
- 오브젝트를 선언하기 위해서는
변수 = new 클래스(필드)를 사용하여 선언한다
// class declaration
class Person {
	// 생성자
	constructor(name, age) {
	// 필드
	this.name= name;
	this.age= age;
	}
	// 메서드
	speak() {
		console.log(`${this.name}: hello!`);
	}
}class Person {
	// 생성자
	constructor(name, age) {
	// 필드
	this.name= name;
	this.age= age;
	}
	// 메서드
	speak() {
		console.log(`${this.name}: hello!`);
	}
}

const ellie = new Person('ellie', 20);
console.log(ellie.name);
console.log(ellie.age);
ellie.speak();
Getter & Setter
- 클래스 내부에서 값을 방어적으로 변경해주기 위해 세팅하는 메서드
- 값을 변경하기 위해서는 getter, setter가 동시에 사용되어야 합니다
- 일반적으로 변수를 초기화하는 작업을 내부에서 변경하기 위해서는 getter&setter가 그 과정을 수행하게 됨
- getter는 필드 값을 호출하기 위해 필요한 메서드
- setter는 필드 값의 밸류를 새로 할당하기 위해 필요한 메서드
class Person {
	constructor(firstName, lastName) {
		this.firstName= firstName;
	  this.lastName = lastName;
		this.age= age;
	}

	get age() {
		return this._age;
	}

	set age(value) {
		this._age = value < 0 ? 0 : value;
	}
}
const user1 = new User('Steve', 'Job', -1);
console.log(user1.age);
Public & Private Field
- 생성자를 쓰지 않고 필드를 사용할 수 있음
#privateField처럼 해시태그를 사용해서 내부에서만 쓰거나 변경할 수 있도록 작성할 수 있음
class Experiment {
	publicField = 2;
	#privateField = 0;
}
Static Field, Method
- 인스턴스를 이용해서 생성한 오브젝트와 상관없이 클래스 자체에 연결되어 있는 공통적으로 자주 사용하는 필드를 활용할 수 있음
class Article {
	static publisher = 'Dram Coding';
	constructor(articleNumber) {
		this.articleNumber = articleNumber;
	}

	static printPublisher() {
		console.log(Article.publisher);
	}
}

const article1 = new Article(1);
const article2 = new Article(2);
console.log(Article.publisher);
Article.printPublisher();
상속 & 다양성
- 하나의 객체를 다양하게 표현하기 위해서는 무엇이 필요한가?
- 예) 삼각형, 사각형, 원을 클래스를 사용한 오브젝트로 어떻게 표현할까?
- 너비와 높이 같은 반복되어지는 것을 계속 따로 만들어 반복해야 할까?
- Shape이라는 속성을 한 번 만들어서 각 개체가 가져가 쓴다면 효율적이겠다!
class MarvelCinematicUniverse {
	constructor(name, hero, villian) {
		this.name = name;
		this.hero = hero;
		this.villian = villian;
	}

	명대사() {
		console.log(`이 영화에서 명대사를 말한 인물은 ${this.villian}입니다!`)
	}
}

class Ironman extends MarvelCinematicUniverse {}
class Spiderman extends MarvelCinematicUniverse {}
const rdj = new Ironman('ironman2', '토니 스타크', '울트론');
rdj.명대사()
const 토비맥과이어 = new Spiderman('spiderman3', '피터 파커', '그린 고블린');
class Shape {
constructor(width, height, color) {
this.width = width;
this.height = height;
this.color = color;
}
draw() {
console.log(`drawing ${this.color} color of`);
}
getArea() {
return width * this.height;
}
// 사각형이라는 클래스에 쉐이프 클래스 상속
class Rectangle extends Shape {}
class Triangle extends Shape {
draw() {
super.draw();
console.log('⚠')
}
getArea() {
return (this.width * this.height) / 2;
}
}
const rectangle = new Rectangle(20,20,'blue');
rectangle.draw();
console.log(rectangle.getArea());
const triangle = new Triangle(20,20,'red');
triangle.draw();
console.log(triangle.getArea());- 상속은 자식 클래스를 선언할 때
extends 부모클래스라고 추가로 작성하는 것으로, 부모클래스를 자식클래스가 상속하게 된다 - 부모클래스를 상속받은 자식클래스는 동일한 필드와 메서드를 작성한 셈이 되며, 그대로 사용할 수가 있게 된다.
- 물론 오브젝트를 선언할 때에 부모 클래스가 요구하는 필드 값을 작성해주어야 한다
Overriding
- 부모 클래스의 메서드를 덮고 다른 내용으로 해당 메서드를 작성하고 싶을 때 사용한다
- 자식 클래스에서 동일한 메서드를 선언하고, 내용을 작성하게 되면 부모클래스의 메서드는 출력하지 않는다.
- 부모 클래스의 메서드 또한 사용하고 싶다면,
super.메서드()를 사용하여 둘 다 사용할 수 있다
InstanceOF
- 인스턴스와 클래스가 서로 상관관계가 있는지 체크하는 메서드 (true, false로 반환한다)
인스턴스 instanceof 클래스형태로 사용한다
console.log(rectangle instanceof Rectangle); // true
console.log(triangle instanceof Rectangle); // false
console.log(triangle instanceof Triangle); // true
console.log(triangle instanceof Shape); // true
console.log(triangle instanceof Object); // true
📌 Object
자바스크립트 7. 오브젝트 넌 뭐니? | 프론트엔드 개발자 입문편 (JavaScript ES6)
Object란?
- primitive 타입(number, str …)은 하나의 변수에 하나의 값만 할당할 수 있다
- 출력하려면 값을 각각 다 적어줘야 한다
- 함수의 인자로 넣을 때도 각각 다 적어줘야 한다
- primitve 타입의 변수가 너무 많아지면 관리하기도 힘들고, 로지컬하게 생각하기도 어렵다
- 따라서 오브젝트 형태로 작성해서 간편하게 데이터를 관리하자
Literals and Properties
-
object literal
const obj = { };과 같이 중괄호를 열어서 만들기
const ellie = {name:'ellie', age:4}; // {key : value} ellie.hasJob = true; // 오브젝트 선언 이 후의 밸류 생성 delete ellie.hasJob; // 오브젝트 선언 이 후의 밸류 삭제- 특이하게 선언을 한 이후에 값을 추가할 수가 있다.
- Javascript가 동적으로 타입을 인지하기 때문이다
- 그러나 너무 많이 사용하기에는 미친짓이다!
- 특이하게 선언을 한 이후에 값을 삭제할 수가 있다
-
object constructor
const obj = new Object();와 같이 new를 사용해서 만들기
Computed Property
- 오브젝트는
변수.프로퍼티혹은변수[’프로퍼티’]스트링형식으로 프로퍼티에 접근할 수있다. 후자의 경우 Computed Property에 해당된다- key는 항상 string 타입으로 작성해야 한다
- 일반적으로 코딩할 때는 dot(
.) 을사용하여 작성하지만, 정확하게 밸류의 타입을 몰라서 메서드를 작성하지 못 할 때는 대괄호([ ]) 방식의 컴퓨트 프로퍼티로 작성한다-
코딩할 때는 점 하나 찍는게 편하니까! 또, 메서드를 자연스럽게 뒤에 붙여서 작성하기 좋다!
-
반면 컴퓨트 프로퍼티의 경우, 값이 무엇이든 상관없거나 값이 뭐가 들어올 지 아예 모르는 경우, 단순 검사식에 사용하거나 할 때는 적어주기도 한다
function printValue(obj, key) {
	// console.log(obj.key); 를 이 경우에는 사용할 수 없다
	console.log(obj[key]);
}
printValue(ellie, 'name');
printValue(ellie, 'age');
-
Property Value Shorthand
- 오브젝트를 일일이 key : value 로 만들어주기에는 특수문자가 번거롭다
- function을 사용하여 오브젝트로 선언해주는 방식이 조금 더 편리하다! → 이게 Shorthand
// 일반적인 오브젝트의 선언방법
const person1 = {name: 'bob', age: 2};
const person2 = {name: 'steve', age: 3};
const person3 = {name: 'dave', age: 4};

// Shorthand
const person4 = makePerson('ellie', 30);
console.log(person4);
function makePerson(name, age) {
	return {
		name,
		age,
	};
}
Constructor Function
- 오브젝트를 일일이 만들때마다, 키밸류를 적는게 귀찮다
- 그래서 함수를 마치 클래스처럼 만들어서 오브젝트를 선언하는 방식이 Contructor Function
- 클래스 선언 규칙처럼
function 대문자로 시작하는 함수이름 (필드){}와 같은 방식으로 선언하며, 이 함수자체가 constructor 역할을 수행한다고 하여 constructor function 이라고 부른다
const person4 = makePerson('ellie', 30);
console.log(person4);
function Person(name, age) {
		// this = {};
		this.name = name;
		this.age = age;
		// return this;
}
In Operator
- key가 object안에 존재하는지 확인하는 메서드
key in object형식으로 작성한다
console.log('name' in ellie);for in & for of
- 오브젝트 내부의 키, 밸류를 확인하기 위해 사용하는 메서드
-
for (key in obj)
for (key in object) {}형식으로 사용함- 오브젝트 내부의 키를 반복문으로 슬라이싱함
for (key in ellie) { console.log(key); } -
for (value of iterable)
- 오브젝트 중 순차적으로 순환이 가능한 배열(array)의 경우에 사용할 수 있는 내부 값을 반복하는 메서드
for (value of array) {}형식으로 사용함
const array = [1,2,3,4];
for (value of array) {
	console.log(value);
}
Clonning
- 오브젝트를 선언하고, 다른 변수에 똑같은 오브젝트를 가리킨다면 동일한 레퍼런스가 할당되어 있다
- 동일한 레퍼런스를 보고 있기 때문에 오브젝트 프로퍼티를 변경하면, 다른 변수의 오브젝트 프로퍼티도 변해있다
- 서로 같은 레퍼런스를 보고 있지만, 새롭게 복제해서 사용해 기존 레퍼런스의 값을 변경하지 않도록 하려는 방식이 Clonning 이다
- 새로운 빈 오브젝트를 선언하고,
Object.assign을 사용하여 오브젝트를 클로닝하는 것이 가능하다
const user4 = Object.assign({}, user);

const fruit1 = {color: 'blue'};
const fruit2 = {color: 'red', size:'big'};
// 두 개를 합침
const fruit3 = {size:'small'};
const mixed = Object.assign({}, fruit1, fruit2, fruit3); // **red small**
//뒤에 있는 프로퍼티가 덮어 씌움.png)
📌 Array
자바스크립트 8. 배열 제대로 알고 쓰자. 자바스크립트 배열 개념과 APIs 총정리 | 프론트엔드 개발자 입문편 (JavaScript ES6 )
What is Array
- 자료구조 : 어떤 방식, 형식으로 데이터를 담느냐에 따라서 저마다의 자료구조를 가진다
- 오브젝트도 자료 구조 중 하나일 수 있다
- 일반적으로는 자료 구조는 한 종류의 데이터만을 담는다
- Javascript는 Dynamically Typed Language라 여러 개를 담을 수도 있지만… 하지말자
- 자료구조를 사용하면 효율적으로 자료를 검색, 삽입, 정렬, 삭제 등을 사용하는데 뛰어난 사용성을 가진다
- 자료구조는 Index로 접근이 가능하다
Array Declaration
- 배열을 선언하는 방법은
new Array();를 사용하거나 대괄호([]) 안에 데이터를 넣어 선언할 수 있다.
const arr1 = new Array();
const arr2 = [1,2];
Index Position
- 배열은 숫자(인덱스)를 대괄호([])에 넣어 전달하게 되면 배열 내의 몇 번째 값이 들어있는지 확인할 수 있다
- 배열의 인덱스는 0 번째 부터 시작한다
- 배열의 인덱스의 길이를 넘어서면 오류
- 배열의 마지막 값은
배열[배열.length-1]로 찾을 수 있다
const emoji = ['👩🚀', '🐳'];
console.log(emoji);
console.log(emoji.length);
console.log(emoji[0]);Looping
- 배열을 반복하면서 내용을 모두 출력해보자
- for loop
for (let i=0; i<emoji.length; i++) {
	console.log(emoji[i]);
}- for 반복문을 사용하여 배열의 길이만큼 반복한다
- 반복한 인덱스의 숫자를 배열에 넣어줘서 배열의 모든 값을 한번 씩 가져온다
- for of
for (let target_emoji of emoji) {
	console.log(target_emoji);
}- for of 반복문으로 기존 반복문보다 조금 더 짧고 간편하게 작성할 수 있다
- python의 반복문과 비슷하다고 생각하면 됨
- forEach
emoji.forEach(function (변수, 인덱스, 배열){
	console.log(emoji, index);
})

emoji.forEach((emoji, index, array) => console.log(emoji, index))- forEach는 변수, 인덱스, 배열을 값을 각각 리턴해주는 메서드
배열.forEach()라는 형식으로 작성하게 된다- Anonymous Function을 사용하며
변수, 인덱스, 배열을 파라미터로 받는다- 함수 내부에서 변수, 인덱스, 배열을 가져다가 사용하면 된다
- forEach 구문을 사용하면 반복한 횟수를 일일이 지정하지 않아 배열의 길이만큼 반복이 이미 되어있음
- 일반적으로 변수와 인덱스를 주로 사용한다(배열은 거의 사용하지 않음)
- forEach 메서드 내부의 Anonymous Function 이라는 특성을 활용하여 Arrow Function 으로 간결하게 작성할 수도 있다
Add, Delete, Copy
-
Push
- 제일 뒤에 요소 넣기
emoji.push('🙋♂️', '🐢'); console.log(emoji); -
Pop
- 제일 뒤에 요소 하나 빼기
emoji.pop(); -
unshift
- 앞에서부터 데이터를 넣을 수 있음
emoji.unshift('🙋♂️','🐢'); -
shift
- 앞에서부터 데이터를 뺄 수 있음
emoji.shift();
- shift와 unshift는 push와 pop 보다 엄청엄청 느리다!
- 배열은 순서대로 값을 참조한다는 점에 있기 때문에, 메모리 이동량이 많아지면서 자연스럽게 느려지게 된다
- 맨 앞에 값을 넣어주기 위해 배열의 메모리를 다 한 자리씩 뒤로 밀어야함
- 맨 앞에 값을 빼주기 위해 배열의 메모리를 다 한 자리식 앞으로 당겨야함
- splice
- 지정된 위치의 포지션을 삭제하는 메서드
- 파라미터에는 삭제를 시작할 인덱스번호와 삭제될 인덱스 번호를 인자값으로 넣는다
splice(start: number, deleteCount?: number)형식으로 작성한다- 메서드를 살펴보면 ? 표시가 되어있는것들이 있는데 이건 Optional한 인자값이다 (즉 넣어도 되고 넣지 않아도 됨)
emoji.push('🧩','🎯','😈');
console.log(emoji);
emoji.splice(1, 3); // 1번째 인덱스의 아이템부터 3개의 아이템을 순서대로 삭제하기
emoji.splice(1); // 1번째 인덱스의 아이템부터 지움(즉, 뒤는 모두 지움)
emoji.splice(1, 1, '💾','🎨'); // 1번째 인덱스의 아이템을 1개 지우고 뒤의 아이템을 1번째 인덱스 자리부터 추가- concat
- 두 개의 배열을 합치는 메서드
const emoji2 = ['💡','📜'];
const newEmoji = emoji.concat(emoji2);
Searching
- indexOf 메서드를 사용하여 값이 몇번째의 인덱스에 해당하는지 확인할 수 있다
배열.indexOf(값)형식으로 사용한다- 배열안에 원하는 indexOf를 통해 조회할 값이 있다면 해당하는 위치의 인덱스를 return하며, 만약 원하는 값이 없다면 -1을 return한다
console.log(emoji);
console.log(emoji.indexOf('🐳');
console.log(emoji.includes('👩🚀');
console.log(emoji.includes('🧛♂️');
console.log(emoji.indexOf('🧛♂️');- includes메서드를 사용하여 배열 안에 값이 들어 있는 지 참 거짓을 리턴할 수 있다
- lastIndexOf메서드를 사용하여 같은 값이 있다면 마지막 인덱스를 내보낸다
📌 Array APIs
자바스크립트 9. 유용한 10가지 배열 함수들. Array APIs 총정리 | 프론트엔드 개발자 입문편 ( JavaScript ES6)
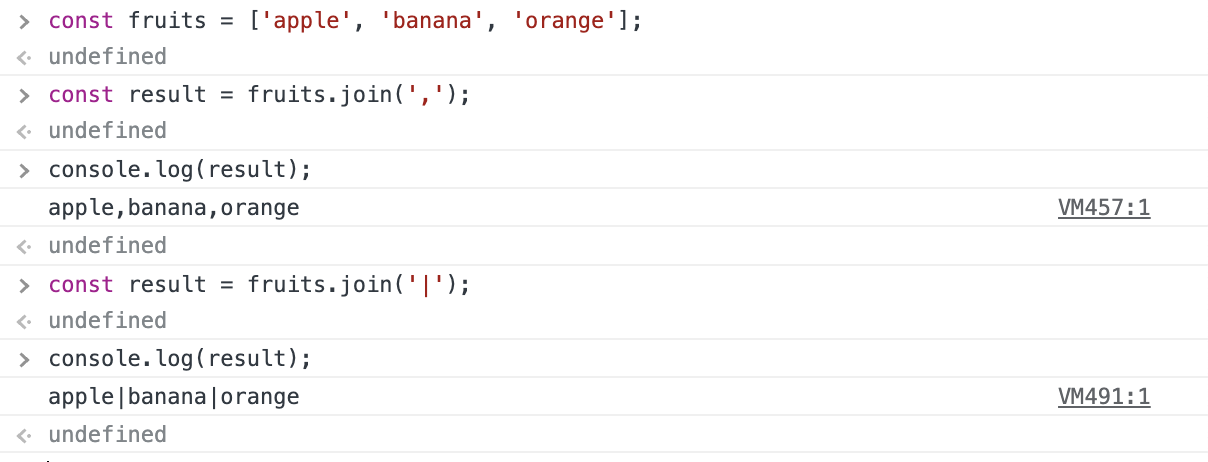
Join
- 배열 내부의 아이템을 모두 더해 String으로 변환
배열.join(’구분자’);형식으로 작성한다- Separator(구분자)를 사용하여 문자를 구분하며 기호를 바꾸어 변경도 가능하다 (ex : ‘,’ / ‘|’)
const fruits = ['apple', 'banana', 'orange'];
const result = fruits.join(',');
console.log(result);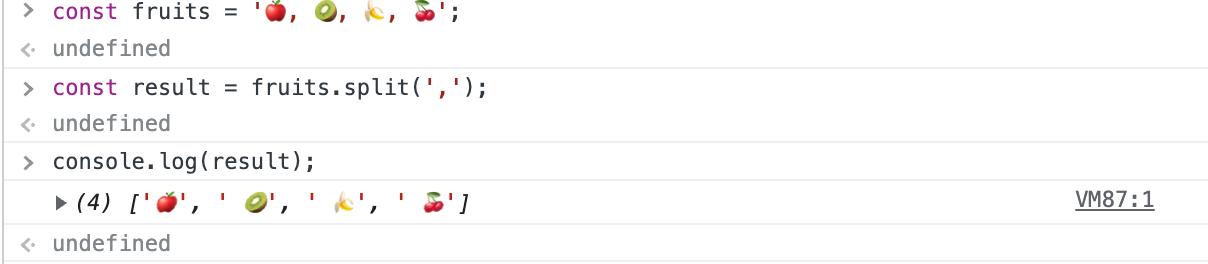
Split
- 주어진 문자열을 구분자로 구분하여 배열로 변환
문자열.split(’구분자’)를 사용하여 작성한다- split(',', 2) limit 은 옵션 → ['🍎', ' 🥝']
const fruits = '🍎, 🥝, 🍌, 🍒';
const result = fruits.split(',');
console.log(result);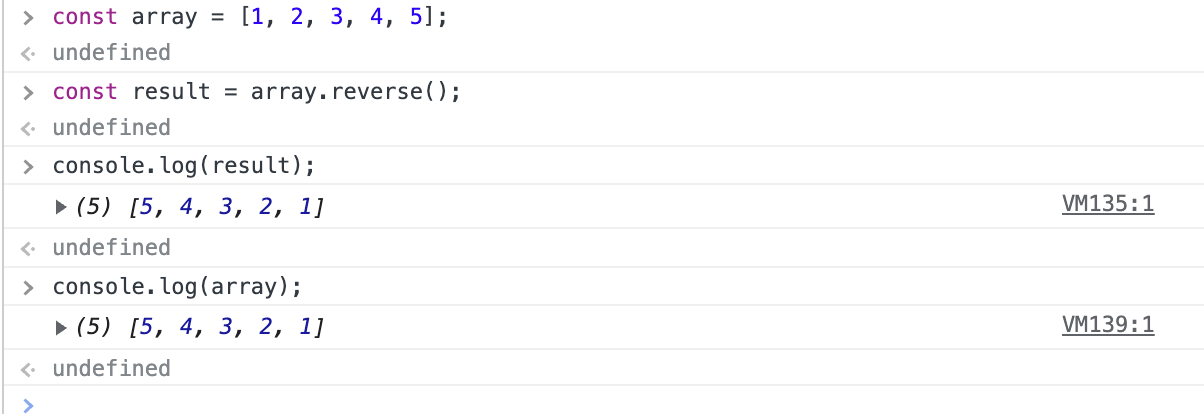
Reverse
- 주어진 배열의 순서를 거꾸로 변환하기
배열.reverse();
const array = [1, 2, 3, 4, 5];
const result = array.reverse();
console.log(result);
console.log(array);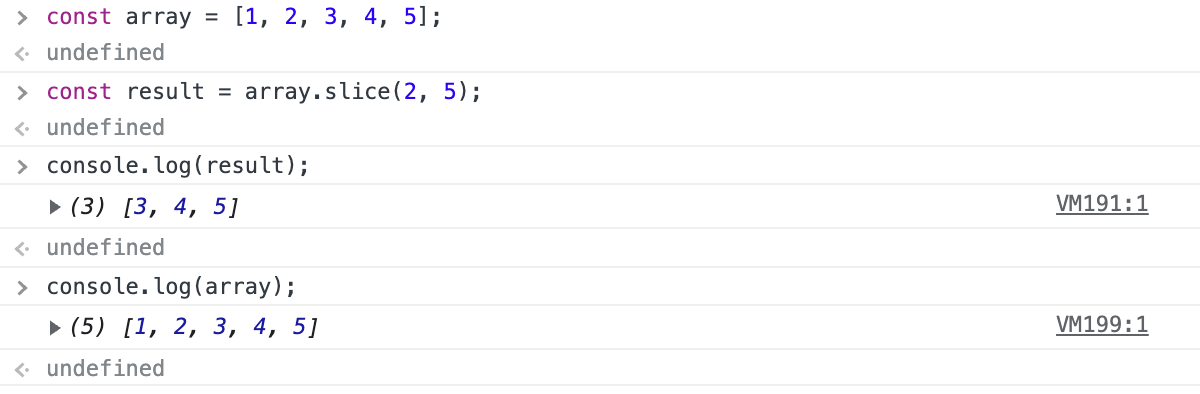
Slice
- 특정 값을 제외한 새로운 배열을 생성
- splice 메서드는 값을 삭제하는 메서드 이므로 새로운 배열을 생성하는 메서드와는 다름
배열.slice(시작인덱스, 마지막인덱스+1)형식으로 작성한다- slice는 마지막인덱스를 배제하기 때문에 마지막 값을 넣어주고 싶다면 실제 인덱스 값에 1을 더해준다
- slice는 array 값 자체를 변경시키는것이 아니라 배열에서 가져오고 싶은 부분만 return해준다
const array = [1, 2, 3, 4, 5];
const result = array.slice(2, 5);
console.log(result);
console.log(array);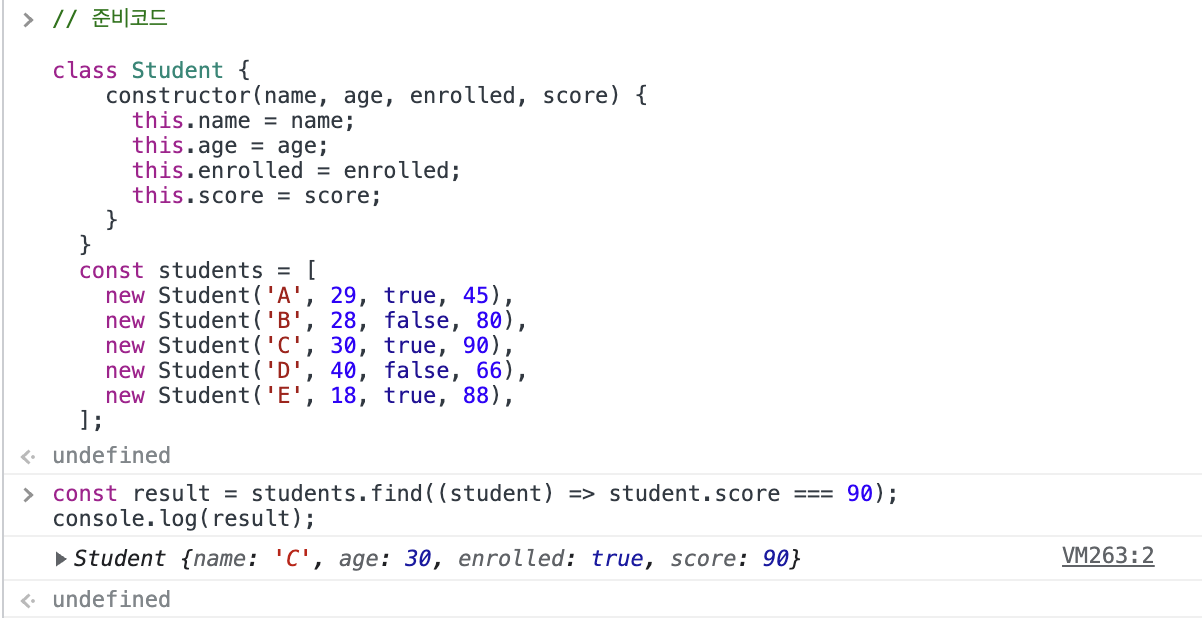
Find
- 클래스의 특정 필드를 찾는 메서드
- 배열 내부에서 원하는 조건에 해당하는 값을 리턴한다
- 만약 배열 내에 값이 두 개 이상이라면, return 의 속성대로 제일 먼저의 값을 반환한다
- find는
배열.find(콜백함수(파라미터)){내용, 리턴}형식을 사용하며, 콜백함수를 만들어서 전달해야함 → Arrow Function 이 가능하다- 파라미터로는 value, index
- true값이 리턴이 된다면 멈추게 된다
// 준비코드

class Student {
    constructor(name, age, enrolled, score) {
      this.name = name;
      this.age = age;
      this.enrolled = enrolled;
      this.score = score;
    }
  }
  const students = [
    new Student('A', 29, true, 45),
    new Student('B', 28, false, 80),
    new Student('C', 30, true, 90),
    new Student('D', 40, false, 66),
    new Student('E', 18, true, 88),
  ];
const result = students.find((student) => student.score === 90);
console.log(result);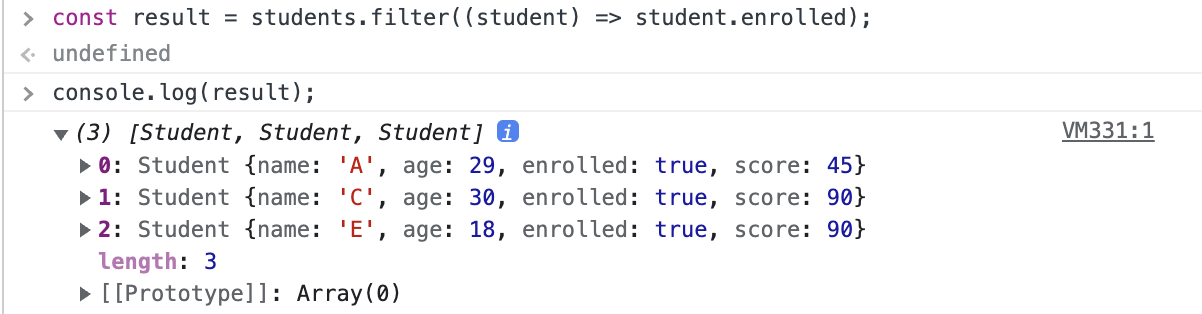
Filter
- 조건dl true인 값에 해당하는 오브젝트를 찾아서 배열로 초기화하기
배열.filter(콜백함수(파라미터){내용 리턴})형식으로 작성한다- find 메서드는 한 개의 오브젝트를, filter 메서드는 여러 개의 오브젝트가 들어간 배열을 반환한다
const result = students.filter((student) => student.enrolled);
console.log(result);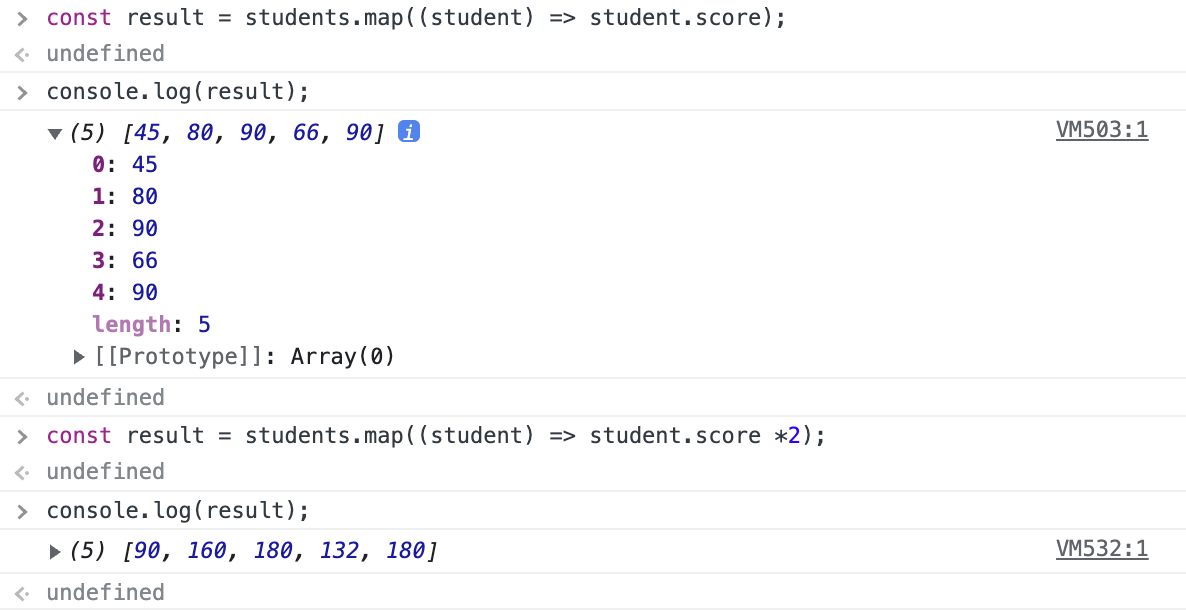
Map
- 특정 필드만 들어있는 배열을 가져오기
- 배열 안에 들어있는 요소 한 가지 한 가지를 다른 것으로 변환하는 것을 의미함
배열.map(콜백함수(파라미터){내용 리턴}형식으로 작성하게 된다- 콜백함수의 파라미터 네이밍이 중요하다!
const result = students.map((student) => student.score);
console.log(result);
Some, Every
- some 메서드는 배열 내부의 오브젝트 중 특정 조건에 해당하는지 참 거짓을 반환한다
배열.some(콜백함수(파라미터) {내용, 리턴}형식으로 작성한다
const result = students.some((student) => student.score < 50);
console.log(result);

const result2 = !students.every((student) => student.score >= 50);
console.log(result2);
- every메서드는 배열 내부의 오브젝트 중 특정 조건이 모두 해당하는지 참 거짓을 반환한다
배열.every(콜백함수(파라미터) {내용, 리턴})형식으로 작성한다
Reduce
- reduce는 배열 내부 특정 필드의 모든 요소의 값을 누적하는 메서드
- 반복문은 누적값과 누적할 다음값으로 나뉘어 두개를 한 번에 비교하게 된다.
- 메서드의 리턴 값은 반복을 돌면서 누적한 값을 넣게 된다
배열.reduce((이전값,지금값) {비교, 리턴(이전값으로 돌아감)}형식으로 작성한다- 누적을 시작할 값을 지정해주는 것으로 시작하게 된다
const result = students.reduce((prev, curr) => prev + curr.score, 0);
console.log(result / students.length);
Sort
- 50점 이상인 학생들의 점수 값을 문자열로 변환
const result = students
      .map((student) => student.score)
      .filter((score) => score >= 50)
      .join();
    console.log(result);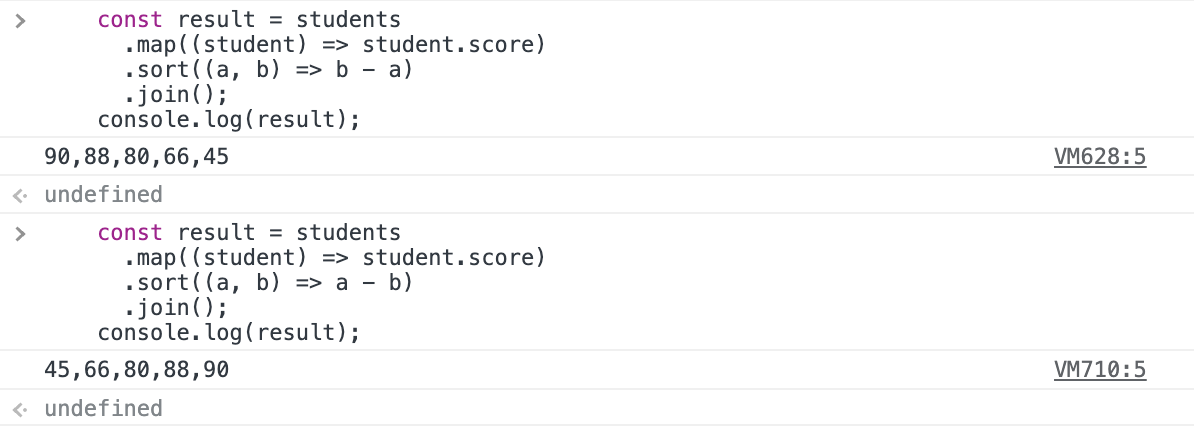
- 학생들의 점수를 오름차순으로 정렬해서 배열로 가져오기
- sort메서드를 사용해서 필드 요소를 정렬할 수 있다
- 값을 비교해서 오름차순, 내림차순을 결정할 수 있다
.sort((a,b) ⇒ a-b)형식으로 작성한다(오름차순, 내림차순은 b-a)
const result = students
      .map((student) => student.score)
      .sort((a, b) => b - a)
      .join();
    console.log(result);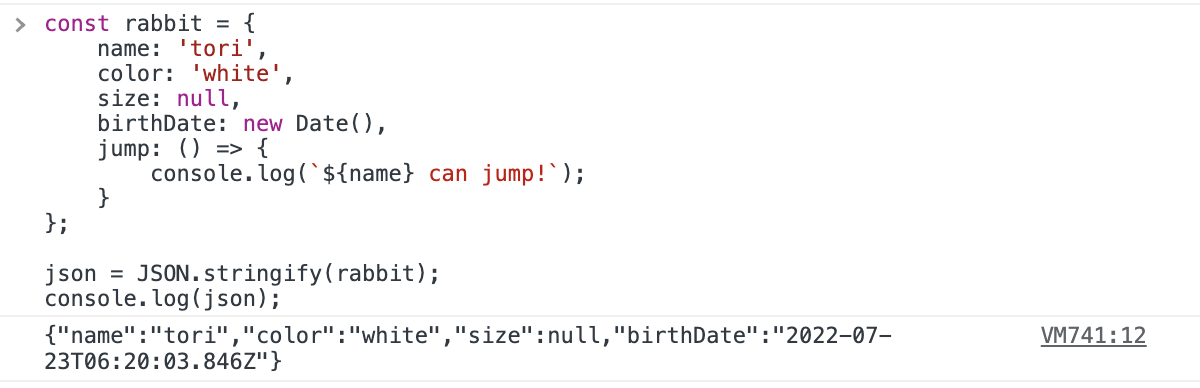
📌 JSON
자바스크립트 10. JSON 개념 정리 와 활용방법 및 유용한 사이트 공유 JavaScript JSON | 프론트엔드 개발자 입문편 (JavaScript ES6)
HTTP
- HTTP란?
- 브라우저 위에서 동작하고 있는 클라이언트가 어떻게 서버와 통신할 수 있는가? 에 대해서 정리한 것이 HTTP(Hypertext Transfer Protocol)
- 어떻게 Hypertext를 주고 받을 수 있는지 약속한 HTTP는
- 클라이언트가 서버에게 데이터를 REQUEST하고
- 서버는 데이터를 사용할 수 있게 RESPONSE 를 받는다
- Hypertext는 문서, 이미지, 링크를 모두 포함하는 포괄적 의미
- 통신
- Hypertext를 넘기기 위해서 사용하는 것이 AJAX통신이다
- Asynchronous Javascript And XML
- 웹페이지에서 동적으로 서버에 주고 받을 수 있게 하는 기술
- fetch API를 통해 간편하게 통신할 수 있다
- 데이터
- XML은 markup 언어로 데이터를 표현할 수 있는 언어를 의미하고, 기존에 많이 사용되었던 언어
- 서버와 데이터를 주고받을 때는 XML을 여전히 사용하기도 하지만 JSON을 많이 활용한다
- JSON
- ES3에서 생긴 Object 선언방식을 보고 만들어진 데이터 언어로, 오브젝트 선언과 비슷하게
key:value파일 포맷 형식으로 작성한다 - 프로그래밍 언어의 플랫폼과 관계없이 범용적으로 사용할 수 있다 (1티어)
- JSON을 사용하면 데이터를 string 타입으로 전송하고, 서버에서 string 타입으로 돌려준다
- ES3에서 생긴 Object 선언방식을 보고 만들어진 데이터 언어로, 오브젝트 선언과 비슷하게
Object to JSON
JSON.이라는 메서드를 기본으로 사용한다- 통신하기 위해 Serialize
-
stringify
stringify메서드는JSON.메서드의 내부 함수이며 오브젝트를 받아서 string으로 변환해주는 기능을 수행한다- 콜백함수에 값을 정의해준다면(문서참조) 좀 더 세밀하게 통제할 수 있음
json = JSON.stringify(['apple', 'banana']); console.log(json);- JSON 형식으로 변환하면 기본 규칙에 의해 single quote(’’)에서 double quote(””)로 고정적으로 변환된다
- 키값과 문자열은 고정적으로 double quote를 사용하며, 이는 변동사항을 허용하지 않는다
const rabbit = {
	name: 'tori',
	color: 'white',
	size: null,
	birthDate: new Date(),
	jump: () => {
		console.log(`${name} can jump!`);
	}
};

json = JSON.stringify(rabbit);
console.log(json);
- 위와 같은 오브젝트에서 JSON으로 시리얼라이즈를 진행할 때 몇 가지의 예외사항이 있다
- JSON의 공통형식에 포함되지 않는 Javascript의 독자적인 형태인 symbol과 같은 자료형은 포함되지 않는다
- 함수는 참조하고 있는 것이 데이터가 아닌 레퍼런스이므로 JSON에 포함되지 않는다
- JSON에서 하나만 보내주고 싶은 밸류가 존재한다면 `JSON.stringify(오브젝트, [키값], [키값] ..)`의 형식으로 적는 것으로 원하는 프로퍼티만 보내주는 것도 가능하다
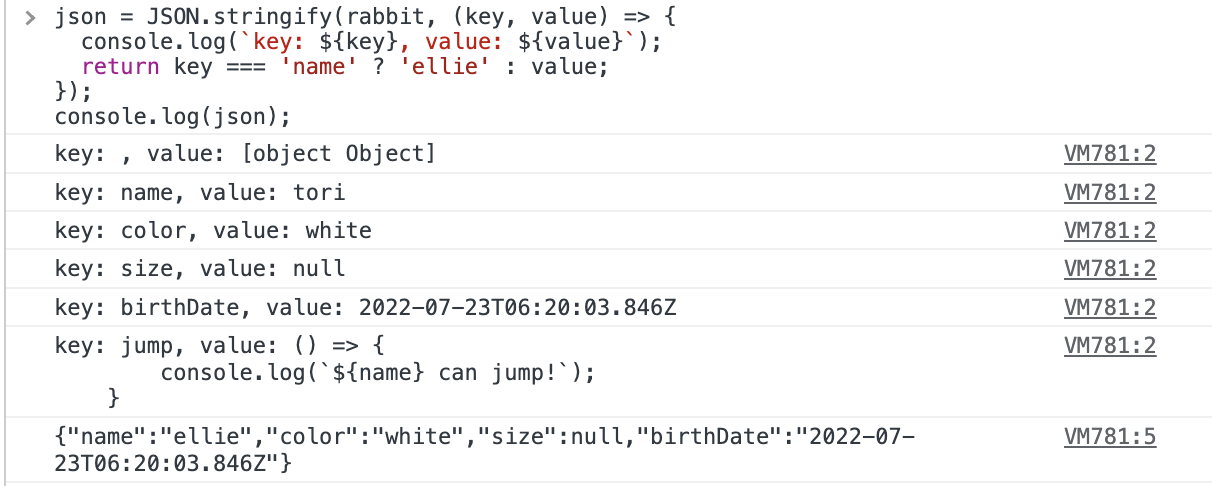
- JSON에서 조금 더 세밀하게 사용하는 방법으로 콜백함수를 사용하는 방법이 있다
- 아래와 같이 코드를 작성하면, 오브젝트부터 불러오기 시작해서 각 필드 값을 출력한다
```jsx
json = JSON.stringify(오브젝트, (key, value) => {
console.log(`key : ${key}, value: ${value}`);
return key === 'name' ? 'ellie' : value;
}
console.log(json);
```
JSON to Object
- 서버에 통신내용을 받기 위해 Deserialize
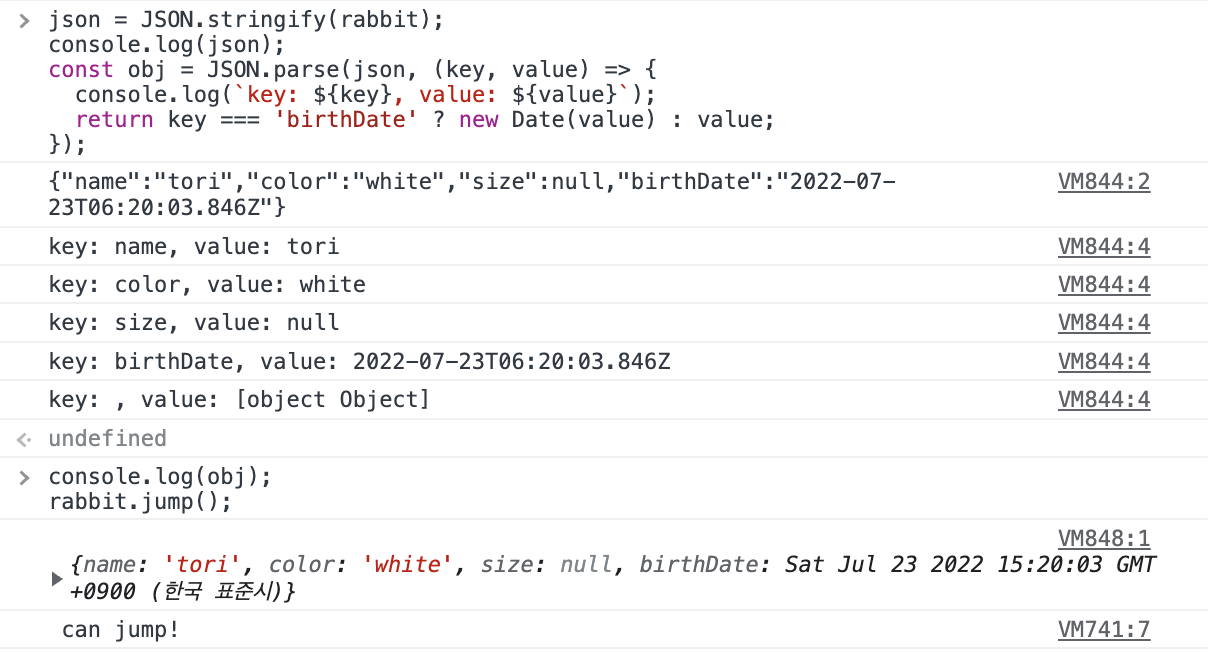
JSON.parse(JSON데이터)메서드를 사용해서 데이터를 변환해주기만 하면 된다!- 그러나 시리얼라이저에서 사용했던 오브젝트 내부의 함수와 독자적인 변수와 같은 내용들은 JSON에 포함되어 있지 않았기 때문에 파싱한 데이터에는 기존 내용이 당연히 존재하지 않는다!
const json = JSON.stringify(rabbit)
const data = JSON.parse(json)- stringify 메서드로 시리얼라이즈를 진행할 때, 오브젝트 내부에 있던 변수로 할당된 오브젝트 또한 문자열로 변환되기 때문에 해당 오브젝트 내부의 메서드는 parse 메서드로 까보면 쓸 수가 없다. (문자열이니까!)
- 그러나 revival 메서드를 통해서 다시 사용할 수 있게 살려낼 수도 있다!
- 콜백함수인 revival은
parse(JSON데이터, (키, 밸류) {내용 리턴})형식으로 작성한다
obj = JSON.parse(json, (key, value) => {
	console.log(`key : ${key}, value: ${value}`);
	return key === 'birthDate' ? new Date(value) : value;
}
console.log(rabbit.birthDate.getDate();
console.log(obj.birthDate.getDate();

JSON References
Best JSON Viewer and JSON Beautifier Online
JSON Parser Online to parse JSON
📌 Callback
자바스크립트 11. 비동기 처리의 시작 콜백 이해하기, 콜백 지옥 체험 😱 JavaScript Callback | 프론트엔드 개발자 입문편 (JavaScript ES6)
동기와 비동기
- Synchronous(동기)
- Javascript는 동기적 특성을 가지고 있다 ← 스크립트를 실행하는 순간 한꺼번에 읽음
- 또한 Javascript는 hoisting에 의해 읽는 순서가 제각각이다 ← var, function hoisting에 의해 특정 코드가 선언과 동시에 읽는 순서 중요도가 맨 위로 올라감
- 이러한 특성을 바탕으로 Javascript가 정한 순서대로 코드를 한 번에 읽어서 한 번에 처리 및 출력을 수행하게 되는 것을 Synchronous(동기) 라고 한다
// synchronous. 코드 전체를 읽어 순서대로 실행됨
console.log(1);
console.log(2);
console.log(3);
- Asyncronous(비동기)
- 프로그램은 동기적 특성에 의해서만 작동되지는 않는다.
- 예를 들어, 1초 뒤에 코드가 실행되기를 원해
setTimeout메서드를 작성하여 코드를 1초 뒤에 실행하게 된다면, 그것은 즉시 실행하는 동기적 특성과는 다르다.- 코드가 1초 뒤에 실행된다면, 코드가 즉시 실행되는 동기적 특성을 막았기 때문이다
- 이렇게 특정한 조건 상황에서 코드가 즉시 실행되는 것을 방지하기 위해 작성하는 것이 Asyncronous(비동기) 라고 한다
// asynchronous. 코드 전체를 읽었지만 특정 코드가 순서대로 실행되지는 않았다
console.log(1);
setTimeout(()=>console.log(2),1000);
console.log(3);- Callback Function
- 콜백 함수는 함수안에 파라미터로 함수를 넣어 순차적으로 함수를 실행시켜주기 위한 함수이다.
- 콜백 함수 또한 동기와 비동기를 위한 방식을 사용할 수 있다.
-
Synchronous Callback
function printImmediately(print){ console.log('즉시 호출하는 동기 콜백'); print(); } printImmediately(print() => console.log('hello')); -
Asynchronous Callback
function printWithDelay(print, timeout) {
	console.log('호출을 막는 비동기 콜백');
	setTimeout(print, timeout);
}
printWithDelay(setTimeout() => console.log('async callback'), 200);
필요한게 1번함수 선언, 2번함수 선언, console.log, 시간제한, 호출
- 잠깐 짚고 넘어가는 콜백 함수의 Arrow Function으로 만들기
-
Q. 에어컨을 작동하는 프로그램을 작성해보기
- 전원을 넣어 에어컨을 켬
- 콜백 함수로 에어컨 온도를 조절함// 콜백 함수. 일반 버전 let power = false; let temp = 22; function 온오프(power, callback){ if (power === false){ power=true; console.log('전원이 켜졌습니다'); callback(temp); } else if (power === true) { power=false; console.log('전원이 꺼졌습니다'); } else { console.log('잘못된 입력값입니다');} return power; } function 온도조절(temp){ let now_temp = temp; console.log(`현재 에어컨 온도는 ${now_temp}입니다`); } power = 온오프(power, 온도조절);// 콜백 함수. 애로우 펑션 버전 let power = false; let temp = 22; function 온오프(power, callback){ if (power === false){ power=true; console.log('전원이 켜졌습니다'); callback(temp); } else if (power === true) { power=false; console.log('전원이 꺼졌습니다'); } else { console.log('잘못된 입력값입니다');} return power; } power = 온오프(power, (temp)=> { let now_temp = temp; console.log(`현재 에어컨 온도는 ${now_temp}입니다`); });
-
- 잠깐 짚고 넘어가는 콜백 함수의 Arrow Function으로 만들기
-
Callback hell
- 콜백 함수는 단일로 사용하면 정말 효율적이지만, 콜백을 계속 타고 들어가다보면 굉장히 비효율적으로 움직이게 되는 콜백 지옥에 빠지게 된다!
- 콜백체인을 쓸 수록 길어지는 코드는 매우 읽기 힘들다!
- 어디서 실행되는지 알기가 어렵게 된다!
class UserStorage {
  loginUser(id, password, onSuccess, onError) {
    setTimeout(() => {
      if (
        (id === 'ellie' && password === 'dream') ||
        (id === 'coder' && password === 'academy')
      ) {
        onSuccess(id);
      } else {
        onError(new Error('not found'));
      }
    }, 2000);
  }

getRoles(user, onSuccess, onError) {
    setTimeout(() => {
      if (user === 'ellie') {
        onSuccess({ name: 'ellie', role: 'admin' });
      } else {
        onError(new Error('no access'));
      }
    }, 1000);
  }
}

const userStorage = new UserStorage();
const id = prompt('enter your id');
const password = prompt('enter your passrod');
userStorage.loginUser(
  id,
  password,
  user => {
    userStorage.getRoles(
      user,
      userWithRole => {
        alert(
          `Hello ${userWithRole.name}, you have a ${userWithRole.role} role`
        );
      },
      error => {
        console.log(error);
      }
    );
  },
  error => {
    console.log(error);
  }
);
📌 Promise
자바스크립트 12. 프로미스 개념부터 활용까지 JavaScript Promise | 프론트엔드 개발자 입문편 (JavaScript ES6)
What is Promise?
- Promise는 비동기를 간편하게 해주는 Javascript 내장 오브젝트
- 비동기 수행을 위해 사용되며 콜백함수를 대체한다
- State: pending → fulfilled or rejected
- 프로미스의 상태는 프로미스가 만들어져서 오퍼레이션이 수행중일 때는 펜딩상태가 되고, 성공하면 fulfilled, 실패하면 rejected 상태가 된다
Promise 만들기
- Producer
new Promise((resolve, reject) => {})형태로 생성이 가능하다- 만들어낸 프로미스는 네트워크 통신, 파일을 읽는 등의 비교적 무거운 수행을 비동기로 처리한다
- 프로미스는 생성하는 순간 executor라는 콜백함수가 따로 호출하지 않아도 바로 실행됨
- 유의해야 할점은 이 executor가 바로 실행되기 때문에 네트워크 요청을 프로미스 내부에 써놓으면, 필요없을 때도 실행해서 괜히 불필요하게 반복작업을 요청하게 되므로 주의해서 작성하기!
const promise = new <Promise((resolve, reject) => {
  // doing some heavy work (network, read files)
  console.log('doing something...');
  setTimeout(() => {
    resolve('ellie');
    // reject(new Error('no network'));
  }, 2000);
});- 프로미스를 생성하고 → 네트워크 통신하는 것처럼 setTimeout 줘보기 → 통신이 완료되었다는 전제 하에
resolve()메서드 사용해서 네트워크에서 받아온, 파일을 읽어온 데이터를 바탕으로 값을 적어 전달한다 - 통신이 실패되었다는 전제 하에
reject(new Error(’error message’));메서드를 사용해서 네트워크 통신이 실패했다는 것을 오류를 담아 전달한다
- Consumer
then, catch, finally메서드를 사용한다- 프로미스 요청이 resolve 메서드를 통해 완료되었다는 것을 인지하고, then 메서드를 작성하여 전달한 데이터를 받아온다
- 프로미스 요청이 reject 메서드를 통해 실패했다는 것을 인지하고, catch 메서드를 작성하여 전달한 오류를 받아온다
- finally 메서드는 성공 실패와 관련없이, 코드의 마지막에 작성해주고 싶을 때 사용하는 메서드. 콜백함수에 인자값 없이 그냥 작성하면 된다
// then 메서드. 성공 케이스 핸들링
prmoise //
.then(value => {
	console.log(value);
});
.catch(error => {
	console.log(error);
});
.finally(() => {
	console.log('finally');
});
Promise Chaining
- 여러 개의 Promise를 연결하여 연속된 처리를 진행할 수 있다. ← 콜백을 대체
- then 메서드는 값을 바로 줄 수도 있지만, Promise를 전달할 수도 있다
const fetchNumber = new Promise((resolve, reject) => {
	setTimeout( ()=> resolve(1), 1000);
});

fetchNumber
	.then(num => num * 2)
	.then(num => num * 3)
	.then(num => {
		return new Promise((resolve, reject) => {
			setTimeout(() => resolve(num-1), 1000);
		});
})- 통신을 통해서 값 1이라는 정수를 받았다
- 1이라는 정수를 바로 전달하지 않고, 일정한 로직을 다시 통과함
- 곱하기 2
- 곱하기 3
- 새로운 프로미스 생성 후 resolve 빼기1 해서 넘겨줌
📌 Async & Await
자바스크립트 13. 비동기의 꽃 JavaScript async 와 await 그리고 유용한 Promise APIs | 프론트엔드 개발자 입문편 (JavaScript ES6)
Async & Await 를 쓰는 이유?
- 콜백함수는 함수를 순차적으로 실행시키기 위해 사용하지만 계속 콜백함수를 이용해 실행하게 되면 콜백체인, 콜백지옥이라고 불리는 단점을 가지고 있다
- 이를 해결하기 위해 프로미스를 사용해서 콜백지옥을 간결하게 작성할 수 있지만, 여전히 HTTP 통신을 위한 API작성에서는 프로미스 또한 체이닝으로 길어지게 된다.
- Async와 Await를 사용하여 깔끔하게 Promise를 사용할 수 있게 된다
Async
- 백엔드에서 데이터를 가져오는데 10초 정도 걸리는 API가 존재한다고 했을 때, 이 함수를 동기로 처리한다면 10초동안 함수를 실행하기 위해 멈춰있을 것이다.
- ← 10초라는 시간 동안 다른 기능을 읽지 못하고 시간이 뜨게 된다
- function 키워드 앞에 async를 적어주는 것으로 Promise와 같은 역할을 수행한다
async function fetchUser() {
	return 'ellie';
}

const user = fetchUser();
user.then(console.log);
console.log(user);
Await
- Async 함수 안의 내용에 적는 것으로, Await를 다 받아와야 Async가 동기된다
function delay(ms) {
  return new Promise(resolve => setTimeout(resolve, ms));
}

async function getApple() {
  await delay(2000);
  return '🍎';
}
getApple();

async function getBanana() {
  await delay(1000);
  return '🍌';
}- 해설
- 위의 함수에서 2초라는 시간은 함수를 동기화 하기 전에 반드시 필요로 한다.
getApple() ;이라는 구문이 실행되기 위해서는 2초라는 시간을 들이고, 리턴 사과를 한 다음에 비로소 구문이 정상적으로 작동된다.
- 위의 해설을 바탕으로 정리한 Async와 Await는 다음과 같다
- Async → 어웨이트가 끝나야 함수를 정상작동시키는 스위치
- Await → 2초라는 반드시 사용할 조건이 포함된 변수, 식
- 예시) 백엔드에서 로그인 데이터를 받아와야 하는 API
- Async → 로그인 리스폰스를 받고 내용이 전부 동기되었다면 실행되는 스위치
- Await → 백엔드로 로그인 Request를 보내고 Response 값을 받아야만 하는 변수
Await의 병렬처리
- Await는 Async 함수 내부에서 반드시 값을 받아야 다음으로 넘어갈 수 있게 만드는 일종의 브레이크 장치이다
async function pickFruits() {
  const apple = await getApple();
  const banana = await getBanana();
  return `${apple} + ${banana}`;
}

async function pickFruits() {
  const applePromise = getApple();
  const bananaPromise = getBanana();
  const apple = await applePromise;
  const banana = await bananaPromise;
  return `${apple} + ${banana}`;
}- 해설
- 위의 함수는 1초의 딜레이를 필요로하는 함수 두 개를 Await 하고 있다
- 그런데 1초 간의 딜레이를 주는 함수 2개를 각각 Await를 해준다면
- 함수가 각각 실행이 끝날 때까지 다음 줄을 읽지 못하게 하기 때문에 1초 리턴→1초 리턴 과 같은 방식으로 총 2초를 소요하게 된다
- 받아야 하는 것은 리턴한 데이터 밸류만 받고 넘어가면 되므로, 함수를 동시에 실행해서 나온 결과만 받았다면 브레이크를 풀어주는 것이 함수 동시실행 1초&1초 → 리턴 으로 1초 더 빠르게 결과 값을 도출할 수 있게 된다
- 위의 함수는 1초의 딜레이를 필요로하는 함수 두 개를 Await 하고 있다
Promise APIs
- 위의 Async & Await를 Promise와 Arrow Function으로 효율적으로 작성해보자
function pickAllFruits() {
	return Promise.all([getApple(), getBanana()]).then(fruits => fruits.join(' + ')
	);
}
pickAllFruits().then(console.log);Promise.all()을 이용해 함수 모두를 리턴해줄 하나의 프로미스로 작성한다.then메서드로 리턴한 값을 활용하게 되는데,- fruits라는 가상변수로
getApple(),getBanana()의 리턴 값을 가져와서 join(’ + ‘)메서드로 사과 + 바나나 로 붙여줘서 리턴한다- 함수를 호출하고 리턴된 값을 콘솔로그로 찍어본다
- fruits라는 가상변수로
- Promise Race
-
Promise.race([getApple(),getBanana()])를 이용하면 리스트 내에 제일 먼저 받는 값만 리턴해줄 수 있다function pickOnlyOne() { return Promise.race([getApple(), getBanana()]); } pickOnlyOne().then(console.log);
-