댓글을 작성하는 API를 호출할 때 페이지 전체가 새로고침 되지 않도록 AJAX를 사용하여 비동기적으로 댓글을 작성하는 기능을 구현해야 합니다.
DB 테이블 추가
작성된 댓글을 저장할 테이블을 추가해줍니다.
CREATE TABLE comments (
    id BiGINT AUTO_INCREMENT PRIMARY KEY,
    board_id BIGINT NOT NULL,
    user_id BIGINT NOT NULL,
    content TEXT NOT NULL,
    created_at DATETIME,
    FOREIGN KEY(user_id) REFERENCES user(id),
    FOREIGN KEY(board_id) REFERENCES board(id)
);
Entity 생성
Comment
@Entity
@Data
@Table(name = "comments")
public class Comment {
    @Id
    @GeneratedValue(strategy = GenerationType.IDENTITY)
    private Long id;

    @Column(name = "user_id")
    private Long userId;

    @Column(name = "board_id")
    private Long boardId;

    @Column(name = "content")
    private String content;

    @Column(name = "created_at")
    private LocalDateTime createdAt;

    @Column(name = "user_name")
    private String userName;
}
Repository 생성
CommentRepository
@Repository
public interface CommentRepository extends JpaRepository<Comment, Long> {
    List<Comment> findByBoardId(Long boardId);
}
Service 생성
CommentService
@Service
public class CommentService {

    private final CommentRepository commentRepository;

    public CommentService(CommentRepository commentRepository) {
        this.commentRepository = commentRepository;
    }

    //댓글 작성
    public Comment createComment(Comment comment) {
        Authentication authentication = SecurityContextHolder.getContext().getAuthentication();
        String currentUserName = authentication.getName();
        comment.setCreatedAt(LocalDateTime.now());
        comment.setUserName(currentUserName);
        return commentRepository.save(comment);
    }
    //댓글 수정

    public Comment updateComment(Long id, Comment comment) {
        Comment existingComment = commentRepository.findById(id)
                .orElseThrow(() -> new IllegalArgumentException("Invalid comment id: " + id));
        existingComment.setContent(comment.getContent());
        existingComment.setCreatedAt(LocalDateTime.now());
        return commentRepository.save(existingComment);
    }

    //댓글 삭제
    public void deleteComment(Long id) {
        commentRepository.deleteById(id);
    }

    //게시글에 있는 댓글 가져오기
    public List<Comment> findByBoardId(Long boardId) {
        return commentRepository.findByBoardId(boardId);
    }

    //메소드 수준에서 권한 체크를 하기 위한 코드
    public boolean isCommentAuthor(Long id, String username) {
        Comment comment = commentRepository.findById(id).orElseThrow(() -> new IllegalArgumentException("Comment not found with id: " + id));
        return comment.getUserName().equals(username);
    }
}
Authentication을 사용하여 현재 로그인한 사용자의 이름을 가져와서
댓글 DB에 작성자 이름으로 저장을 해줍니다.
Service 수정
UserService
public User findByUsername(String username){
        return userRepository.findByUsername(username);
    }
username과 일치는 User 객체를 찾아 리턴하는 메소드입니다.
Controller 수정
BoardController
post.html에 대한 GetMapping을 수정해줍니다.
@GetMapping("/post")
    public String post(Model model, @RequestParam(required = false) Long id, Principal principal){
        Board board = boardRepository.findById(id).orElse(null);
        List<FileData> files = fileService.findByBoardId(id);
        List<Comment> comments = commentService.findByBoardId(id);
        User user = userService.findByUsername(principal.getName());
        model.addAttribute("board", board);
        model.addAttribute("files", files);
        model.addAttribute("comments", comments);
        model.addAttribute("userId", user.getId());
        return "board/post";
    }
model을 이용하여 댓글 내용과 userId 값을 넘겨줍니다.
ApiController 생성
CommentApiController
@RestController
@RequestMapping("/api/comments")
public class CommentApiController {
    private final CommentService commentService;

    public CommentApiController(CommentService commentService) {
        this.commentService = commentService;
    }

    @PostMapping
    public ResponseEntity<Comment> createComment(@RequestBody Comment comment) {
        return ResponseEntity.ok(commentService.createComment(comment));
    }

@PreAuthorize("@commentService.isCommentAuthor(#id, authentication.name)")
    @PutMapping("/{id}")
    public ResponseEntity<Comment> updateComment(@PathVariable Long id, @RequestBody Comment comment) {
        return ResponseEntity.ok(commentService.updateComment(id, comment));
    }


    @PreAuthorize("hasRole('ADMIN') or @commentService.isCommentAuthor(#id, authentication.name)")
    @DeleteMapping("/{id}")
    public ResponseEntity<Void> deleteComment(@PathVariable Long id) {
        commentService.deleteComment(id);
        return ResponseEntity.noContent().build();
    }

}
ResponseEntity
ResponseEntity는 Spring Framework에서 HTTP 응답을 나타내는 클래스입니다.
클라이언트가 GET 요청을 보내고 서버에서 이 요청에 대한 응답으로 ResponseEntity 객체를 반환한다면, ResponseEntity 객체는 서버 측에서 생성된 데이터를 포함하는 HTTP 응답으로 클라이언트에게 반환됩니다. ResponseEntity 클래스는 다양한 HTTP 상태 코드 (예: 200, 404, 500 등)를 반환할 수 있으며, HttpHeaders 객체와 같은 추가 메타데이터를 포함할 수도 있습니다.
ResponseEntity 클래스를 사용하여 Comment에 대한 응답을 리턴해줍니다.
ResponseEntity.ok()는 HTTP 상태 코드 200 (OK)와 함께 빈 본문을 갖는 ResponseEntity 객체를 반환하는 정적 팩토리 메소드입니다. 이 메소드는 성공적인 요청에 대한 응답을 생성하는 데 사용됩니다.
@PreAuthorize
해당 메소드를 실행하기 전에 사용자가 특정한 권한을 가지고 있는지 확인합니다.
@commentService
스프링 프레임워크에서 제공하는 애노테이션 중 하나로, 해당 애노테이션이 적용된 클래스를 서비스 클래스로 지정하는 역할을 합니다.
게시글 페이지
post.html
thymeleaf
<!-- 댓글 입력폼 -->
<form id="comment-form">
    <input type="text" id="comment-content">
    <button type="submit">작성</button>
</form>
<!-- 댓글 목록 -->
<ul id="comment-list" th:each="comment : ${comments}">
    <li>
        <p>작성자: <span th:text="${comment.userName}"></span></p>
        <span th:text="${comment.content}" class="comment-content"></span>
        <div>
            <span th:if="${comment.userName == #authentication.name}">
                <button class="edit-button" th:data-id="${comment.id}">수정</button>
            </span>
                    <span th:if="${#authorization.expression('hasAuthority(''ROLE_ADMIN'')')}">
                <button class="delete-button" th:data-id="${comment.id}">삭제</button>
            </span>
        </div>
        <form class="edit-form" style="display: none;">
            <input type="text" class="edit-content" value="${comment.content}">
            <button type="submit">확인</button>
        </form>
        <span th:text="${#temporals.format(comment.createdAt, 'yyyy-MM-dd HH:mm:ss')}" class="comment-created-at"></span>
    </li>
</ul>
댓글 작성 script
//댓글 수정
    $(document).on('click', '.edit-button', function() {
        let commentId = $(this).data('id');
        let commentLi = $(this).closest('li');
        let commentContent = commentLi.find('.comment-content');
        let editForm = commentLi.find('.edit-form');
        let editContent = editForm.find('.edit-content');

        commentContent.hide();
        editForm.show();
        editContent.val(commentContent.text());
    });

    $(document).on('submit', '.edit-form', function(e) {
        e.preventDefault();
        let commentLi = $(this).closest('li');
        let commentId = commentLi.find('.edit-button').data('id');
        let commentContent = commentLi.find('.comment-content');
        let editForm = $(this);
        let editContent = editForm.find('.edit-content');

        $.ajax({
            url: '/api/comments/' + commentId,
            type: 'PUT',
            contentType: 'application/json',
            data: JSON.stringify({
                content: editContent.val()
            }),
            success: function() {
                commentContent.text(editContent.val());
                editForm.hide();
                commentContent.show();
            }
        });
    });
    // 댓글 삭제
    $(document).on('click', '.delete-button', function () {
        let id = $(this).data('id');
        $.ajax({
            type: 'DELETE',
            url: '/api/comments/' + id,
            success: function () {
                // 댓글 삭제
                $('button[data-id="' + id + '"]').closest('li').remove();
            }
        });
    });
$('#comment-form').submit() 함수는 댓글 작성 폼이 제출될 때 실행됩니다.
event.preventDefault(); 는 브라우저가 폼을 서버로 전송하려는 동작을 막습니다.
let content = $('#comment-content').val(); 는 사용자가 댓글 작성 폼에 입력한 내용을 변수에 저장합니다.
$.ajax() 는 AJAX 요청을 보내고, 서버로부터 응답을 받습니다. 요청 방식은 POST이고, 요청 URL은 '/api/comments' 입니다.
contentType: 'application/json', 는 요청의 content-type이 JSON임을 명시합니다.
data: JSON.stringify({ content: content, boardId: boardId, userId: userId }) 는 요청 본문에 보낼 데이터를 지정합니다. 이 코드에서는 content, boardId, userId를 JSON으로 변환한 데이터가 요청 본문에 포함됩니다.
success: function () { location.reload(); } 는 AJAX 요청이 성공하면 현재 페이지를 새로고침합니다. 이렇게 함으로써, 새로 작성된 댓글이 즉시 화면에 나타납니다.
즉, 이 코드는 댓글 작성 폼이 제출될 때 AJAX 요청을 보내어 비동기식으로 댓글을 생성하고, 페이지를 새로고침하여 댓글이 반영되도록 하는 코드입니다.
댓글 수정 script
//댓글 수정
$(document).on('click', '.edit-button', function() {
let commentId = $(this).data('id');
let commentLi = $(this).closest('li');
let commentContent = commentLi.find('.comment-content');
let editForm = commentLi.find('.edit-form');
let editContent = editForm.find('.edit-content');
commentContent.hide();
editForm.show();
editContent.val(commentContent.text());
});
$(document).on('submit', '.edit-form', function(e) {
e.preventDefault();
let commentLi = $(this).closest('li');
let commentId = commentLi.find('.edit-button').data('id');
let commentContent = commentLi.find('.comment-content');
let editForm = $(this);
let editContent = editForm.find('.edit-content');
$.ajax({
url: '/api/comments/' + commentId,
type: 'PUT',
contentType: 'application/json',
data: JSON.stringify({
content: editContent.val()
}),
success: function() {
commentContent.text(editContent.val());
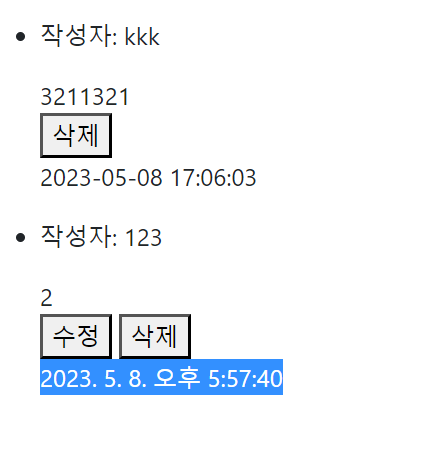
commentLi.find('.comment-created-at').text(new Date().toLocaleString('ko-KR', {timeZone: 'Asia/Seoul'})); // 수정 시간 업데이트
editForm.hide();
commentContent.show();
}
});
}); 첫 번째로, $('.edit-button')을 클릭하면 댓글 수정 폼이 나타나도록 이벤트 핸들러를 등록합니다. 이때, 클릭된 버튼에 대한 정보를 얻기 위해 data('id')를 이용해 해당 댓글의 ID를 가져옵니다. 그리고 closest('li')를 이용해 해당 댓글을 감싸는
find()를 이용해 해당 댓글 내용, 댓글 수정 폼, 댓글 수정 내용을 가져옵니다. 마지막으로, 댓글 내용을 숨기고, 댓글 수정 폼을 보여주고, 댓글 수정 내용을 댓글 내용으로 불러옵니다.
두 번째로, .edit-form에서 submit 이벤트가 발생하면 이벤트 핸들러를 실행합니다. 이때, 댓글 수정 폼 내부에서 수정된 댓글 내용을 가져와서, $.ajax() 함수를 이용해 서버에 PUT 요청을 보냅니다. PUT 요청 URL은 /api/comments/{commentId}로, {commentId} 부분에는 클릭된 버튼의 data('id')로 얻은 댓글 ID를 넣습니다. 데이터 타입은 JSON으로 지정하고, 수정된 댓글 내용을 포함한 객체를 전송합니다. PUT 요청이 성공하면, 댓글 내용을 수정된 내용으로 갱신하고, 댓글 수정 폼을 숨기고, 댓글 내용을 보여줍니다.
toLocaleString('ko-KR', {timeZone: 'Asia/Seoul'})을 이용하여 수정시 한국 시간으로 표시를 해줍니다.
댓글 삭제 script
// 댓글 삭제
    $(document).on('click', '.delete-button', function () {
        var id = $(this).data('id');
        $.ajax({
            type: 'DELETE',
            url: '/api/comments/' + id,
            success: function () {
                // 댓글 삭제
                $('button[data-id="' + id + '"]').closest('li').remove();
            }
        });
    });
댓글 삭제 버튼을 클릭하면, 해당 댓글의 고유한 id를 가져와서 /api/comments/{id} URL로 DELETE 요청을 보냅니다. 서버에서는 해당 id를 가진 댓글을 삭제하고, 응답으로 성공 여부를 클라이언트에게 반환합니다.
성공적으로 댓글이 삭제되면, 클라이언트는 삭제된 댓글의 id와 일치하는 data-id 속성을 가진 버튼 요소를 찾아서 해당 요소의 가장 가까운 li 요소를 삭제합니다. 따라서 댓글이 삭제되면 화면에서도 사라지게 됩니다.
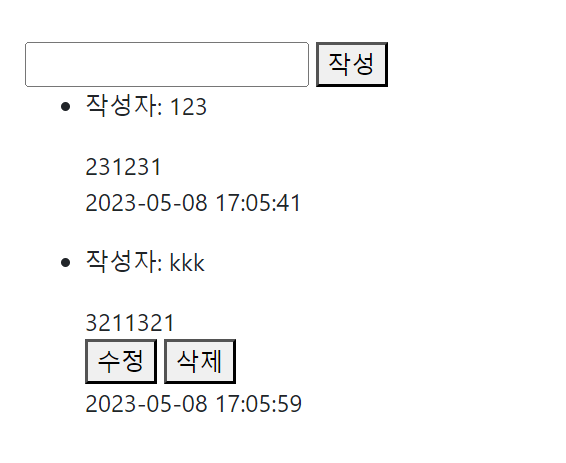
권한이 없는 댓글은 수정 및 삭제가 불가능합니다.
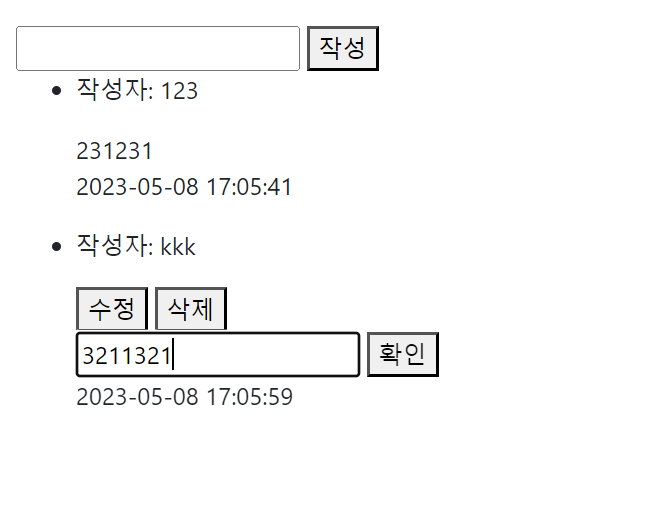
수정 시 새로운 입력창이 생기고 확인을 누르면 수정된 댓글이 반영됩니다.
현재 코드에서 수정을 하면 시간은 바뀌지만 시간을 표시하는 형식은 조금 다르게 표시됩니다.
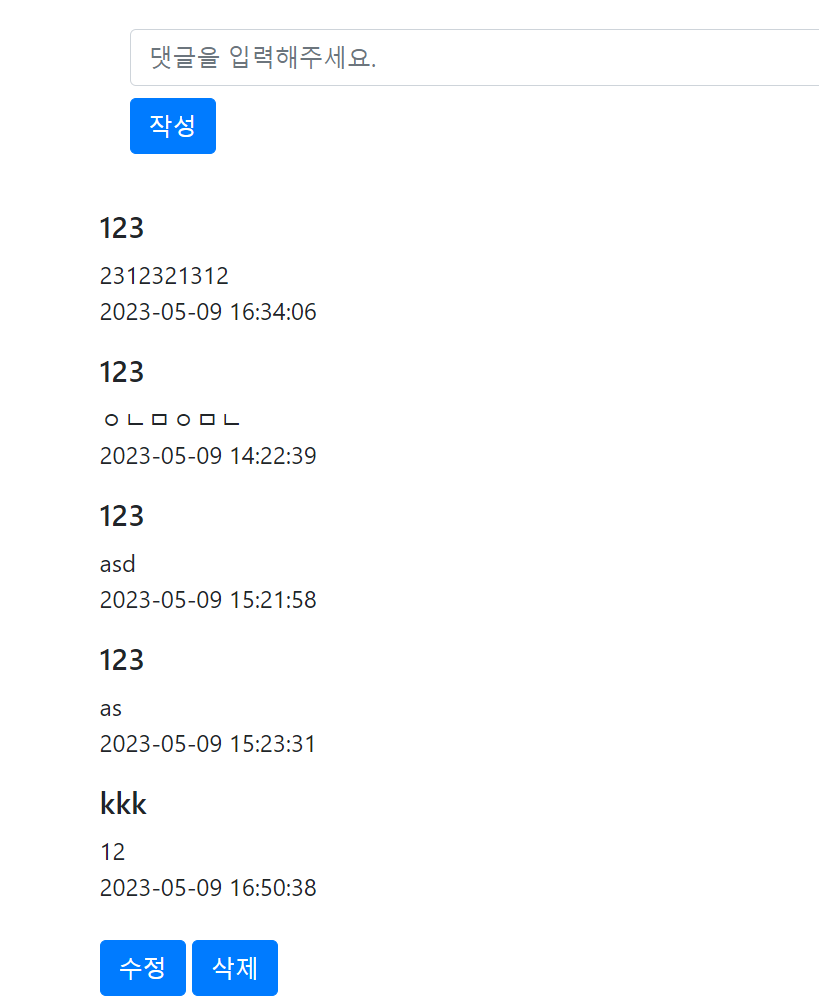
BootStrap을 이용하여 댓글창에 서식적용
댓글 폼
<!-- 댓글 작성 폼 -->
<div class="container">
    <div class="card-body">
        <form id="comment-form" class="form-group">
            <label for="comment-content" hidden>댓글 작성</label>
            <input type="text" id="comment-content" class="form-control" placeholder="댓글을 입력해주세요.">
            <button type="submit" class="btn btn-primary mt-2">작성</button>
        </form>
    </div>
</div>

<!-- 댓글 목록 -->
<div class="container">
    <ul id="comment-list" th:each="comment : ${comments}" class="list-unstyled">
        <li class="mb-3">
            <h5><span th:text="${comment.userName}"></span></h5>
            <span class="comment-content" th:text="${comment.content}"></span>
            <p><span class="comment-created-at"
                            th:text="${#temporals.format(comment.createdAt, 'yyyy-MM-dd HH:mm:ss')}"></span></p>
            <span th:if="${comment.userName == #authentication.name}">
                <button class="edit-button btn btn-primary mt-2" th:data-id="${comment.id}">수정</button>
            </span>
            <span th:if="${#authorization.expression('hasAuthority(''ROLE_ADMIN'')') or comment.userName == #authentication.name}">
                <button class="delete-button btn btn-primary mt-2" th:data-id="${comment.id}">삭제</button>
            </span>
            <form class="edit-form" style="display: none;">
                <input class="edit-content form-control" type="text" value="${comment.content}">
                <button class="btn btn-primary mt-2" type="submit">확인</button>
                <button class="btn btn-secondary mt-2 cancel-button" type="button">취소</button>
            </form>

        </li>
    </ul>
</div>
취소 버튼 script
$(document).on('click', '.cancel-button', function() {
        let commentLi = $(this).closest('li');
        let commentContent = commentLi.find('.comment-content');
        let editForm = commentLi.find('.edit-form');
        let button = commentLi.find('.edit-button')

        editForm.hide();
        button.show();
        commentContent.show();
});list-unstyled를 사용하여 ul의 불릿 기호를 제거해줍니다.
작성자는 h5 태그를 사용하여 댓글 내용보다 진하게 표시를 해주고 버튼들을 bootstrap을 이용하여 서식을 적용시켜줍니다.
수정시 나오는 입력폼에서 취소 버튼을 추가하여 취소 버튼을 누를 경우 입력폼이 숨겨지고 다시 댓글 창이 보이게 해줍니다.
댓글 수정 버튼 클릭 시 수정버튼을 가림
$(document).on('click', '.edit-button', function() {
        let commentId = $(this).data('id');
        let commentLi = $(this).closest('li');
        let commentContent = commentLi.find('.comment-content');
        let editForm = commentLi.find('.edit-form');
        let editContent = editForm.find('.edit-content');
        let editButton = commentLi.find('.edit-button');

        commentContent.hide();
        editForm.show();
        editButton.hide();
        editContent.val(commentContent.text());
    });
$(document).on('submit', '.edit-form', function(e) {
e.preventDefault();
let commentLi = $(this).closest('li');
let commentId = commentLi.find('.edit-button').data('id');
let commentContent = commentLi.find('.comment-content');
let editForm = $(this);
let editContent = editForm.find('.edit-content');
let editButton = commentLi.find('.edit-button')
$.ajax({
url: '/api/comments/' + commentId,
type: 'PUT',
contentType: 'application/json',
data: JSON.stringify({
content: editContent.val()
}),
success: function() {
commentContent.text(editContent.val());
commentLi.find('.comment-created-at').text(new Date().toLocaleString('ko-KR', {timeZone: 'Asia/Seoul'})); // 수정 시간 업데이트
editForm.hide();
editButton.show();
commentContent.show();
}
});
});수정 버튼을 클릭 시 수정 버튼을 안 보이게 처리를 하고 수정이 끝나고 확인을 눌러
success가 됐을 경우 다시 수정 버튼을 표시하게 JS를 수정해줍니다.
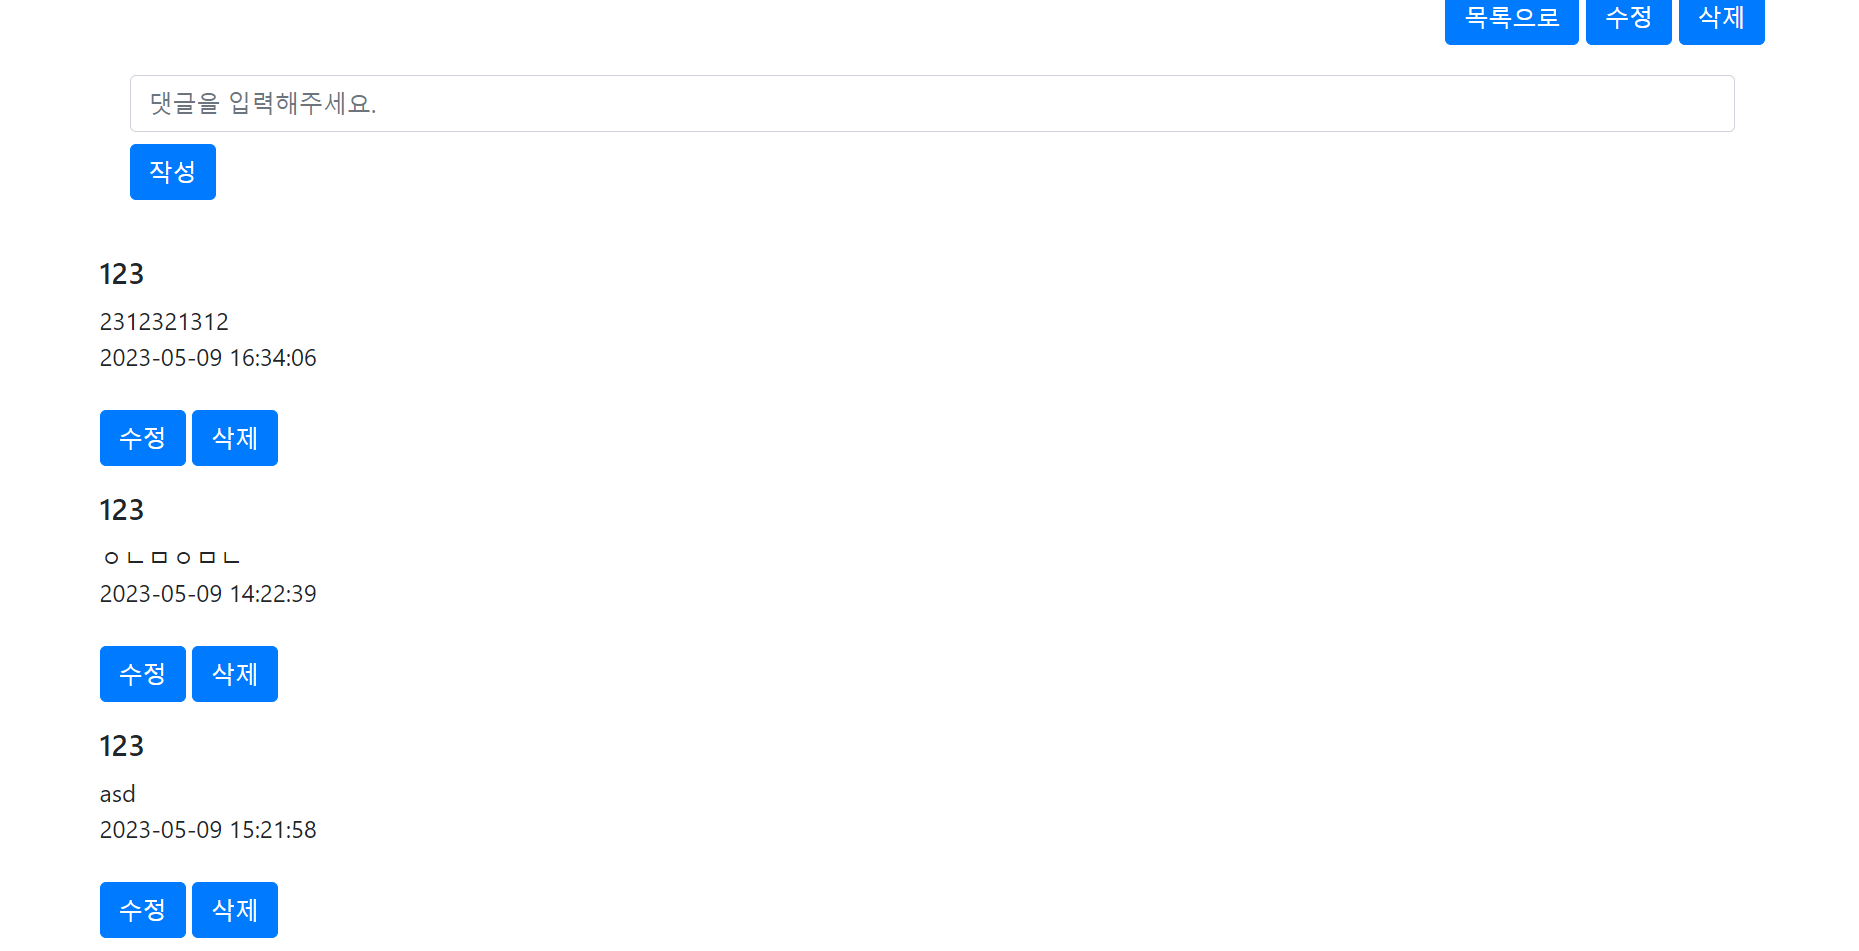
관리자 권한을 가지고 있는 사용자의 댓글창
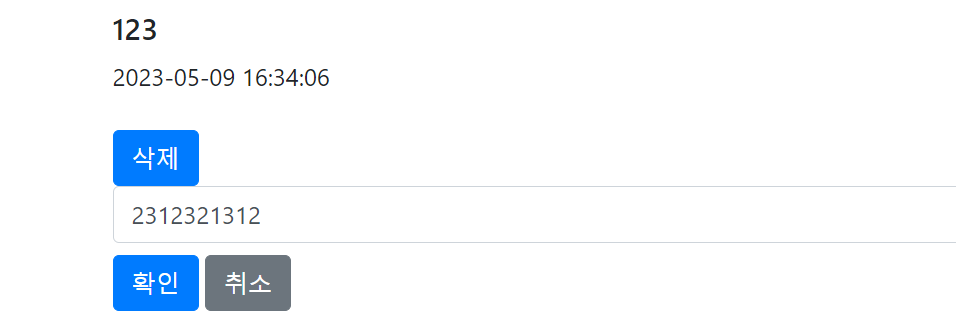
수정창
일반 유저의 댓글창