Documentation | NestJS - A progressive Node.js framework

개요
Nest (NestJS) is a framework for building efficient, scalable Node.js server-side applications. It uses progressive JavaScript, is built with and fully supports TypeScript (yet still enables developers to code in pure JavaScript) and combines elements of OOP (Object Oriented Programming), FP (Functional Programming), and FRP (Functional Reactive Programming).
Under the hood, Nest makes use of robust HTTP Server frameworks like Express (the default) and optionally can be configured to use Fastify as well!
Nest provides a level of abstraction above these common Node.js frameworks (Express/Fastify), but also exposes their APIs directly to the developer. This gives developers the freedom to use the myriad of third-party modules which are available for the underlying platform.
특징
- Typescript를 완벽히 지원되며 빌드된다.
- OOP( Object Oriented Programing ), FP( Functional Programming ),
FRP( Functional Reactive Programming)을 이용해 구현가능하다. - 기본적으로 Express 를 이용해 HTTP 통신을 구현했으며,
사용자가 다른 라이브러리(예를 들어, Fastify)를 사용하여 구성할 수도 있다. - NestJS는 일반적인 NodeJS의 프레임워크( Express, Fastify )의 추상화된 코드를 제공하며
개발자는 그 API들을 확인할 수 있도록 되어있다. - 테스트 가능하고 확장 가능하며 느슨하게 결합되고 유지 관리가 쉬운 어플리케이션을 만들 수 있는 아키텍쳐를 제공한다.
- 기본적으로 제공해주는 CLI Command가 있다.
FRP란?
함수형( Functional ) 프로그래밍 + 반응형( 비동기 )( Reactive ) 프로그래밍
설치
yarn global add @nestjs/cli
npx nest new project-name
기본 파일 구조
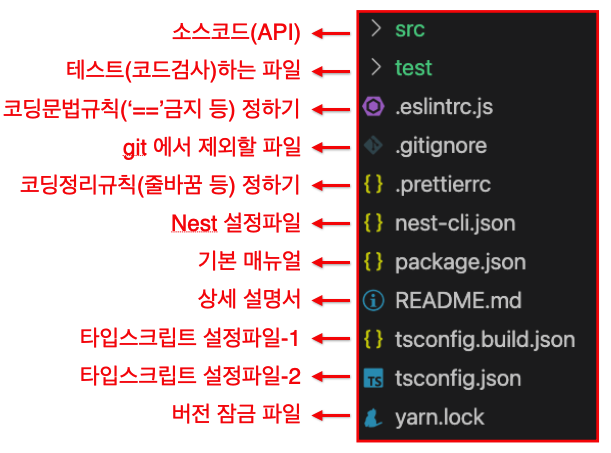 | 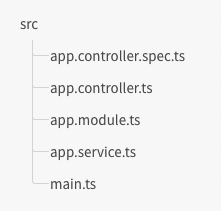 |
npx nest new project-name 을 입력하면 구성되는 폴더 구조
- 기본적으로 MVC 패턴을 바탕으로 구성되어있다.
| 이름 | 설명 |
|---|---|
| app.controller.ts | MVC에서 Controller에 해당한다. |
| app.service.ts | MVC에서 Service에 해당한다. |
| app.controller.spec.ts | Controller의 Unit Test File 이다. |
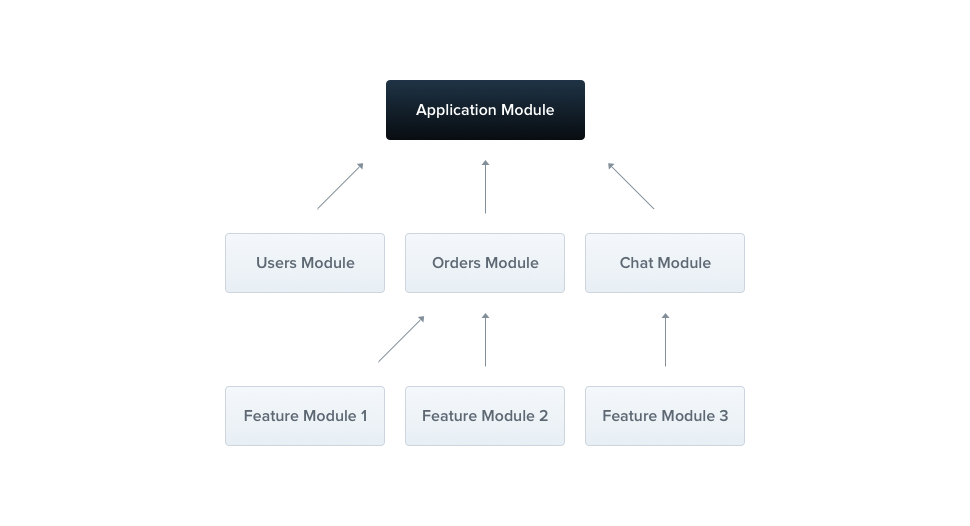
| app.module.ts | Module파일은 기본적으로 Controller와 Service, Model을 하나로 합쳐주는 부모 파일이다. 그 외에도 외부 모듈을 Import해서 자식들이 사용할 수 있도록 해주는 기능이 있다. 또한 app.module.ts는 프로그래머가 만든 API의 Module을 통합시켜주는 기능을 한다. |
| main.ts | 통합된 app.module.ts를 불러와서 NestFactory에 등록하고 서버(Express, Fastify)를 열어주는 기능을 제공한다. |
main.ts
import { NestFactory } from "@nestjs/core";
import { AppModule } from "./app.module";

async function bootstrap() {
    const app = await NestFactory.create(AppModule);
    await app.listen(3000);
}
bootstrap();
.module.ts
import { Module } from "@nestjs/common";

@Module({
    imports: [],
    controllers: [],
    providers: [],
    exports: [],
})
export class AppModule {}- @Module() 데코레이터를 통해 구현된다.
- 데코레이터 옵션으로 imports, exports, controllers, providers이 있으며 여기에 MVC 패턴을 바탕으로 제작한 파일을 통합해주면 된다.
| providers | 제공자 | @Injectable() 데코레이터를 통해 제작된 Instance( Service )를 여기에 적는다. |
| controllers | 관리자 | @Controller() 데코레이터를 통해 제작된 Instance( Controller )를 여기에 적는다. |
| imports | 포함 | 현재 모듈에 필요한 외부 모듈을 여기에 적는다. |
| exports | 내보내기 | 현재 모듈을 외부 모듈들이 import 할 수 있도록 하고 싶을때 여기에 모듈 이름을 적는다. ( app.module.ts 에서 import할때는 export를 적지 않아도 된다 ) |
.controller.ts
import { Controller, Get, Post } from "@nestjs/common";
import { AppService } from "./app.service";

@Controller()
export class AppController {
    constructor(
        private readonly appService: AppService
    ) {}

    @Get('/')
    getHello(): string {
        return this.appService.getHello();
    }
}- @Controller() 데코레이터를 통해 구현된다.
- @Get(), @Post() 등등 HTTP Method 이름으로 구현된 데코레이터를 이용해 Routing한다.
- contructor( 생성자 )에 Service를 DI( Dependency Injection )하여 사용한다.
.service.ts
import { Injectable } from "@nestjs/common";

@Injectable()
export class AppService {
    getHello(): string {
        return "Hello World!";
    }
}- @Injectalbe() 데코레이터를 통해 구현된다.
- Controller에서 사용할 비즈니스 로직을 여기에 구현하면 된다.
.controller.spec.ts
import { Test, TestingModule } from "@nestjs/testing";
import { AppController } from "../controllers/app.controller";
import { AppService } from "../services/app.service";

describe("AppController", () => {
    let appController: AppController;

    beforeEach(async () => {
        const app: TestingModule = await Test.createTestingModule({
            controllers: [AppController],
            providers: [AppService],
        }).compile();

        appController = app.get<AppController>(AppController);
    });

    describe("root", () => {
        it('should return "Hello World!"', () => {
            expect(appController.getHello()).toBe("Hello World!");
        });
    });
});- 기본 골격은 Jest와 동일하다
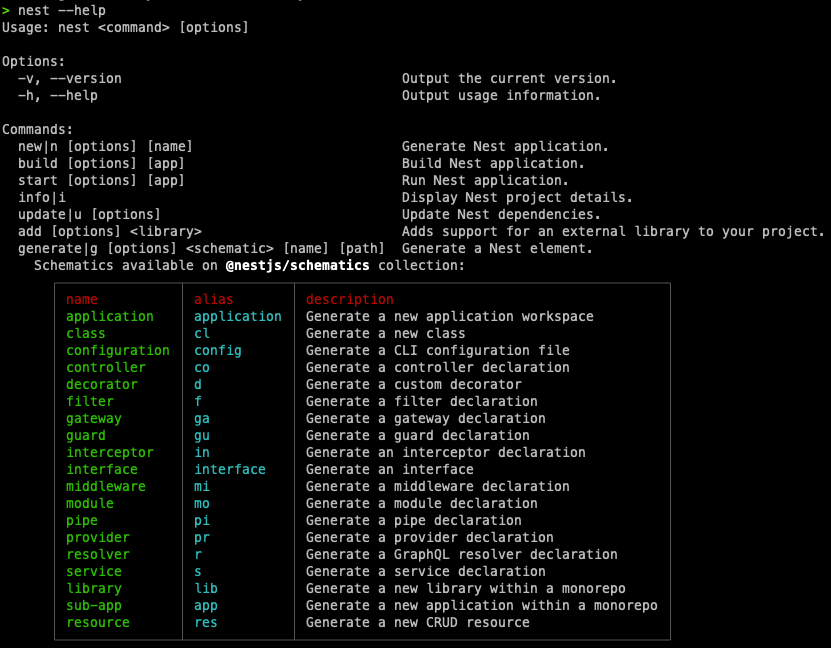
CLI Commands
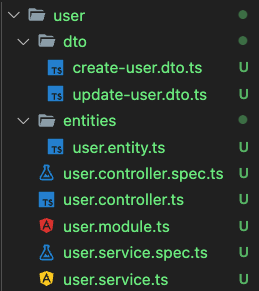
nest g resource user
import { Controller, Get, Post, Body, Patch, Param, Delete } from '@nestjs/common';
import { UserService } from './user.service';
import { CreateUserDto } from './dto/create-user.dto';
import { UpdateUserDto } from './dto/update-user.dto';

@Controller('user')
export class UserController {
  constructor(private readonly userService: UserService) {}

  @Post()
  create(@Body() createUserDto: CreateUserDto) {
    return this.userService.create(createUserDto);
  }

  @Get()
  findAll() {
    return this.userService.findAll();
  }

  @Get(':id')
  findOne(@Param('id') id: string) {
    return this.userService.findOne(+id);
  }

  @Patch(':id')
  update(@Param('id') id: string, @Body() updateUserDto: UpdateUserDto) {
    return this.userService.update(+id, updateUserDto);
  }

  @Delete(':id')
  remove(@Param('id') id: string) {
    return this.userService.remove(+id);
  }
}
CRUD 기능을 가진 폴더를 만들어주고, app.module.ts에 자동으로 import 시켜준다.
cli를 입력하게 되면, REST API 인지, GraphQL 인지 선택할 수 있도록 옵션을 제공해주며, 선택하게 되면 관련된 라이브러리까지 설치해주는 모습을 볼 수 있다.
nest g [module|controller|service|...] [name]
해당하는 기능을 가진 파일을 폴더와 함께 만들어주는 cli로, nest —help 를 입력하면 여러 커멘드를 확인해볼 수 있다.