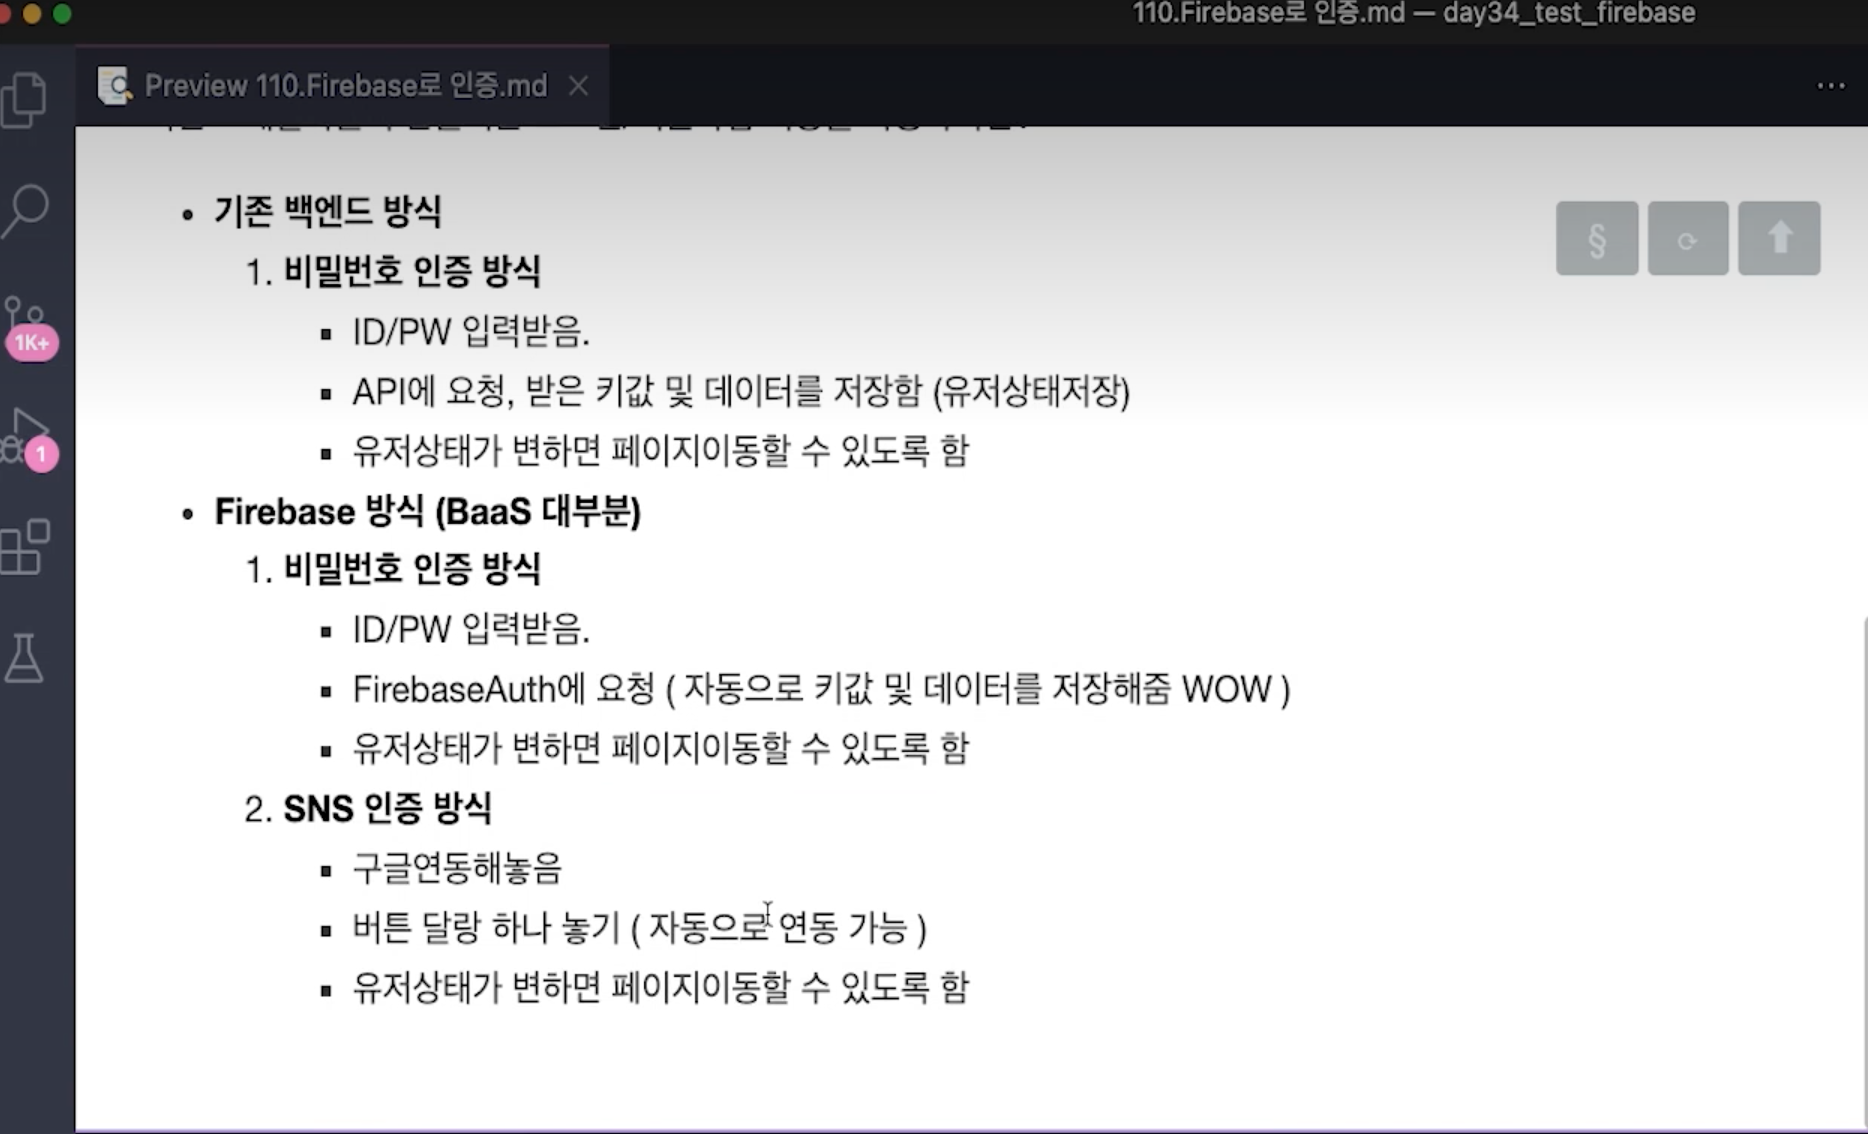
Google이 만든 BaaS.
flutter에서 firebase 쓰기
- Firebase 관련 제품들은 최신버전으로 유지하자.
1. Firebase 콘솔 접속
2. 프로젝트 생성
3. CLI 설치
curl -sL https://firebase.tools | bash위 코드를 입력해 cli를 설치한다.
컴터 비번 입력해야함.

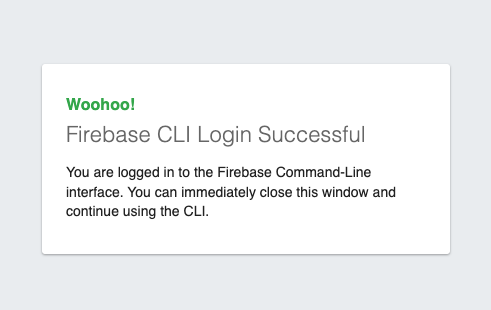
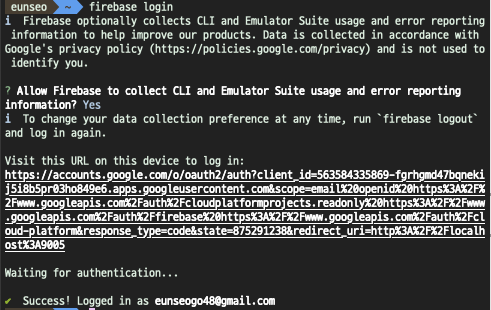
firebase login위 코드를 입력하면 구글 로그인을 하도록 창이 뜬다. 로그인에 성공하면 아래와 같은 화면을 볼 수 있음.
firebase projects:list내가 현재 어떤 프로젝트를 가지고있는지도 볼 수 있다.

4. flutter 플젝 생성
5. 플러터 프로젝트에 적용
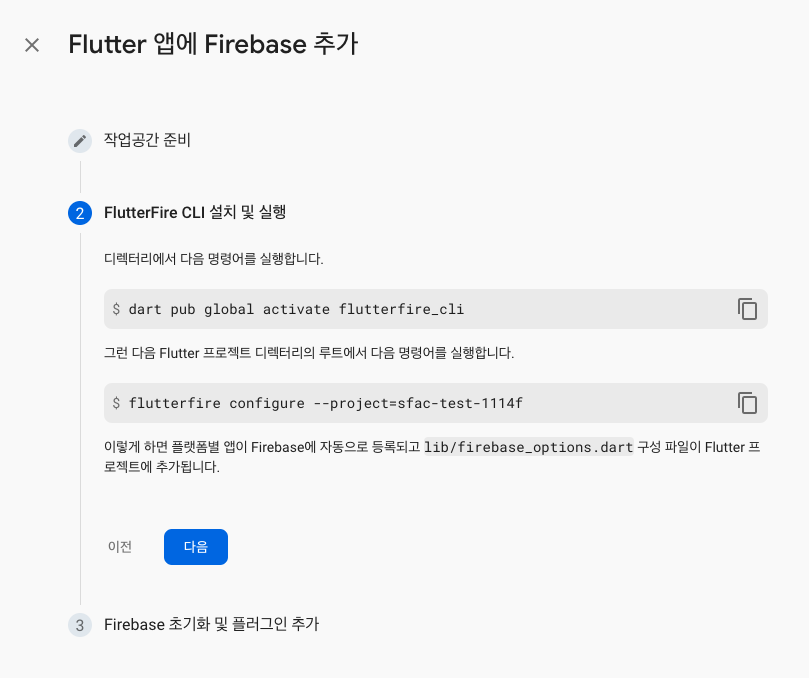
dart pub global activate flutterfire_cli
flutterfire configure --project={프로젝트명}

프로젝트 내에서 위 명령을 입력해야한다.
flutterfire configure --project=sfac-test-1114f
flutterfire를 찾지 못하는 에러 발생
export PATH="$PATH":"$HOME/.pub-cache/bin" 이 명령어를 입력한 후에 flutterfire를 실행한다. 지금 .zshrc로 설정된 PATH가 따로 있어서 못찾는 듯. 이 방법은 임시조치라서 환경변수에 추가를 해 주는 게 좋겠다.

6. 사용할 패키지 설치
firebase_core필수!cloud_firestore선택
파이어베이스가 연동이 되면 lib폴더에 firebase 관련 파일이 하나 생긴다. 절대 건들지 말라고 함.
7. Firebase.initializeApp 호출
main.dart에서 void main 부분에 Firebase를 호출한다.
이때 WidgetsFlutterBinding.ensureInitialized() 이부분을 추가해서 렌더링 전에 초기화하도록 한다. 그리고 비동기로 수정한다.
void main() async { //main 비동기로 수정
  runApp(const MyApp());
  WidgetsFlutterBinding.ensureInitialized(); //초기화
  await Firebase.initializeApp(
    options: DefaultFirebaseOptions.currentPlatform,
  );
}
Tip
파이어베이스는 싱글톤 방식임
어떤 페이지에서 호출해도 동일한 인스턴스가 나온다.
firebase 기능 사용하기
cloud_firestore CRUD
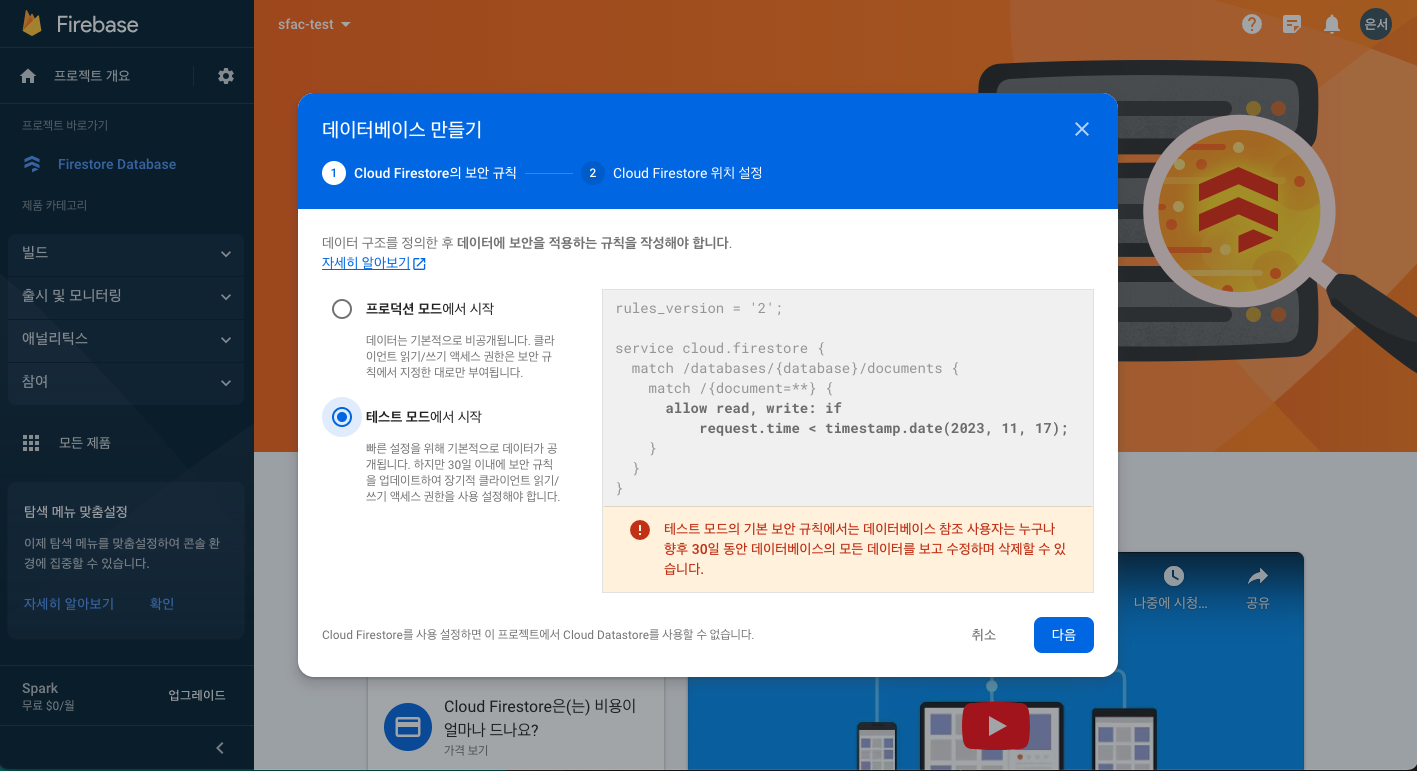
store 위치는 서울로 한다.
Read
데이터를 만들어놓을 수 있다.

모든 Doc
FirebaseFireStore.instance.collection(컬렉션명).get();Id로
FirebaseFireStore.instance.collection(컬렉션명).doc(Id).get();필터링해서
FirebaseFireStore.instance.collection(컬렉션명).where(키, isEqualTo: 값);예시
  List items = [];
  var instance = FirebaseFirestore.instance;

  readFromCloudFireStore() async {
    var res = await instance.collection('/memo').get();
    items = res.docs.map((e) => e.data()).toList();
    setState(() {});
  }

  readDocument(String docId) async {
    var res = await instance.collection('/memo').doc(docId).get();
    print(res.data());
    setState(() {});
  }

  readFinishedDoc() async {
    var res = await instance
        .collection('memo')
        .where('isFinished', isEqualTo: true)
        .get();
    print(res.docs);
  }
create
DocId 자동
map형태로 데이터를 전달한다.
instance.collection(컬렉션명).add({'key': value, 'key2': value})DocId 세팅(set)
- 만약에 이미 존재하는 id면
* SetOption(merge: true) 값을 주어서 새로운 값으로 덮어씌운다.
FirebaseFirestore.instance.collection(컬렉션명).doc(지정이름).set({'key': value})예시
  createDoc(String title) async {
    var res = await instance
        .collection('memo')
        .add({'title': title, 'isFinished': false});
  }

  createDocById(String title, String id) async {
    var res = await instance
        .collection('memo')
        .doc(id)
        .set({'title': title, 'isFinished': false});
  }
Update
FirebaseFirestore.instance.collection(컬렉션명).doc(지정이름).update({'key': value,});예시
  updateDoc(String id, Map<String, dynamic> data) async {
    var res = await instance.collection('memo').doc(id).update(data);
  }
delete
FirebaseFirestore.instance.collection(컬렉션명).doc(지정이름).delete();예시
  deleteDoc(String id) async {
    instance.collection('memo').doc(id).delete();
  }
firebase_auth
인증방식: 비밀번호 인증, SNS 인증
1. firebase_auth 설치
2. Authentication 빌드
3. 적용
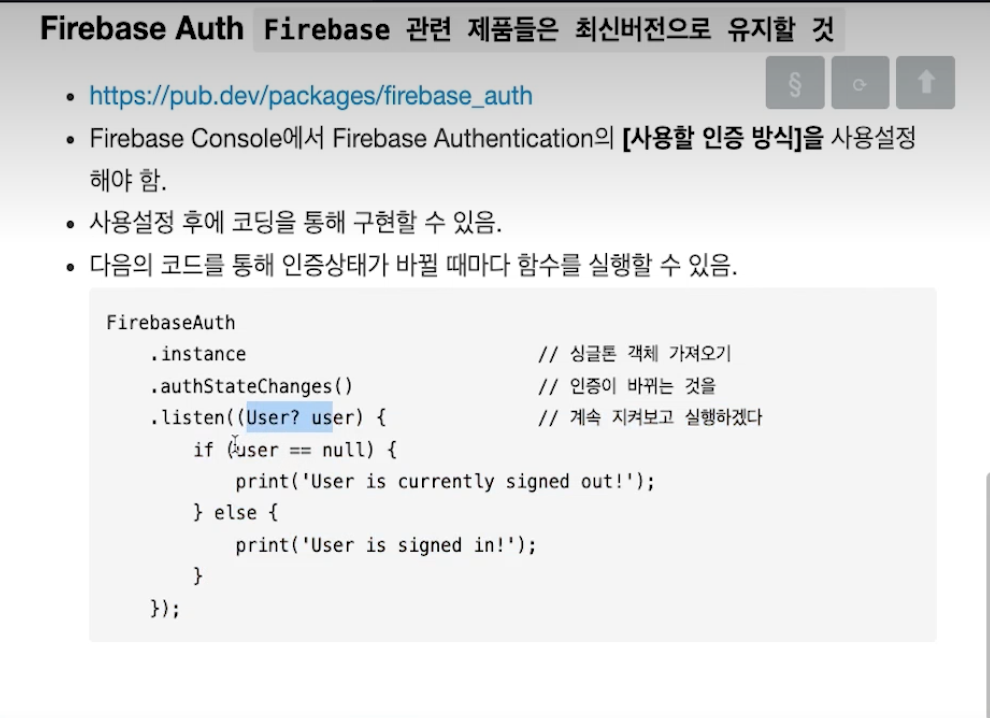
인증상태
void initState() {
super.initState();
FirebaseAuth.instance.authStateChanges().listen((user) {
if (user != null) {
print('회원가입 or 유저 입장');
return;
}
print('회원가입 or 로그인 필요');
});
}비밀번호 인증
_handleSignupButton() {
  FirebaseAuth.instance.createUserWithEmailAndPassword(
    email: 'email@test.test',
    password: '12341234',
  ),
}
로그아웃
FirebaseAuth.instance.signOut();로그인
FirebaseAuth.instance.signInWithEmailAndPassword(
email:,
password:,
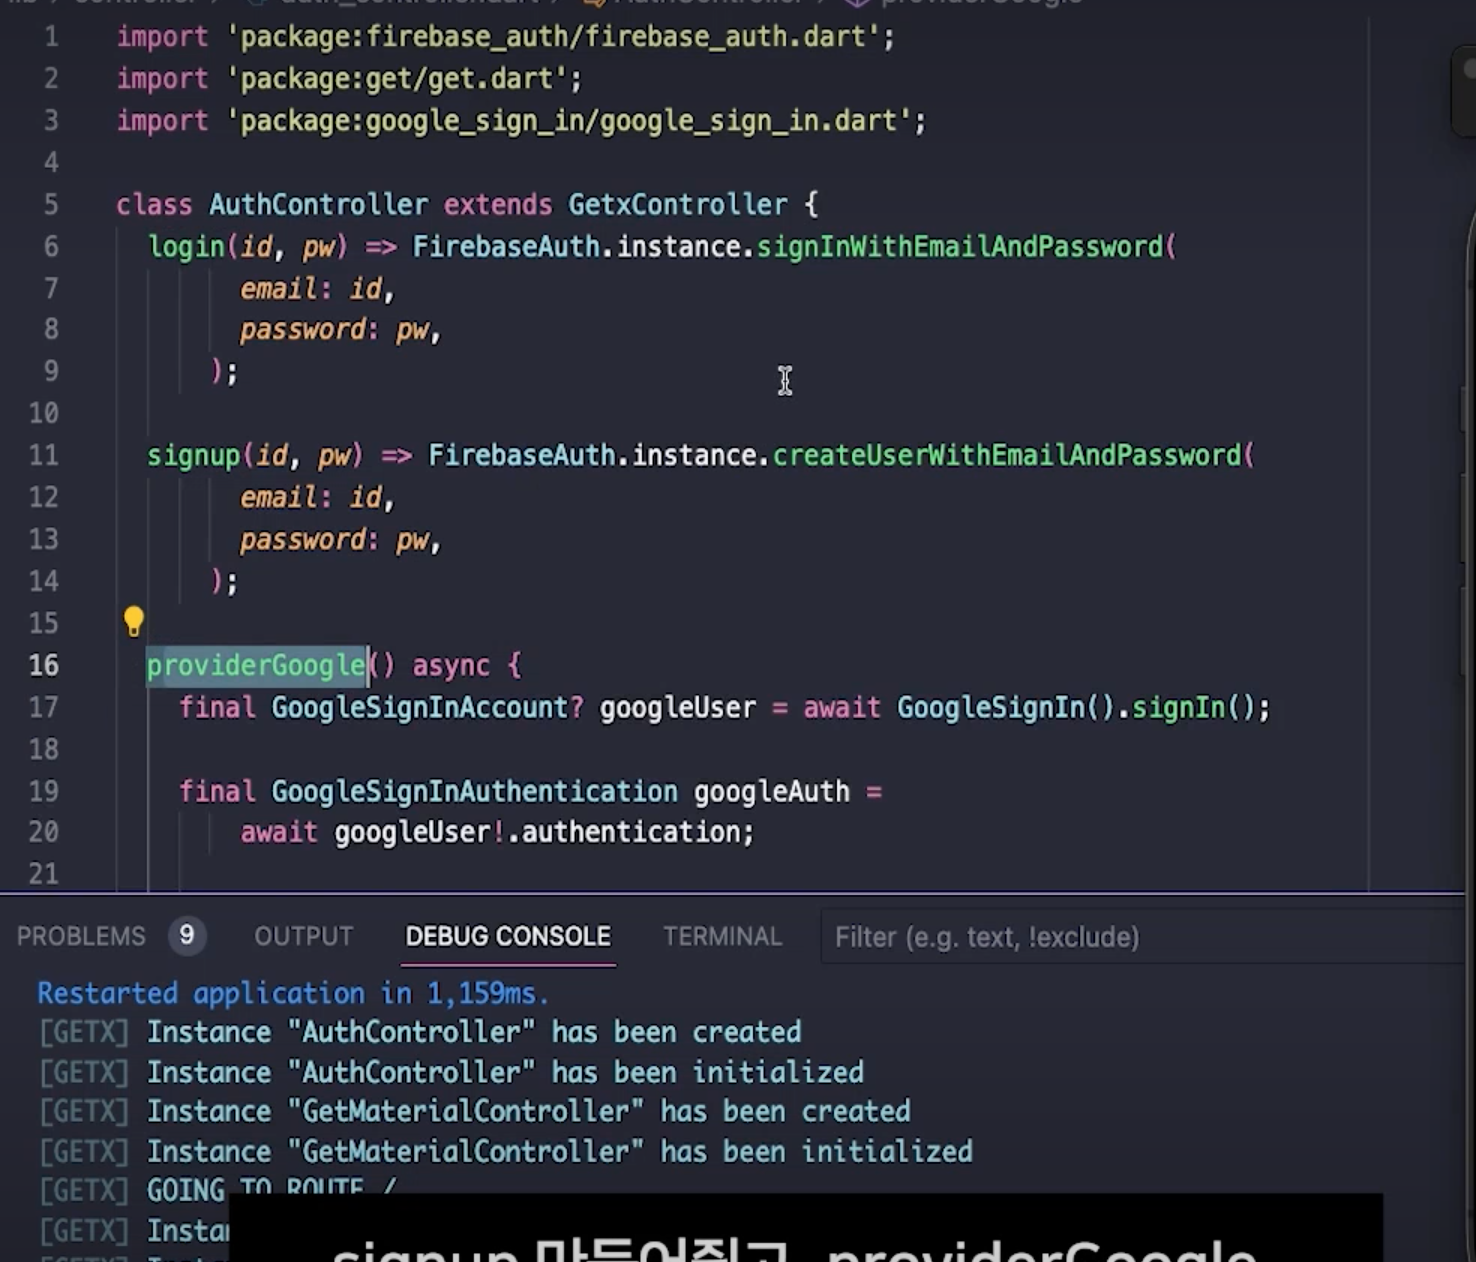
);구글로그인
이 코드 복붙
import 'package:google_sign_in/google_sign_in.dart';
Future<UserCredential> signInWithGoogle() async {
// Trigger the authentication flow
final GoogleSignInAccount? googleUser = await GoogleSignIn().signIn();
// Obtain the auth details from the request
final GoogleSignInAuthentication? googleAuth = await googleUser?.authentication;
// Create a new credential
final credential = GoogleAuthProvider.credential(
accessToken: googleAuth?.accessToken,
idToken: googleAuth?.idToken,
);
// Once signed in, return the UserCredential
return await FirebaseAuth.instance.signInWithCredential(credential);
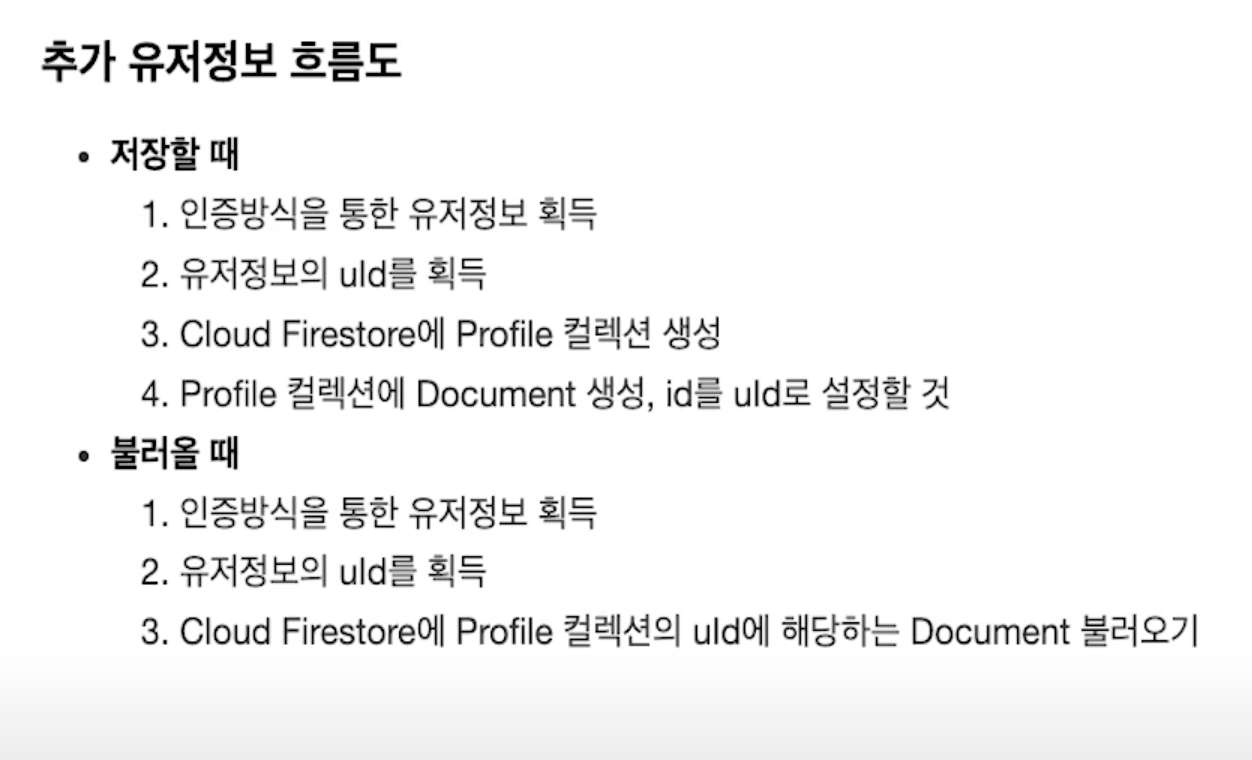
}추가 유저정보 담기
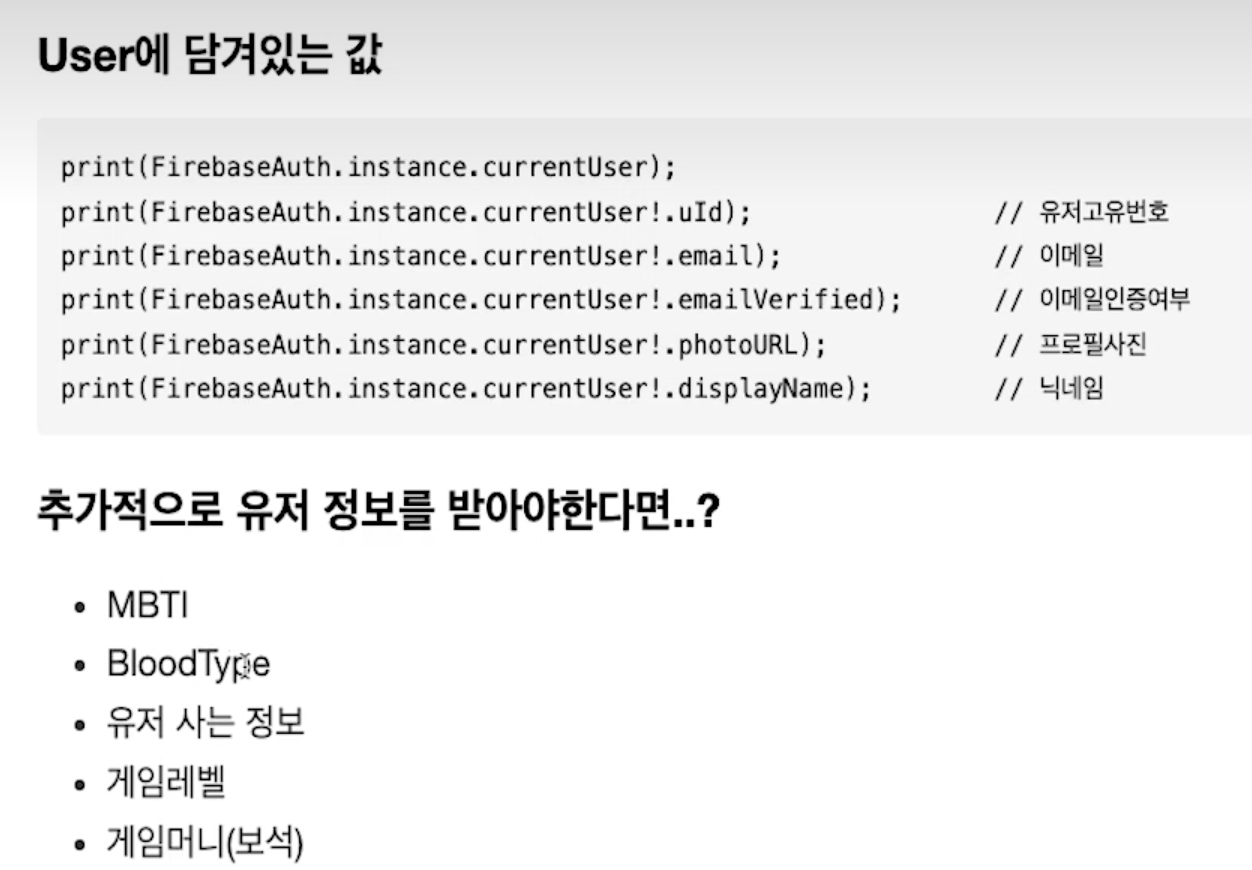
유저에 커스텀 데이터를 넣기 위해서
- FirebaseAuth.instance.currentUser!.uId를 활용
Cloud Firestore를 활용한다.Profile 컬렉션 > userId 문서ID > MBTI, BloodType, Info..
추가 유저정보 흐름도
파이어베이스 콘솔에서 profile 생성

적용
AuthController
AuthController - onInit

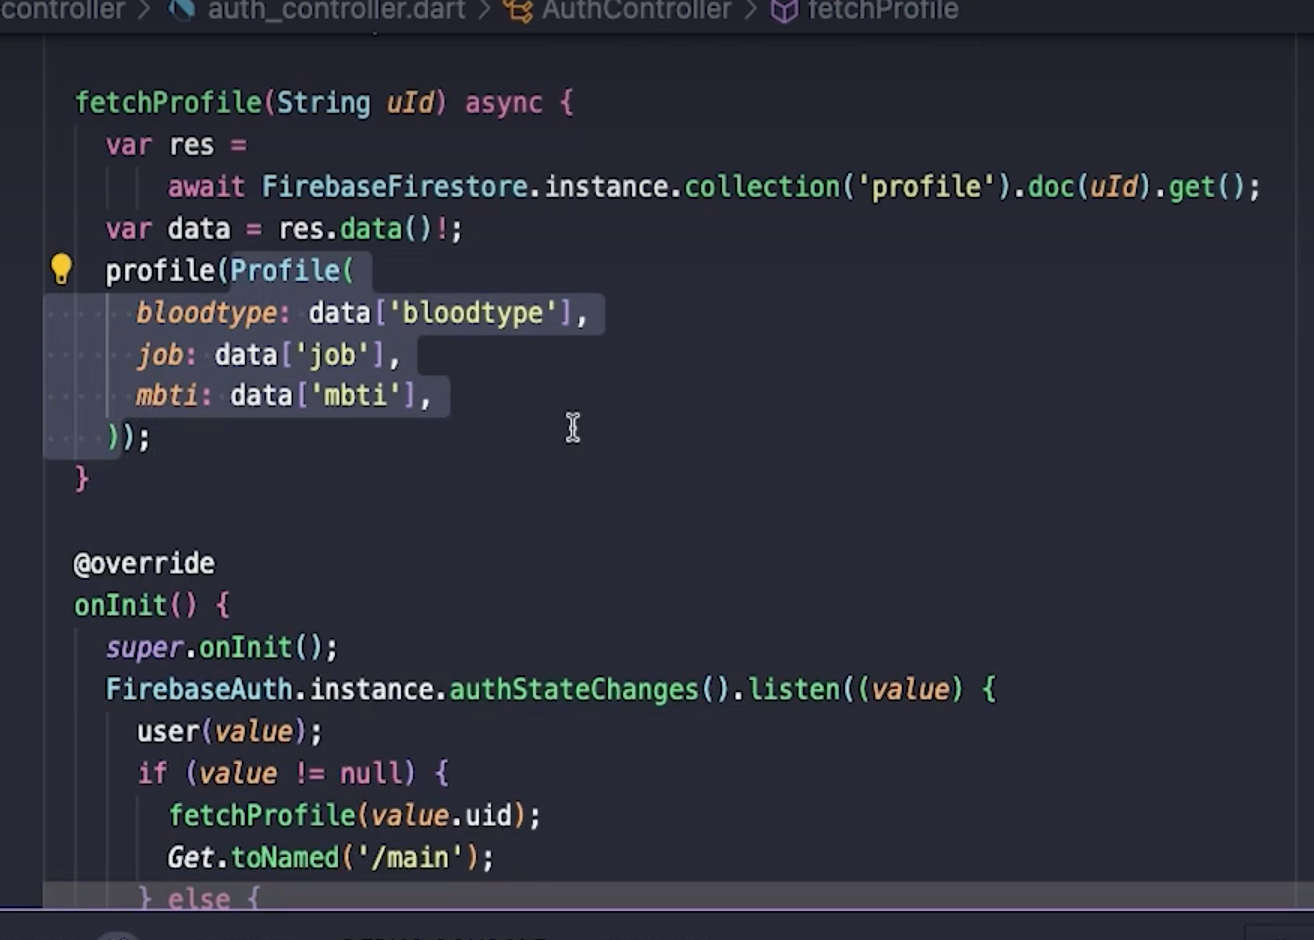
AuthController - fetchProfile
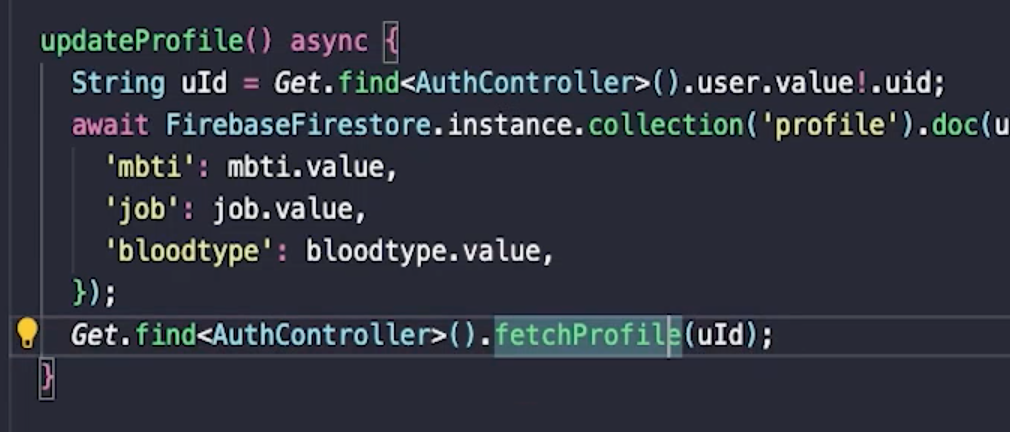
ProfileEditController - updateProfile

ProfileEditController - curProfile

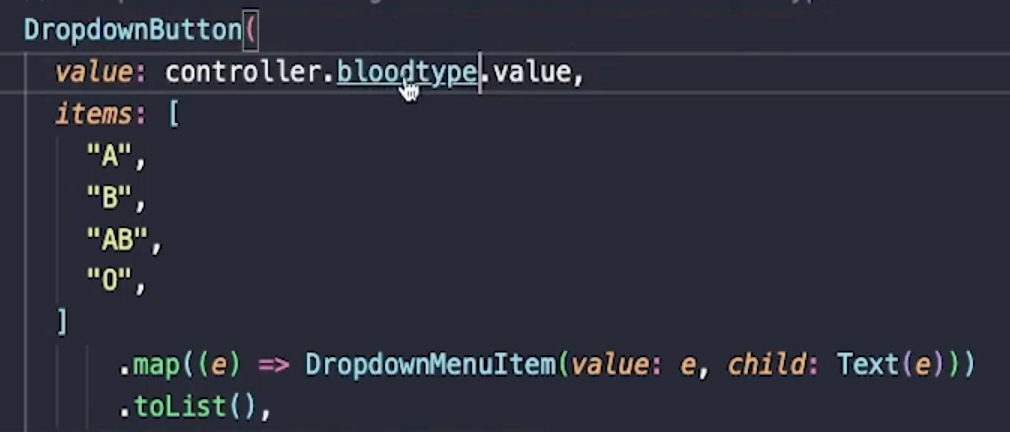
editPage - curValue
DropdownButton에 초기값(현재값)을 줄 수 있다.
바뀐 값 AuthController에도 적용하기
fetchProfile 한번 더 실행시키면 됨.
firebase_store
reference라는 참조방식. (폴더 경로)
final storageRef = FirebaseStorage.instance.ref();파일 업로드
경로를 먼저 설정한 뒤 저장이 가능해진다.
purFile 메서드를 사용한다.
final storageRef = FirebaseStorage.instance.ref('images/mountains.jpg');
await storageRef.putData(data);
파일 다운로드
파일 다운로드는 url로 처리할 수 있다.(안그런 경우도 있음)
final storageRef = FirebaseStorage.instance.ref('images/mountains.jpg');
var fileUrl = await storageRef.getDownloadUrl();
적용
upload button
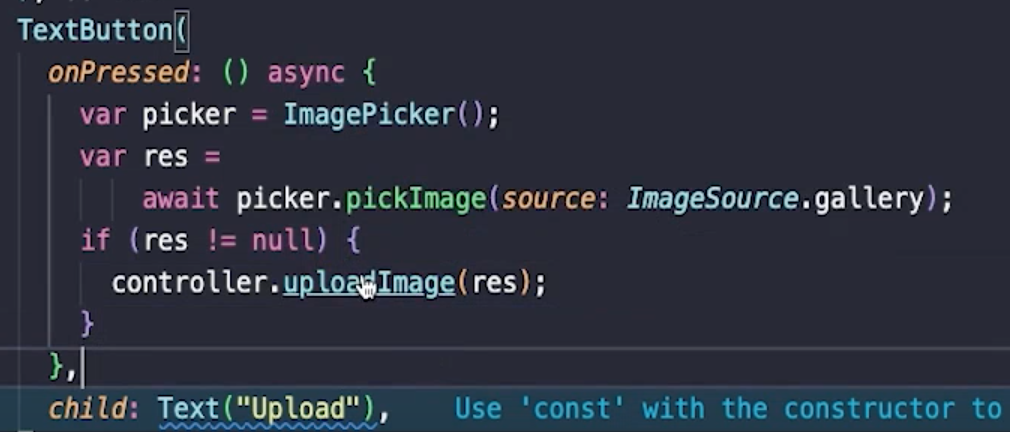
uploadImage
dart:io에 있는 File을 이용해 XFile 타입을 File로 바꿔준다.

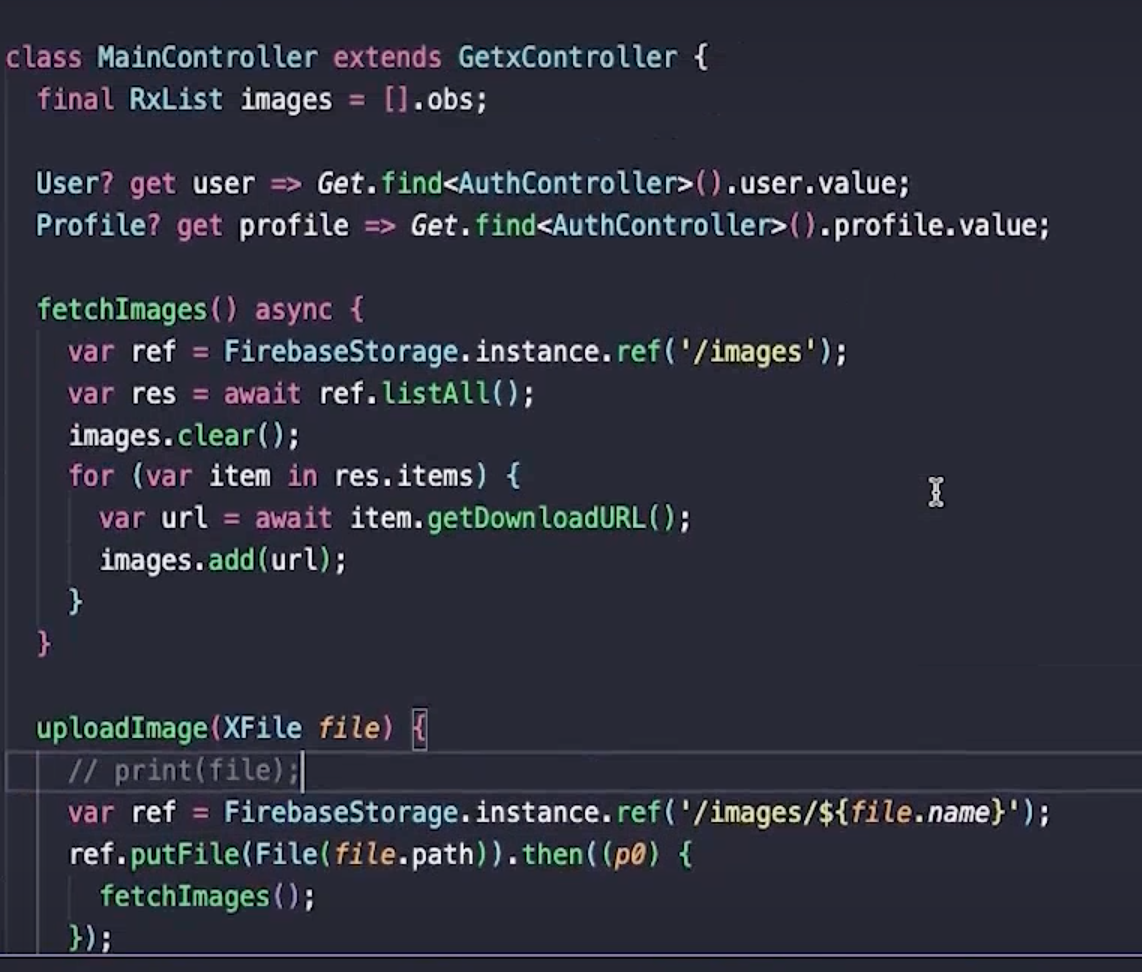
fetchImages
- 비동기 동작을 동기적으로 하기 위해 await 대신 .then을 사용함.
- images.clear를 통해 중복으로 이미지가 추가되는것을 방지함.
- 경로에
/images/uid가 들어가야 함.
error: 에뮬레이터
android: App requires Multidex support

관련 android 문서
아래 코드를 'android/app/build.gradle' 에 추가한다.
android {
    defaultConfig {
    	multiDexEnabled true
	}
    ...
}

dependencies {
    def multidex_version = "2.0.1"
    implementation "androidx.multidex:multidex:$multidex_version"
}
ios: specify a platform for this target in our Podfile
Error output from CocoaPods:
↳

    [!] Automatically assigning platform `iOS` with version `11.0` on target `Runner` because no platform was specified. Please specify a platform for this target in your Podfile. See `https://guides.cocoapods.org/syntax/podfile.html#platform`.

Error running pod install
Error launching application on iPhone 14 Pro Max.
이런 에러가 난다.
ios>Podfile에서 platform: ios, '11.0' 부분 주석 해제
# Uncomment this line to define a global platform for your project
platform :ios, '11.0'
이제 이런에러가 남
[!] CocoaPods could not find compatible versions for pod "flutter_login_facebook":
      In Podfile:
      ...
Error running pod install
Error launching application on iPhone 14 Pro Max.
빌드가 너무 오래걸린다.
ios/Podfile.lock 에 firebase의 버전을 확인한다.
pod 'FirebaseFirestore', :git => 'https://github.com/invertase/firestore-ios-sdk-frameworks.git', :tag => '10.15.0' 이 부분 추가
target 'Runner' do
  // 이 다음 줄이 추가됨 (중요!! 제일 뒤에 버전이 있음. 내 버전으로 바꿀 것)
  pod 'FirebaseFirestore', :git => 'https://github.com/invertase/firestore-ios-sdk-frameworks.git', :tag => '10.15.0'
  use_frameworks!
  use_modular_headers!

  flutter_install_all_ios_pods File.dirname(File.realpath(__FILE__))
end
또또 새로운 에러
Lexical or Preprocessor Issue (Xcode): 'PigeonParser.h' file not found원래 버전
dependencies:
  cloud_firestore: ^4.10.0
  cupertino_icons: ^1.0.2
  firebase_auth: ^4.11.0
  firebase_core: ^2.18.0
  firebase_storage: ^11.3.0
  flutter:
    sdk: flutter
  get: ^4.6.6
  flutter_login_facebook: ^1.8.0
수정 버전
dependencies:
  cloud_firestore: 4.9.2
  cupertino_icons: ^1.0.2
  firebase_auth: 4.10.0
  firebase_core: 2.16.0
  firebase_storage: 11.2.7
  flutter:
    sdk: flutter
  get: ^4.6.6
  flutter_login_facebook: ^1.8.0
그리고 flutter clean을 해줌.
아래 파일들도 삭제하고 다시 빌드한다.
$ flutter clean
$ rm -Rf ios/Pods
$ rm -Rf ios/.symlinks
$ rm -Rf ios/Flutter/Flutter.framework
$ rm -Rf ios/Flutter/Flutter.podspec
$ rm ios/Podfile
하.... 열리질 않는다. 일단 포기