
과제1: 계산기
요구사항
- TextField를 두 개 사용하여 변수에 저장합니다.
- 사칙연산이 가능하도록 버튼을 4개 만듭니다. 각각의 버튼(+,-,*,/)를 누르면 해당 연산자에 맞는 결과값을 출력합니다.
- 이 때, 결과값은 다이얼로그(Dialog)로 출력합니다.
Dialog란, 앱에서 팝업창처럼 화면위에 화면을 띄우는것을 말합니다.
일반적으로 showDialog가 있고, AlertDialog를 주로 사용합니다. - 계산 결과를 result로 넣으면, 다이얼로그를 출력하는 예시코드가 제공됩니다.
해당 코드를 활용하여 결과를 화면에 출력하세요.
showResultDialog(BuildContext context, var result)

구현 화면

input을 받고 결과값을 출력하는 일종의 계산기를 만드는 과제였다.
과제2: 키오스크
요구사항
- 음식을 누르면 주문 리스트에 담기는 키오스크앱을 만들어봅시다.
- 음식이미지는 자유이며, 필요한 경우 위에 첨부된 파일을 이용하여도 됩니다.
- 하단에 떠있는 버튼을 누르면 지금까지 주문된 주문 리스트를 초기화합니다.
- 하단에 떠잇는 버튼은 정중앙의 하단, 넓게 펴진 형태로 [ 초기화하기 ]텍스트를 포함합니다.
- 음식이 보여지는 것은 [갤러리] 형태로 보여지게 하며, 검색을 통해 해결합니다.
- 그 외 UI 디자인은 자유입니다.
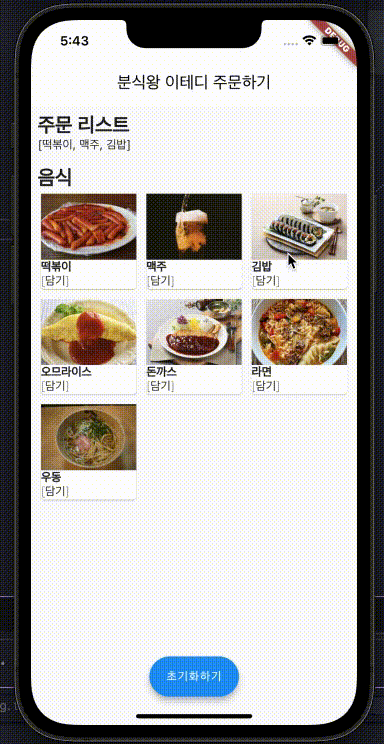
구현 화면
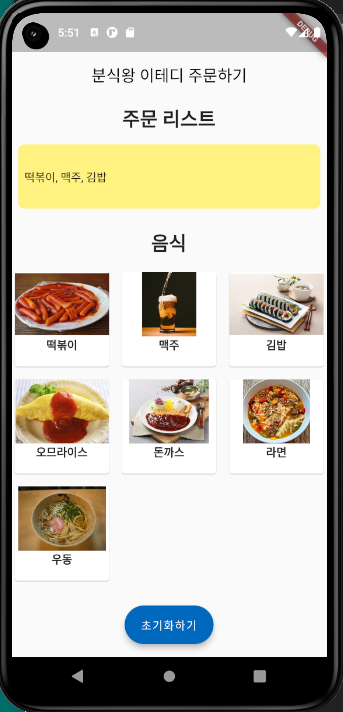
메뉴를 선택하면 주문 리스트에 담기고, 초기화하기 버튼을 누르면 주문 리스트가 리셋되어야한다.
MenuCard
import 'package:flutter/material.dart';
class MenuCard extends StatelessWidget {
const MenuCard({super.key, required this.image, required this.name});
final String image;
final String name;
Widget build(BuildContext context) {
return Card(
child: Center(
child: Column(
children: [
Image.asset(
image,
height: 80,
//이미지 고정하는 방법
//1. 이미지를 expanded로 감싸기
//2. 컬럼에서 alignment를 stretch로 주기.(가운데 정렬)
//3. boxfit.cover
),
Text(
name,
style: const TextStyle(
fontWeight: FontWeight.bold,
),
),
],
),
),
);
}
}
main.dart
import 'package:assignment2/MenuCard.dart';
import 'package:flutter/material.dart';
void main() {
runApp(const MyApp());
}
class MyApp extends StatefulWidget {
const MyApp({super.key});
State<MyApp> createState() => _MyAppState();
}
class _MyAppState extends State<MyApp> {
final List<Map<String, String>> menus = [
{
"name": '떡볶이',
"image": 'assets/option_bokki.png',
},
{
"name": '맥주',
"image": 'assets/option_beer.png',
},
{
"name": '김밥',
"image": 'assets/option_kimbap.png',
},
{
"name": '오므라이스',
"image": 'assets/option_omurice.png',
},
{
"name": '돈까스',
"image": 'assets/option_pork_cutlets.png',
},
{
"name": '라면',
"image": 'assets/option_ramen.png',
},
{
"name": '우동',
"image": 'assets/option_udon.png',
},
];
List<String> cart = [];
void addMenu(String item) {
// print(item);
setState(() {
cart.add(item);
});
}
// This widget is the root of your application.
Widget build(BuildContext context) {
return MaterialApp(
home: Scaffold(
appBar: AppBar(
centerTitle: true,
title: const Text(
"분식왕 이테디 주문하기",
),
backgroundColor: Colors.transparent,
foregroundColor: Colors.black,
elevation: 0, //그림자 없애기
),
body: Column(
children: [
// 카트
Padding(
padding: const EdgeInsets.all(8.0),
child: Column(
children: [
const Text(
"주문 리스트",
style: TextStyle(
fontWeight: FontWeight.bold,
fontSize: 24,
),
),
const SizedBox(height: 16),
Container(
height: 80,
margin: const EdgeInsets.only(bottom: 16),
decoration: const BoxDecoration(
color: Color.fromARGB(255, 255, 242, 129),
borderRadius: BorderRadius.all(
Radius.circular(8),
),
),
child: Row(
children: [
Padding(
padding: const EdgeInsets.all(8.0),
child: Text(
cart.isEmpty ? "주문할 음식을 담아주세요:)" : cart.join(', '),
),
),
],
),
),
],
),
),
// 메뉴판
Column(
children: [
const Text(
"음식",
style: TextStyle(
fontWeight: FontWeight.bold,
fontSize: 24,
),
),
const SizedBox(
height: 16,
),
GridView.count(
shrinkWrap: true,
crossAxisCount: 3,
mainAxisSpacing: 8,
crossAxisSpacing: 8,
children: menus.map((menu) {
return GestureDetector(
onTapDown: (details) {
addMenu(menu["name"]!);
},
child: MenuCard(
image: menu["image"]!,
name: menu["name"]!,
),
);
}).toList(),
),
],
),
],
),
// 초기화버튼
floatingActionButton: FloatingActionButton.extended(
backgroundColor: const Color.fromARGB(255, 0, 104, 189),
onPressed: () {
setState(() {
cart.clear();
});
},
label: const Text("초기화하기"),
),
floatingActionButtonLocation: FloatingActionButtonLocation.centerFloat,
),
);
}
}
풀이
tip: abstract class
GridView(gridDelegate: SliverGridDelegate)를 쓰면 SliverGridDelegate 에러가 난다.
이때 클래스를 확인해보면 abstract된 클래스라는 것을 확인할 수 있다.
이 클래스에서 마우스 오른쪽을 클릭하면 추상화된 클래스를 상속(확장해)받아 구현한 클래스를 확인할 수 있다. 이 경우에는 SliverGridDelegateWithFixedCrossAxisCount를 발견!
컬럼은 확장하려고 한다.
때문에 에러가 발생한다. 이때 해결방법이 여러가지 있는데,
1. Container로 감싸서 height을 지정한다.
2. Expanded를 부모로 준다.
3. shrinkWrap을 준다.
GridView(
  gridDelegate: const SliverGridDelegateWithFixedCrossAxisCount(
  crossAxisCount: 3,
  ),
  children: const [
    Text('1'),
    Text('2'),
    Text('3'),
    Text('3'),
  ],
),
본 후기는 유데미-스나이퍼팩토리 9주 완성 프로젝트캠프 학습 일지 후기로 작성 되었습니다.

주니어 플러터 개발자의 고군분투기