Ajax는 Asynchronous Javascript and Xml의 약자
자바스크립트의 라이브러리 중 하나
XMLHttpRequest 객체를 이용 ->전체 페이지를 새로 고치지 않고 페이지의 일부만을 로드 => 비동기
비동기 방식은 시간도 빠르고, 화면을 리로드하는 경우 전체 리소스를 다 가져올 필용벗이 일부 필요한 부분만 가져오기 때문에 장점이 있다.
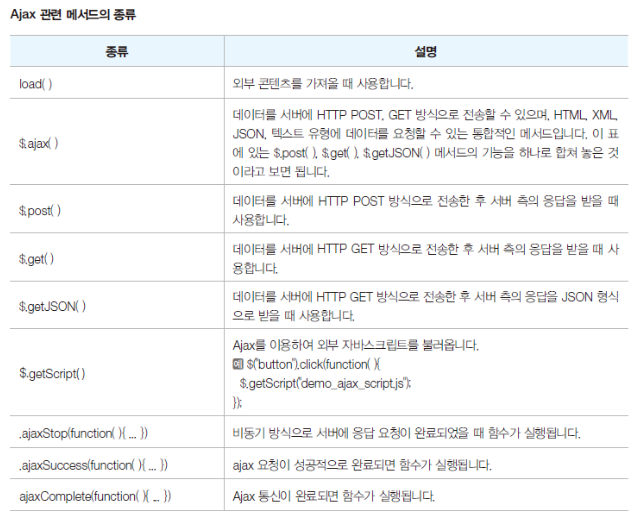
Ajax 관련 메소드
▼ .load()
        <script>
            // jQuery(document).ready(function(){
            // $(document).ready(function(){
            // $(function){ // jquery entry point
            $(() => {
                // .load() =>
                // (method) JQuery.load(url: string, data?: string |
                // Object, complete?: (responseText: string, textStatus: string,
                //  XMLHttpRequest: XMLHttpRequest) => any): JQuery
                $("#newsWrap_1").load("ttt.html #news_1"); // load
                $("#newsWrap_2").load("ttt.html #news_2"); // load
                // 컨텐츠가 필요할 때 끊어올 수 있다.
            }); // jq

        </script>

    </head>


    <body>
        <h1>LOAD 1</h1>
        <div id="newsWrap_1">ㅇㄴ</div>

        <h1>LOAD 2</h1>
        <div id="newsWrap_2">ㅇㄴ</div>


    </body>
$.ajax( ) 요놈이 제일 메인이다.
▼.ajax( )
jquery_ajax_2.html:1 Access to XMLHttpRequest at
'file:///C:/app/ui_workspace/html/220704/json/MOCK_DATA.json' from origin
'null' has been blocked by CORS policy: Cross origin requests are only
supported for protocol schemes: http, data, chrome, chrome-extension, chrome-
untrusted, https.
이게 뜬다 딥빡..
해결의 과정을 겪는데..
알아본 결과
간단하게 요약하자면 동일출처정책은
CORS에러는 교차 HTTP 요청에 대해 막는 거라고 보면 된다.
따라서 그 막는 과정 보안과정을 없에야한다고 했다.
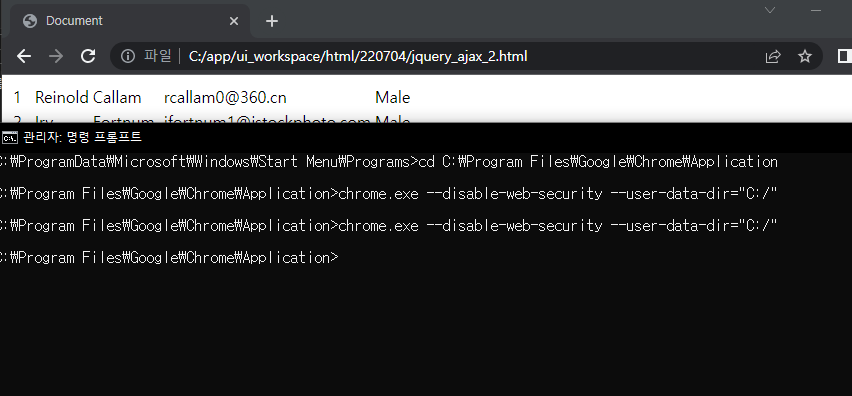
이렇게 뒤에 보안을 막는다는 disable security 를 설정해주고
내 파일의 해당 URL을 넣어주니 잘된다.
휴.. 저녁시간에 안먹고 겁나 구글링했다..
무슨 일이 없으면 교차 요청이 없도록 하라는데. 근데 ajax 넣자마자 그런걸...
C:\Program Files\Google\Chrome\Application>chrome.exe --disable-web-security --user-data-dir="C:/"
https://brunch.co.kr/@adrenalinee31/1
한 줄기 빛
JSON은 연관배열로 되어있다.
키와 값으로 이뤄진 배열로 되어있다.
▼ JSON 내용 부르기
        <script>
            $(function() {
                $.ajax({


                    // --1. 로컬/ 원격 요청 URL 지정
                    url:"json/MOCK_DATA.json",

                    // --2. 요청한 문서의 타입(유형) 지정
                    dataType:"json",

                    // --3. 비동기 요청에 대한 응답이 성공적으로 왔을때,
                    //      자동으로 callback 되는 메소드
                    success:function(data) { // call back if succeeded

                    // --4. 비동기 요청에 대한 응답이 실패로 왔을때,
                    //      자동으로 callback 되는 메소드
                    // error: function(XHR){  // callback if failed

                        // console.clear();
                        // console.group('error or succeeded');

                        // console.log('\t+ XHR', XHR) // XMLHttpRequest (내장)객체 - 비동기 호출의 근간

                        // console.log('\t+ readyState', XHR.readyState); // XHR의 상태코드값 출력
                        // console.log('\t', XHR.status); // XHR의 상태코드값 출력
                        // console.log('\t', XHR.statusText); // XHR의 상태코드값 출력
                        // // console.log('\t', XHR.statusCode()); // 웹서버의 응답 상태코드 (HTTP status code)

                        // console.groupEnd();


                        // JSON Binding into DOM tree.
                        if(data.length > 0) {
                            let tb = $("<table>"); // 새로운 태그 생성

                            //  JSON의 데이터를 순회로 지정한 형식대로 만들기
                            for(let i in data) {
                                let id = data[i].id;
                                let first_name = data[i].first_name;
                                let last_name = data[i].last_name;
                                let email = data[i].email;
                                let gender = data[i].gender;

                                var row = $("<tr />").append(
                                    $("<td>").text(id),
                                    $("<td>").text(first_name),
                                    $("<td>").text(last_name),
                                    $("<td>").text(email),
                                    $("<td>").text(gender)
                                );

                                tb.append(row);
                            }
                            $(".wrap").append(tb);
                        }


                    }
                });
            });
        </script>

    </head>

    <body>
        <div class="wrap"></div>
    </body>
▼ XML 내용 부르기
XML은 용량이 커지기에 JSON 많이씀
        <script>
            $(function() {
                $.ajax({
                    url:"json/dataset.xml", // 로컬 경로형식
                  //url:"localhost:8080/temp/dataset.xml", // 원격형식
                    dataType:"xml",

                    // XML문서를 바인딩
                    success:function(data) {
                        console.clear();
                        console.group('success');
                        console.log("성공적이야 success");
                        console.log(data);
                        console.groupEnd();

                        // 받아온 XML 문서에서, <record> 태그를 모두 찾아라
                        let $data = $(data).find("record");
                        // 결과 타입은 ==> jQuery 객체 : Array-Like Object
                        console.log('\t + data', $data);


                        if($data.length > 0) {
                            let tb = $("<table />");
                            $.each($data, function(i, o) {
                                let $id =
                                $(o).find("id").text();

                                let $first_name =
                                $(o).find("first_name").text();

                                let $last_name =
                                $(o).find("last_name").text();

                                let $email =
                                $(o).find("email").text();

                                let $gender =
                                $(o).find("gender").text();

                                let row = $("<tr />").append(
                                    $("<td />").text($id),
                                    $("<td />").text($first_name),
                                    $("<td />").text($last_name),
                                    $("<td />").text($email),
                                    $("<td />").text($gender)
                                );

                                tb.append(row);
                            });
                            $(".wrap").append(tb);
                        }
                    }// success

                    // error: function(XHR) {
                    //     console.clear();
                    //     console.group('fail');
                    //     console.log("실패야 fail");
                    //     console.log(XHR);
                    //     console.groupEnd();
                    // } // error
                });// ajax
            });// jq
            </script>
    </head>


    <body>
        <div class="wrap"></div>
    </body>
또 원격이 안된다.. 후... ㅠ
▼ XHR 객체
-XMLHttpRequest (XHR)은 AJAX 요청을 생성하는 JavaScript API
-XHR의 메서드로 브라우저와 서버간의 네트워크 요청을 전송 가능
-
XHR 객체의 readyState 속성값의 의미:
0 > 1 > 2 > 3 > 4 (범위값: 0 ~ 4)
readyState 의미
0     XHR객체를 생성하고,초기화가 안된상태(new)
1     XHR객체를 초기화한 상태(open)
2     XHR객체로 요청을 보낸상태(send)
3     XHR객체가 응답을 받고있는 상태(미완료)
4     XHR객체가 응답을 완전히 받은 상태(완료)
▼정석대로 다찍어본다. => readyState가 다 안찍힘
         <script>
            // BOM의 최상위 객체
            window.onload = function(){

                //  XHR의 생명주기? 를 보는 코드
                // XHR을 이용한 동기식 요청처리


                //  --------------------------------
                // 1. var XMLHttpRequest: new() => XMLHttpRequest
                // ---------------------------------

                var xhr = new XMLHttpRequest();

                console.log('1. xhr: ', xhr);
                console.log('\t + readyState:', xhr.readyState);

                // 2---------------------------------
                // XMLHttpRequest.open(
                //     method:String,    // HTTP method: GET,POST
                //     url: String       // action URL
                //     async: boolean    // 동기식/ 비동기식을 결정
                //     username?: String // HTTP basic 인증을 위한 아이디
                //     password?: String //  암호
                // )// void open

                // GET방식 , URL , 동기식 결정
                // xhr.open('GET', 'http://localhost:8080/doc/persons.json?name=koo%age=23', false);
                // xhr.open('POST', 'http://localhost:8080/doc/persons.json', false);

                xhr.open('GET', 'json/MOCK_DATA.json', false);

                // xhr.setRequestHeader('Content-Type', 'application/x-www-form-urlencoded');

                console.log('2.xhr: ', xhr);
                console.log('\t+ readyState: ', xhr.readyState);

                //-------------------------
                //3. XMLHttpRequest.send(
                //     body?:document | BodyInit
                // ): void
                //-----------------------------
                //xhr.send('name=Yoseph&age=23');

                xhr.send();

                console.log('3.xhr', xhr); // restate 2,3이 안찍힘 너무 빨리 지나간다고 한다.
                console.log('\t+ readyState: ', xhr.readyState);

                //---------------------------------------------
                // 4 XHR 로 보낸 요청과 그 응답 데이터를 이용해서,
                //현재 문서의 <body> 태그의 콘텐츠로 지정
                document.body.innerHTML = xhr.responseText; // 응답데이터
            }
        </script>
▼이벤트 핸들러를 사용해서 state과정을 보기 => readyState가 다 찍힘
         <script>
            // BOM의 최상위 객체
            window.onload = function(){

                //  XLR의 생명주기?
                // XMLHttpRequest (XHR)은 AJAX 요청을 생성하는 JavaScript API
                // XHR의 메서드로 브라우저와 서버간의 네트워크 요청을 전송 가능
                // 이벤트 핸들러를 줘보자 1~3 까지 찍히던게
                // 1~4까지 다찍힘

                // XHR을 이용한 동기식 요청처리


                //  --------------------------------
                // 1. var XMLHttpRequest: new() => XMLHttpRequest
                // ---------------------------------
                var xhr = new XMLHttpRequest();


                //----------------------------------------------//
                // Step2. (property) XMLHttpRequest.onreadystatechange:
                //              (this: XMLHttpRequest, ev: Event) => any
                //----------------------------------------------//
                // 저장 함수 (또는 함수의 이름)마다 자동으로 호출 할 수있는 readyState의 속성이 변경
                xhr.onreadystatechange = function () {
                    console.log('onreadystatechange:', xhr.readyState); // 여기서 1234순서 다찍어줌

                    if(xhr.readyState == 4) {   // 응답완료상태에서...

                        if(xhr.status == 200) { // HTTP status code 성공 한다면
                            document.body.innerHTML = xhr.responseText; // HTML 문서안에  응답 responseText를 넣어주겠다

                            // JSON.parse: JSON -> JS Object 로 변환
                            var arr = JSON.parse(xhr.responseText);   // JSON으로 변환한 응답 TEXT를 arr에 넣겠다
                            console.log(arr); // 콘솔에 arr을 출력

                            // if(arr.length > 0) {
                            //     var person = arr[0];
                            //     console.group('PERSON');
                            //         console.log('1. id:', person.id);
                            //         console.log('2. first_name:', person.first_name);
                            //         console.log('3. last_name:', person.last_name);
                            //         console.log('4. email:', person.email);
                            //         console.log('5. gender:', person.gender);
                            //         console.log('6. ip_address:', person.ip_address);
                            //     console.groupEnd();
                            // } // if(array.length)

                        } // if(status==200)
                    } // if(readyState==4)
                };  // onreadystatechange


            //----------------------------------------------//
            // (method) XMLHttpRequest.open(
            //   method: string, url: string, async: boolean, username?: string, password?: string
            // ): void
            //----------------------------------------------//
            xhr.open('GET', 'json/MOCK_DATA.json', true); // 어떤형식으로 어디 파일을 열것인가 동기 비동기?
            // xhr.setRequestHeader('Content-Type', 'application/x-www-form-urlencoded');


            //----------------------------------------------//
            // (method) XMLHttpRequest.send(body?: Document | BodyInit): void
            //----------------------------------------------//
            xhr.send(); // 보내버리기

            }
        </script>
▼호출시 쿼리스트링 형태로 정보를 만들어주는 메소드들 (Form에 대한 정보를 쿼리형식전달)
        <script defer>
            console.clear();

            $(() => {

                $('#submit').click((e) => {
                    e.preventDefault();

                    //1. <form> 태그의 입력양식과 사용자가 입력한 값을 기반으로,
                    // 비동기 호출시, 전송할 쿼리스트링을 만들어 주는 $.serializ()메소드의 사용 예
                    let serializedStr = $('#form1').serialize();
                    console.log(`serializedStr: ${serializedStr}`);


                    // 2. JS 객체를 비동기 호출시 전송할 쿼리스트링 형태로 만들어주는
                    //  $.param() 메소드의 예
                    let paramStr = $.param({name: 'Yoseph', age: 23});
                    console.log(`paramStr: ${paramStr}`);
                });

            }); // .jq

        </script>
    </head>


    <body>

        <h1>aj02.html</h1>

        <hr>

        <form action="#" id="form1">
            1. name: <input type="text" name="name"> <br>
            2. age: <input type="number" name="age">

            <p></p>

            <input type="submit" value="submit" id="submit">
        </form>

    </body>
결과

조사결과 둘의 차이점은 param 은 JS객체를 쿼리스트링으로 만들어주고 serialize는 form의 입력데이터를 쿼리스트링으로 만들어준다.