상태관리(state management)
Flutter

상태관리
Flutter에서는 크게 두 종류의 위젯이 존재한다. 하나는 상태를 가지지 않는 Stateless Widget과 상태를 가지고 있는 Stateful Widget이다.(위젯이야기를 참고하자)
Statefule Widget은 한 위젯 안에서 상태(데이터)를 가지고 해당 상태의 변화에 따라 화면에 표시되는 UI를 변경한다.
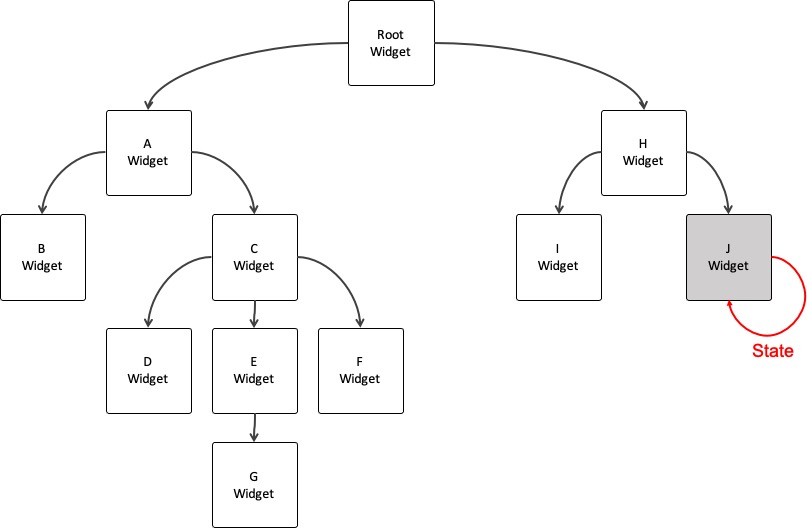
그런데 만약, 다른 위젯에서 동일한 데이터가 필요한 경우, 어떻게 해야할까?
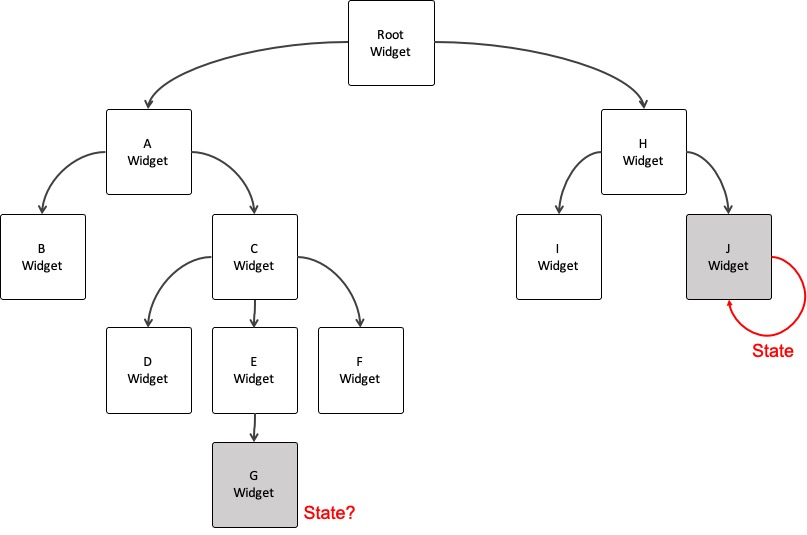
상태를 공유하는 두 위젯의 공통 부모 위젯을 Stateful Widget으로 만들고, 자식 위젯을 생성할 때, 파라메터로 해당 상태를 전달하면, 두 위젯 사이에서 동일한 상태를 사용할 수 있다.
하지만 상태를 표시하기 위해서는 부모위젯이 rebuild되야하는 데, 이때 하위의 모든 자식들이 rebuild된다. 즉 불필요한 위젯들이 Re-build되면서 성능 이슈가 나타날 수 있다.
Flutter에서 사용할 수 있는 대표적인 상태 관리 방법에는 다음과 같은 것들이 있다.
Provider
Provider는 상태관리를 위해 등장했으며, 이렇게 동일한 상태(데이터)를 전역적으로 다른 위젯들과 공유할 때 사용한다.
InheritedWidget을 감싸 사용성과 재사용성을 높힌 라이브러리이다.
InheritedWidget을 사용하는 것보다 좋은 점
- 단순화된 자원 할당/재원
- lazy-loading(지연로딩)
- 매번 새로운 class만들지 않아도 되고 boilerplat 코드 제거 가능.
- boilerplat : 최소한 변경으로 여러곳에서 재사용되고, 반복적으로 비슷한 형태를 띄는 코드, 비효율적이며 리팩토링 과정에서 수정
- devtool : Provider를 사용하면 Flutter devtool에서 응용프로그램의 상태를 볼 수 있다.
- InheritedWidget을 사용하는 보편적인 방법 제공(Provider.of/Consumer/Selector 참조)
- ChangeNotifier와 같이 복잡도가 기하급수적으로 증가하는 listening mechanism에 확장성을 향상시킨다.
- 확장성 : 사용자수의 증대에 유연하게 대응할 수 있는 정도
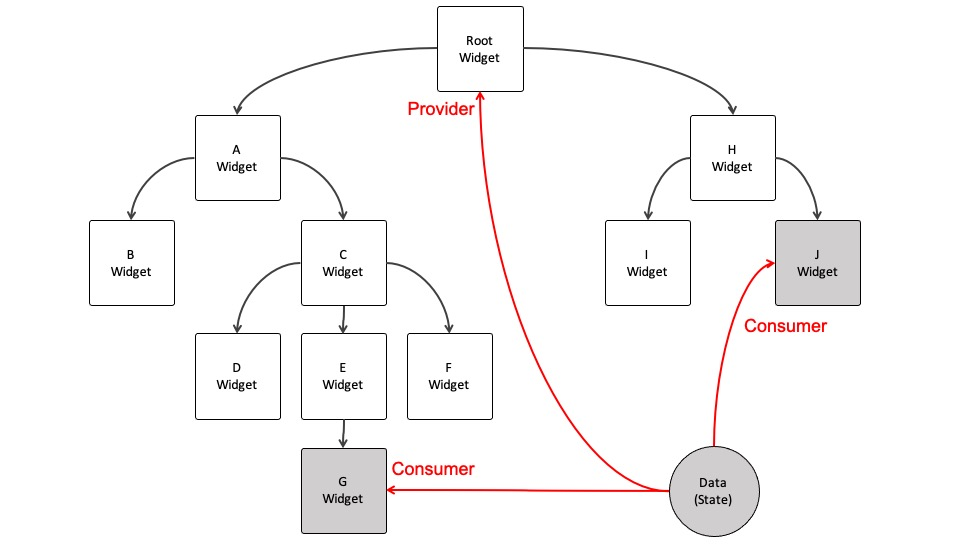
Provider를 사용할 때에는, 위젯 트리와 상관없이 데이터를 저장할 클래스를 생성하고, 해당 상태를 공유하는 공통 부모 위젯에 Provider를 제공하고, 상태를 사용하는 곳에는 Provider의 데이터를 읽어서 사용하게 된다.
document
패키지 사용
설치
터미널에서 밑의 명령어를 실행하여 provider를 추가한다.
$ flutter pub getpubspec.yaml
아래 구문이 추가됨을 확인할 수 있다.
dependencies:
  provider: ^5.0.0
import
provider를 소비하는 곳에 import한다.
import 'package:provider/provider.dart';간단한 예제로 알아보자
//counter.dart의 전체 소스
import 'package:flutter/material.dart';

class Counter with ChangeNotifier {
  int _count = 0;

  int getCount() {
    return _count;
  }

  void incrementCount() {
    _count++;

    notifyListeners();// 숫자가 증가했다는 것을 ChangeNotifierProvider에 알려주기 위해 notifyListeners()를 호출한다.
  }
}
notifyListeners
update 되었을 때, ChangeNotifierProvider에 알려주기 위해 호출한다.
import 'package:flutter/material.dart';
import 'package:provider/provider.dart';
import 'package:provider_ex/counter.dart';
void main() {
runApp(const MyApp());
}
class MyApp extends StatelessWidget {
const MyApp({Key? key}) : super(key: key);
// This widget is the root of your application.
Widget build(BuildContext context) {
return MaterialApp(
title: 'Flutter Demo',
theme: ThemeData(
primarySwatch: Colors.blue,
),
home: ChangeNotifierProvider<Counter>(
//provider가 제공된 MyHomePage하위의 모든 위젯은 provider에 접근이 가능하다
create: (_) => Counter(), //bulider -> create
child: const MyHomePage(title: 'Flutter Demo Home Page')),
);
}
}
class MyHomePage extends StatelessWidget {
const MyHomePage({Key? key, required this.title}) : super(key: key);
final String title;
//-> begin
// @override
// State<MyHomePage> createState() => _MyHomePageState();
// }
// class _MyHomePageState extends State<MyHomePage> {
//-> end // stateful -> stateless : 이제 provider로 상태 변화가 가능하니 stateful을 사용하지 않아도 됨.
//-> begin
//int _counter = 0;
// void _incrementCounter() {
// setState(() {
// _counter++;
// });
// }
//-> end // 이제 provider로
Widget build(BuildContext context) {
return Scaffold(
appBar: AppBar(
title: Text(title),
),
body: Center(
child: Column(
mainAxisAlignment: MainAxisAlignment.center,
children: <Widget>[
const Text(
'You have pushed the button this many times:',
),
Consumer<Counter>(
//Consumer는 값을 사용할 위젯을 감싼후 빌더에서 값을 넘겨 준다.
builder: (context, value, child) => Text(
//value == Cunsumer가 사용할 오브젝트 타입(여기서는 Counter)
value.getCount().toString(),
//'$_counter',
style: Theme.of(context).textTheme.headline4,
),
),
],
),
),
floatingActionButton: FloatingActionButton(
onPressed: () => Provider.of<Counter>(context, listen: false)
.incrementCount(), //provider는 사용할 곳에 직접 호출한다.
//listen : false 의 의미? notify를 받지 않는다... 왜? 여기는 플로팅버튼이니까! 바뀔 값이 없다구...
//context는 MyHomePage의 context이다.
//provider를 선언한 곳의 context를 가져오므로 에러 나면 어느 위치의 context를 사용하는 지 반드시 확인!
//Consumer는 context를 알아서 찾는다!(차이점)
tooltip: 'Increment',
child: const Icon(Icons.add),
),
);
}
}
Provider는 크게 생성 부분과 소비 부분으로 나누어 생각하면 된다.
생성 부분에서는 사용할 데이터 타입을 결정하고 해당 데이터에 대한 Provider를 만들고, 소비 부분에서는 Provider를 통해 데이터를 불러오거나 수정하는 등의 작업을 진행한다.
ChangeNotifierProvider
ChangeNotifierProvider를 통해서 Provider를 생성하면, Counter의 숫자가 증가할 때 UI의 숫자도 똑같이 증가하게 할 수 있다.
ChangeNotifierProvider는 ChangeNotifier의 notifyListeners()를 기다리다가, notifyListeners()가 호출되면, 자신의 자식을 재빌드하여 UI를 업데이트해주기 때문이다.
Provider 소비
Provider를 소비한다는 말은 Provider의 데이터 값을 변경하거나 화면에 보여주는 것을 의미한다.
지금의 경우에는 Counter의 숫자를 증가시키거나 화면에 보여주는 것이 Provider 소비가 되겠다.
Consumer
하나의 build 메소드에서 Provider를 생성도 하고 소비도 해야하는 상황이다. 이 때는 Consumer를 사용해야 Provider를 소비할 수 있다.
body: Center(
        child: Column(
          mainAxisAlignment: MainAxisAlignment.center,
          children: <Widget>[
            const Text(
              'You have pushed the button this many times:',
            ),
            Consumer<Counter>(
              builder: (context, value, child) => ElevatedButton(
                onPressed: () => Provider.of<Counter>(context, listen: false)
                    .incrementCount(),
                child: Text(value.getCount().toString()),
              ),
            ),
          ],
        ),
      ),
위의 예제는 consumer만을 사용하기 위해 만든 예제이다. 같은 공간에서 값을 바꾸고 보여줘야 하기 때문에 floatingActionButton에서 ElevatedButton으로 바꾸어 클릭할 때 마다 버튼의 Text를 갱신하였다.
Provider.of(context)
body: Center(
        child: Column(
          mainAxisAlignment: MainAxisAlignment.center,
          children: <Widget>[
            Text(
              'You have pushed the button this many times : ${Provider.of<Counter>(context).getCount()}',
            ),
          ],
        ),
      ),
      floatingActionButton: FloatingActionButton(
        onPressed: () =>
            Provider.of<Counter>(context, listen: false).incrementCount(),
        tooltip: 'Increment',
        child: const Icon(Icons.add),
      ),
watch, read
- context.watch<T> ()의 경우, T의 데이터 값을 화면에 보여주는 용도로 사용한다. T의 데이터 값이 변경되었을 때, 위젯을 재빌드하여 변경된 데이터 값을 보여줘야 하기 때문이다.
- context.read<T>()의 경우, T의 데이터 값을 변경하는 등의 이벤트들을 위한 용도로 사용한다. 이러한 이벤트들은 T의 데이터 값의 변경에 따라 재빌드할 필요가 없기 때문이다.
위의 코드를 바꿔보자
floatingActionButton: FloatingActionButton(
        onPressed: () => context.read<Counter>().incrementCount(),//after
        //Provider.of<Counter>(context, listen: false).incrementCount()//before
        tooltip: 'Increment',
        child: const Icon(Icons.add),
      ),
만약에 onPressed: () => context.watch<Counter>().incrementCount() 로 수정한다면, 오류가 발생하는 것을 확인할 수 있다!
왜냐하면...
body: Center(
        child: Column(
          mainAxisAlignment: MainAxisAlignment.center,
          children: <Widget>[
            Text(
              'You have pushed the button this many times : ${context.watch<Counter>().getCount()}',
            ),
          ],
        ),
      ),
      floatingActionButton: FloatingActionButton(
        onPressed: () => context.read<Counter>().incrementCount(), //after
        //Provider.of<Counter>(context, listen: false).incrementCount()//before
        tooltip: 'Increment',
        child: const Icon(Icons.add),
      ),
위와 같이 쓰기 때문이다! Text를 자세히 보자!
InheritedWidget
widget에서 필요한 데이터를 전달해주는 가장 간단한 방식은 부모에서 자식으로 직접 전달해주는 것이다.
그러나 애플리케이션의 UI component와 비즈니스 로직이 추가되면서 점점 복잡해짐에 따라 필연적으로 특정 데이터를 필요로 하는 widget의 개수도 하나가 아니라 여러 개로 늘어날 것이다.
이렇게 되면 부모에서 자식으로 직접 데이터를 전달해주는 방식은 비효율적이다.
다행히도 flutter는 특별한 widget을 이용해서 특정 데이터를 계층상 아래에 있는 모든 widget에서 효율적으로 가져갈 수 있게 해주었다.
이 특별한 widget을 InheritedWidget이라고 부른다.
document
간단한 예제로 알아보자
class FrogColor extends InheritedWidget {
const FrogColor({
Key? key,
required this.color,
required Widget child,
}) : super(key: key, child: child);
final Color color;
static FrogColor of(BuildContext context) {
final FrogColor? result = context.dependOnInheritedWidgetOfExactType<FrogColor>();
assert(result != null, 'No FrogColor found in context');
return result!;
}
bool updateShouldNotify(FrogColor old) => color != old.color;
}updateShouldNotify
InheritedWidget이 어떠한 이유로 인해 update 되었을 때, 이 InheritedWidget에 의존하는 widget을 rebuild 할 지 결정하는 장소이다.
(위젯들에게 변경을 노티해야 하는지...)
메소드 구현
이 규칙은 BuildContext.dependOnInheritedWidgetOfExactType를 호출하는 InheritedWidget의 정적 메소드를 제공하는 데 사용된다.
이는 스코프 내에 없는 위젯에 대한 fallback을 스스로 정의할 수 있게 한다. 위의 예제의 경우 null을 리턴하지만, 기본값을 설정할 수도 있다.
상속된 위젯이 아닌 데이터를 반환하는 경우가 있다. 예를들어 위의 예제의 경우 FrogColor 위젯대신 Color를 반환 했을 수도 있다.
때때로 inherited widget 은 다른 class의 상세를 구현하며 private하다. of 메소드는 (이 경우에) public class에 할당된다.
예를들어 theme은 private inherited widget를 구현하는 stateless widget이고, Theme.of 는 BuildContext.dependOnInheritedWidgetOfExactType 를 이용하여 상속된 위젯을 찾고서 ThemeData를 반환한다.
of 메소드
현재 위젯에서 조상 위젯으로 거슬로 올라가고 싶을 때가 있다.
of 메소드를 사용하면 context에서부터 조상쪽으로 가장 가까운 Widget을 찾는 것이 가능하다.
메소드 호출
위젯트리에서 상속된 위젯 하위에 있어야 사용이 가능하다. 아래의 예시를 보자
//# 1 (working)
class MyPage extends StatelessWidget {
const MyPage({Key? key}) : super(key: key);
Widget build(BuildContext context) {
return Scaffold(
body: FrogColor(
color: Colors.green,
child: Builder(
builder: (BuildContext innerContext) {//이 buildContext 사용해야함
return Text(
'Hello Frog',
style: TextStyle(color: FrogColor.of(innerContext).color),
);
},
),
),
);
}
}//# 1 (not working)
class MyOtherPage extends StatelessWidget {
const MyOtherPage({Key? key}) : super(key: key);
Widget build(BuildContext context) {//이 buildContext를 사용하니까 안되지
return Scaffold(
body: FrogColor(
color: Colors.green,
child: Text(
'Hello Frog',
style: TextStyle(color: FrogColor.of(context).color),
),
),
);
}
}Redux
-
Single source of truth
- 동일한 데이터는 항상 같은 곳에서 가지고 온다.
- 즉, 스토어라는 하나뿐인 데이터 공간이 있다는 의미이다.
-
State is read-only
- 리액트에서는 setState 메소드를 활용해야만 상태 변경이 가능하다.
- 리덕스에서도 액션이라는 객체를 통해서만 상태를 변경할 수 있다.
-
Changes are made with pure functions
- 변경은 순수함수로만 가능하다.
- 리듀서와 연관되는 개념이다.
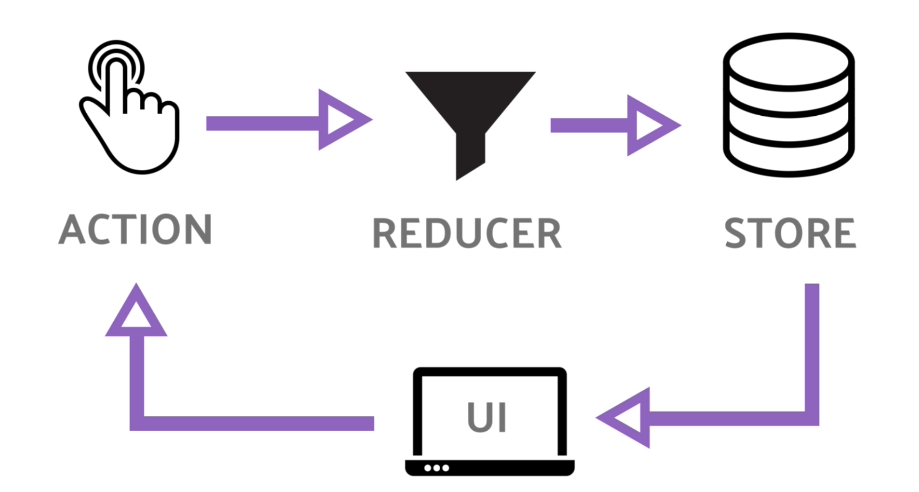 Store(스토어) – Action(액션) – Reducer(리듀서)
 -
Store (스토어)
- Store(스토어)는 상태가 관리되는 오직 하나의 공간이다.
- 컴포넌트와는 별개로 스토어라는 공간이 있어서 그 스토어 안에 앱에서 필요한 상태를 담는다.
- 컴포넌트에서 상태 정보가 필요할 때 스토어에 접근한다.
-
Action (액션)
- Action(액션)은 앱에서 스토어에 운반할 데이터를 말한다. (주문서)
-
Reducer (리듀서)
- Action(액션)을 Store(스토어)에 바로 전달하는 것이 아니다. Action(액션)을 Reducer(리듀서)에 전달해야한다.
- Reducer(리듀서)가 주문을 보고 Store(스토어)의 상태를 업데이트하는 것이다.
- Action(액션)을 Reducer(리듀서)에 전달하기 위해서는 dispatch() 메소드를 사용해야한다.
document
패키지 사용
설치
터미널에서 밑의 명령어를 실행하여 Redux를 추가한다.
$ flutter pub add flutter_reduxpubspec.yaml
아래 구문이 추가됨을 확인 할 수 있다.
dependencies:
  flutter_redux: ^0.9.0
import
import 'package:flutter_redux/flutter_redux.dart';간단한 예제로 알아보자
import 'package:flutter/material.dart';
import 'package:flutter_redux/flutter_redux.dart';
import 'package:redux/redux.dart';
// One simple action: Increment
enum Actions { Increment }
// reducer : 증가 action에 따라 이전 count을 가지고 증감시킴.
int counterReducer(int state, dynamic action) {
return action == Actions.Increment ? state + 1 : state;
}
void main() {
// store 를 main()이나 State 함수 안에 전역변수로 생성한다.
// 이게 'build'에 직접 생성하는 것보다 핫리로드에서 더 잘 동작함.
final store = Store<int>(counterReducer, initialState: 0);
runApp(FlutterReduxApp(
title: 'Flutter Redux Demo',
store: store,
));
}
class FlutterReduxApp extends StatelessWidget {
final Store<int> store;
final String title;
FlutterReduxApp({Key? key, required this.store, required this.title})
: super(key: key);
Widget build(BuildContext context) {
// StoreProvider 는 MaterialApp 이나 WidgetsApp을 감싸야 한다.
// 이렇게 하면 모든 라우트가 store에 접근할 수 있게 된다.
return StoreProvider<int>(
// store를 StoreProvider에 전달한다.
// StoreConnector 로 접근하면 `Store` 값을 찾고 사용할 수 있다..
store: store,
child: MaterialApp(
theme: ThemeData.dark(),
title: title,
home: Scaffold(
appBar: AppBar(title: Text(title)),
body: Center(
child: Column(
mainAxisAlignment: MainAxisAlignment.center,
children: [
// Store 를 카운트 값을 렌더링하는 텍스트 위젯에 연결한다.
//
// 텍스트 위젯을 StoreConnector로 감싼다. StoreConnector는 가까운 StoreProvider로 부터 Store을 찾는다.
// 가장 최근 카운트 값을 string으로 변환 후 builder에 count(string)로 전달한다.
//
// 버튼이 눌릴 떄마다 action은 dispatch되고 reducer에 의해 실행된다.
// reducer가 state를 업데이트 하고 나서 위젯은 자동으로 가장 마지막 값으로 rebuild된다.
// subscriptions 이나 Streams을 수동으로 관리 할 필요가 없다!
StoreConnector<int, String>(
converter: (store) => store.state.toString(),
builder: (context, count) {
return Text(
'The button has been pushed this many times: $count',
style: Theme.of(context).textTheme.displayMedium,
);
},
)
],
),
),
// Store를 FloatingActionButton에 연결한다.
// Store를 사용하여 증가 액션(Increment action)을 보내는(dispatch) 콜백을 생성한다.
// 그리고 이 콜백을 onPresssed handler로 전달한다.
floatingActionButton: StoreConnector<int, VoidCallback>(
converter: (store) {
// `VoidCallback`을 리턴한다.
// (파라미터도 없고 리턴값도 없다)
// 증가 액션(Increment action)을 보내는 역할만 한다.
return () => store.dispatch(Actions.Increment);
},
builder: (context, callback) {
return FloatingActionButton(
// `callback`을 `onPressed`에 전달
onPressed: callback,
tooltip: 'Increment',
child: Icon(Icons.add),
);
},
),
),
),
);
}
}
StoreProvider
- 기본 위젯이다. 지정된 Redux Store를 요청하는 모든 하위 항목에게 전달된다.
StoreBuilder
- StoreProvider 로부터 Store와 build 함수를 전달받는 하위 위젯(자식위젯)
StoreConnector
- 가장 가까운 상위 StoreProvider에서 Store를 가져오고, Store를 지정된 변환 함수로 변환하여 ViewModel로 전달하고, ViewModel을 Builder 함수에 전달하는 하위 위젯이다.
저장소가 변경 이벤트를 발생시킬 때마다 위젯이 자동으로 재구성된다. 구독을 관리할 필요가 없다!
BLoC
BLoC는 Presentation Layer와 business Logic을 분리하여 코드를 작성할 수 있도록 해준다.
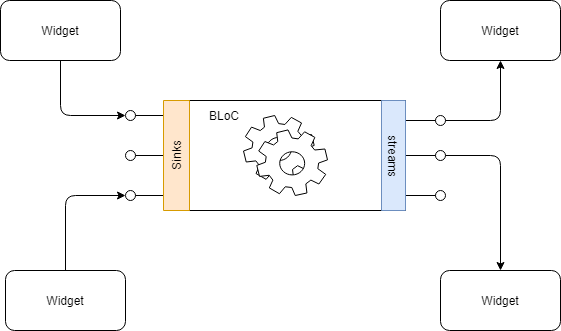
BLoC는 스트림을 이용하여 만들어진다.
위젯은 Sinks (입구)를 통하여 BLoc에 이벤트를 보낸다.
BLoC객체는 위젯으로부터 이벤트를 전달받으면 필요한 Repository 등으로부터 데이터를 전달받아 business Logic을 처리한다.
business Logic을 처리한 후, BLoC 객체를 구독 중인 UI 객체들에게 상태를 전달한다
위에서 이야기한 대로 위젯은 BLoC객체의 stream을 구독하고 있어서 BLoC객체의 streams를 통해 결과를 전달받는다.
BLoC객체가 상태가 변경되면 BLoC의 상태를 구독 중인 위젯들은 그 상태로 UI를 변경한다.
- UI에서 여러 BLoC이 존재.
- UI와 business로직을 분리하여 관리.
- BLoC은 여러 UI에서 구독. (재사용이 가능)
- BLoC만을 분리하여 테스트도가 가능.
document
패키지 사용
설치
터미널에서 밑의 명령어를 실행하여 BLoC를 추가한다.
$ flutter pub add flutter_blocpubspec.yaml
아래 구문이 추가됨을 확인 할 수 있다.
dependencies:
  flutter_bloc: ^8.0.1
import
import 'package:flutter_bloc/flutter_bloc.dart';간단한 예제로 알아보자
import 'package:flutter/material.dart';
import 'package:flutter_bloc/flutter_bloc.dart';
void main() => runApp(CounterApp());
class CounterApp extends StatelessWidget {
Widget build(BuildContext context) {
return MaterialApp(
home: BlocProvider(
//BlocProvider로 감싸면 하위 위젯들은 모두 접근 가능하다!
create: (_) => CounterCubit(),
child: CounterPage(),
),
);
}
}
class CounterPage extends StatelessWidget {
Widget build(BuildContext context) {
return Scaffold(
appBar: AppBar(title: const Text('Counter')),
body: BlocBuilder<CounterCubit, int>(
//count를 사용할 곳에 BlocBuilder를 사용하여 감싸준다.
builder: (context, count) => Center(child: Text('$count')),
),
floatingActionButton: Column(
crossAxisAlignment: CrossAxisAlignment.end,
mainAxisAlignment: MainAxisAlignment.end,
children: <Widget>[
FloatingActionButton(
child: const Icon(Icons.add),
onPressed: () => context.read<CounterCubit>().increment(),
),
const SizedBox(height: 4),
FloatingActionButton(
child: const Icon(Icons.remove),
onPressed: () => context.read<CounterCubit>().decrement(),
),
],
),
);
}
}
class CounterCubit extends Cubit<int> {
CounterCubit() : super(0);
void increment() => emit(state + 1);
void decrement() => emit(state - 1);
}BlocBuilder
BlocBuilder는 새로운 State를 전달 받았을 때 호출하여 widget을 변경한다. Streambuild, FutureBuilder와 유사
BlocBuilder<BlocA, BlocAState>(
  builder: (context, state) {
    // return widget here based on BlocA's state
  }
)
condition 옵션을 이용하여 이전 BLoC의 State와 현재 BLoC의 State를 취하고 bool을 반환한다.
condition이 false를 반환하면 builder를 호출하지 않는다.
BlocBuilder<BlocA, BlocAState>(
  condition: (previousState, state) {
    // return true/false to determine whether or not
    // to rebuild the widget with state
  },
  builder: (context, state) {
    // return widget here based on BlocA's state
  }
)
BlocProvider
BlocProvider는 child에 Bloc을 제공하는 Flutter widget이다.
BLoC의 단일 인스턴스가 서브 트리 내의 여러 위젯에 제공될 수 있도록 종속성 주입 (DI) 위젯으로 사용된다.
BlocProvider(
  create: (BuildContext context) => BlocA(),
  child: ChildA(),
);
서브 트리에서 BLoC을 참조하여 사용하고자 한다면 아래와 같이 사용 가능하다.
BlocProvider.of<BlocA>(context)MultiProvider
MultiBlocProvider는 여러여러 BlocProvider 위젯을 하나로 병합하는 Flutter 위젯이다.
BlocProvider를 중첩할 필요가 없다.
//BlocProvider
BlocProvider<BlocA>(
  create: (BuildContext context) => BlocA(),
  child: BlocProvider<BlocB>(
    create: (BuildContext context) => BlocB(),
    child: BlocProvider<BlocC>(
      create: (BuildContext context) => BlocC(),
      child: ChildA(),
    )
  )
)
//MultiBlocProvider
MultiBlocProvider(
providers: [
BlocProvider<BlocA>(
create: (BuildContext context) => BlocA(),
),
BlocProvider<BlocB>(
create: (BuildContext context) => BlocB(),
),
BlocProvider<BlocC>(
create: (BuildContext context) => BlocC(),
),
],
child: ChildA(),
)BlocListener
BlocListener는 해당 Bloc의 State가 변경되었을 때 호출되는 위젯이다.
BlocListener<BlocA, BlocAState>(
  listener: (context, state) {
    // do stuff here based on BlocA's state
  },
  child: Container(),
)
condition속성을 이용하여 제어도 가능하다.
BlocListener<BlocA, BlocAState>(
  condition: (previousState, state) {
    // return true/false to determine whether or not
    // to call listener with state
  },
  listener: (context, state) {
    // do stuff here based on BlocA's state
  }
  child: Container(),
)
MultiBlocListener
MultiBlocListener는 여러 BlocListener 위젯을 하나로 병합하는 Flutter 위젯이다.
MultiBlocListener(
  listeners: [
    BlocListener<BlocA, BlocAState>(
      listener: (context, state) {},
    ),
    BlocListener<BlocB, BlocBState>(
      listener: (context, state) {},
    ),
    BlocListener<BlocC, BlocCState>(
      listener: (context, state) {},
    ),
  ],
  child: ChildA(),
)
GetX
GetX는 상태 관리 패키지로 많이 알려져있지만, 사실 이보다는 더 많은 기능을 가지고 있다. Flutter에서 GetX를 사용하게 되면, 상태 관리뿐만 아니라, Route, 다국어 지원, 화면 크기 가져오기, API 호출 기능 등 다양한 기능을 제공하고 있다.
GetX에는 세 가지 기본 원칙이 있다.
성능: GetX는 성능 및 최소 리소스 소비에 중점을 둔다. Stream 또는 ChangeNotifier을 사용하지 않는다.
생산성: GetX는 쉽고 쾌적한 구문을 사용한다. 개발 시간을 절약하고 응용 프로그램이 제공할 수 있는 최대 성능을 제공할 수 있다.
일반적으로 개발자는 메모리에서 컨트롤러를 제거하는 것에 관심을 가져야 한다. GetX에서는 기본적으로 사용되지 않는 리소스가 메모리에서 제거되므로 이 작업은 필요하지 않는다.
이 파일을 메모리에 보관하려면 종속성에서 "permanent: true"을 명시적으로 선언해야 한다. 이렇게 하면 시간을 절약할 수 있을 뿐만 아니라 메모리에 대한 불필요한 의존성을 줄일 수 있다. 종속성 로드도 기본적으로 late로 동작한다.
조직: View, 프레젠테이션 논리, 비즈니스 논리, 종속성 주입 및 탐색의 전체 디커플링(결합 제거)을 수행할 수 있다.
경로 간 탐색에 context가 필요하지 않으므로 위젯 트리(시각화)에 의존하지 않는다.
MultiProviders를 통해 Controllers/Models/Blocs 클래스를 위젯 트리에 삽입할 필요가 없다. 이를 위해 GetX는 자체 종속성 주입 기능을 사용하여 DI를 뷰에서 완전히 분리한다.
기본적으로 깨끗한 코드를 사용하여 응용 프로그램의 각 기능을 어디서 찾을 수 있는지 알 수 있다.
GetX도 Android, iOS, Web, Mac, Linux, Windows 및 서버에서 동일한 코드로 실행할 수 있다.
document
패키지 사용
설치
터미널에서 밑의 명령어를 실행하여 GetX를 추가한다.
$ flutter pub add getpubspec.yaml
아래 구문이 추가됨을 확인 할 수 있다.
dependencies:
  get: ^4.6.3
import
import 'package:get/get.dart';간단한 예제로 알아보자
import 'package:flutter/material.dart';
import 'package:get/get.dart';
void main() => runApp(const GetMaterialApp(home: Home()));
class Home extends StatelessWidget {
//getX로 상태관리를 할 예정이므로 더이상 StatefulWidget을 사용할 필요가 없다.
const Home({Key? key}) : super(key: key);
Widget build(context) {
// Get.put()을 사용하여 클래스를 인스턴스화하여 해당 클래스의 모든 "하위" 경로에 사용할 수 있도록 한다.
final Controller c = Get.put(Controller());
return Scaffold(
// appBar: AppBar(
// title: GetBuilder<Controller>(builder: (controller) {
// return Text(
// '${controller.count}',
// style: Theme.of(context).textTheme.headline4,
// );
// }),
// ),//1. 단순형 상태관리
appBar: AppBar(title: Obx(() => Text("Clicks: ${c.count}"))),
//2. 반응형 상태관리
// Use Obx(()=> 카운트가 변경될 때마다 Text()를 업데이트한다.
body: Center(
child: ElevatedButton(
child: Text("Go to Other"),
onPressed: () => Get.to(
Other()), // Navigator.push를 간단한 Get.to()로 대체한다. context가 필요없다!
),
),
floatingActionButton: FloatingActionButton(
child: Icon(Icons.add),
onPressed: c.increment,
),
);
}
}
class Other extends StatelessWidget {
// Get을 이용해 다른 페이지에서 사용 중인 컨트롤러를 찾아서 해당 컨트롤러로 리디렉션하도록 요청할 수 있다.
final Controller c = Get.find();
Widget build(context) {
// 업데이트된 변수에 접근한다.
return Scaffold(
body: Center(
child: Text("${c.count}"),
),
);
}
}
/*
class CountController extends GetxController {//1. 단순형 상태관리
var count = 0;
void increment() {
count++;
update();//상태가 변경되었음을 알림!
}
}*/
class Controller extends GetxController {//2. 반응형 상태관리
var count = 0.obs;//RxInt와 같은 반응형 상태 변수가 된다.(반응형 상태관리)
increment() => count++;
}
StatelessWidget
getX로 상태관리를 할 예정이므로 더이상 StatefulWidget을 사용할 필요가 없다.
Get.put()
상태 관리를 하기 위해서는 GetX로 만든 컨트롤러를 사용하여 등록(Register)할 필요가 있다. 클래스를 인스턴스화하여 해당 클래스의 모든 "하위" 경로에 사용할 수 있도록 한다.
Get.to()
Navigator.push를 간단한 Get.to()로 대체한다. context가 필요없다!
Get.find()
Get을 이용해 다른 페이지에서 사용 중인 컨트롤러를 찾아서 해당 컨트롤러로 리디렉션하도록 요청할 수 있다.
udpate
단순형 상태관리에서 상태가 변경되었음을 알린다.
getBuilder
단순형 상태관리에서 상태값을 반영하기 위해 사용한다.
.obs;
RxInt와 같은 반응형 상태 변수가 된다.
Obx(() =>
카운트가 변경될 때마다 Text()를 업데이트한다.
RiverPod
document
패키지 사용
설치
터미널에서 밑의 명령어를 실행하여 RiverPod를 추가한다.
$ flutter pub add riverpodpubspec.yaml
아래 구문이 추가됨을 확인 할 수 있다.
dependencies:
  riverpod: ^1.0.3
import
import 'package:riverpod/riverpod.dart';간단한 예제로 알아보자
import 'package:flutter/material.dart';
import 'package:hooks_riverpod/hooks_riverpod.dart';
void main() {
runApp(
ProviderScope(//전체 앱에서 riverpod 사용이 가능하다.
child: MyApp(),
),
);
}
class MyApp extends StatelessWidget {
Widget build(BuildContext context) {
return MaterialApp(
title: 'Counter Demo',
theme: ThemeData(
primarySwatch: Colors.blue,
),
home: CounterPage(),
);
}
}
class CounterPage extends HookConsumerWidget {
// HookConsumerWidget은 HookWidget과 HookWidget의 기능을 포함한다.
// provider를 구독하는 것과 hooks를 사용하는 것이 모두 가능하다.
Widget build(BuildContext context, WidgetRef ref) {
// HookConsumerWidget은 build 메소드 안에서 hooks을 사용할 수 있도록 도와줍니다.
final CounterState counterState = ref.watch(counterProvider);
final CounterNotifier counterNotifier = ref.watch(counterProvider.notifier);
// 프로바이더를 사용/구독하기 위해서 ref 매개변수도 사용할 수 있습니다.
return Scaffold(
appBar: AppBar(
title: const Text('Counter'),
),
body: Container(
width: double.infinity,
child: Column(
mainAxisAlignment: MainAxisAlignment.center,
crossAxisAlignment: CrossAxisAlignment.center,
children: [
Padding(
padding: const EdgeInsets.all(10),
child: Text('Count: ${counterState.value}'),
),
ElevatedButton(
onPressed: () => counterNotifier.increase(),
child: const Text('Increase'),
),
ElevatedButton(
onPressed: () => counterNotifier.decrease(),
child: const Text('Decrease'),
)
],
),
),
);
}
}
//////////// CounterState /////////////////
class CounterState {
CounterState({
this.value = 0,
});
final int value;
/// 'freezed'를 사용해 복잡한 객체를 핸들링할 경우 아래와 같이 사용할 수 있다.
CounterState copyWith({int? count}) {
return CounterState(
value: count ?? value,//count가 null이 아니면 count, null 이면 value
);
}
}
//////////// CounterNotifier /////////////////
final counterProvider =
StateNotifierProvider.autoDispose<CounterNotifier, CounterState>(
(_) => CounterNotifier(),
);
//StateNotifierProvider : StateNotifier를 수신하고 외부에 노출하는 provider이다.(riverpod의 권장 솔루션)
class CounterNotifier extends StateNotifier<CounterState> {
//StateNotifier : state에 새로운 값을 할당하며 자동으로 listeners에 노티한다. 그리고 ui를 업데이트한다.
CounterNotifier() : super(CounterState());
void increase() => state = state.copyWith(count: state.value + 1);
void decrease() => state = state.copyWith(count: state.value - 1);
}
ProviderScope
이 위젯의 하위에서 riverpod 사용이 가능하다.
HookConsumerWidget
HookConsumerWidget은 HookWidget과 HookWidget의 기능을 포함한다.
provider를 구독하는 것과 hooks를 사용하는 것이 모두 가능하다.
WidgetRef ref
프로바이더를 사용/구독하기 위해서 ref 매개변수도 사용할 수 있습니다.
StateNotifier
state에 새로운 값을 할당하며 자동으로 listeners에 노티한다. 그리고 ui를 업데이트한다.
StateNotifierProvider
StateNotifier를 수신하고 외부에 노출하는 provider이다.(riverpod의 권장 솔루션)
그래서 뭐 쓰라고?
다음을 참고해 보자!
Top 10 State Management for Flutter
유투버 추천 상태관리
- setState : 상태관리가 많이 필요없는 간단한 앱
- GetX : 다양한 기능이 포함된 상태관리 앱
- RiverPod : 큰 프로젝트에도 안전하고 유지보수가능한 상태관리 앱