#7 침대에서 벗어나기
useRef 로 컴포넌트 안의 변수 만들기
우리가 컴포넌트에서 특정 DOM을 선택할려면, ref를 사용해야한다고 배웠다.
이 때, Hook의 한 종류인 useRef을 사용해서 설정해주면 된다.
useRef은 DOM을 선택하는 외에 다른 용도가 존재한다.
바로, 컴포넌트 안에서 조회 및 수정 할 수 있는 변수를 관리하는 것이다.
useRef으로 관리하는 변수는 다음과 같이 값을 관리 할 수 있다.
- setTimeout, setInterval 을 통해서 만들어진 id
- 외부 라이브러리를 사용하여 생성된 인스턴스
- scroll 위치
App 컴포넌트에 useRef을 사용해서 변수를 관리할 것 이다.
용도는 배열에 새 항목을 추가할건데, 새 항목에서 사용 할 고유 id를 관리하는 일을 한다.
UserList 컴포넌트에 배열을 직접 선언을 했는데, 이번에는 배열을 App에다가 선언하고 UserList에게 props로 전달을하는 것이다.
App.js
import React from 'react';

import UserList from './UserList';

function App() {
  const users = [
    {
      id: 1,
      username: 'velopert',
      email: 'public.velopert@gmail.com'
    },
    {
      id: 2,
      username: 'tester',
      email: 'tester@example.com'
    },
    {
      id: 3,
      username: 'liz',
      email: 'liz@example.com'
    }
  ];
  return <UserList users={users} />;
}

export default App;
UserList.js
import React from 'react';

function User({ user }) {
  return (
    <div>
      <b>{user.username}</b> <span>({user.email})</span>
    </div>
  );
}

function UserList({ users }) {
  return (
    <div>
      {users.map(user => (
        <User user={user} key={user.id} />
      ))}
    </div>
  );
}

export default UserList;
이제 App에서 useRef( )를 사용하여 nextId 라는 변수를 만들어본다.
App.js
import React, { useRef } from 'react';
import UserList from './UserList';

function App() {
  const users = [
    {
      id: 1,
      username: 'velopert',
      email: 'public.velopert@gmail.com'
    },
    {
      id: 2,
      username: 'tester',
      email: 'tester@example.com'
    },
    {
      id: 3,
      username: 'liz',
      email: 'liz@example.com'
    }
  ];

  const nextId = useRef(4);
  const onCreate = () => {
    // 나중에 구현 할 배열에 항목 추가하는 로직
    // ...

    nextId.current += 1;
  };
  return <UserList users={users} />;
}

export default App;
useRef( )에서 파라미터로 값을 넣어주면, 이 값이 .current의 기본값으로 설정된다.
그리고 이 값을 수정 할때에 .current 값을 수정하면 되고 조회 할 때에는 .current 를 조회하면 된다.
배열에 항목 추가하기
이번에는 배열에 새로운 항목을 추가하는 방법에 대해 알아보겠다.
input 두 개와 button 한개로 이루어진 CreateUser 컴포넌트를 src에 만들어보겠다.
CreateUser.js
import React from 'react';

function CreateUser({ username, email, onChange, onCreate }) {
  return (
    <div>
      <input
        name="username"
        placeholder="계정명"
        onChange={onChange}
        value={username}
      />
      <input
        name="email"
        placeholder="이메일"
        onChange={onChange}
        value={email}
      />
      <button onClick={onCreate}>등록</button>
    </div>
  );
}

export default CreateUser;
이번 컴포넌트에서 상태관리를 하지 않고 App 파일에 하고, input의 값 및 이벤트로 등록할 함수들을 props로 넘겨받아서 사용해보겠다.
App 파일을 밑에처럼 수정해본다.
App.js
import React, { useRef } from 'react';
import UserList from './UserList';
import CreateUser from './CreateUser';

function App() {
  const users = [
    {
      id: 1,
      username: 'velopert',
      email: 'public.velopert@gmail.com'
    },
    {
      id: 2,
      username: 'tester',
      email: 'tester@example.com'
    },
    {
      id: 3,
      username: 'liz',
      email: 'liz@example.com'
    }
  ];

  const nextId = useRef(4);
  const onCreate = () => {
    // 나중에 구현 할 배열에 항목 추가하는 로직
    // ...

    nextId.current += 1;
  };
  return (
    <>
      <CreateUser />
      <UserList users={users} />
    </>
  );
}

export default App;
화면구현은...

CreateUser 컴포넌트가 필요한 props를 App에서 준비해준다.
App.js
import React, { useRef, useState } from 'react';
import UserList from './UserList';
import CreateUser from './CreateUser';

function App() {
  const [inputs, setInputs] = useState({
    username: '',
    email: ''
  });
  const { username, email } = inputs;
  const onChange = e => {
    const { name, value } = e.target;
    setInputs({
      ...inputs,
      [name]: value
    });
  };
  const users = [
    {
      id: 1,
      username: 'velopert',
      email: 'public.velopert@gmail.com'
    },
    {
      id: 2,
      username: 'tester',
      email: 'tester@example.com'
    },
    {
      id: 3,
      username: 'liz',
      email: 'liz@example.com'
    }
  ];

  const nextId = useRef(4);
  const onCreate = () => {
    // 나중에 구현 할 배열에 항목 추가하는 로직
    // ...

    setInputs({
      username: '',
      email: ''
    });
    nextId.current += 1;
  };
  return (
    <>
      <CreateUser
        username={username}
        email={email}
        onChange={onChange}
        onCreate={onCreate}
      />
      <UserList users={users} />
    </>
  );
}

export default App;
input에 값을 입력하고 등록 버튼을 눌렀을 때, input 값들이 초기화된다.
버튼을 클릭하면...
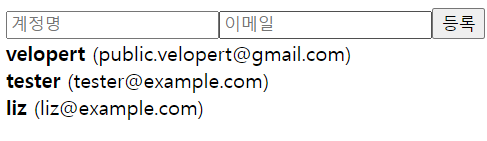
잘 초기화되서 출력되었다.
users에 useState를 사용해서 컴포넌트를 관리해보겠다.
App.js
import React, { useRef, useState } from 'react';
import UserList from './UserList';
import CreateUser from './CreateUser';

function App() {
  const [inputs, setInputs] = useState({
    username: '',
    email: ''
  });
  const { username, email } = inputs;
  const onChange = e => {
    const { name, value } = e.target;
    setInputs({
      ...inputs,
      [name]: value
    });
  };
  const [users, setUsers] = useState([
    {
      id: 1,
      username: 'velopert',
      email: 'public.velopert@gmail.com'
    },
    {
      id: 2,
      username: 'tester',
      email: 'tester@example.com'
    },
    {
      id: 3,
      username: 'liz',
      email: 'liz@example.com'
    }
  ]);

  const nextId = useRef(4);
  const onCreate = () => {
    // 나중에 구현 할 배열에 항목 추가하는 로직
    // ...

    setInputs({
      username: '',
      email: ''
    });
    nextId.current += 1;
  };
  return (
    <>
      <CreateUser
        username={username}
        email={email}
        onChange={onChange}
        onCreate={onCreate}
      />
      <UserList users={users} />
    </>
  );
}

export default App;
이제 배열에 새로운 항목을 추가할 차례다.
배열에 push 함수를 사용하면 안된다. 사용한다면 기존의 배열을 한번 복사하고 나서 사용해야 한다.
우리는 첫 번째로 spread 연산자를 사용해서 배열에 새 항목을 추가해보겠다.
App.js
import React, { useRef, useState } from 'react';
import UserList from './UserList';
import CreateUser from './CreateUser';
function App() {
const [inputs, setInputs] = useState({
username: '',
email: ''
});
const { username, email } = inputs;
const onChange = e => {
const { name, value } = e.target;
setInputs({
...inputs,
[name]: value
});
};
const [users, setUsers] = useState([
{
id: 1,
username: 'velopert',
email: 'public.velopert@gmail.com'
},
{
id: 2,
username: 'tester',
email: 'tester@example.com'
},
{
id: 3,
username: 'liz',
email: 'liz@example.com'
}
]);
const nextId = useRef(4);
const onCreate = () => {
const user = {
id: nextId.current,
username,
email
};
setUsers([...users, user]);
setInputs({
username: '',
email: ''
});
nextId.current += 1;
};
return (
<>
<CreateUser
username={username}
email={email}
onChange={onChange}
onCreate={onCreate}
/>
<UserList users={users} />
</>
);
}
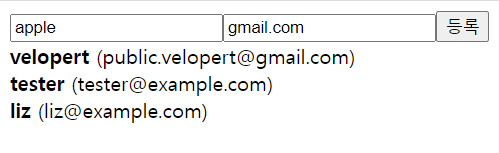
export default App;결과는...
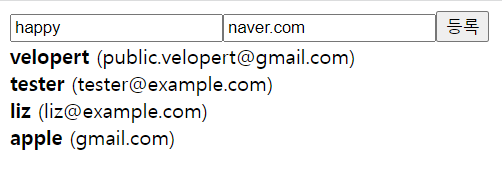
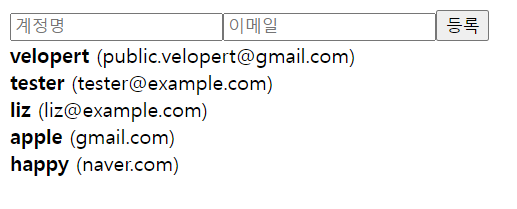
추가한 apple과 happy라는 이메일들은 잘 출력되서 나타났다.
두 번째 방법으로는 concat 함수를 사용하는 것인데 concat 함수는 기존의 배열을 수정하지 않고, 새로운 요소가 추가된 새로운 배열을 만든다.
App.js
import React, { useRef, useState } from 'react';
import UserList from './UserList';
import CreateUser from './CreateUser';

function App() {
  const [inputs, setInputs] = useState({
    username: '',
    email: ''
  });
  const { username, email } = inputs;
  const onChange = e => {
    const { name, value } = e.target;
    setInputs({
      ...inputs,
      [name]: value
    });
  };
  const [users, setUsers] = useState([
    {
      id: 1,
      username: 'velopert',
      email: 'public.velopert@gmail.com'
    },
    {
      id: 2,
      username: 'tester',
      email: 'tester@example.com'
    },
    {
      id: 3,
      username: 'liz',
      email: 'liz@example.com'
    }
  ]);

  const nextId = useRef(4);
  const onCreate = () => {
    const user = {
      id: nextId.current,
      username,
      email
    };
    setUsers(users.concat(user));

    setInputs({
      username: '',
      email: ''
    });
    nextId.current += 1;
  };
  return (
    <>
      <CreateUser
        username={username}
        email={email}
        onChange={onChange}
        onCreate={onCreate}
      />
      <UserList users={users} />
    </>
  );
}

export default App;
결과적으로 배열에 새 항목을 추가 할 때에는 이렇게 spread 연산자를 사용하거나, concat 함수를 사용하면된다.
참고 : 벨로퍼트와 함께하는 모던 리액트
느낀점 :
- 오늘은 useRef로 변수 만들기랑 배열에 새로운 항목을 추가하는 방법에 알아봤다.
- 공부하면 공부할수록 어렵고 아직 이해를 완전히 할려면 내가 직접 코드를 짜는 방법밖에 없다.
