✍3.0 Introduction
TypeScript란? JavaScript를 기반으로 한 프로그래밍 언어
프로그래밍 언어가 작동하기 전에 type을 확인하는 strongly-typed 언어이다.
const plus = (a:number, b:number) => a+b;
JavaScript언어에서 파란색 부분만 새로 추가된 것
✍3.1 DefinitelyTyped
- 타입스크립트 설치하기
npx create-react-app (내 앱 이름) --template typescript- styled-components 설치
npm i --save-dev @types/styled-components✍3.2 Typing the Props
interface란? object shape(객체 모양)을 TypeScript에게 설명해준다.
TypeScript에게 내 component가 가져야 하는 prop을 설명해주고 싶을 때 어떻게 해야하는지 배워보자
interface PlayerShape {
  name: string;
  age: number;
}

const sayHello = (playerObj: PlayerShape) =>
  `Hello ${playerObj.name} you are ${playerObj.age} years old.`;

console.log(sayHello({ name: "pororo", age: 7 }));
✍3.3 Optional Props
CircleProps interface에서,
bgColor → required, borderColor → optional
interface CircleProps {
  bgColor: string;
  borderColor?: string;
}
만약 Circle에서 borderColor는 optional이고, Contatiner에서 required이면 어떻게 해야할까?
App.tsx
function App() {
  return (
    <div>
      <Circle borderColor="white" bgColor="teal" />
      <Circle bgColor="tomato" />
    </div>
  );
}
Circle.tsx
interface ContainerProps {
  bgColor: string;
  borderColor: string;
}

const Container = styled.div<ContainerProps>`
  width: 200px;
  height: 200px;
  background-color: ${(props) => props.bgColor};
  border-radius: 100px;
  border: 1px solid ${(props) => props.borderColor};
`;

interface CircleProps {
  bgColor: string;
  borderColor?: string;
}

function Circle({ bgColor, borderColor }: CircleProps) {
  return (
    <Container
      bgColor={bgColor}
      borderColor={borderColor ?? bgColor}
    ></Container>
  );
}
Contatiner의 borderColor에 초기값을 주면 된다.
borderColor는 사용자가 만든 borderColor값이며, 만약 undefined된 상태라면 초기값을 보낸다.
borderColor={borderColor ?? (초기값) }
default값을 argument에서 설정할수도 있다.
function Circle({ bgColor, borderColor, text = "default text" }: CircleProps) {}✍3.4 State
const [counter,setCounter] = useState(1);useState(1) 처럼 초기값을 number로 줬을 때, TypeScript는 앞으로도 계속 number 일거라고 추측한다.
많은 경우에는 같은 타입으로 시작하고 끝나는데, 아주 극소수의 경우에는 다른 타입으로 끝날수도 있다.
const [value, setValue] = useState<number | string>(0);
  setValue(2);
  setValue("hello");
✍3.5 Forms
처음 onChange = (event) => {} 함수를 선언하면, event부분에서 에러가 날것이다.
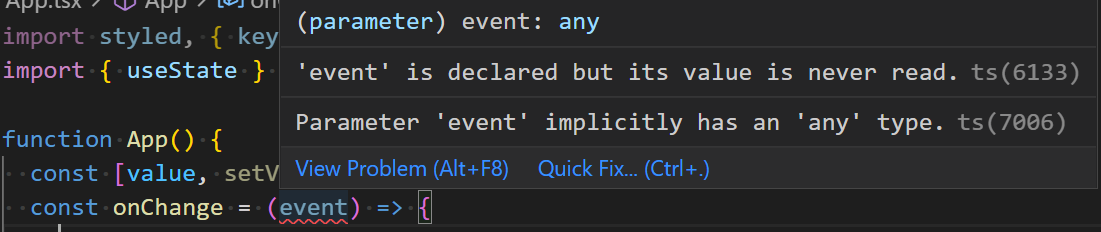 'any'는 TypeScript의 타입이고, 무엇이든 될 수 있다는 것을 뜻한다.
그냥 any를 사용하는 것보다 타입스크립트에게 설명해 주는 방법이 더 좋은데, 다음과 같은 방법을 사용한다. (FormEvent등 쓰는 방법을 알기 위해서는 그냥 구글링하면 된다)
 const onChange = (event: React.FormEvent<HTMLInputElement>) => {
    console.log(event.currentTarget.value);
  };
✅추가적으로 ES6문법을 공부해보자.
const onChange = (event: React.FormEvent<HTMLInputElement>) => {
    const {
      currentTarget: { value },
    } = event;
  };
여기서 const {currentTarget: {value}} = event;
코드가 이해가 잘 되지 않아 찾아봤는데,
event안 currentTarget안에 value 값을 기존 이름 그대로 value 라는 변수를 만드는 ES6 문법이라고 한다.
const value = event.currentTarget.value 랑 같은데, currentTarget안에서 여러개를 가져오고 싶을 때 유용하게 사용할 수 있다.
const value = event.currentTarget.value;
const tagName = event.currentTarget.tagName;
const width = event.currentTarget.width;
const id = event.currentTarget.id;

//같은 코드
const {
	currentTarget: {value,tagName,width,id}
    } = event;
위 네줄의 코드와 아래 코드는 서로 같다.
✍3.6 Themes
TypeScript와 styled components 테마를 연결해보는 챕터
https://styled-components.com/docs/api#typescript
styled.d.ts 파일 생성
일종의 우리가 설치해 놓은 파일을 override, 내 styled components의 테마 정의를 확장하는 것이다.
styled.d.ts
declare module "styled-components" {
  export interface DefaultTheme {
    textColor: string;
    bgColor: string;
  }
}
theme.ts
import { DefaultTheme } from "styled-components";

export const lightTheme: DefaultTheme = {
  bgColor: "white",
  textColor: "black",
};

export const darkTheme: DefaultTheme = {
  bgColor: "black",
  textColor: "white",
};