0. 폴더구조
- 본인의 폴더 구조 스타일 정리
- /PROJECT
	└─ /public
    	└─ favicon.ico
        └─ index.html
	└─ /src
		└─ /api
		└─ /components
        	└─ 기능별 폴더
            └─ layout (혹은 common)
		└─ /router
        	└─ index.js
		└─ /store
        	└─ /modules
            └─ index.js
		└─ /views
		└─ App.vue
		└─ main.js
1. api(axios)
axios를 import하여 백엔드 디폴트 주소를 설정하여 원하는 api로 만들어 사용
- http.js 같은 파일로 고정 url의 axios를 따로 편하게 만듦
- JWT를 사용할 경우 axios interceptor로 토큰 검증하는 부분도 뒷 부분에 작성
import axios from "axios";

// axios 객체 생성
const http = axios.create({
  baseURL: "백엔드 default 주소",
  // "https://cors-anywhere.herokuapp.com/http://i7a801.p.ssafy.io:8080/api": cors 이슈로 proxy서버를 사용할 때 앞에 붙여 사용
  headers: {
    "Content-type": "application/json",
  },
});

export default http;

//http.interceptors.response.use( ~~~ );
2. Store
- vue2와 동일
- 가독성있고 쉽게 분류하기 위해서 modules라는 하위 폴더를 만들고 각 기능에 해당하는 Store.js 파일을 만든 후, index.js에서 각 모듈을 import하여 사용
- 크게 state, getters, mutations, actions, modules로 나뉨
- state : store의 변수. 새로고침하면 날라감
- getters : state 값을 가져올 때 사용
- mutations : state 값을 바꿀 때 사용. commit을 이용해 사용.
- actions : 주로 백엔드와 통신을 할 때 사용. dispatch로 사용.
- 필요 시, async와 await로 비동기적으로 실행 가능 (하나의 처리가 끝나고 다음 처리를 진행함)
- 파라미터에 { getters, commit, dispatch }를 이용해 원하는 함수를 사용 가능
- axios의 then에서 파라미터로 res가 아닌 {data}로 데이터만 뽑아 쓸 수 있음
// jwt 헤더를 포함시킨 store 예시 샘플
import http from "@/api/http";

export const rankingStore = {
  state: {
    data: null,
  },
  getters: {
    getData(state) {
      return state.data;
    },
  },
  mutations: {
    SET_DATA(state, data) {
      state.data = data;
    },
  },
  actions: {
    async getData({ commit, getters }, param) {
      await http
        .get("ranking/til/" + param, {
          headers: getters.authHeader,
        })
        .then(({ data }) => {
          console.log("데이터 받아오기 성공");
          commit("SET_DATA", data);
        })
        .catch((e) => {
          console.error(e);
        });
    },
  },
  modules: {},
};
3. view
- MainView.vue와 기능별 View를 만들고 여기서 컴포넌트들을 라우터로 호출
- 해당 View에서 공통적으로 사용할 부분은 View에 작성을 하고, 아닌 부분은 각 컴포넌트에 작성
<template>
  <router-view></router-view>
</template>

<script>
export default {
  name: "ProfileView",
  components: {},
};
</script>

<style></style>
4. Router
- index.js에 router 내용을 작성
- Vue2와 동일
- import는 최상단에 하거나 routes에 선언하는 곳에 쓸 수 있음
- children으로 view의 하위 요소들을 import할 수 있고 path에 ':param'으로 url을 통해 param을 주고 받을 수 있다.
- createRouter에서 히스토리모드(createWebHistory), 해시모드(createWebHashHistory)를 설정할 수 있음. (vue2와 다름)
import { createRouter, createWebHashHistory } from "vue-router";
import MainView from "../views/MainView.vue";
const routes = [
  {
    path: "/",
    name: "mainview",
    component: MainView,
  },
  {
    path: "/til",
    name: "TilView",
    component: () => import("@/views/TilView.vue"),
    children: [
      {
        path: "create",
        name: "TilCreate",
        component: () => import("@/components/til/TilCreate.vue"),
      },
      {
        path: ":tilPk/edit",
        name: "TilUpdate",
        component: () => import("@/components/til/TilUpdate.vue"),
      },
      {
        path: "list/my/:userId",
        name: "TilList",
        component: () => import("@/components/til/TilListLayout.vue"),
      },
    ],
  },
];

//여기서 히스토리, 해시모드를 지정 가능
const router = createRouter({
  history: createWebHashHistory(),
  routes,
});
네비게이션 가드
- 주로 리디렉션하거나 취소하여 네비게이션을 보호하는 데 사용
// 네비게이션 가드(ex. 로그인을 안할 시, 모든 페이지는 로그인 페이지로 이동됨)
import store from "@/store";

let profileBool = false;

router.beforeEach((to, from, next) => {
  console.log("#to ", to);
  console.log("#from ", from);
  console.log("#from FullPath ", from.fullPath);
  console.log("#to FullPath ", to.fullPath);
  if (
    to.name != "SignIn" &&
    to.name != "SignUp" &&
    to.name != "PassWordSeek" &&
    !store.getters.isLoggedIn
  )
    next({ name: "SignIn" });
  else if (
    from.name == "profile" &&
    to.name == "profile" &&
    from.fullPath != to.fullPath &&
    !profileBool
  ) {
    console.log("라우터 변경 감지");
    next();
  } else next();
});
5. Component
- /components
- /layout에 Nav.vue, Footer.vue, SideBar.vue 같은 레이아웃을 작성
- 기능별 폴더를 만들고 그 안에 기능별.vue 작성
- 최대한 컴포넌트화를 진행해 재사용성을 높이고 기능별 분리를 시킴
- 상황에 따라 props, emit을 적극 사용하여 List, Item 작성
컴포넌트
- Store의 state, getters, mutations, actions 사용
- vue2와 다르게 mapState, mapActions를 사용하지 않고 methods와 state가 setup()에 같이 작성된다.
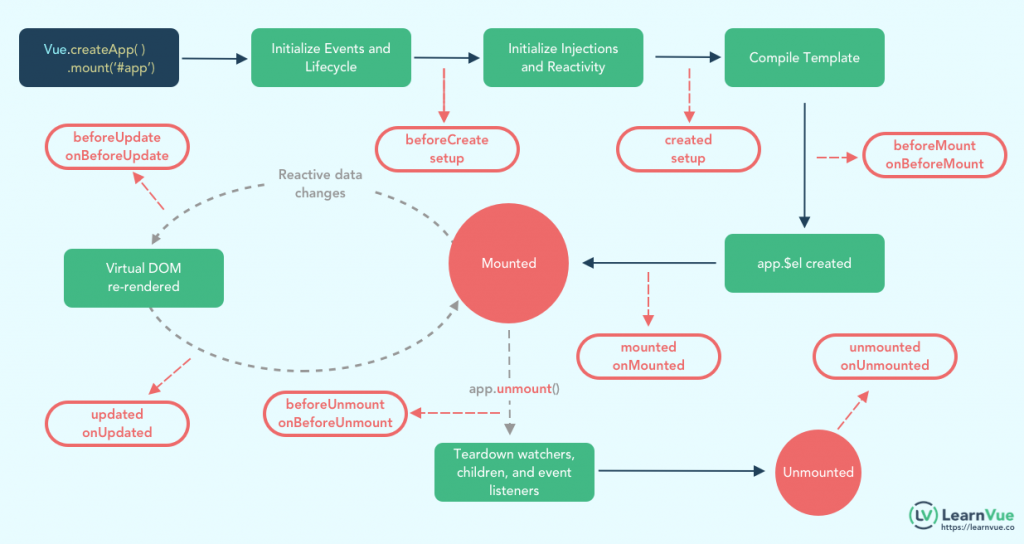
- created도 setup내에 그냥 작성하면 된다. 그 외에도 onmounted 등을 사용할 수 있음. (lifecycle을 이해할 것)
- 기본적으로 store값을 쓸 때에는 useStore와 computed를 이용해 사용한다. (아래 코드 참고)
- computed를 이용하면 즉각적으로 값이 변하는 것을 알 수 있는 반응형으로 만들 수 있다.
<script>
import { computed } from "vue";
import { useStore } from "vuex";
import { reactive, refs } from "vue";
export default {
  name: "TestComponent",
  setup() {
    const store = useStore(); //store 사용
    const getters = computed(() => store.getters); //getters 불러오기
    const state = reactive({ // reactive로 변수 선언
      title: null,
      personnel: null,
      hour: null,
      min: null,
      content: null,
    });
    const name = refs("김진회"); //refs로 변수 선언
    const month = refs(4);

    function updateState() {
      store.commit("SET_STORE_STATE", 10); // mutations함수로 state값 바꾸기 (수정) [commit]
    }
    function callState() {
        console.log(getters.value.getIsCompeteStarted); //setup()내에서 computed한 값을 사용할 때는 value 붙이기 (state 호출)
        console.log(state.content); // 컴포넌트의 변수 호출
      }
    }
    function callActions() {
      store.dispatch("testAction", 10); //Action함수에 파라미터로 10값 넘기기 (actions 호출) [dispatch]
    }

    return { store, getters, updateState, callState, callActions, state, name, month }; //setup에서 선언한 변수와 함수는 전부 return해주기
  },
  components: { },
};
</script>
6. reactive와 refs
vue3에서 컴포넌트안에서의 변수 선언은 크게 reactive와 refs가 있다.
각각 장단점이 있으며 보통 원시타입을 지정해서 쓸 경우 refs를 사용하고, 원시타입을 지정하지 않거나 객체로 사용하는 경우 reactive를 사용한다. (출처 StackOverflow)
reactive
- 장점
- state안에 선언하여 작성하고 읽을 때 편하다.
- return에 해당 객체만 선언하고 변수 전부를 쓰지 않아도 된다.
- 단점
- 변수 호출 시, 전부 객체.변수를 사용 ex) {{ state.name }}
- 숫자든 문자든 string 등으로 인식함. (원시타입 지정에 불편함)
ref
- 장점
- 원시타입 가능. number, boolean... 등등
- 변수 호출 시, 변수명만 써도 됨. ex) {{ name }}
- 단점
- return에 변수명들 다 적어줘야 함
- 선언 시, 비교적 깔끔해 보이지 않을 수 있음
toRef, toRefs
reactive를 ref처럼 사용하는 방법으로 toRef, toRefs 등도 있음
7. Props, Emit
Props
부모의 값을 자식한테 전달할 때 사용
- 부모: :변수명="변수명"
- 자식: 스크립트에 props: ["변수명"]쓰고 template에서는 {{ 변수명 }} 으로 사용
ex)- 부모:
<coop-item v-for="(room, i) in getters.getRooms" :room="room" :key="i" /> - 자식:
(스크립트) props: ["room"], (템플릿) <div>{{ room.title }}</div>
혹은(스크립트) props: {room:Object}, (템플릿) <div>{{ room.title }}</div>
*setup(props)로 파라미터에 props를 넣으면 setup내에서도 쓸 수 있다.
- 부모:
emit
자식의 값을 부모한테 전달할 때 사용
- 부모: @함수명="함수명", 해당 함수의 파라미터를 가져와 사용
- 자식: setup({ emit })을 하고, emit("이름", 전달할 값);
- 예시(모달창)
- 부모(list):
//template <PeopleItem :person="person" @setModal="setModal" /> ... //script setup() { function setModal(data) { state.emitValue = data; } return { setModal } } - 자식(item):
*emit은 이 방식말고도 약간 다른 방식도 있으니 필요 시 찾아볼 것//template <button class="모달창키는버튼" @click="setModal">모달창</button> setup(props, { emit }) { function setModal() { emit("setModal", props.person); }
- 부모(list):
8. 모달창(Modal)
본인은 부트스트랩의 modal을 사용
data-bs-target을 적용할 모달 id와 동일하게 작성할 것.
list에서 각각의 item을 클릭 시 해당 모달창이 뜨는 형식을 예로 들면 (뉴스피드, 게임방 등)
그냥 모달창을 선언하고 사용하면 item이 전부 생성되고 모달창에 들어갈 값이 하나의 item값만 들어가기 때문에 내가 클릭한 item의 값만 모달창에 적용되도록 해야 함
- 방법 1: 제이쿼리를 이용해 모달창의 class의 value를 내가 클릭한 item의 값으로 변경하기 (복잡하고 비추천)
- 방법 2: props와 emit을 이용. v-if를 이용해서 따로 설정한 모달on/off변수값이나 emit값이 있는 지를 확인해서 모달창 렌더링을 하고, 모달창의 값들은 emit의 값들을 넣음
ex) item을 클릭 시 모달창이 나오고 모달창에는 해당 유저에게 dm보내기가 출력
//부모
<template>
  <h2>부모내용생략</h2>
  <span v-for="(projectPerson, i) in getters.getProjectPeople" :key="i">
      <PeopleItem :projectPerson="projectPerson" @setModal="setModal" />
  </span>
  <!-- 모달 -->
  <div
    v-if="emitPerson != null"
    class="modal fade"
    id="personDetailInfo"
    tabindex="-1"
    aria-labelledby="personDetailInfoLabel"
    aria-hidden="true"
  >
    <div class="modal-dialog modal-dialog-centered">
      <div class="modal-content">
        <!-- 모달닫기버튼 -->
        <div class="modal-header justify-content-space-evenly">
          <button
            type="button"
            class="btn-close"
            data-bs-dismiss="modal"
            aria-label="Close"
          ></button>
        </div>
        <!-- emit 받은 값 사용 -->
        <div class="profile-name">
                {{ emitPerson.userNickname }}
              </div>
        <!-- DM 보내기 -->
        <div
          class="modal-footer justify-content-center"
          data-bs-dismiss="modal"
          aria-label="Close"
        >
          <button type="button" class="btn">
            <font-awesome-icon icon="fa-solid fa-comments" />
            DM 보내기
          </button>
        </div>
      </div>
    </div>
  </div>
</template>

<script>
import PeopleItem from "@/components/recruit/projectPeople/PeopleItem.vue";
import { computed, ref } from "vue";
import { useStore } from "vuex";
import router from "@/router";
export default {
  name: "PeopleList",
  setup(props) {
    const store = useStore();
    const getters = computed(() => store.getters);

    // 모달창emit관련
    let emitPerson = ref("");
    function setModal(data) {
      emitPerson.value = data;
    }
    return { store, getters, emitPerson, setModal };
  },
  components: {
    PeopleItem,
  },
};
//자식
<template>
<div
class="user-info flex-fill"
data-bs-toggle="modal"
data-bs-target="#personDetailInfo"
@click="setModal"
>
<h3>{{ projectPerson.userNickname }}</h3>
</div>
</template>
<script>
import { reactive, computed } from "vue";
import { useStore } from "vuex";
export default {
name: "PeopleItem",
props: ["projectPerson"],
setup(props, { emit }) {
function setModal() {
emit("setModal", props.projectPerson);
}
const store = useStore();
const getters = computed(() => store.getters);
return { state, getters, setModal };
},
components: {},
};
</script>9. Interval (주기적으로 함수 실행)
1분에 한 번씩 백엔드에 요청을 보낸다던지 타이머 등에 사용
- 시작: setInterval(() => { 함수내용 }, 1000); //ms초 단위
- 중지: 해당 setInterval을 변수로 지정하고 clearInterval(변수명)으로 중지
주의사항: 작성 코드에 따라 의도치 않게 interval이 중복으로 실행되는 경우가 있을 수 있으니 방지해야 함.
const interval = setInterval(() => {
    store.dispatch("sendTime", 1);
}, 60000);
...
clearInterval(interval);
10. Web Storage
- localstorage: 영구적으로 저장 가능. 도메인마다 별도로 저장
- sessionstorage: 브라우저가 종료되면 데이터 삭제. 새로고침은 남아있음
- cookies: 매번 서버로 전송. 문자열을 넘어 객체정보 저장 가능. 만료일자를 지정 가능.
11. STOMP를 이용한 채팅 구현
socket.io vs WebSocket
- socket.io: 양방향 통신을 하기 위해 웹소켓 기술을 활용하는 라이브러리. 방 개념으로 일부 클라이언트에게만 전송하는 브로드캐스팅이 가능함
- WebSocket: HTML5 웹 표준 기술. 양방향 소통을 위한 프로토콜. 매우 빠르게 작동하며 통신할 때 아주 적은 데이터를 이용함
STOMP
- 웹소켓은 양방향 통신이 가능하지만, 미지원 웹 브라우저가 있고, 웹 브라우저 이외의 클라이언트 지원에 대한 이슈가 있다.
- 따라서 보통 자바 SpringBoot를 이용한 백엔드와의 통신에는 STOMP를 이용한다. [ SpringBoot(Java) + SockJS + Stomp ]
- socket.js(sockjs): 웹소켓과 유사한 객체를 제공하는 브라우저 js 라이브러리. 웹소켓이 지원하지 않는 브라우저까지 커버가능.
- Stomp: 특정 방을 구독을 하고 누군가 해당 방에 메세지를 send하면 구독하고 있는 사용자는 해당 메세지를 수신 받을 수 있다. (멀티채팅, 여러 개의 톡방 구현 등이 편리함)
- 주의사항: 중복으로 구독하는 것을 방지하기 위해 구독코드를 최상단요소에 위치하거나 unsubscribe와 disconnect를 이용해야 함.
- 새로고침은 기존 구독이 끊기지만 페이지 이동은 기존 구독을 유지하면서 중복으로 구독될 수 있음
1) 프론트(구독)
//카톡같은 채팅방 예제
function connect() {
  store.dispatch("getChatRoomList", getters.value.getLoginUserId); //db에 저장된 자신의 채팅방 목록 가져오기
  const roomList = getters.value.getRoomList;
  const serverURL = "백엔드 주소";
  let socket = new SockJS(serverURL);
  this.stompClient = Stomp.over(socket);
  console.log("소켓 연결을 시도합니다.");
  this.stompClient.connect(
    {},
    () => {
      // 소켓 연결 성공
      console.log("소켓 연결 성공");
      for (const room of roomList) {
        this.stompClient.subscribe("/send/" + room.chatRoomId, (res) => { //해당 채팅방 구독
          const data = JSON.parse(res.body);
          if (
            getters.value.getChatUserId == data.sendUserId ||
            data.sendUserId == getters.value.getLoginUserId
          ) {
            console.log("수신 메시지: ", data);
            const sendData = {
              userId: getters.value.getLoginUserId,
              chatRoomId: room.chatRoomId,
              chatId: data.chatId,
            };
            store.dispatch("sendRecentReadMsg", sendData);
            store.commit("APPEND_RECV_LIST", data);
          }
        });
      }
    },
    (error) => {
      console.log("소켓 연결 실패", error);
    }
  );
  store.commit("SET_STOMP_CLIENT", this.stompClient); // 다른 컴포넌트에서 이 stompClient를 쓰기 위해서 저장
}
2) 프론트(메세지보내기)
function send() {
  console.log("송신메세지:" + state.message);
  if (
    getters.value.getStompClient &&
    getters.value.getStompClient.connected
  ) {
    const msg = {
      chatRoomId: state.chatRoomId,
      sendUserId: state.userId,
      message: state.message,
    };
    getters.value.getStompClient.send("/receive", JSON.stringify(msg), {}); //메세지 보내기. 백엔드와 보내는 데이터 형식 맞추기
  }
}
3) 백엔드(SocketController.java)
package com.cogether.api.chat.web;

import com.cogether.api.chat.domain.ChatRequest;
import com.cogether.api.chat.domain.ChatResponse;
import com.cogether.api.chat.service.ChatService;
import com.cogether.api.liveCoop.domain.LiveCoopRequest;
import com.cogether.api.liveCoop.domain.LiveCoopResponse;
import com.cogether.api.liveCoop.service.LiveCoopService;
import lombok.AllArgsConstructor;
import org.springframework.messaging.handler.annotation.MessageMapping;
import org.springframework.messaging.simp.SimpMessagingTemplate;
import org.springframework.stereotype.Controller;

@AllArgsConstructor
@Controller
public class SocketController {

    private final SimpMessagingTemplate template; //특정 Broker로 메세지를 전달

    private final ChatService chatService;

    private final LiveCoopService liveCoopService;

    @MessageMapping(value = "/receive") //채팅받기
    public void chat(ChatRequest.CreateChat request) {

        ChatResponse.GetChat response = chatService.createChat(request);

        template.convertAndSend("/send/" + request.getChatRoomId(), response); //sub한 사람들에게 보내기
    }

    @MessageMapping(value = "/receive/coop") //협력모드 채팅받기
    public void getLiveCoop(LiveCoopRequest.SocketLiveCoop request) {
        LiveCoopResponse.SocketLiveCoop response = liveCoopService.socketLiveCoop(request);
        template.convertAndSend("/send/coop/" + request.getLiveCoopId(), response); //협력모드 채팅보내기
    }
}
00. 그 외 키워드 (시간나면 정리하기. 학습했고 이미 구현했지만 기록 정리 필요)
- promise와 async/await (동기비동기)
- JWT 및 헤더
- 기본 html style과 기본 스타일 제거
- style scoped
- fix를 이용해 sns처럼 무한스크롤 구현
- cors에러의 원인 및 해결
- css 반응형 만들기
- px, %, vh, vw, calc(), rem
- aws를 이용한 이미지 저장

SSAFY 7기. HMG. 협업, 소통, 사용자중심