📝 오늘 배운 것
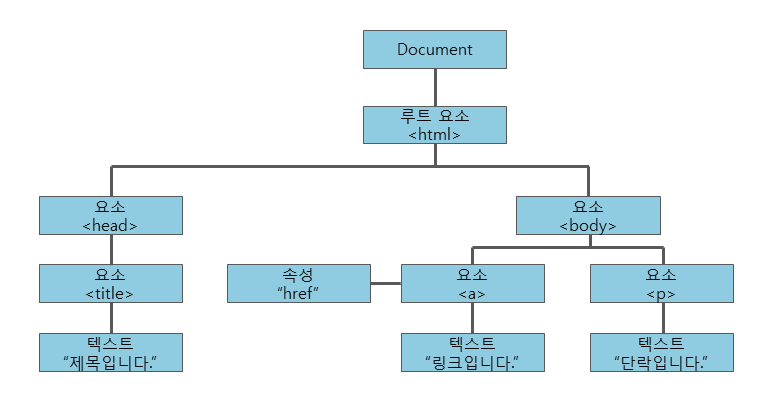
DOM(Document Object Model)
문서 객체 모델(The Document Object Model, 이하 DOM) 은 HTML, XML 문서의 프로그래밍 interface 이다. DOM은 문서의 구조화된 표현(structured representation)을 제공하며 프로그래밍 언어가 DOM 구조에 접근할 수 있는 방법을 제공하여 그들이 문서 구조, 스타일, 내용 등을 변경할 수 있게 돕는다.
DOM 은 웹 페이지의 객체 지향 표현이며, 자바스크립트와 같은 스크립팅 언어를 이용해 DOM 을 수정할 수 있다.
자바스크립트로 HTML 문서의 모든 HTML 요소 및 속성을 변경 및 추가, 제거 할 수 있고 CSS로 스타일을 변경하거나 HTML 이벤트를 추가 및 반응할 수 있다.
💡 JS로 DOM의 Element 가져오기
<!DOCTYPE html>
<html lang="en">
<head>
    <meta charset="UTF-8">
    <meta http-equiv="X-UA-Compatible" content="IE=edge">
    <meta name="viewport" content="width=device-width, initial-scale=1.0">
    <title>JS Tutorial</title>
    <link rel="stylesheet" href="prac.css">
</head>
<body>
    <h1>자바스크립트 연습중</h1>
    <h1>쿼리 셀렉터로 h1을 모두 가져와 보자!</h1>
    <ul id="ul-item">
      <!--함수의 괄호 안에 this를 입력하면 해당 element만 함수의 인자로 넘겨줄 수 있다.-->
      <!--this.id를 입력하면 id값을 넘겨줄 수도 있다.-->
      <!--this를 넣어주면 js 파일의 해당 함수 괄호안에 인자를 받을 name을 자유롭게 설정할 수 있다.-->
        <li class="list-item" id="first-item" onclick="handleItem(this)">첫 번째 리스트 아이템</li>
        <li class="list-item" id="second-item" onclick="handleItem(this)">두 번째 리스트 아이템</li>
        <li class="list-item" id="third-item" onclick="handleItem(this)">세 번째 리스트 아이템</li>
    </ul>
    <button onclick="handleButton()">버튼</button>
    <script src="prac.js"></script>
</body>
</html>
javascript
console.log('항상 자바스크립트 연결부터 확인하기!')

// querySelector로 선택한 태그 중 가장 위의 태그만 불러온다.
const mainheader = document.querySelector('h1')

// querySelectorALL을 사용하면 선택한 태그 전부를 불러온다.
const mainheaders = document.querySelectorAll('h1')

// getElementByID로 내가 가져올 id과 동일한 id 값을 가진 태그를 가져온다. (단 ID는 document에서 하나만 존재함!)
const get_ul = document.getElementById('ul-item')

// getElementsByClassBName으로 내가 가져올 classname과 동일한 name 값을 가진 클래스의 태그들을 리스트로 가져온다.
const get_li = document.getElementsByClassName('list-item')

// 가져온 값을 변수에 담고 classList.toggle로 해당 id의 태그에 class를 추가하거나 제거할 수 있다.
get_ul.classList.toggle('toggle-test');

// 클래스로 가져온 객체의 리스트 전체에 대한 toggle 적용은 할 수 없기에 에러가 발생한다.
get_li.classList.toggle('toggle-test2')

// 그래서 먼저 리스트가 담긴 객체를 반복문을 사용하여 리스트를 뽑아내야 하는데 우선 내려오는 리스트를 Array(배열)로 만들어야 한다.
// Array.from(객체)로 반복문을 돌릴 객체를 선택하고
// .forEach((변수)=>{})로 앞서 from으로 가져온 객체를 반복하여 forEach에서 선언한 변수 명으로 리스트의 배열을 하나씩 가져온다.

Array.from(객체).forEach((변수명)=>{
    변수명.classList.toggle('toggle-test2');
})

// 버튼에 함수를 만들고 함수 안에 css가 적용된 toggle을 넣어준다.
// 버튼의 onclick 속성으로 버튼을 누를 때마다 함수가 실행되게끔하여 toggle이 적용되었다가 적용되지않게 할 수 있다.
function handleButton() {
    console.log('버튼을 눌렀을 때 실행되는지 부터 확인하자!!! / 방금 html의 함수명 뒤에 괄호 안붙여서 콘솔 안찍힘 주의!')
    get_ul.classList.toggle('toggle-test')
    Array.from(get_li).forEach((itmelist)=>{
        itmelist.classList.toggle('toggle-test2')
    })
}
// html에서 함수의 괄호 안에 this를 입력했기 때문에 인자를 받고 item이라는 이름으로 인자를 받는다.
function handleItem(item){
  // 인자의.id로도 해당 element의 id값을 가져올 수 있다.
    const select_item = document.getElementById(item.id)
    select_item.classList.toggle('some-item')

    console.log('아이템을 눌렀을 때 값이 나오나??')
    console.log('item : ',item)
    console.log('item.id : ',item.id)
    console.log('item.innertext : ',item.innerText)
}
연습용으로 만들어본 to do list
<!DOCTYPE html>
<html lang="en">
<head>
<meta charset="UTF-8">
<meta http-equiv="X-UA-Compatible" content="IE=edge">
<meta name="viewport" content="width=device-width, initial-scale=1.0">
<title>To Do List</title>
<link rel="stylesheet" href="index.css">
</head>
<body>
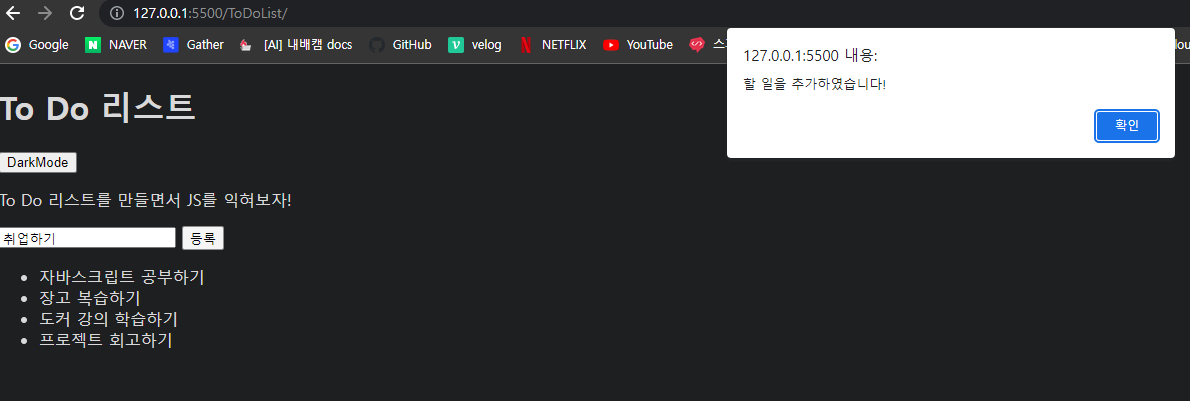
<h1>To Do 리스트</h1>
<button id="darkmode" onclick="handleDarkmode()">DarkMode</button>
<p>To Do 리스트를 만들면서 JS를 익혀보자!</p>
<div>
<input type="text" name="list" id="list" placeholder="할 일을 입력해주세요!">
<button onclick="handleRegistList()">등록</button>
</div>
<ul id="all-list">
</ul>
<script src="index.js"></script>
</body>
</html>// javascript
console.log('index.js 로드 완료!')
function handleDarkmode() {
//body 태그를 가져와 body라는 변수에 담음(body는 하나 뿐이라 querySelector 사용했음)
const body = document.querySelector('body')
// 버튼을 눌러 함수가 실행되면 body 변수에 classList.toggle로 darkmode 이름의 클래스를 달아줌
body.classList.toggle('darkmode')
}
function handleRegistList() {
// list라는 id를 가진 input 태그를 가져와 item이라는 변수에 담음
const item = document.getElementById('list')
// item 변수의 .value로 입력한 값을 content로 정의함
const content = item.value
// if(content)로 content가 있을 경우와 없을 경우를 조건문으로 처리
if (content){
console.log('content가 있는경우')
// document에 li 태그를 생성하여 newlist라는 변수에 담음
const newlist = document.createElement('li')
// newlist에 .innerText로 li 태그에 들어갈 내용을 content(인풋 태그의 입력값)로 설정
newlist.innerText = content
// all-list라는 id를 가진 ul 태그를 all_list라는 변수에 담음(ul 태그 안 li들도 모두 가져옴)
const all_list = document.getElementById('all-list')
//위에서 생성하고 내용이 입력된 newlist(li태그)를 all_list(ul태그)에 추가
all_list.append(newlist)
alert('할 일을 추가하였습니다!')
item.value = ""
item.focus();
} else {
console.log('content가 없는 경우')
alert('할 일을 입력 후 등록해주세요!')
item.focus();
}
}다크모드는 따로 강의에서 다루지 않았지만 생각이 나서 구현해보았고 다크모드가 적용이 되었을때 버튼에 id를 달아서 id값을 가져와 변수에 담은 후 변수.innerText로 버튼의 글자를 바꿔줄 수는 있었다.
하지만 다시 버튼을 눌렀을 때 dark mode로 바뀌지 않고 바뀌었던 글자가 유지되어 완벽히 구현하지 못하였다. (이 부분은 조금 더 찾아보고 적용해봐야겠다.)
이번 강의로 하트 모양의 좋아요 기능도 구현할 수 있을 것 같다.
다음에는 좋아요도 도전해봐야겠다!

웹개발 회고록