Fragment 예제 코드를 보던 중 Navigation Components를 사용하여 Fragment를 전환하는 방법에 대해 접했다.
Navigation Components는 Fragment를 좀 더 간단하고 안정적으로 이동하는데 도움을 준다.
본인은 Android Studio 4.1.2 버전이며 Project 생성 시 Basic Activity 선택 시 해당 Navigation Components로 사용한 예제를 확인할 수 있다.

build.gradle(Project)
// Top-level build file where you can add configuration options common to all sub-projects/modules.
buildscript {
    ext.kotlin_version = "1.4.31"
    repositories {
        google()
        jcenter()
    }
    dependencies {
        def nav_version = "2.3.5"
        classpath "androidx.navigation:navigation-safe-args-gradle-plugin:$nav_version"
        classpath "com.android.tools.build:gradle:4.1.2"
        classpath "org.jetbrains.kotlin:kotlin-gradle-plugin:$kotlin_version"

        // NOTE: Do not place your application dependencies here; they belong
        // in the individual module build.gradle files
    }
}

allprojects {
    repositories {
        google()
        jcenter()
    }
}

task clean(type: Delete) {
    delete rootProject.buildDir
}
해당 코드에서 필수인 것은 아래와 같다.
ext.kotlin_version = "1.4.31"

def nav_version = "2.3.5"
classpath "androidx.navigation:navigation-safe-args-gradle-plugin:$nav_version"
build.gradle(Module)
plugins {
    id 'com.android.application'
    id 'kotlin-android'
}
apply plugin: "androidx.navigation.safeargs.kotlin"
android {
    compileSdkVersion 30
    buildToolsVersion "30.0.3"

    defaultConfig {
        applicationId "com..myapplication"
        minSdkVersion 16
        targetSdkVersion 30
        versionCode 1
        versionName "1.0"

        testInstrumentationRunner "androidx.test.runner.AndroidJUnitRunner"
    }

    buildTypes {
        release {
            minifyEnabled false
            proguardFiles getDefaultProguardFile('proguard-android-optimize.txt'), 'proguard-rules.pro'
        }
    }
    compileOptions {
        sourceCompatibility JavaVersion.VERSION_1_8
        targetCompatibility JavaVersion.VERSION_1_8
    }
    kotlinOptions {
        jvmTarget = '1.8'
    }
}

dependencies {

    implementation "org.jetbrains.kotlin:kotlin-stdlib:$kotlin_version"
    implementation 'androidx.core:core-ktx:1.5.0'
    implementation 'androidx.appcompat:appcompat:1.3.0'
    implementation 'com.google.android.material:material:1.3.0'
    implementation 'androidx.constraintlayout:constraintlayout:2.0.4'
    implementation 'androidx.navigation:navigation-fragment-ktx:2.3.5'
    implementation 'androidx.navigation:navigation-ui-ktx:2.3.5'
    testImplementation 'junit:junit:4.+'
    androidTestImplementation 'androidx.test.ext:junit:1.1.2'
    androidTestImplementation 'androidx.test.espresso:espresso-core:3.3.0'
}
해당 코드에서 필수인 것은 아래와 같다.
apply plugin: "androidx.navigation.safeargs.kotlin"
implementation 'androidx.navigation:navigation-fragment-ktx:2.3.5'
implementation 'androidx.navigation:navigation-ui-ktx:2.3.5'
apply plugin: "androidx.navigation.safeargs.kotlin"은 데이터 전달을 위해서 필요한데 java 사용시에는 apply plugin: "androidx.navigation.safeargs" 로 선언이 되어야 한다.
이제 필요한 세팅은 다 하였고, 다음으로 해야 할 건 res->navigation->nav_graph.xml
에서 화면 전환 시 전달할 data를 추가한다.
여기서 주의해야할 건 데이터를 받는 Fragment에서 argument를 추가해야 하는 것이다.
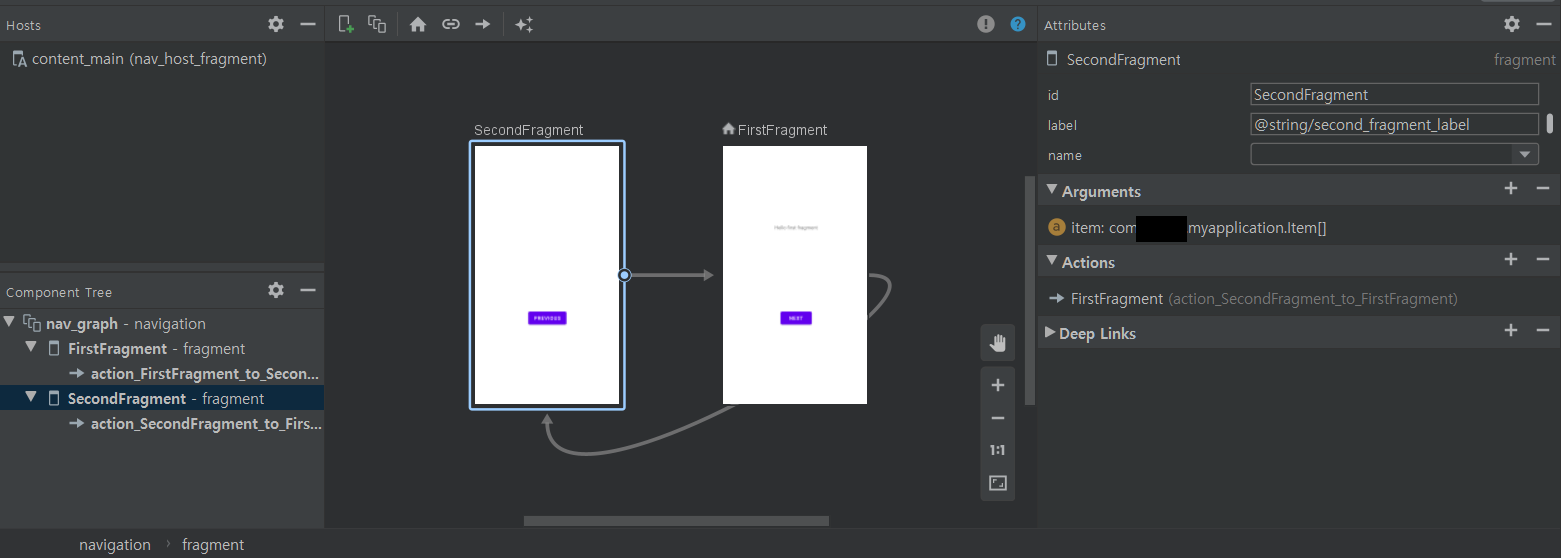
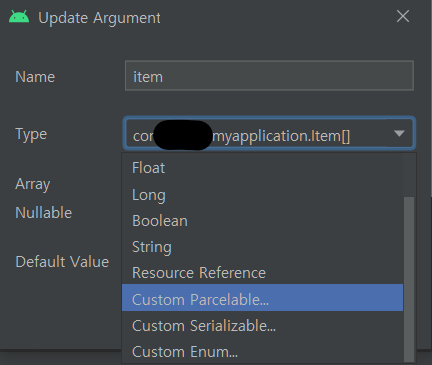
SecondFragment를 눌러 오른쪽 Arguments에서 전달 받을 데이터를 추가한다.
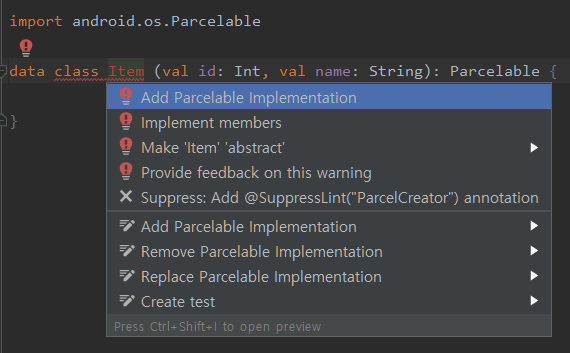
본인은 직접 만든 data class의 ArrayList를 넘겨주고 싶었기 때문에 먼저 해당 data를 Parcelable로 implements 하였다. Parcelable로 implements 하면 자동으로 Parcelable Implementation를 만들 수 있기 때문에 아래 코드 처럼 작성하였다.
package com..myapplication
import android.os.Parcel
import android.os.Parcelable
data class Item (val id: Int, val name: String): Parcelable {
constructor(parcel: Parcel) : this(
parcel.readInt(),
parcel.readString().toString()
) {
}
override fun writeToParcel(parcel: Parcel, flags: Int) {
parcel.writeInt(id)
parcel.writeString(name)
}
override fun describeContents(): Int {
return 0
}
companion object CREATOR : Parcelable.Creator<Item> {
override fun createFromParcel(parcel: Parcel): Item {
return Item(parcel)
}
override fun newArray(size: Int): Array<Item?> {
return arrayOfNulls(size)
}
}
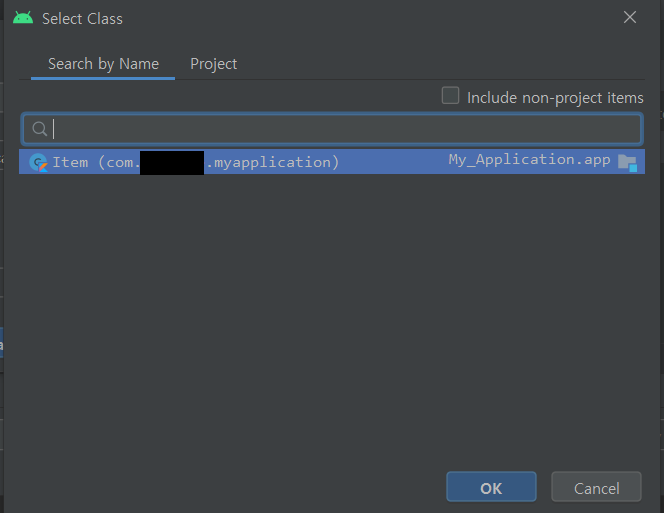
}그럼 다음 Arguments의 Type을 Custom Parcelable로 하여 만든 data class를 지정하고, 그런 다음 Array를 체크하여 추가한다.
nav_graph.xml
<?xml version="1.0" encoding="utf-8"?>
<navigation xmlns:android="http://schemas.android.com/apk/res/android"
xmlns:app="http://schemas.android.com/apk/res-auto"
xmlns:tools="http://schemas.android.com/tools"
android:id="@+id/nav_graph"
app:startDestination="@id/FirstFragment">
<fragment
android:id="@+id/FirstFragment"
android:name="com..myapplication.FirstFragment"
android:label="@string/first_fragment_label"
tools:layout="@layout/fragment_first">
<action
android:id="@+id/action_FirstFragment_to_SecondFragment"
app:destination="@id/SecondFragment" />
</fragment>
<fragment
android:id="@+id/SecondFragment"
android:name="com..myapplication.SecondFragment"
android:label="@string/second_fragment_label"
tools:layout="@layout/fragment_second">
<action
android:id="@+id/action_SecondFragment_to_FirstFragment"
app:destination="@id/FirstFragment" />
<argument
android:name="item"
app:argType="com..myapplication.Item[]" />
</fragment>
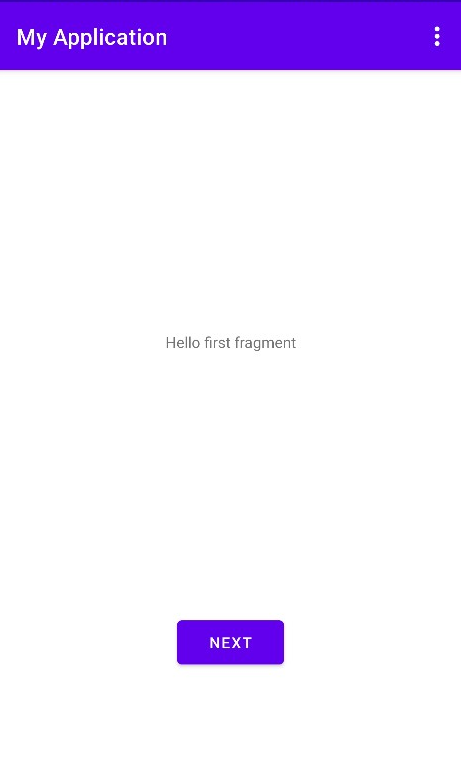
</navigation>그런 다음 FirstFragment 에서 action으로 전달할 data를 담고, SecondFragment에서 Args로 데이터를 받아 text에 띄워줄 수 있도록 한다.
데이터를 받을 때는 지정한 argument name을 이용하여 args.item 형태로 받는다. 본인은 argument name을 item으로 하였다.
이때 본인은 arraylist 형태로 데이터를 전달하고 받고 싶었기 때문에 arraylist로 데이터를 선언한 다음, 데이터를 전달할 때 array로 바꾸고(item.toTypedArray()), 받을 때 다시 array를 arraylist로 전환한다(args.item.toCollection(ArrayList())).
코드는 아래와 같다.
FirstFragment.kt
package com..myapplication

import android.os.Bundle
import androidx.fragment.app.Fragment
import android.view.LayoutInflater
import android.view.View
import android.view.ViewGroup
import android.widget.Button
import androidx.navigation.fragment.findNavController

/**
 * A simple [Fragment] subclass as the default destination in the navigation.
 */
class FirstFragment : Fragment() {

    override fun onCreateView(
            inflater: LayoutInflater, container: ViewGroup?,
            savedInstanceState: Bundle?
    ): View? {
        // Inflate the layout for this fragment
        return inflater.inflate(R.layout.fragment_first, container, false)
    }

    override fun onViewCreated(view: View, savedInstanceState: Bundle?) {
        super.onViewCreated(view, savedInstanceState)
        val item = ArrayList<Item>()
        item.add(Item(0, "name"))
        view.findViewById<Button>(R.id.button_first).setOnClickListener {
            val action = FirstFragmentDirections.actionFirstFragmentToSecondFragment(item.toTypedArray())
            findNavController().navigate(action)
        }
    }
}
SecondFragment.kt
package com..myapplication
import android.os.Bundle
import androidx.fragment.app.Fragment
import android.view.LayoutInflater
import android.view.View
import android.view.ViewGroup
import android.widget.Button
import android.widget.TextView
import androidx.navigation.fragment.findNavController
import androidx.navigation.fragment.navArgs
/**
* A simple [Fragment] subclass as the second destination in the navigation.
*/
class SecondFragment : Fragment() {
override fun onCreateView(
inflater: LayoutInflater, container: ViewGroup?,
savedInstanceState: Bundle?
): View? {
// Inflate the layout for this fragment
return inflater.inflate(R.layout.fragment_second, container, false)
}
override fun onViewCreated(view: View, savedInstanceState: Bundle?) {
super.onViewCreated(view, savedInstanceState)
val args: SecondFragmentArgs by navArgs()
val itemList = args.item.toCollection(ArrayList())
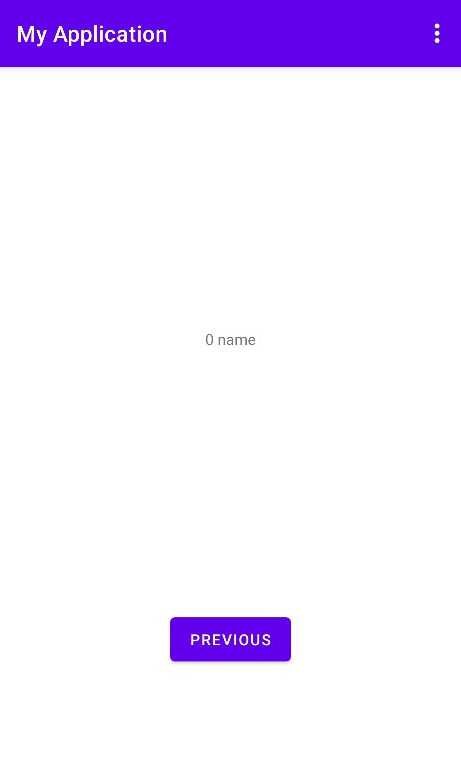
view.findViewById<TextView>(R.id.textview_second).text = "${itemList[0].id} ${itemList[0].name}"
view.findViewById<Button>(R.id.button_second).setOnClickListener {
findNavController().navigate(R.id.action_SecondFragment_to_FirstFragment)
}
}
}여기서 FirstFragment에서 사용된 FirstFragmentDirections 이 없다고 뜨는 경우,
Build -> ReBuild Project를 해보자.
결과는 아래와 같다.