- 해당 글은 django celery document 를 참고하여 작성하였습니다.
source: Celery 5.0.5 documentation
서론. Queuing in Django
Django 는 사용자가 요청한 정보를 전달하기 위해 View(java 에서는 컨트롤러) 에서 작업을 수행하고 결과물을 사용자에게 전달하는 구조입니다. view 에서 수행하는 작업이 무거운 경우 사용자는 요청에 대한 결과물을 받기 위해 작업이 끝날 때 까지 기다려야 합니다.
사용자가 작업을 요청할 때 해당 작업에 대한 처리가 느린 경우(요청에 따라 다른 API 를 호출하는 작업이 일어나거나 메일을 전달해야 하는 경우) 큐잉 시스템을 이용해서 서비스에 대한 불편을 줄일 수 있습니다. 예를 들어 콜센터 직원(서버) 이 고객의 전화(클라이언츠) 를 받는 상황을 가정해 봅니다. 이 때 콜센터 직원은 2가지 방식으로 고객을 응대할 수 있습니다.
1.고객의 전화에 응대하기 위해 모든 요구사항에 대한 응답을 해준다. 이후 밀린 고객의 요청을 순서대로 처리한다.
2.고객의 전화에 응대할 때 바로 답할 수 없는 문의는 칠판에 써놓고 다른 직원들이 해당 작업을 수행한다.
첫번째와 두번째 방법 모두 고객의 요청을 동일한 시간에 처리해준다는 점은 같지만 첫번째의 경우(동기) 해당 요청을 처리하면서 다른 고객에 대한 응대를 받을 수 없다는 단점이 있습니다. 두번째(비동기) 의 경우 콜센터 직원은 고객에게 접수가 되었다는 응답만 빠르게 해주고 문의사항에 대한 응답은 다른 직원들이 처리하게 하여 여러 고객을 응대 할 수 있게 됩니다.
Django 에서 해당 시스템을 구현하기 위해서는 워커와 브로커가 필요한데 브로커는 메세지 전달자 즉 일을 분배해주는 역할이고 celery 는 이러한 업무를 처리할 수 있도록 브로커로부터 메세지를 전달받고 worker 가 해당 작업을 처리하도록 합니다.
본론 1.Django Impementation
package-install
작업 환경 : Amazon Linux 2 AMI (HVM), SSD Volume Type
celery 설치 : pip install celery
RabbitMQ 설치 : sudo apt-get install rabbitmq-server
Django project
[projectname]/
├── [projectname]/
│ ├── __init__.py
│ ├── admin.py
│ ├── celery.py
│ ├── settings.py
│ ├── tasks.py
│ ├── urls.py
│ ├── views.py
│ ├── wsgi.py
└── manage.py
장고 project 설치후 tasaks.py, celery.py 파일을 project 폴더 안에 생성해줍니다.
__init__.py
from __future__ import absolute_import, unicode_literals

# This will make sure the app is always imported when
# Django starts so that shared_task will use this app.
from .celery import app as celery_app

__all__ = ('celery_app',)
celery.py
from __future__ import absolute_import, unicode_literals
import os
from celery import Celery

# set the default Django settings module for the 'celery' program.
os.environ.setdefault('DJANGO_SETTINGS_MODULE', 'project_name.settings')

app = Celery('project_name')

# Using a string here means the worker doesn't have to serialize
# the configuration object to child processes.
# - namespace='CELERY' means all celery-related configuration keys
#   should have a `CELERY_` prefix.
app.config_from_object('django.conf:settings', namespace='CELERY')

# Load task modules from all registered Django app configs.
app.autodiscover_tasks()


@app.task(bind=True)
def debug_task(self):
    print(f'Request: {self.request!r}')
project_name 은 django 프로젝트 이름을 의미합니다.settings.py
INSTALLED_APPS = [
    'projectname',
    'django.contrib.admin',
    'django.contrib.auth',
    'django.contrib.contenttypes',
    'django.contrib.sessions',
    'django.contrib.messages',
    'django.contrib.staticfiles',
    'django_celery_results',
]

CELERY_RESULT_BACKEND = 'django-db' 	#<- option(result db에 저장원할 때 필요)
CELERY_CACHE_BACKEND = 'django-cache'	#<- option
CELERY_BROKER_URL = 'amqp://localhost'

CELERY_ACCEPT_CONTENT = ['application/json']
CELERY_TASK_SERIALIZER = 'json'
CELERY_RESULT_SERIALIZER = 'json'
CELERY_TIMEZONE = 'Asia/Seoul'
tasks.py (비동기로 처리할 작업,저는 mongodb insert로 테스트 하였습니다)
# Create your tasks here
from __future__ import absolute_import, unicode_literals

from celery import shared_task
from celery.utils.log import get_task_logger
import pymongo
logger = get_task_logger(__name__)


@shared_task(bind=True, track_started=True)
def c_insert_db_test(self,data):
    conn = pymongo.MongoClient('mongodb://localhost:27017')
    db = conn['service_netnography']
    test_collection = db['test']
    test_collection.insert_one({"result": data})
    print('c_inset_db_test_success')
views.py (tasks.py 에서 만든 c_insert_db_test 함수 import)
from project_name.tasks import c_insert_db_test

def test_view(request):
	###수행하고자 하는 작업
    data = "test"
    c_insert_db_test.delay(data)
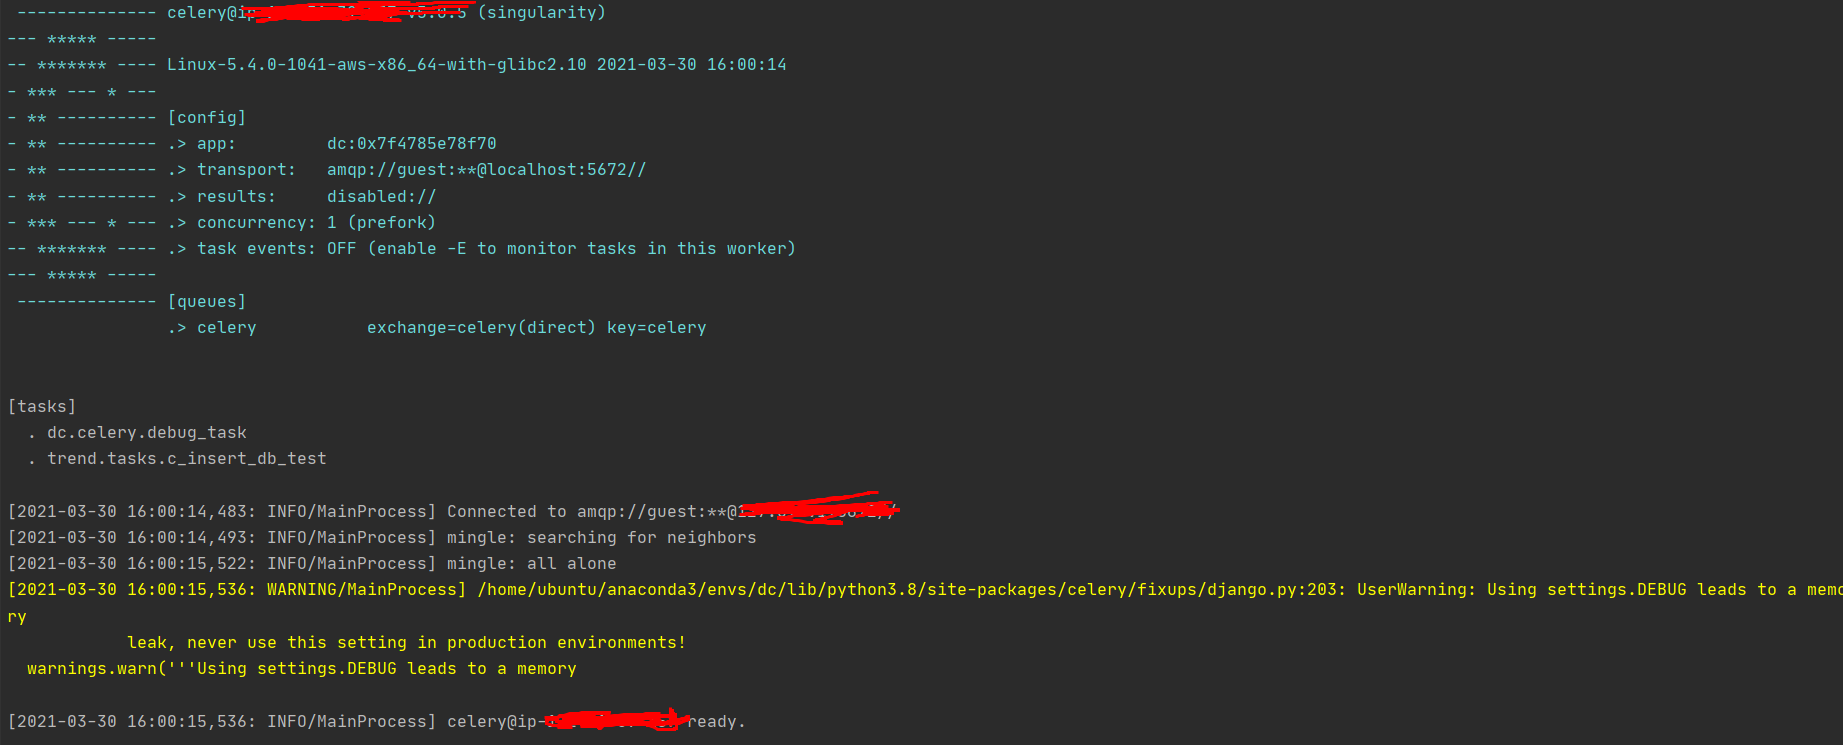
2. celery worker active
terminal 창에서 celery -A projectname worker -l INFO
(종료: celery -A proj control shutdown)
[tasks] 를 보면 현재 celery 에서 비동기 작업 가능한 task 목록이 나옴
api로 post 요청시

celery 실행하고 있는 terminal 을 보면 아래와 같이 c_insert_db 함수가 제대로 실행됐다고 나옴.

3. demonization
celeryd daemon 설정
init script 이용하기
$ sudo vi /etc/init.d/celeryd
샐러리 공식 ini-script 복붙하기
$ sudo nano /etc/default/celeryd# Names of nodes to start # most people will only start one node: CELERYD_NODES="worker1" # but you can also start multiple and configure settings # for each in CELERYD_OPTS #CELERYD_NODES="worker1 worker2 worker3" # alternatively, you can specify the number of nodes to start: #CELERYD_NODES=10 # Absolute or relative path to the 'celery' command: CELERY_BIN="/home/ubuntu/proj/venv/bin/celery" #CELERY_BIN="/virtualenvs/def/bin/celery" # App instance to use # comment out this line if you don't use an app CELERY_APP="projectName" # or fully qualified: #CELERY_APP="app.tasks:app" # Where to chdir at start. CELERYD_CHDIR="/home/ubuntu/proj/" # Extra command-line arguments to the worker CELERYD_OPTS="--time-limit=300 --concurrency=2" # Configure node-specific settings by appending node name to arguments: #CELERYD_OPTS="--time-limit=300 -c 8 -c:worker2 4 -c:worker3 2 -Ofair:worker1" # Set logging level to DEBUG #CELERYD_LOG_LEVEL="INFO" # %n will be replaced with the first part of the nodename. CELERYD_LOG_FILE="/var/log/celery/%n%I.log" CELERYD_PID_FILE="/var/run/celery/%n.pid" # Workers should run as an unprivileged user. # You need to create this user manually (or you can choose # a user/group combination that already exists (e.g., nobody). CELERYD_USER="ubuntu" CELERYD_GROUP="ubuntu" # If enabled pid and log directories will be created if missing, # and owned by the userid/group configured. CELERY_CREATE_DIRS=1
시작 : sudo /etc/init.d/celeryd start
중지 : sudo /etc/init.d/celeryd stop
재시작 : sudo /etc/init.d/celeryd restart
상태확인 : sudo /etc/init.d/celeryd status
현재 실행중인 celery worker 삭제하는 법:
ps aux|grep 'celery worker'
sudo kill -9 process_id
결론.
rabbitmq 와 celery를 이용하였는데 DB 에 to-do-list 테이블을 만들고 트리거를 걸어서 외부 api 를 호출하는 방법으로 비슷한 작업을 수행할 수 있을 것 같습니다. db trigger 와 django 연결하는 방법을 알면 해당 방법이 더 간단할 수 있을거 같습니다.
이상으로 Django 비동기 작업 처리하는 방법에 대한 글을 마치겠습니다.